
TRUFIBER HOODS for Those with GT500 front Fascia!
 2/10/08 | 09:43 PM
#441
Have him send you a carbon fiber one.
 2/11/08 | 03:54 AM
#443
Bullitt Member
Joined: October 23, 2006
Posts: 410
Likes: 0
Well Con-Way freight found my hood and is supposed to deliver it early this week. I'll have the shop do a through inspection and then I'll stop by and take some photos. Guess this is what we get for being among the first. Sure hope mine shows up mostly in one piece. If its fixable, I'll likely work with it.
 2/11/08 | 06:26 AM
#445
Team Mustang Source
Joined: August 3, 2005
Posts: 1,652
Likes: 2
From: Mustang/Tuttle, Oklahoma

 2/14/08 | 06:31 AM
#449
Bullitt Member
Joined: October 23, 2006
Posts: 410
Likes: 0
Well, Conway found the hood and finally delivered it to my body shop. Went by last night and had a chat with body man and the shop owner on where we go from here.
All in all the hood is in pretty good shape, better than most glass hoods they have recieved. VERY well packed.
The hood has numerous bubbles under the gel coat. body guy is convinced that glass did not fully outgas before gel coat was applied. Says to prevent continuation after painting, we need to sand the entire hood and bake it dry, then prep and paint. There are a few chips and surface cracks from shipping that will need to be addressed.
The mesh grille covers are perfect strangly enough. We plan to glass in the louvers like louis did since the stripes will go through the louvers due to the wider width. Will also need some drain holes for water that enters the front vents as it currently has nowhere to go. Also inside of hood between the shells (back side of glass) is un coated and direcly exposed to rain from the front vents. Body guy is concerned with long term damage to the fiberglass under the paint from moisture on the back side.
I can see this is not going to be a low cost body shop event. The whole hood think is likely to cost in the three grand range before its done.....
At least its here and mostly in one piece. I need to bring the car by for trial fitting before they spend too much time on it. That will not be until at least next week as the car is waiting on parts to be driveable again. Waiting on UPS....
2/14/08 | 11:34 PM
#451
Bullitt Member
Joined: May 30, 2007
Posts: 209
Likes: 0
Body guy is convinced that glass did not fully outgas before gel coat was applied. Says to prevent continuation after painting, we need to sand the entire hood and bake it dry, then prep and paint. There are a few chips and surface cracks from shipping that will need to be addressed.
Baking is a good idea since most FRP resin takes 6 months to fully cure (especially if they used a standard or low to medium quality resin) but be careful the hood can loose its shape and distort as it is heated up. Again I don't trust the China companies to use good quality resin.
2/15/08 | 11:37 AM
#452
Cobra R Member
Joined: October 10, 2004
Posts: 1,627
Likes: 1
From: Location: Indy
I was talking to Terry from Proglass about this and here is his input:
"We do bake every hood we ship to post cure and find any pin air. We find
VERY little, maybe one spot for every 10 hoods. The fact that thier
hood is full of bad spots is just because the Chinese did not roll out
the part very well (imagine that). The body guys explanation of gassing
out is pure bs, the gelcoat goes in the mold before the fiberglass is
layed out. Also water hurting the back side is REALLY bs. I wish I could
get 3 grand to put a hood on someones car, it would be a nice hood too!"
2/15/08 | 04:02 PM
#453
Bullitt Member
Joined: October 23, 2006
Posts: 410
Likes: 0
Well the spots are there and we are hopeful that full sanding, baking and then paint prep will solve the current problems and prevent any future ones.
Dont know just yet what the final bill be, just saying there is a LOT more to do here than paint and install. Always is with a glass hood. Did not mean to imply the hood was bad. Its actually in FAR better shape than one I got from Cervini's a few years back. As for the water, the vents face forward. Water WILL enter the space between the two shell and once there there is no drainage currently.
Figuring the hood itself is about a grand delivered, a grand to paint with full stripes top and bottom, the glass work and materials at 1500 to 2000 seemed about right. Good body guys in this area make about $40/hr so thats only about 40 hrs plus materials and taxes.....
2/18/08 | 01:44 PM
#454
Legacy TMS Member
Joined: October 22, 2007
Posts: 126
Likes: 2
Let's see your aftermarket hood
Just arrived. Do not sign any papers until you check it. Have a soft drink ready for the driver. lol.


Here are some pictures taken while its being painted at the body shop. It was sanded, primed, sealed, and painted four times due to workmanship of the hood.


Drying in the sun before putting the hood on the car. One week of sun bathing.


Here are some pictures of the car with the hood pins. I asked Boltzman for input on the hood pins and after seeing the photograph he sent, I decided to make a bracket out of 1/4 inch stainless steal because I did not want to remove the whole front of the car. I painted the brackets black and the only thing missing now are the black stripes which will have to wait 'til next week because of rain. I drilled a 1/2 inch hole in the rain pans and put a hose in it to drain rain water. I will put them in the trunk and have them ready in case of rain. I didn't want to defeat the purpose of the louvers releasing the heat. Thanks everyone.


Here are some pictures taken while its being painted at the body shop. It was sanded, primed, sealed, and painted four times due to workmanship of the hood.
Drying in the sun before putting the hood on the car. One week of sun bathing.
Here are some pictures of the car with the hood pins. I asked Boltzman for input on the hood pins and after seeing the photograph he sent, I decided to make a bracket out of 1/4 inch stainless steal because I did not want to remove the whole front of the car. I painted the brackets black and the only thing missing now are the black stripes which will have to wait 'til next week because of rain. I drilled a 1/2 inch hole in the rain pans and put a hose in it to drain rain water. I will put them in the trunk and have them ready in case of rain. I didn't want to defeat the purpose of the louvers releasing the heat. Thanks everyone.
2/18/08 | 05:31 PM
#457
Team Mustang Source
Joined: August 3, 2005
Posts: 1,652
Likes: 2
From: Mustang/Tuttle, Oklahoma
I was gettin my hopes up that Trufiber had added the water trays and hood pins then I saw the last pic and realized it wasn't for the GT500 front fascia. I was getting excited because Trufiber is sending me a replacement and I thought it was going to have upgrades.
 B
2/19/08 | 06:47 AM
B
2/19/08 | 06:47 AM
#459
Legacy TMS Member
Joined: October 22, 2007
Posts: 126
Likes: 2
hood pins
I got them from Amazon.com,phone # 1-877-525-9540;item Black carbon fiber hood pin lock set.They serve a dual purpose,keep the hood down at high speed,you cant open the hood with out the keys.
Semper fi
Semper fi
2/20/08 | 06:48 AM
#460
Bullitt Member
Joined: October 23, 2006
Posts: 410
Likes: 0
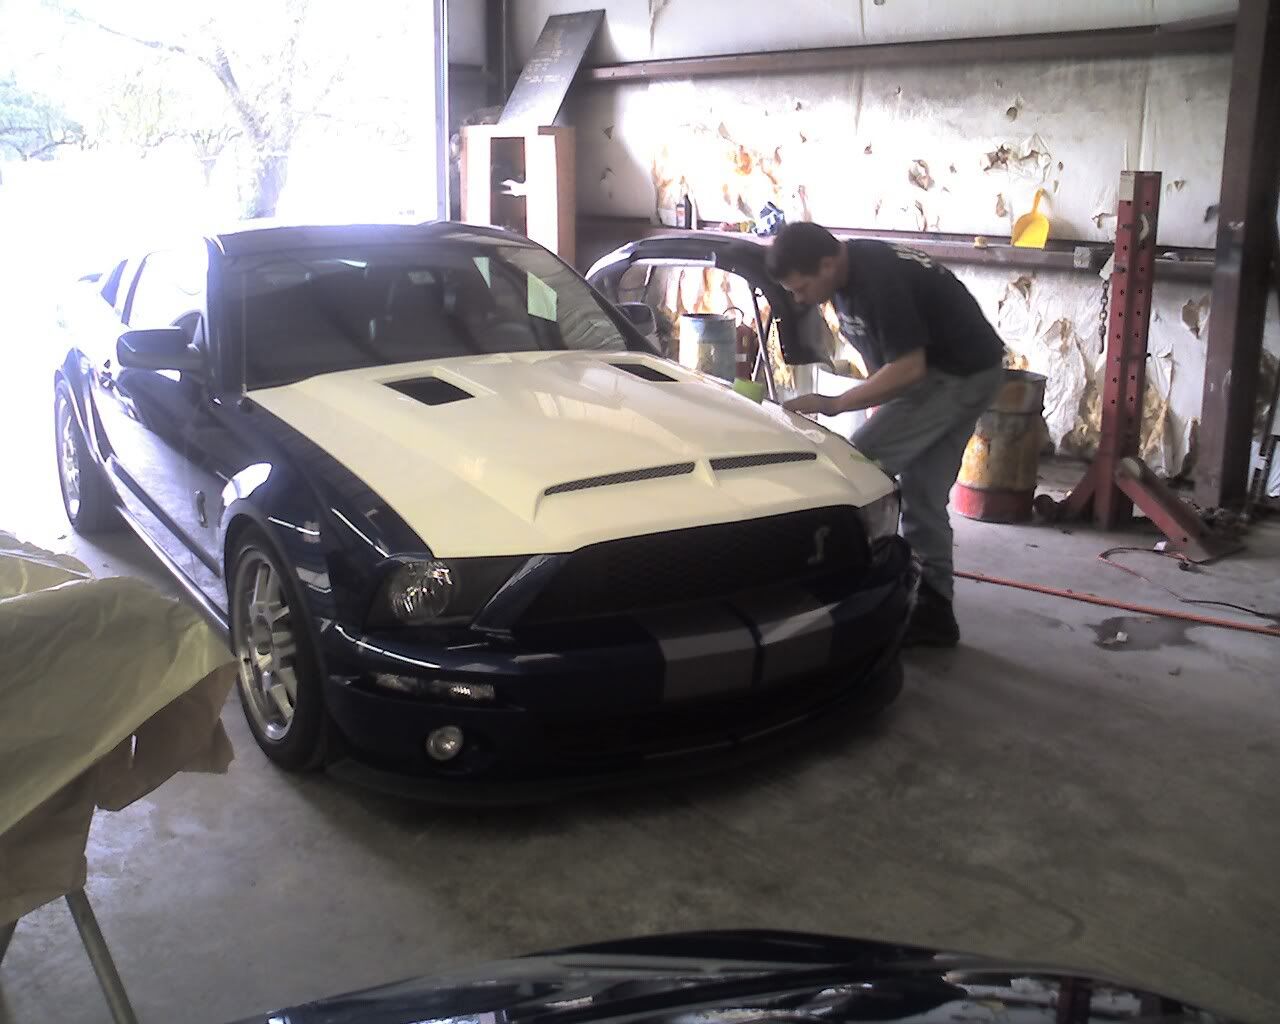
Couple of photos from yesterdays first trial fitting. The hood fits pretty well but we did find a few 'issues'
On the underside the hood hits the cap on the intercooler bottle. Stock bottle and cap. I am replacing with the Pfab tank so hopefully that will go away.
Hits the bolts for the strut mounts, forward outsid bolt on both sides will require reshaping that area of the underside of the hood for clearance.
Most of the body lines line up perfectly with the following exceptions, side edges of hood needed trimming to have a parrallel gap on both sides. Body guy says that is pretty normal for a glass hood, better oversize slightly and trim than to be too small.
On the front left corner (passenger side) the leading edge of the hood is not at the same angle as the leading edge of the fender. On the right side the body line and front edge match EXACTLY. We have to build out the upper body line on the leading edge of the hood on the passenger side to make it match. About 1/8" off.
Bolt holes for hinges are not the same dimension apart as on stock hood. Neither disitance between sides nor hole spacing. As modification of the mount holes and threads in the hood would prove difficult, we 'wallowed out' the holes in the hinge flange to allow it to mount. Still had to pull the hinges a good 1/4" closer together than for the stock hood.
While all of this might seem overly critical, I am just documenting what we find. Some of these issues may not matter to some and be ignored. I am a bit of a perfectionist. This hood will look as good and straight as the oem KR hood before it leaves the shop.