
What have you done to/with your Boss 302 this week?

Bullitt Member
Joined: March 15, 2011
Posts: 279
Likes: 0
From: SE Michigan
Brake Duct installation
Has anyonne installed the brake duct kit themselves yet? I've searched this blog and the web and have not found any instructions or photos. I was under there today putting in the Trans scoop (all mods should be that easy) so I took off the cover to look at the potential brake duct install.
Looks kinda Nasty
What do you do the the windshiled washer tank?
Does the fog light delete insert pop out to work on?
I am assuming you cut a hole in the plastic wheel well liner for the hose?
Anyone Know what a dealership charges to do this install?
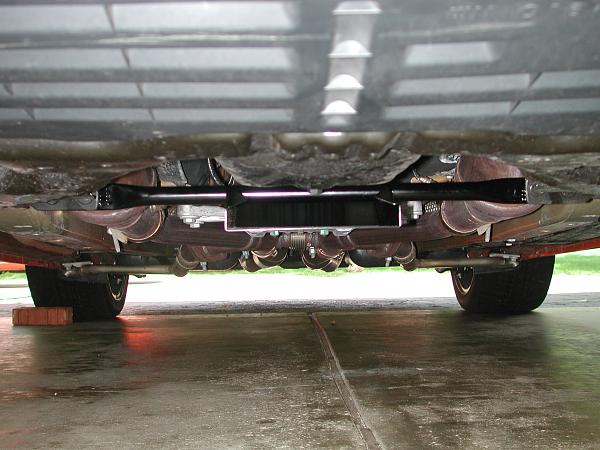
The trans scoop looks good, it doesn't hang down far at all. Kinda sucks for the oil change though, its right in the way of the discharge.
Bullitt Member
Joined: July 1, 2011
Posts: 279
Likes: 0
From: SD
Cooling Duct install
Bossdog,
I installed the GT/CS (BOSS) lower fascia on my '10 GT a few weeks ago, and also installed the Steeda brake cooling kit. Would have installed the Saleen grill to, but it was on back order.
Only took pics a week later, so sorry for no play-by-play.
Here's what your fascia looks like.
http://www.latemodelrestoration.com/...nt-Valance-Kit
I realize the '12s are slightly different underneath than a '10, but hopefully this will help.
You don't need hose clamps on the fascia attachment--the hose can't move up there, so it won't come lose.
Drivers side, the hose will go under the horn.
Passenger side, the hose should go under the washer fluid tank.
Inside the wheel well, loosen the fender well plastic by removing connectors.
If you remove the bumper, get the hose from the bumper to the wheel well, then cut to final length, and attach to brake back plate. Error to the long side--you can always trim if too long--the hose won't stretch if too short.
Jack up front and set on jack stands. Remove wheels, calipers, brackets (if backing plates the hose attaches to are not already mounted).
Try this without removing the front bumper:
Remove any plastic panels under/behind the lower fascia.
If you can route the hose from the wheel well into to the fascia, and get it hooked up to the hose, you're in luck.
If not, you'll most likely have to remove the bumper.
Here's a link on how to install a GT/CS or BOSS fascia, so it shows how to undo it all. Obviously you don't need to remove the BOSS lower fascia.
http://www.mylrs.com/blogs/lrs/archi...installed.aspx
As you remove the bumper, clean the floor, and put down a rug/blanket/etc to not scratch the bumper as you lay it down to remove final electric wires--mine's got some floor rash on it. And an assistant is required to prevent lots of floor rash.
The flat piece immediately around the air entry hole in the fascia (about 4x6") removes from the rest of the fascia w/ 3 prong clips--2 on one side, one on the other, by removing it out the front--molded into this is the 3" pipe out the back that the hose attaches to (I'll call them the air dams). Remove them for easier install of the hose. May be a tight finger squeeze to get at the clips, or they may simply push out w/ reasonable force on the back of the 3" connector tube. On the rear of the fascia, there's also some molded plastic to hold the fog lights used on the GT/CS--that's an integral part of the fascia.
Driver side, push hose from front, under horn, and into wheel well. Leave plenty of hose out the front--you'll move it rearward after the bumper is back on.
My horn was in the way. I moved it rearward about 3" to a different mounting hole, loosened the nuts on each horn, and rotated them so the horn's horn opening pointed upward, giving more room under it.
Passenger side--Remove the lower (front and back) washer tank bolts. Front: Remove the "nut" clip. Replace factory bolt w/ a 1/4 or 5/16" by about 2" bolt. Stack washers onto the bolt to hold the washer further away from the center of the car. Add a washer and bolt to mount it. On the lower back, I used the factory hardware but stacked washers between the tank and body to hold the tank further out--stack as many as you can. You may need to loosen the top bolt to make this easier.
Push hose from front, past/under the washer tank, into wheel well. Again, leave plenty hanging out the front, so it can be fed in later.
Replace bumper/grill/fascia assembly. As you put it in place, push brake cooling hose thru the openings in the fascia--they should stick out several inches as the bumper goes into place.
Once the bumper is on, slip the 2 air dams you removed from the fascia earlier, into the hose. Do the drivers side first, its easier. Have an assistant SLOWLY pull the hose into the wheel well as you push the air dam/hose toward and into the fascia--DON'T let the hose get pulled off the air dam pipe. Mate the air dam back into the fascia, and tell the assistant to stop pulling the hose. Repeat on passenger side. The hose has to turn sharper for the washer tank, so this one isn't as easy.
Once the air dams are back in, figure out how long the hose needs to be. It needs to make a pretty sharp angle so the wheel doesn't rub in a hard turn inboard. My hose is set up so the inside of the hose is about even w/ the inside of the swaybar--if I run my hand along the inside of the swaybar, it will be on the inside of the hose also. The hose hangs below the sway bar. I bought Gorilla duct tape and wrapped it around the hose where it might rub on the body or sway bar--I don't have to want to do this project again (well, unless I buy a BOSS).
Mount the backing plates, curve the hose in an almost 90 deg turn, cut to length, attach w/ clamp, and then use a mongo sized cable tie (Steeda told me the bigger the better, so mine are like 175 lb ones), and tie hose to the oblong hole in the body forward of the sway bar. Some people tie to sway bar also, but I didn't.
Trim wheel well plastic since the hose will most likely push it toward the wheel. Trim so it lays back in natural position, and reconnect fasteners you may have removed earlier.
Turn wheel full left and right to ensure hose doesn't bind.
Cable tie as desired.
Install brakes and wheels and look turn wheels full left/right to ensure no rubbing. Put vehicle back on ground.
Congrats--you're done!
I worked real slow and methodical (this was virgin body work territory for me), and it took me several hours. I could do it again in a couple.
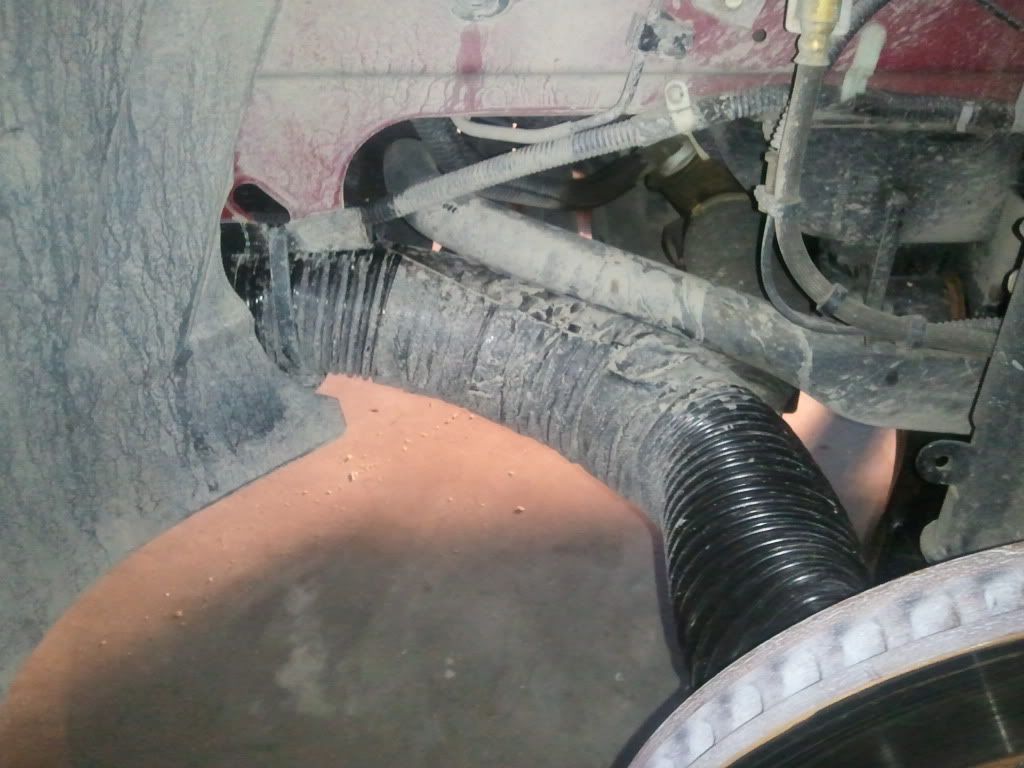
Here's some pics--after the first track day, so its dirty--w/ the cooling kit installed (if I did this wright for my first post).
You'll see the cable tie thru the oblong body hole. I also ran duc tape along the bottom edge of that red body metal to help prevent wear-thru.
Drivers side:
Passenger side"

Well, that's a huge first post, but hopefully it will help.
I installed the GT/CS (BOSS) lower fascia on my '10 GT a few weeks ago, and also installed the Steeda brake cooling kit. Would have installed the Saleen grill to, but it was on back order.
Only took pics a week later, so sorry for no play-by-play.
Here's what your fascia looks like.
http://www.latemodelrestoration.com/...nt-Valance-Kit
I realize the '12s are slightly different underneath than a '10, but hopefully this will help.
You don't need hose clamps on the fascia attachment--the hose can't move up there, so it won't come lose.
Drivers side, the hose will go under the horn.
Passenger side, the hose should go under the washer fluid tank.
Inside the wheel well, loosen the fender well plastic by removing connectors.
If you remove the bumper, get the hose from the bumper to the wheel well, then cut to final length, and attach to brake back plate. Error to the long side--you can always trim if too long--the hose won't stretch if too short.
Jack up front and set on jack stands. Remove wheels, calipers, brackets (if backing plates the hose attaches to are not already mounted).
Try this without removing the front bumper:
Remove any plastic panels under/behind the lower fascia.
If you can route the hose from the wheel well into to the fascia, and get it hooked up to the hose, you're in luck.
If not, you'll most likely have to remove the bumper.
Here's a link on how to install a GT/CS or BOSS fascia, so it shows how to undo it all. Obviously you don't need to remove the BOSS lower fascia.
http://www.mylrs.com/blogs/lrs/archi...installed.aspx
As you remove the bumper, clean the floor, and put down a rug/blanket/etc to not scratch the bumper as you lay it down to remove final electric wires--mine's got some floor rash on it. And an assistant is required to prevent lots of floor rash.
The flat piece immediately around the air entry hole in the fascia (about 4x6") removes from the rest of the fascia w/ 3 prong clips--2 on one side, one on the other, by removing it out the front--molded into this is the 3" pipe out the back that the hose attaches to (I'll call them the air dams). Remove them for easier install of the hose. May be a tight finger squeeze to get at the clips, or they may simply push out w/ reasonable force on the back of the 3" connector tube. On the rear of the fascia, there's also some molded plastic to hold the fog lights used on the GT/CS--that's an integral part of the fascia.
Driver side, push hose from front, under horn, and into wheel well. Leave plenty of hose out the front--you'll move it rearward after the bumper is back on.
My horn was in the way. I moved it rearward about 3" to a different mounting hole, loosened the nuts on each horn, and rotated them so the horn's horn opening pointed upward, giving more room under it.
Passenger side--Remove the lower (front and back) washer tank bolts. Front: Remove the "nut" clip. Replace factory bolt w/ a 1/4 or 5/16" by about 2" bolt. Stack washers onto the bolt to hold the washer further away from the center of the car. Add a washer and bolt to mount it. On the lower back, I used the factory hardware but stacked washers between the tank and body to hold the tank further out--stack as many as you can. You may need to loosen the top bolt to make this easier.
Push hose from front, past/under the washer tank, into wheel well. Again, leave plenty hanging out the front, so it can be fed in later.
Replace bumper/grill/fascia assembly. As you put it in place, push brake cooling hose thru the openings in the fascia--they should stick out several inches as the bumper goes into place.
Once the bumper is on, slip the 2 air dams you removed from the fascia earlier, into the hose. Do the drivers side first, its easier. Have an assistant SLOWLY pull the hose into the wheel well as you push the air dam/hose toward and into the fascia--DON'T let the hose get pulled off the air dam pipe. Mate the air dam back into the fascia, and tell the assistant to stop pulling the hose. Repeat on passenger side. The hose has to turn sharper for the washer tank, so this one isn't as easy.
Once the air dams are back in, figure out how long the hose needs to be. It needs to make a pretty sharp angle so the wheel doesn't rub in a hard turn inboard. My hose is set up so the inside of the hose is about even w/ the inside of the swaybar--if I run my hand along the inside of the swaybar, it will be on the inside of the hose also. The hose hangs below the sway bar. I bought Gorilla duct tape and wrapped it around the hose where it might rub on the body or sway bar--I don't have to want to do this project again (well, unless I buy a BOSS).
Mount the backing plates, curve the hose in an almost 90 deg turn, cut to length, attach w/ clamp, and then use a mongo sized cable tie (Steeda told me the bigger the better, so mine are like 175 lb ones), and tie hose to the oblong hole in the body forward of the sway bar. Some people tie to sway bar also, but I didn't.
Trim wheel well plastic since the hose will most likely push it toward the wheel. Trim so it lays back in natural position, and reconnect fasteners you may have removed earlier.
Turn wheel full left and right to ensure hose doesn't bind.
Cable tie as desired.
Install brakes and wheels and look turn wheels full left/right to ensure no rubbing. Put vehicle back on ground.
Congrats--you're done!
I worked real slow and methodical (this was virgin body work territory for me), and it took me several hours. I could do it again in a couple.
Here's some pics--after the first track day, so its dirty--w/ the cooling kit installed (if I did this wright for my first post).
You'll see the cable tie thru the oblong body hole. I also ran duc tape along the bottom edge of that red body metal to help prevent wear-thru.
Drivers side:
Passenger side"
Well, that's a huge first post, but hopefully it will help.
Last edited by SD GT; Jul 2, 2011 at 08:48 PM.
Has anyonne installed the brake duct kit themselves yet? I've searched this blog and the web and have not found any instructions or photos. I was under there today putting in the Trans scoop (all mods should be that easy) so I took off the cover to look at the potential brake duct install.
Looks kinda Nasty
What do you do the the windshiled washer tank?
Does the fog light delete insert pop out to work on?
I am assuming you cut a hole in the plastic wheel well liner for the hose?
Anyone Know what a dealership charges to do this install?
Attachment 90014
The trans scoop looks good, it doesn't hang down far at all. Kinda sucks for the oil change though, its right in the way of the discharge.
Last edited by 06GT; Jul 2, 2011 at 09:16 PM.
Shelby GT350 Member
Joined: November 20, 2010
Posts: 2,382
Likes: 1
From: Sioux Falls, SD
Has anyonne installed the brake duct kit themselves yet? I've searched this blog and the web and have not found any instructions or photos. I was under there today putting in the Trans scoop (all mods should be that easy) so I took off the cover to look at the potential brake duct install.
Looks kinda Nasty
What do you do the the windshiled washer tank?
Does the fog light delete insert pop out to work on?
I am assuming you cut a hole in the plastic wheel well liner for the hose?
Anyone Know what a dealership charges to do this install?
Attachment 90014
The trans scoop looks good, it doesn't hang down far at all. Kinda sucks for the oil change though, its right in the way of the discharge.
Looks kinda Nasty
What do you do the the windshiled washer tank?
Does the fog light delete insert pop out to work on?
I am assuming you cut a hole in the plastic wheel well liner for the hose?
Anyone Know what a dealership charges to do this install?
Attachment 90014
The trans scoop looks good, it doesn't hang down far at all. Kinda sucks for the oil change though, its right in the way of the discharge.
The pics and description start at post #23
Just saw your post Drew

Here's a writeup and pics from BMO: http://bossmustangsonline.com/boss-3...angsonline/15/
The pics and description start at post #23
Just saw your post Drew
The pics and description start at post #23
Just saw your post Drew

Shelby GT350 Member
Joined: November 20, 2010
Posts: 2,382
Likes: 1
From: Sioux Falls, SD
Tasca Super Boss 429 Member
Joined: December 18, 2010
Posts: 3,708
Likes: 0
From: NorCal
haha I love those
Cobra Member
Joined: June 7, 2010
Posts: 1,089
Likes: 0
From: Earth


Always a classic:
Shelby GT350 Member
Joined: November 20, 2010
Posts: 2,382
Likes: 1
From: Sioux Falls, SD
TSB 10-3-7
I installed TSB 10-3-7 a.k.a. the turkey baster today while I was swapping rotors, pads and wheels. When I loosened the axle bolt, there was a small amount of pressure release so I'm wondering if it's still not a little overfilled. I'm heading to the track Thursday so we'll see what happens. Looks like it's a good fix, but if it's still a little overfilled, it may vent just a bit more. I cleaned everything up so if there's fresh fluid, it should show up....not to mention hopefully I won't get all greasy tying it down to the trailer 
in for results...otherwise I may try to pull my catch can off my '06
Shelby GT350 Member
Joined: November 20, 2010
Posts: 2,382
Likes: 1
From: Sioux Falls, SD