Padded Leather Console Armrest Covers

Bullitt Member
Joined: August 26, 2011
Posts: 239
Likes: 0
From: San Diego
It was the medium pebble which looks pretty good. The smooth must be very smooth! I did brush the dog hair off the alcantara but, since I live with the top down 330 days out of the year, things blow in all the time LOL!
Tasca Super Boss 429 Member
Joined: July 7, 2012
Posts: 4,421
Likes: 21
From: Indianapolis
Got mine today! Love it so much.
my only advice is to not over tighten the latch screws.
Thanks mike!
Note before and after pics.
my only advice is to not over tighten the latch screws.
Thanks mike!
Note before and after pics.
Last edited by Getportfolio; May 9, 2013 at 01:26 PM.

Tasca Super Boss 429 Member
Joined: July 7, 2012
Posts: 4,421
Likes: 21
From: Indianapolis
The quality and fit is exceptional. It's amazing how the covers unify the interior and give it more class. In addition, the driving experience is enhanced. They are soooo comfortable.
Everyone in this forum needs to purchase one. Regardless of cloth or leather interior.
Everyone in this forum needs to purchase one. Regardless of cloth or leather interior.
Thread Starter
Mach 1 Member
Joined: September 15, 2009
Posts: 679
Likes: 2
From: Traverse City MI.
 thanks man, and thanks to everyone. all the pics are looking great and ive been saving them to post on the website. i`m also getting the part posted up all over the amustangrocksleather website now too. thanks to everyone for putting up with the confusion of the secret webpage but i tried to do as promised. the store on the website will work so much better with dropdowns for options, invoices, bookkeeping ect.
 it is a different look. with the padding, it changes the flushed out look, which does look nice and sleek but i think the new look is super nice, unique and custom, and the materials really upgrade that plastic lid.
pete with the prototype cover in the first pic didnt like that it sits up so he recessed his down into the console. alex notched his lid where the back of the latch hits to allow it to come to the full up position easier. i really think stretching tight and gluing that front flap in that groove works good, and in time the leather will stretch and relax and take that shape better. ive found that even wrapped loose in the frt and the latch not coming to full up, it still latches and releases ok.
it looks like everyone is doing pretty great with the installs and it does require being a good diy`r. if your thinking the install is not in your wheelhouse, i`m sure you could find help from someone or a interior shop. the install instructions with pics are on the "how to install" page of the website.
INSTALLATION TIPS:
ive fitted every cover we have sent out myself and taken a pic of almost every one. the smooth grain leather is the hardest to get fitted good and to get smoothed out. the med pebble is a little thicker, and the heavy pebble though it looks the most rugged is actually the softest and most forgiving. working the leather to the sides and rolling the seam over the side edges, turning the rear corners inside out and stretching the cover tight to the rear them folding the corners right side out over the lid and working the seams with your thumbs helps get the back corners nice, working the cover to the to the sides and rear with your hands, adding a little heat and rubbing it in different directions to find the direction that gives the best results, pulling the velcro straps snug, even past where they line up can help as with getting the cover fit best before screwing the inside cover back on are some install tips. time and summer heat is huge for the leather to relax and take shape too.
Last edited by amustangrocks; May 12, 2013 at 08:38 PM.
Cobra R Member
Joined: July 17, 2012
Posts: 1,906
Likes: 4
From: Virginia
I've got this installed right now, sitting on my lap but I cannot get the button working 100%. It's very stiff and only comes up halfway. Is a matter of heating the leather at this point or should I start over
Thread Starter
Mach 1 Member
Joined: September 15, 2009
Posts: 679
Likes: 2
From: Traverse City MI.
the install instructions are on the website now on the "how to install" page, 3rd cover down for the 10+
http://www.amustangrocksleather.com/How_to_Install.html
Last edited by amustangrocks; May 13, 2013 at 07:43 PM.
Thread Starter
Mach 1 Member
Joined: September 15, 2009
Posts: 679
Likes: 2
From: Traverse City MI.
give it some time, in time the leather will relax and take that shape and get worked in aloowing the latch to return more to the 100% up. even it its not returning all the way, the latch will still catch and release ok.
Tasca Super Boss 429 Member
Joined: July 7, 2012
Posts: 4,421
Likes: 21
From: Indianapolis
Mmmm. I read the instructions again and realized that while I did apply some archival glue to the groove area, I did not create the the actual "groove" before installing the latch. I put the glue on and pulled that small latch flap area (including corners) as tight as possible and quickly and carefully installed the lower plate as to not let the leather slip loose. A ball point pen worked great for making a tiny guide hole in the thin cloth on the left and right side of where two of the latch screws go. (If that makes sense.)
The latch works great when the screws are snug. For kicks, I over tightened the screws and the latch would not work. Consider that when installing.
I was so picky that I made sure not a hint of the Velcro straps could be visible from under the console cover. This involved smoothing the leather out, and getting every crinkle out.... Pulling it tight. Careful though when pulling.
Be patient and take your time. I'm not the expert but just wanted to share. Hope it helps someone.
Last edited by Getportfolio; May 19, 2013 at 04:10 PM.
Cobra R Member
Joined: July 17, 2012
Posts: 1,906
Likes: 4
From: Virginia
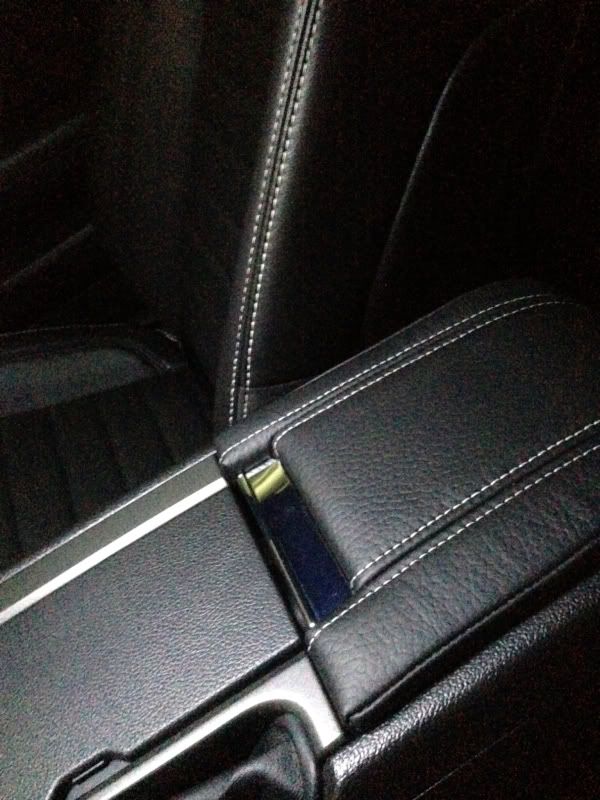
Yeah it's pretty much perfect now. And time will only make it better I'm sure. Great product and service you did for me with the return and all. Here are installs. Kinda dark out right now though
Cobra R Member
Joined: September 22, 2012
Posts: 1,690
Likes: 18
From: Ontario, California
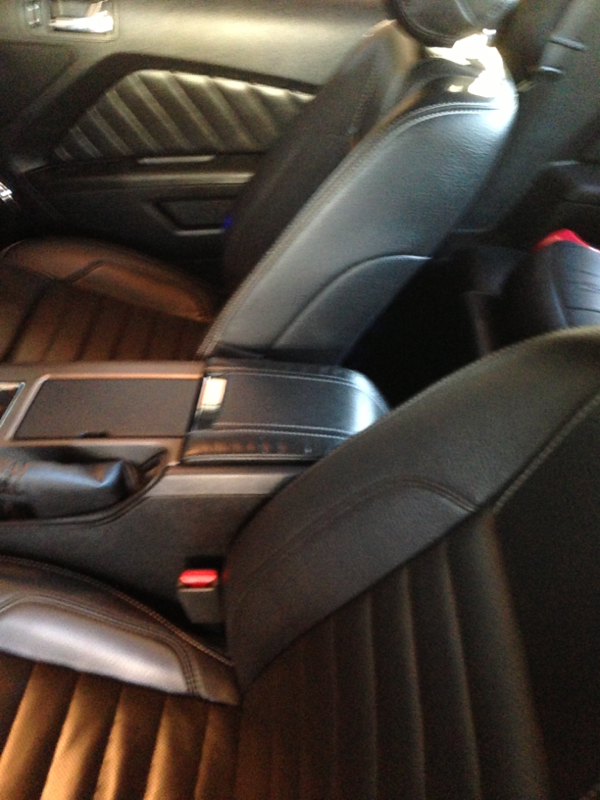
I got mine today. I installed it and really wasn't happy at first. It just looked odd. I gave it a little heat and it was better but still looked weird. I realized I had put leather conditioner on my seats yesterday. I put some on the armrest and its much better. In hindsight, I think I should of ordered it all smooth. It looks good but my seats grain is just enough off that I may order another one in all smooth. Great price and great craftsmanship. The weak link is the dork that ordered.

Last edited by Mr. V; May 13, 2013 at 10:05 PM.
Bullitt Member
Joined: July 30, 2008
Posts: 425
Likes: 8
From: Indianapolis, IN
I had this problem at first as well. I think you will find the button will work better if you back the screws that hold it on, off a little. I had overtightend mine when re-attaching the button assembly to the lid. About 1/4 to 1/2 a turn to the left and the button worked like it did originally. Give that a try.
Member
Joined: November 16, 2011
Posts: 31
Likes: 0
From: Calgary, Alberta, Canada
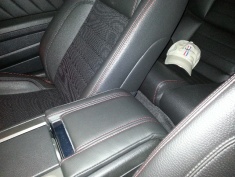
I am not sure if I have white or silver stitching, but sure looks similar to this with heavy pebble, I have the 2012 with premium perforated heated seats, should I send a picture? Do you send to Canada?
 Here is a quick cell phone pic.