Louver replacement for quarter window glass


 2/20/07, 08:11 PM
#882
Mach 1 Member
Join Date: March 11, 2005
Posts: 584
Likes: 0
Received 0 Likes
on
0 Posts
Online color-ordering and required tools also now available:
http://www.silverhorseracing.com/web...ategory_id=255
http://www.silverhorseracing.com/web...ategory_id=255
2/20/07, 08:20 PM
#883
legacy Tms Member
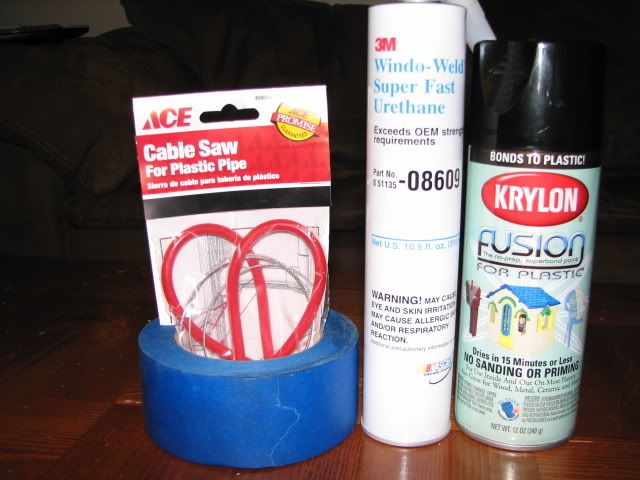
I mighta got a bit overkill... wound up with so much on the table I had to take a pic-used everything except the big gun...on such a small part the little touchup gun is handy, used syringes to accurately mix small amounts of paint...dunno why I even took the primer gun along...
in your other pic, masking the backside looks pretty easy to get at- how long did it take you to mask the outside windows the second time around? I think I had about two hours trimming little masks out and trying to get them where I wanted them...that was probably the most tedious part of the whole thing for me...
one comment on the tool to remove- the ones Silverhorse carries works very well , and the wire is a fairly smooth braided cable...I think the pipe cable saw is abrasive coated, would require extreme care around paint...the smooth cable still rubbed some of the black edge off the glass, but only some little specks right at the edge, would be nothing to touchup, if even noticeable... did the cablesaw scratch the glass edge?
Probably dont matter, as if youre as happy with these as I am, that glass aint ever going back in again, is it

note: the edges on my masks are really 'jagged looking', thats black marker line...I trimmed a pieced togeher mask for each window, traced that to a paper template, shaded over that with marker onto the tape and trimmed masks out, flipped over template paper and used again to mark other side...
 2/20/07, 11:24 PM
#884
FWIW, the full paint is cheaper due to no masking required (less labor) but these parts are just beautiful with the visibility option.
I took a couple more pictures today of the redfire car we did, now that the interior is back in. I'll get them up maybe tomorrow evening - I'm very happy with the way they came out, and glad that everyone who has received them has been happy.
P.S. - So Mark - are we going to get you to pop out the windows again and go to the "louver side"? You know that the fit of the OEM window is all over the map from what we've seen - every car the glass is different, and from side to side it's normally different too. It's not the glass that is the variable, it's the sealer - pins or not.
2/21/07, 11:28 AM
#886
Bullitt Member
Join Date: July 20, 2006
Location: Virginia Beach, VA
Posts: 420
Likes: 0
Received 0 Likes
on
0 Posts
Marcello, my wife warned me that if I replaced the window the second time she wouldn't ride in the Stang...it's been 4 months and she has not been in the Stang...if I mess with the windows again, she'll divorce me!
(very sore subject with her)
(very sore subject with her)
 2/21/07, 04:48 PM
#890
Bullitt Member
Join Date: September 25, 2006
Posts: 397
Likes: 0
Received 0 Likes
on
0 Posts
Exactly!
I'd like to see a pic of the louver installed and the interior parts back in place. Just want to see how the inside of the louver blensd in with the surrounding interior pieces.
Mark
I'd like to see a pic of the louver installed and the interior parts back in place. Just want to see how the inside of the louver blensd in with the surrounding interior pieces.
Mark
2/21/07, 07:43 PM
#891
Here you go... not 100% what you want, but the shots like that look weird since you have to intentionally throw the background out of focus to get the interior in-focus.
HTH...
HTH...
2/21/07, 07:53 PM
#892
Cobra R Member
Join Date: November 12, 2004
Posts: 1,914
Likes: 0
Received 0 Likes
on
0 Posts
All I can say is wow, those look unbelievable. You can see the dash vents, and steering wheel etc, just as clear as glass it looks like, and seems to blend well. I cant wait. Soon, Soon.
2/22/07, 08:23 AM
#893
Mach 1 Member
Join Date: March 11, 2005
Posts: 584
Likes: 0
Received 0 Likes
on
0 Posts
Ok, im basically sold that I am going to get these now, just waiting for someone who got the pre-painted to see how the color match is or if I should take them somewhere locally and have them match it. So one someone gets the pre-painted post up some pics
 2/22/07, 10:46 AM
#895
Everyone shifted from regular pre-order to pre-painted... so we have a new backup on our hands trying to get them through paint. There were a lot though that shipped last week and this week without paint, so I'm sure pictures will start popping up here and there as they get painted and installed...
Patience my friend, patience
Patience my friend, patience
2/22/07, 11:38 AM
#896
Team Mustang Source
Thread Starter
Join Date: June 19, 2004
Location: Phoenixville, PA
Posts: 6,840
Likes: 0
Received 2 Likes
on
2 Posts
Hey Marcello, LOVE THE LOUVERS! You got am amazing product that you should be VERY proud of. I can't wait to see people's reaction to them at this coming season of car shows!!! Carlisle is going to be sweet!! I got a question I was hoping you could help me with. What should I use to sand down the high marks from the mold lines around the edge? See the pics below to get an idea what I am describing. Someone at work told me to use some 320 or 400 grit paper and wet sand them lightly to get the high point level with the rest of the frame. Is this what you would recommend? I figured I could do this ahead of time before I give them to my painter to finish. Thanks for the help, and I can't wait to get these on my car!! 
2/22/07, 11:45 AM
#897
Thanks! The high point is so that you can sand it down - if it was trimmed too low, you'd have to do fill work, which we try and avoid . That little lip there is how we avoid (partially) the ejector pins. 320 might be a bit too fine to start with, I might start with 180, and go to 320-400 just near the end prior to priming it. Wet sanding is nice, but I doubt it is neccessary for this spot.
. That little lip there is how we avoid (partially) the ejector pins. 320 might be a bit too fine to start with, I might start with 180, and go to 320-400 just near the end prior to priming it. Wet sanding is nice, but I doubt it is neccessary for this spot.
2/22/07, 11:52 AM
#898
Team Mustang Source
Thread Starter
Join Date: June 19, 2004
Location: Phoenixville, PA
Posts: 6,840
Likes: 0
Received 2 Likes
on
2 Posts
Thanks! The high point is so that you can sand it down - if it was trimmed too low, you'd have to do fill work, which we try and avoid . That little lip there is how we avoid (partially) the ejector pins. 320 might be a bit too fine to start with, I might start with 180, and go to 320-400 just near the end prior to priming it. Wet sanding is nice, but I doubt it is neccessary for this spot.
. That little lip there is how we avoid (partially) the ejector pins. 320 might be a bit too fine to start with, I might start with 180, and go to 320-400 just near the end prior to priming it. Wet sanding is nice, but I doubt it is neccessary for this spot.