Louver replacement for quarter window glass

 2/19/07, 03:29 PM
#862

It is almost impossiable to get a perfect color match on any part that has been painted and mailed. Heck even going local will not get you a perfect match as well.
All colors have varainces of that color from the factory. You can pull a part, say a gas door, from a Redfire and put it on a different year or even same year and it will be off.
Air pressure, wetness of coats and type of clear all can effect the finished color.
Light angles and so on will do it too.
I have painted for over 15 years and can say for sure, if the color is perfect you got lucky.
The best you can hope for is close and that WILL look great for sure and 99% of the people will not notice it.
BTW, still waiting...
Jay
2/19/07, 04:48 PM
#863
legacy Tms Member
It is almost impossiable to get a perfect color match on any part that has been painted and mailed. Heck even going local will not get you a perfect match as well.
All colors have varainces of that color from the factory. You can pull a part, say a gas door, from a Redfire and put it on a different year or even same year and it will be off.
Air pressure, wetness of coats and type of clear all can effect the finished color.
Light angles and so on will do it too.
I have painted for over 15 years and can say for sure, if the color is perfect you got lucky.
The best you can hope for is close and that WILL look great for sure and 99% of the people will not notice it.
BTW, still waiting...
Jay
All colors have varainces of that color from the factory. You can pull a part, say a gas door, from a Redfire and put it on a different year or even same year and it will be off.
Air pressure, wetness of coats and type of clear all can effect the finished color.
Light angles and so on will do it too.
I have painted for over 15 years and can say for sure, if the color is perfect you got lucky.
The best you can hope for is close and that WILL look great for sure and 99% of the people will not notice it.
BTW, still waiting...
Jay
2/19/07, 04:48 PM
#864
Bullitt Member
Join Date: September 25, 2006
Posts: 397
Likes: 0
Received 0 Likes
on
0 Posts
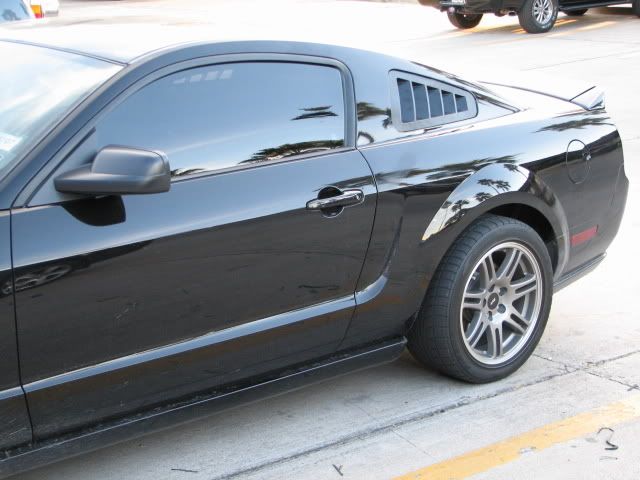
Everyone has posted pictures from how the louvers look on the outside (fantastic!) but I'd like to see how they look on the inside.
No so much looking through the louvers, but rather, how well they blend in with the interior.
Thanks!
Mark
No so much looking through the louvers, but rather, how well they blend in with the interior.
Thanks!
Mark
 2/19/07, 09:57 PM
#866
legacy Tms Member
Machine- I'm kinda confused-
post 823- installed pics
post 840-
post 854-
these were installed on the 17th(painted on the inside), the adhesive still showed, then were removed undamaged on the 19th? did the inside paint let go, or get damaged by the adhesive in some way? I woulda thought the adhesive would be solid after 12 hours or so- I *thought* glass shops wait only 4 hours before releasing a car to owner after changing glass, but dunno what adhesive they use...rethinking, perhaps pushing in just mushed the bead out wider requiring a lot longer cure time? you mentioned noticing the bead line after cured/hardened, how 'deep' was it hardened after 2 days vs how much was still soft when you removed it? and did the sealant 'melt' the inside paint or something causing the line to show?
the adhesive on mine is pretty thick: I chopped the little rubber 'shim' into 3 tiny pcs, and stuck one near where each 'pin' was, and one back near where it came from-test fit it in, looked pretty good, so put a bead 'eyeballed' thicker than the rubber pads. when pressing in, the rubber pads just prevented me from pushing in too far- just must be certain your bead is taller all the way around. dunno why both my shim blocks basically 'popped out' undamaged with the cutting wire (adhesive tape intact even) mighta just been dumb luck... dunno if right or wrong, but they did setup pretty much flush...as much as the glass did anyway.
after about an hour the urethane felt pretty solid...just wondering if adhesive varies that much(Ohio=cold here/low humidity...texas?) or if something else went awry- or if that adhesive stays that soft for 48+ hours...I was worried about that, because it was so cold here, but after it setup an hour, wasnt too worried about keeping it warm as I couldnt move the thing with a fair amount of pressure...(still left the tape on overnight just in case). thought it was kinda odd 3M didnt list any temperature/dry times on the caulking tube...info on temp/humidity effects on cure time might be handy to know...
post 823- installed pics
post 840-
Marcello, I did not paint them on the outside...only on the inside. I like them the way they are, but once they show some wear and tear over time, I will most likely get them painted on the exterior, as well.
Congratulations on an excellent product. The quality of fit, finish, size weight, design etc. is all top-notch. My mustang thanks you...
Congratulations on an excellent product. The quality of fit, finish, size weight, design etc. is all top-notch. My mustang thanks you...
I came to a dreadful realization today...something Marcello warned me about...
If you dont paint the exterior you can see the adhesive bead pretty clearly. I guess I didnt see it until it cured and hardened.
Long story short: I removed them and painted the exterior as well.
If you dont paint the exterior you can see the adhesive bead pretty clearly. I guess I didnt see it until it cured and hardened.
Long story short: I removed them and painted the exterior as well.
the adhesive on mine is pretty thick: I chopped the little rubber 'shim' into 3 tiny pcs, and stuck one near where each 'pin' was, and one back near where it came from-test fit it in, looked pretty good, so put a bead 'eyeballed' thicker than the rubber pads. when pressing in, the rubber pads just prevented me from pushing in too far- just must be certain your bead is taller all the way around. dunno why both my shim blocks basically 'popped out' undamaged with the cutting wire (adhesive tape intact even) mighta just been dumb luck... dunno if right or wrong, but they did setup pretty much flush...as much as the glass did anyway.
after about an hour the urethane felt pretty solid...just wondering if adhesive varies that much(Ohio=cold here/low humidity...texas?) or if something else went awry- or if that adhesive stays that soft for 48+ hours...I was worried about that, because it was so cold here, but after it setup an hour, wasnt too worried about keeping it warm as I couldnt move the thing with a fair amount of pressure...(still left the tape on overnight just in case). thought it was kinda odd 3M didnt list any temperature/dry times on the caulking tube...info on temp/humidity effects on cure time might be handy to know...
2/20/07, 07:54 AM
#867
Mach 1 Member
Join Date: March 11, 2005
Posts: 584
Likes: 0
Received 0 Likes
on
0 Posts
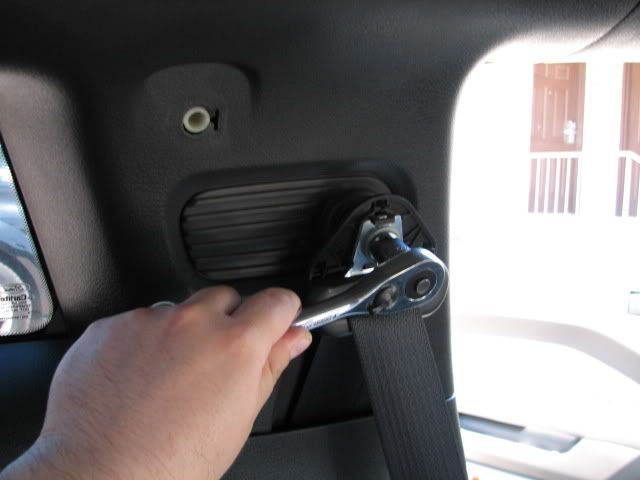
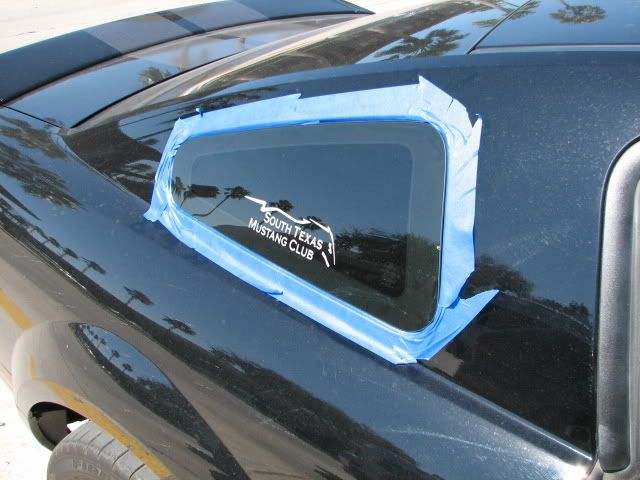
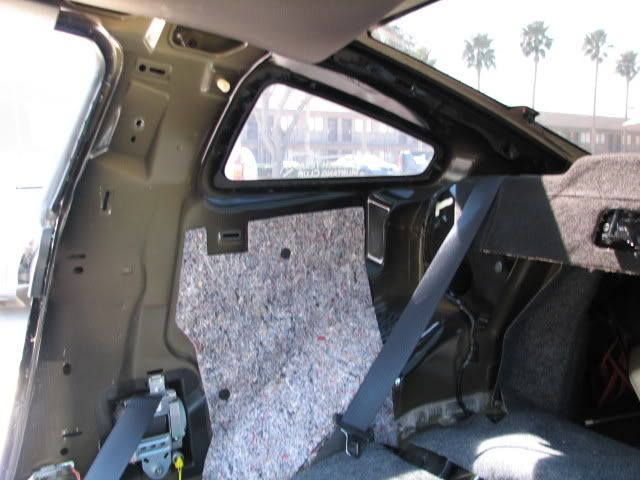
Marcello for the do-it-yourself kit do you provide full detailed intructions on window removal and such?
Even if you do can someone post a good write up with photos of the entire process, I'm very interested to know just what all it takes before pulling the trigger and making an order.
Even if you do can someone post a good write up with photos of the entire process, I'm very interested to know just what all it takes before pulling the trigger and making an order.
2/20/07, 08:30 AM
#868
Marcello for the do-it-yourself kit do you provide full detailed intructions on window removal and such?
Even if you do can someone post a good write up with photos of the entire process, I'm very interested to know just what all it takes before pulling the trigger and making an order.
Even if you do can someone post a good write up with photos of the entire process, I'm very interested to know just what all it takes before pulling the trigger and making an order.
Online color-ordering and required tools also now available:
http://www.silverhorseracing.com/web...ategory_id=255
Photo shoot with the redfire 06 is here:
http://www.silverhorseracing.com/bradons-06.htm
2/20/07, 08:43 AM
#869
Ford4V429,
That's a good question, I kind of thought that he did the removal much sooner than when posted, but wasn't sure. Machine - did you use the 3M fastcure we sell, or did you get a tube of sealer locally?
That's a good question, I kind of thought that he did the removal much sooner than when posted, but wasn't sure. Machine - did you use the 3M fastcure we sell, or did you get a tube of sealer locally?
2/20/07, 11:40 AM
#870
Bullitt Member

Join Date: August 10, 2005
Posts: 248
Likes: 0
Received 0 Likes
on
0 Posts
sorry for the confusion...installed on the 17th, removed on the morning of the 18th (my post is dated as such)
the weather was very odd during this time. It was a decent temp during first install on the 17th...about low 60's or so. It got cold overnight, into the 40's, then up to the 70's on the morning of the 18th....maybe that had something to do with it. Also, my stang is not garage kept.
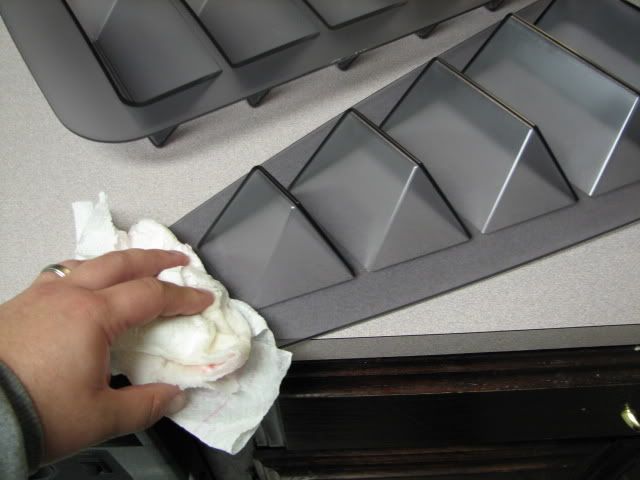
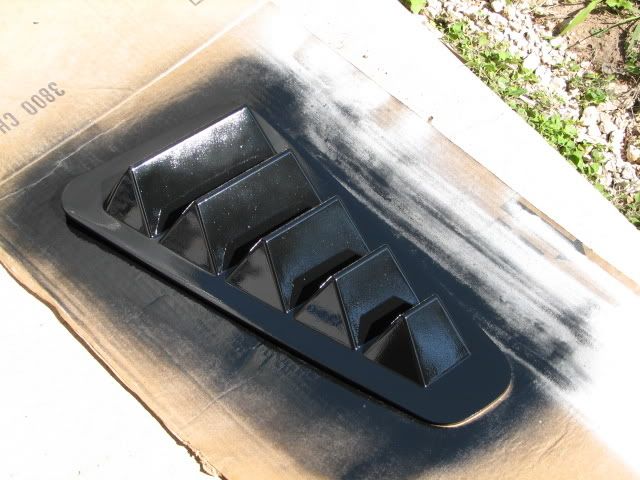
The adhesive seems to have shrunk or something during curing, because it pulled the paint off the backside of the louvers, thus I was able to see it more clear the next morning. I deduced that the better option was to scrape the paint off the backside so that the adhesive stuck directly to the edge of the louvers instead. I painted the outside to hide the mess I made underneath as well as any outline of the bead.
I used a commercial 3M adhesive used by most glass shops. I have the tube at home, so I'll have to get you an exact name/part no when I get home later today.
On a positive note, they look better then before, and feel much firmer...and since I have more adhesive underneath, there is slightly less recess then before.
the weather was very odd during this time. It was a decent temp during first install on the 17th...about low 60's or so. It got cold overnight, into the 40's, then up to the 70's on the morning of the 18th....maybe that had something to do with it. Also, my stang is not garage kept.
The adhesive seems to have shrunk or something during curing, because it pulled the paint off the backside of the louvers, thus I was able to see it more clear the next morning. I deduced that the better option was to scrape the paint off the backside so that the adhesive stuck directly to the edge of the louvers instead. I painted the outside to hide the mess I made underneath as well as any outline of the bead.
I used a commercial 3M adhesive used by most glass shops. I have the tube at home, so I'll have to get you an exact name/part no when I get home later today.
On a positive note, they look better then before, and feel much firmer...and since I have more adhesive underneath, there is slightly less recess then before.
 2/20/07, 12:28 PM
#872
Mach 1 Member
Join Date: March 11, 2005
Posts: 584
Likes: 0
Received 0 Likes
on
0 Posts
This is exactly what I was looking for
2/20/07, 12:32 PM
#873
Member

Join Date: March 9, 2006
Location: Concord, NC
Posts: 30
Likes: 0
Received 0 Likes
on
0 Posts
I have a set ordered for my car painted yellow with the slats visible. I did a couple quick photochops to figure out which way I wanted them. Now I am just getting anxious to pay for the paint upgrade.
2/20/07, 02:17 PM
#874
legacy Tms Member
sorry for the confusion...installed on the 17th, removed on the morning of the 18th (my post is dated as such)
the weather was very odd during this time. It was a decent temp during first install on the 17th...about low 60's or so. It got cold overnight, into the 40's, then up to the 70's on the morning of the 18th....maybe that had something to do with it. Also, my stang is not garage kept.
The adhesive seems to have shrunk or something during curing, because it pulled the paint off the backside of the louvers, thus I was able to see it more clear the next morning. I deduced that the better option was to scrape the paint off the backside so that the adhesive stuck directly to the edge of the louvers instead. I painted the outside to hide the mess I made underneath as well as any outline of the bead.
I used a commercial 3M adhesive used by most glass shops. I have the tube at home, so I'll have to get you an exact name/part no when I get home later today.
On a positive note, they look better then before, and feel much firmer...and since I have more adhesive underneath, there is slightly less recess then before.
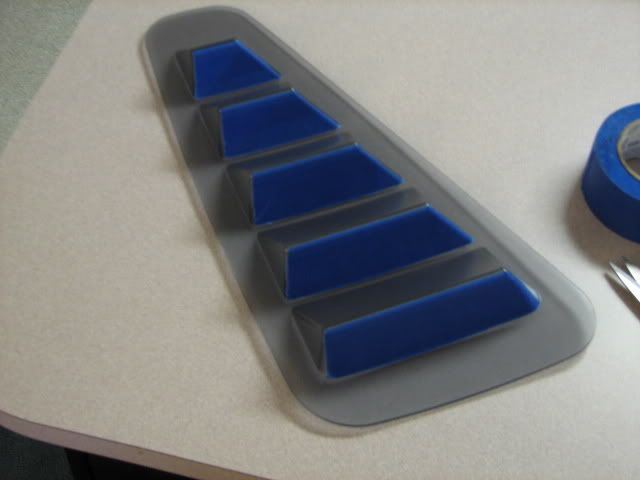
so ya got some pics of the painted version? Did you go all black, or mask the windows? I think it took me about 2 hours just to cut masks, prep for paint...like those r/c helicopter canopies, no easy way to get around masking carefully
 2/20/07, 04:53 PM
#875
I lust for a M24
Join Date: November 6, 2004
Location: Football HOF, Canton OH
Posts: 7,045
Likes: 0
Received 4 Likes
on
4 Posts
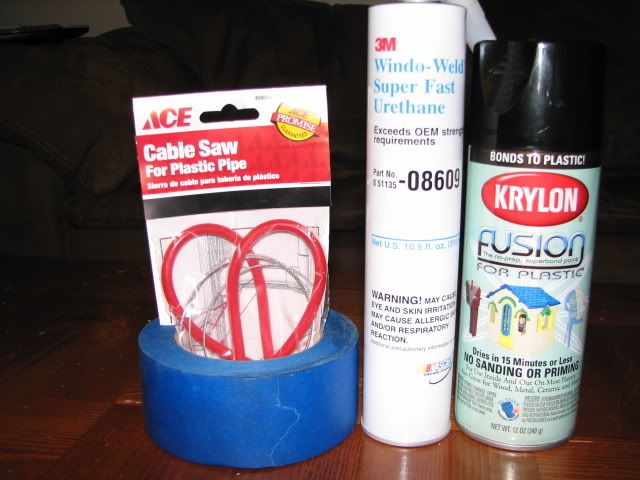
Well, dropped off the louvers at the shop, I'm hoping they'll be ready tomorrow. 
I picked up 3m Window-Weld Super Fast Urethane. 08609 - I just checked the SHR website and I see that they're selling something different.
Will what I got work? Has anyone else used it? What's the difference?
click: http://multimedia.mmm.com/mws/mediaw...666iKbc7rrrrQ-
Thanks!
I picked up 3m Window-Weld Super Fast Urethane. 08609 - I just checked the SHR website and I see that they're selling something different.
Will what I got work? Has anyone else used it? What's the difference?
click: http://multimedia.mmm.com/mws/mediaw...666iKbc7rrrrQ-
Thanks!
2/20/07, 05:12 PM
#876
What you got will work fine. We went with the 08690, mostly since we wanted to make sure that it set up as quickly as possible, but the 08609 is about the same stuff IIRC. Just be sure the date code is good on it - they make a pretty big deal about the shelf life of that stuff, hence why we went direct to 3M rather than through a WD to get it - wanted to make sure it was as fresh as possible.


 2/20/07, 05:32 PM
#880
Bullitt Member
Join Date: July 20, 2006
Location: Virginia Beach, VA
Posts: 420
Likes: 0
Received 0 Likes
on
0 Posts
I posted a long, long time ago...I had my right rear quarter window replaced (after the factory job had left one of the corners sticking out a bit due to too much urethane while on the assembly line)...Anyway, I had it replaced a second time because the first time my installer put it in he placed it squarely into the frame (without any guidance from me as to positioning) leaving an equal amount of spacing around the window... there were no pins to guide it in because I had him break the rear quarter window (and remove everything). I chose this method instead of having the installer tearing the interior apart... the result of this first installation ended up in the replaced window not matching the position of the factory side.
Trying to make a long story short, for the second replacement of the window (after we agreed to break the window again) he called me in after he had the urethane bead in place so that I could tell him how I wanted the rear quarter window positioned. What I wanted was for the side of the window, which has the longest vertical side, to line up closer to the "B" pillar so that it would match the factory fit on the other side.
Be sure to take a good look at your rear quarter windows and you will see that the longest vertical side of the window is closer to the front of the car (i.e. measure the gaps and you will see that the window does not sit squarely in the center of the frame). I would recommend taking a picture of the rear quarter windows before you remove them. Also, he told me that we had about 5-8 minutes to adjust the window in place before the urethane really starts to set up (ambient temp was about 77 degrees)... so be sure to keep that in mind when inserting your louvers.
Marcello has really done a fantastic job with those louvers... he has put a lot of time and effort into them -- and the accompanying instructions. The Silverhorse Louvers look really sharp on the Stangs that have already installed them!!!
---------------------------------------------------------------------
(Marcello...BTW, I paid for the second installation...$300 parts and labor...my dealer paid for the first installation. Lesson Learned for me: watch the installer actually place the window in the frame and then adjust it's position to match the factory fit as necessary before the urethane sets up).