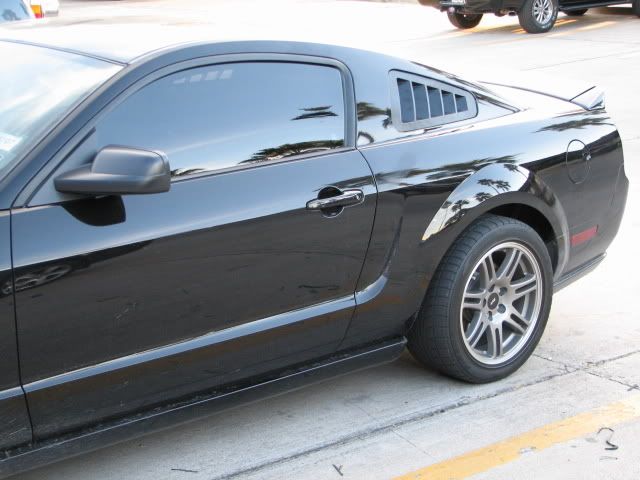
Louver replacement for quarter window glass


 2/17/07, 06:25 PM
#824
Bullitt Member

Join Date: August 10, 2005
Posts: 248
Likes: 0
Received 0 Likes
on
0 Posts
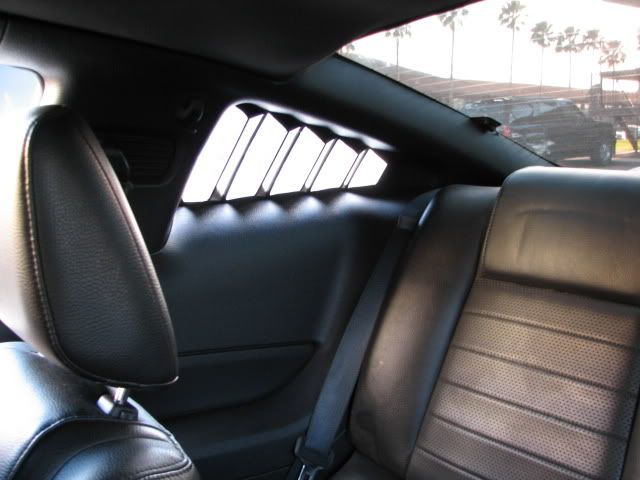
PS - dont let the middle picture fool you...you can only see through them from front to back, and not the other way around...
So do I get the title of #2 stang with Silver Horse Racing louvers? and how about #1 self-install...lol
So do I get the title of #2 stang with Silver Horse Racing louvers? and how about #1 self-install...lol
 2/17/07, 07:22 PM
#827
 2/17/07, 07:39 PM
#828
Cobra R Member
Join Date: September 26, 2006
Location: East Moline, IL
Posts: 2,019
Likes: 0
Received 5 Likes
on
4 Posts
Wow those are fantastic. I can't wait to see more people's rides. If I didn't have the C-Series kit, I would be ordering right now. But I don't think they'd flow right.
2/17/07, 07:58 PM
#829

I knew that question would come up about sitting in. It would take a lot of the adhesive to bring it out flush. If you check the window, it's in on top, out on the bottom so it doesnt fit flush anyways. Atleast mine was.
2/17/07, 08:04 PM
#831
Bullitt Member
Join Date: August 10, 2005
Posts: 248
Likes: 0
Received 0 Likes
on
0 Posts
Either way, I love my louvers, and I know you love yours, too!
 2/17/07, 08:25 PM
#832
I lust for a M24
Join Date: November 6, 2004
Location: Football HOF, Canton OH
Posts: 7,045
Likes: 0
Received 4 Likes
on
4 Posts
The factory adhesive layer was pretty thick. Measure the thickness of the OE Glass + adhesive thickness. Subtract the thickness of the louver and that'll give you an idea of how much adhesive to use to bring it out flush.
Is this advisable Marcello?
Is this advisable Marcello?
2/17/07, 10:44 PM
#833
Bullitt Member
Join Date: August 10, 2005
Posts: 248
Likes: 0
Received 0 Likes
on
0 Posts
All due respect, but I dont think that will bring it to flush. Having just done this today, and having left about 1/3rd of the old adhesive on (as per instructions), I can assure you that it will not.
2/18/07, 07:15 AM
#835
I lust for a M24
Join Date: November 6, 2004
Location: Football HOF, Canton OH
Posts: 7,045
Likes: 0
Received 4 Likes
on
4 Posts

They're definately strong enough.
Looking on the Redfire install above, they look pretty close to being flush.
2/18/07, 09:03 AM
#837
Morning guys - yes, the black one gets to be #2  Good job - did you paint them on the outside or from the backside - it's hard to tell in the photos, although I'd recommend everyone paint from the outside due to the manufacturing process. Also, I was very impressed yesterday with the view out the back of the car from the passenger side, but in the photo you posted it looks more like you're looking out from the driver's backseat (more straight-on) than from the driving position over your shoulder (where it is designed to be seen through). I have a good shot of the red one from this angle, but took it prior to the interior being back in but he put some tint on his to darken it (which messed up the clarity of the piece), so I didn't post it up - see below though...
As to the questions regarding the fit - the factory window was our target. It is all over the map as far as how it fits in the car, from sticking out on one corner, to flush, to in on one corner, out on another, etc... Thing is, because of the color of it and just normal human nature, you normally don't pay much attention to the "big picture" of it until you go to do something like this where you will carefully inspect how the piece replacing the glass fits - never looking that carefully at the glass that was there to begin with. If you measure 10 cars, you're going to get 10 sets of #'s WRT to fit, that's just the way they come off the line.
Also, there is no difference (worthy of mention) between the OE glass and our piece. The production louvers measure .130~.140" thick. The OE glass measures around the same depending on where you are measuring.(machine or others with the glass already out can confirm this measurement - it "feels" thicker due to weight only) The louvers are designed using the OE glass as the starting point, and only in the louver area do they differ from the factory glass, hence all sealing, fit, alignment, etc. would be to factory tolerances. (This is why we laser scanned the original glass) If you use the original bead (+ wire thickness) as your guide, it gets you in the ballpark for thickness of the seal, but it's hard to do that when there is so much inconsistency from the factory on this, even on a single window (which was the case on the red car pictured - back of the window was in, bottom front was out, seal barely hit the sheetmetal in one spot, etc...)
AF - making the louver thicker is not realistic for a great number of reasons, all of which have a bad effect on cost to you the customer at the end of it all and make getting an acceptable part that much harder. Plus, like I said, the car to car variations are all over the place - similar to the fit and finish of the front end sheet metal from car to car and why aftermarket hoods get a bad wrap even when they are "correctly" made from a factory plug.
So, all that said, the louvers can sit 100% flush if you want to build up the seal (and why we say in the directions a little extra is better than too little), but the preferred install, and the one that has happened here since day one, is a slight recess to match the original glass we're replacing. It also then leaves you a slight roll edge that is visible on the body, which actually looks pretty good, and right where the factory would have it. If you want to install 100% flush, I'd recommend coming a little further in with the seal to the opening, rather than being out near the outer edge of the part, and build it up some more with an additional amount of skin time before installing the louver. Alternatively, you could use a rope seal, but I'm not sure how well that would work compared to the urethane gun for this, as we have not tried it that way.
Does that help?
Good job - did you paint them on the outside or from the backside - it's hard to tell in the photos, although I'd recommend everyone paint from the outside due to the manufacturing process. Also, I was very impressed yesterday with the view out the back of the car from the passenger side, but in the photo you posted it looks more like you're looking out from the driver's backseat (more straight-on) than from the driving position over your shoulder (where it is designed to be seen through). I have a good shot of the red one from this angle, but took it prior to the interior being back in but he put some tint on his to darken it (which messed up the clarity of the piece), so I didn't post it up - see below though... As to the questions regarding the fit - the factory window was our target. It is all over the map as far as how it fits in the car, from sticking out on one corner, to flush, to in on one corner, out on another, etc... Thing is, because of the color of it and just normal human nature, you normally don't pay much attention to the "big picture" of it until you go to do something like this where you will carefully inspect how the piece replacing the glass fits - never looking that carefully at the glass that was there to begin with. If you measure 10 cars, you're going to get 10 sets of #'s WRT to fit, that's just the way they come off the line.
Also, there is no difference (worthy of mention) between the OE glass and our piece. The production louvers measure .130~.140" thick. The OE glass measures around the same depending on where you are measuring.(machine or others with the glass already out can confirm this measurement - it "feels" thicker due to weight only) The louvers are designed using the OE glass as the starting point, and only in the louver area do they differ from the factory glass, hence all sealing, fit, alignment, etc. would be to factory tolerances. (This is why we laser scanned the original glass) If you use the original bead (+ wire thickness) as your guide, it gets you in the ballpark for thickness of the seal, but it's hard to do that when there is so much inconsistency from the factory on this, even on a single window (which was the case on the red car pictured - back of the window was in, bottom front was out, seal barely hit the sheetmetal in one spot, etc...)
AF - making the louver thicker is not realistic for a great number of reasons, all of which have a bad effect on cost to you the customer at the end of it all and make getting an acceptable part that much harder. Plus, like I said, the car to car variations are all over the place - similar to the fit and finish of the front end sheet metal from car to car and why aftermarket hoods get a bad wrap even when they are "correctly" made from a factory plug.
So, all that said, the louvers can sit 100% flush if you want to build up the seal (and why we say in the directions a little extra is better than too little), but the preferred install, and the one that has happened here since day one, is a slight recess to match the original glass we're replacing. It also then leaves you a slight roll edge that is visible on the body, which actually looks pretty good, and right where the factory would have it. If you want to install 100% flush, I'd recommend coming a little further in with the seal to the opening, rather than being out near the outer edge of the part, and build it up some more with an additional amount of skin time before installing the louver. Alternatively, you could use a rope seal, but I'm not sure how well that would work compared to the urethane gun for this, as we have not tried it that way.
Does that help?
2/18/07, 09:12 AM
#838
Bullitt Member
Join Date: August 10, 2005
Posts: 248
Likes: 0
Received 0 Likes
on
0 Posts
I think it's only responsible to state that these will not sit flush under current installation guidelines.
After having reflected on it further, I think that the alignment pegs added further spacing. You see, I laid a thick bead, then pressed the louvers into place. I applied pressure, to ensure that I got a nice good seal. I think that flattened the adhesive further, and thats part of the reason why they dont sit flush.
I think the factory glass was lightly pressed on, and the pegs acted as a retainer between the glass and body, allowing the adhesive to dry with more thickness, thus making the window more flush - as well as keeping the window in place.
My suggestion, having really thought this one out: Buy replacement pegs/pins and attach them to your louvers during installation. This will allow you the freedom to keep your louvers as flush as possible, without worrying about them falling out during the period of curing.
FWIW, I didnt like the window being flush, anyway. I always thought that it blended too much into the body, and you could hardly see it against my black paint. After installation, I can say that I love my louvers EXACTLY the way they are, and I think this is the best mod I've ever done to my stang...Period.
2/18/07, 09:16 AM
#839
Dethroned Nascar Guru
Marcello,
Based on all the R&D you did, I knew there was a logical explanation. So because the original factory glass will fit differently on various Mustangs (due to factory inconsistency), these louvers will follow suit.
You probably already mentioned this issue in one of the previous 800 posts in this thread.
Thank you for the explanation.
It's a very nice product. Like I said, I was just curious.
2/18/07, 09:28 AM
#840
Bullitt Member
Join Date: August 10, 2005
Posts: 248
Likes: 0
Received 0 Likes
on
0 Posts
Marcello, I did not paint them on the outside...only on the inside. I like them the way they are, but once they show some wear and tear over time, I will most likely get them painted on the exterior, as well.
Congratulations on an excellent product. The quality of fit, finish, size weight, design etc. is all top-notch. My mustang thanks you...
Congratulations on an excellent product. The quality of fit, finish, size weight, design etc. is all top-notch. My mustang thanks you...