Ponies on The Run (Again)
 3/2/07, 12:51 PM
#6641
Legacy TMS Member
Join Date: May 24, 2006
Location: San Diego
Posts: 7,409
Likes: 0
Received 0 Likes
on
0 Posts
Tom-The new bar looks awesome. Glad to hear they're shipping you another one without defects.
Bill-I agree with Tom and Daryl on the placement of the stripes.
S/C preference-Twin screw either KB or Saleen. If one day I do amass enough money for one I'd probably ditch the shaker and get a new hood.
Did you guy's know there's a hidden mickey mouse in your car??
Bill-I agree with Tom and Daryl on the placement of the stripes.
S/C preference-Twin screw either KB or Saleen. If one day I do amass enough money for one I'd probably ditch the shaker and get a new hood.
Did you guy's know there's a hidden mickey mouse in your car??
 3/2/07, 12:59 PM
#6642
Bullitt Member
Join Date: October 13, 2004
Location: Kissimmee, FL
Posts: 302
Likes: 0
Received 0 Likes
on
0 Posts
They do get the job done and I suppose they're not turbos so...
The hot-rodder in me just cringes at them. They do integrate a little better, but look at that horrible intake path on the link that Bill lncluded. I know it makes power it just seems so restrictive.
But when you've got a couple grand to toss about we can worry about it then, much like when I have several grand to get my whipple
3/2/07, 01:06 PM
#6643

Daryl's DRL install is up in the Hotlinks now. 
3/2/07, 01:18 PM
#6644
Leo, you're having waaay too much fun with your new camera!
 3/2/07, 01:47 PM
#6645
Cobra R Member
Join Date: January 15, 2007
Location: Hampton Roads, VA
Posts: 1,581
Likes: 0
Received 0 Likes
on
0 Posts
This always seems to happen to me (remember the Shaker?). I don't think I'm being too picky, and neither does Steve at Aeroform. He wants to overnight me one so I'll have it for tomorrow's show. I told him that was awesome customer service, but to just send it regular Fed-Ex.
Sorry to hear about the bar itself. But, I'm glad to hear that Steve was understanding and even willing to ship it next day if needed.
Like I said, they have GREAT customer service. Yes, it's upsetting to see the two new orders from TMS had "issues," but I think customer service says more than the product sometimes.
3/2/07, 01:48 PM
#6646
Cobra R Member
Join Date: January 15, 2007
Location: Hampton Roads, VA
Posts: 1,581
Likes: 0
Received 0 Likes
on
0 Posts
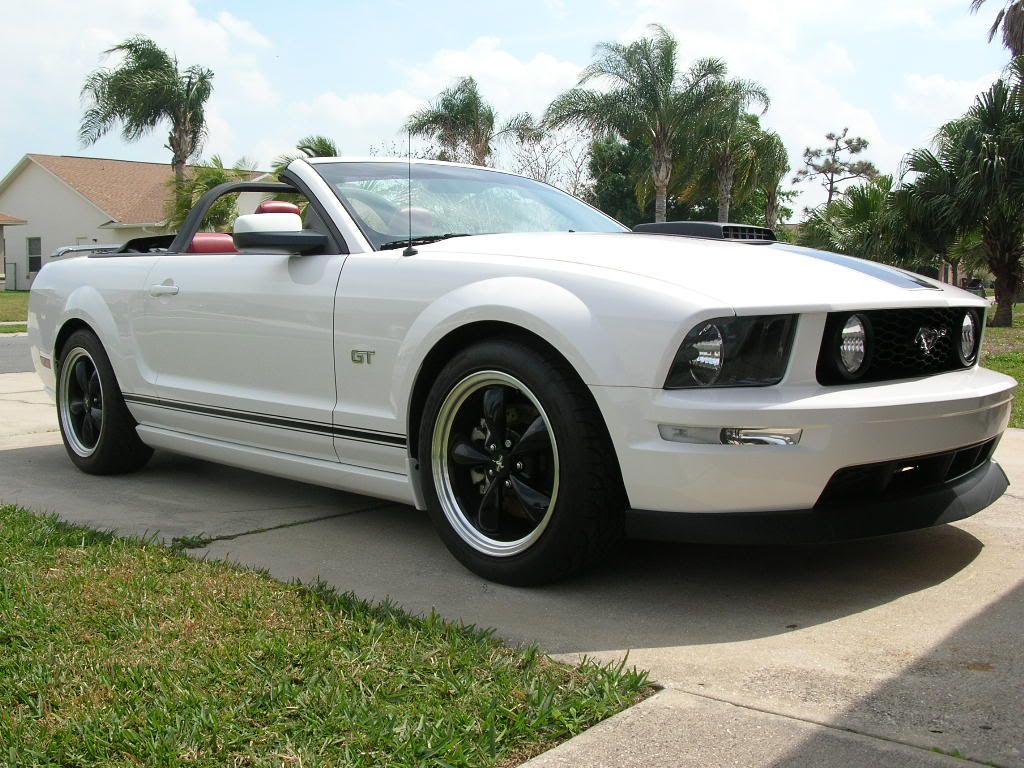
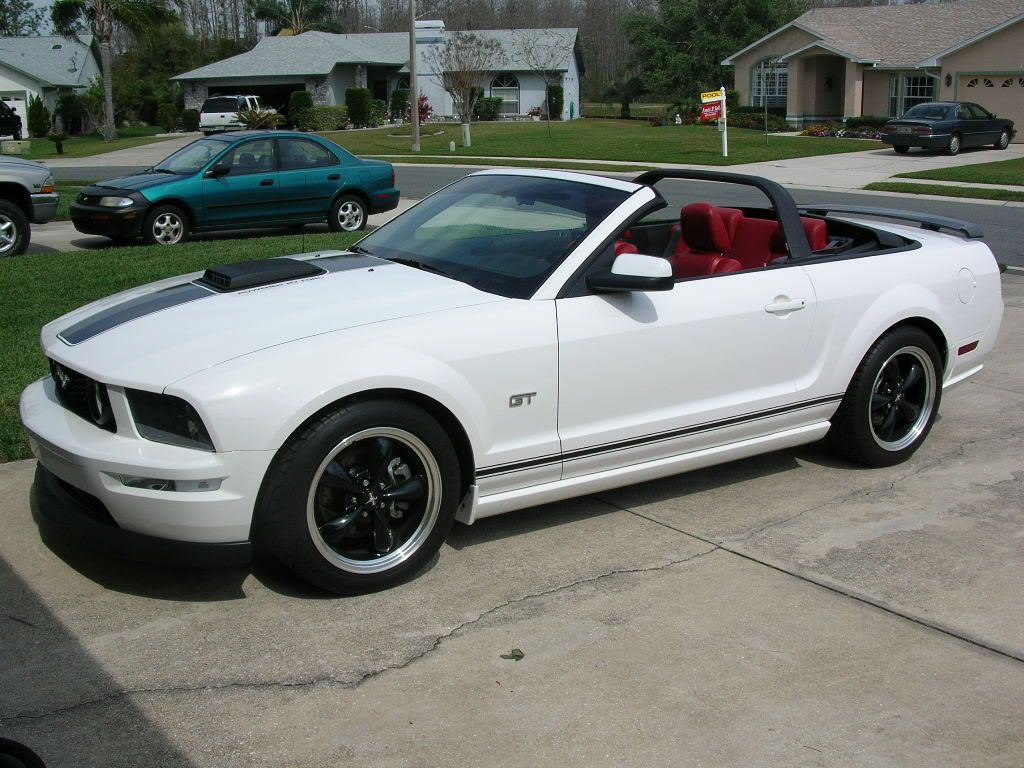
Great news: It was finally a nice enough day to be able to take the car out for a spin with the top down
It was a perfect convertible day: 70 degrees, mostly sunny, a nice cool breeze. Those days don't happen too often, so I had to capitalize on it.
It was a perfect convertible day: 70 degrees, mostly sunny, a nice cool breeze. Those days don't happen too often, so I had to capitalize on it.
3/2/07, 02:55 PM
#6647
GTR Member
Join Date: January 26, 2006
Location: Central Florida
Posts: 4,639
Likes: 0
Received 0 Likes
on
0 Posts
3/2/07, 02:58 PM
#6648
GTR Member
Join Date: January 26, 2006
Location: Central Florida
Posts: 4,639
Likes: 0
Received 0 Likes
on
0 Posts
3/2/07, 03:09 PM
#6649
 3/2/07, 03:20 PM
#6650
Shelby GT350 Member
Thread Starter
Join Date: January 17, 2006
Location: Tornado Alley
Posts: 2,061
Likes: 0
Received 0 Likes
on
0 Posts
 and he would be a SoFla Wuss anyway
3/2/07, 03:23 PM
and he would be a SoFla Wuss anyway
3/2/07, 03:23 PM
#6651
GTR Member
Join Date: January 26, 2006
Location: Central Florida
Posts: 4,639
Likes: 0
Received 0 Likes
on
0 Posts
65 degrees isn't cold... I drove to work in 50 degree weather with the top down - just turned on the heat!
After all my work today cleaning the cars, I really don't want them getting all that road grime on them.
3/2/07, 03:24 PM
#6652
btw- 65° is cold!
edit: I told you he would use the heater!
3/2/07, 03:28 PM
#6653
GTR Member
Join Date: January 26, 2006
Location: Central Florida
Posts: 4,639
Likes: 0
Received 0 Likes
on
0 Posts
3/2/07, 04:31 PM
#6654
Cobra R Member
Join Date: January 15, 2007
Location: Hampton Roads, VA
Posts: 1,581
Likes: 0
Received 0 Likes
on
0 Posts
I've never heard of Z-16. What I use is a regular dash protectant (ie-meguairs quick detail, black magic, whatever). But, I would NOT recommend a "cream"-like cleaner, such as the Meguiars in the red bottle, because it gets "stuck" in the texture of the bar [and please, no jokes.....]
3/2/07, 05:00 PM
#6656
GTR Member
Join Date: January 26, 2006
Location: Central Florida
Posts: 4,639
Likes: 0
Received 0 Likes
on
0 Posts
I've never heard of Z-16. What I use is a regular dash protectant (ie-meguairs quick detail, black magic, whatever). But, I would NOT recommend a "cream"-like cleaner, such as the Meguiars in the red bottle, because it gets "stuck" in the texture of the bar [and please, no jokes.....]
But everything I put on the bar seems to make it spotty. When I wipe it on, the towel sticks to the bar. I looked at it closely and there are holes in it that the towel fiber sticks to. I think I just got a very inferior bar. I'm sure the next one will be a lot better - he's going to hand pick it.
3/2/07, 08:19 PM
#6657
GTR Member
Join Date: January 26, 2006
Location: Central Florida
Posts: 4,639
Likes: 0
Received 0 Likes
on
0 Posts
Aeroform Sport Bar Write-Up
If it gets the TacoBill stamp of approval, use this link, Bill:
http://forums.bradbarnett.net/showthread.php?t=61451
The instructions were very thorough, but here are some additional pictures and info:
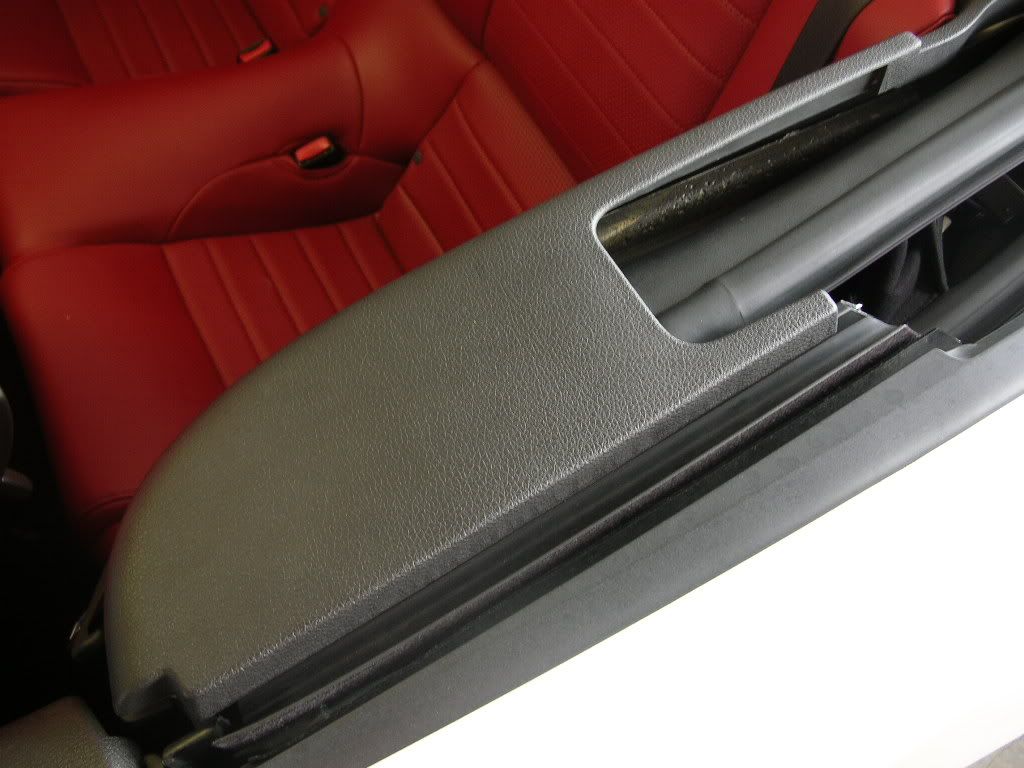
 The first step is to pop off this side trim panel. Reach into the hole where the seat belt comes out and lift up. Several clips hold the panel in place, but it pops up easily.
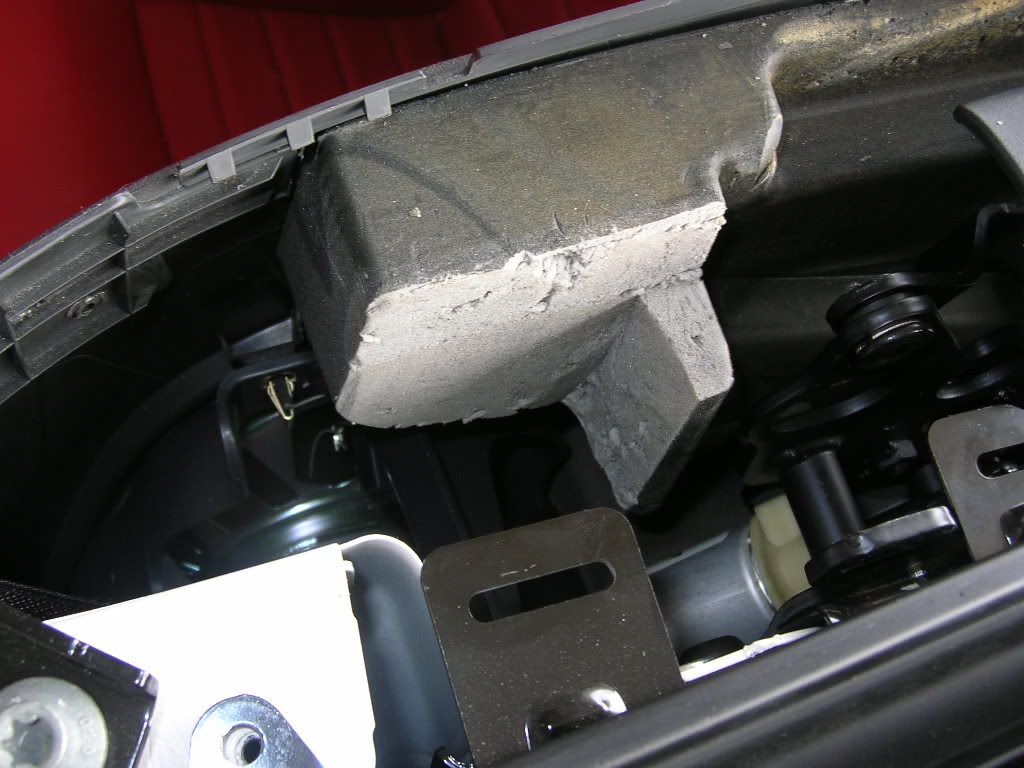
 This is what's underneath. The circle shape in the stabilizing foam is where I layed the bracket in place to get an idea of how much foam had to be cut away in an upcoming step.
 These two bolts have to be removed next using a 10mm socket. DO NOT drop the bolts or the socket down into the openings or they could be lost forever. I checked the approximate torque of the bolts before removing them and it was 100 lb-in. Remove the window trim rail.

 Next, about 2" of the stabalizing foam needs to be cut away to allow clearance for the mounting bracket. I used the blade shown and just did it by hand. I sliced off what you see in the second pic. Use caution not to damage the speaker or wiring below the bracket.

 The Sport Bar mounting bracket goes in with the window trim rail using the same bolts. Follow the supplied instructions to see exactly how the mounting bracket and the window trim rail fit together. Start the bolts by hand and start the bolt toward the rear of the car first. After both bolts are started by hand, tighten them both and then torque to 100 lb-in. The instructions don't give a torque, but I like to make sure everything is even. 100 lb-in is a hair tighter than they were from the factory, but it isn't too tight to even come close to stripping the bolts.
 This supplied template shows exactly where to mark the center of the hole that needs to be cut into the panel removed in step #1. I used an awl to make the mark. I then drilled the hole out with a small drill bit.
 I noticed that this roll of electrical tape had the same inside diameter of the hole that needed to be cut into the panel: 1 1/4". I layed the roll of tape on the panel, putting the small hole in the center and marked the bigger hole with a Sharpie.
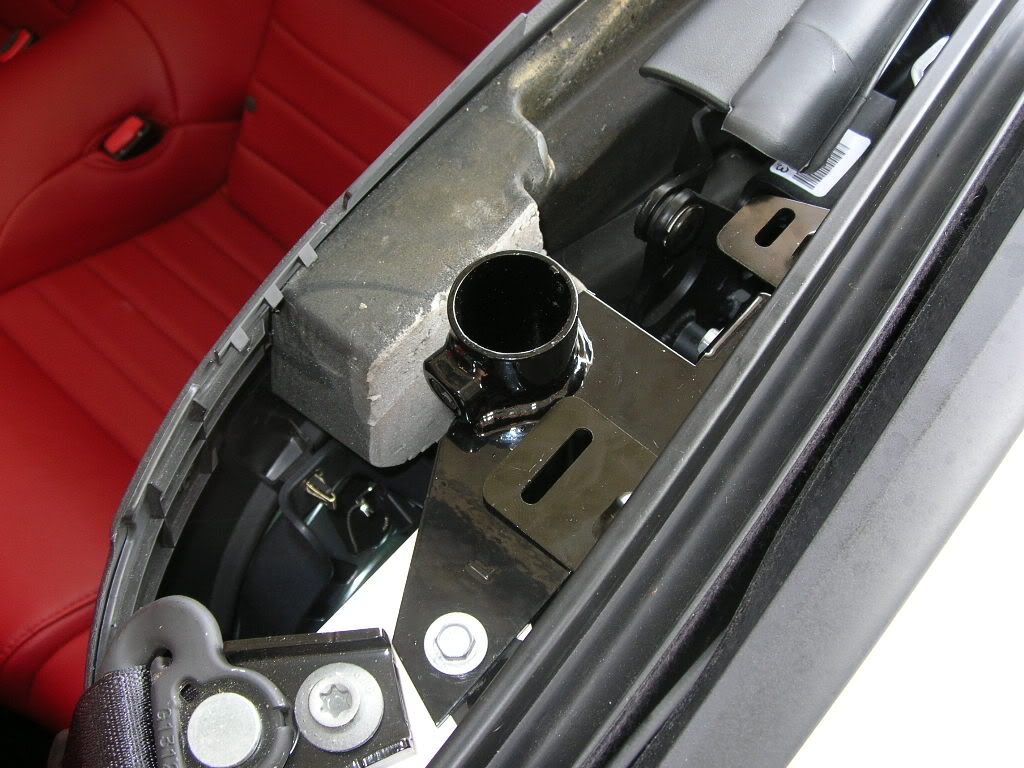
 The instructions say to use a hole saw, but since I didn't have a 1 1/4" hole saw, I just used a dremel to enlarge the hole to the proper size. Here is the panel snapped back into place with the hole the perfect size for the bar to go through into the receiver. Not too shabby, if I do say so myself!
  The hole only needs to be the size of the inside diameter of the tube on the mounting bracket.
Now just repeat everything for the other side of the car.
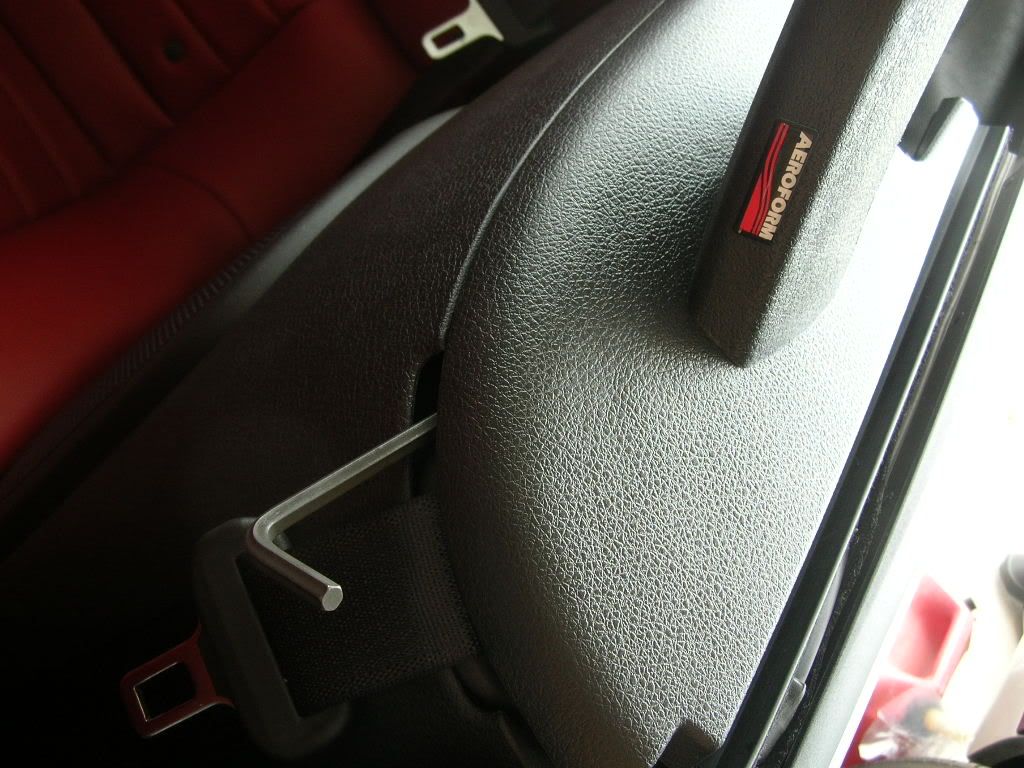
 Finally, you can lay the bar into place. I did it myself, but it may be easier with a helper. The suppled allen wrench fits through the seat belt opening to tighten the set screw that securely holds the Sport Bar into place. Push down on the bar slightly to get the best possible look at the area where it meets the trim panel. Don't push down too much or it could distort the edge of the foam facing outward. There's not much leverage, but you can use an adjustable wrench to turn the allen wrench and really get a good bite on the bar with the set screw.
 The finished product! Looks awesome and it's very easy to install.


http://forums.bradbarnett.net/showthread.php?t=61451
The instructions were very thorough, but here are some additional pictures and info:
 The first step is to pop off this side trim panel. Reach into the hole where the seat belt comes out and lift up. Several clips hold the panel in place, but it pops up easily.
 This is what's underneath. The circle shape in the stabilizing foam is where I layed the bracket in place to get an idea of how much foam had to be cut away in an upcoming step.
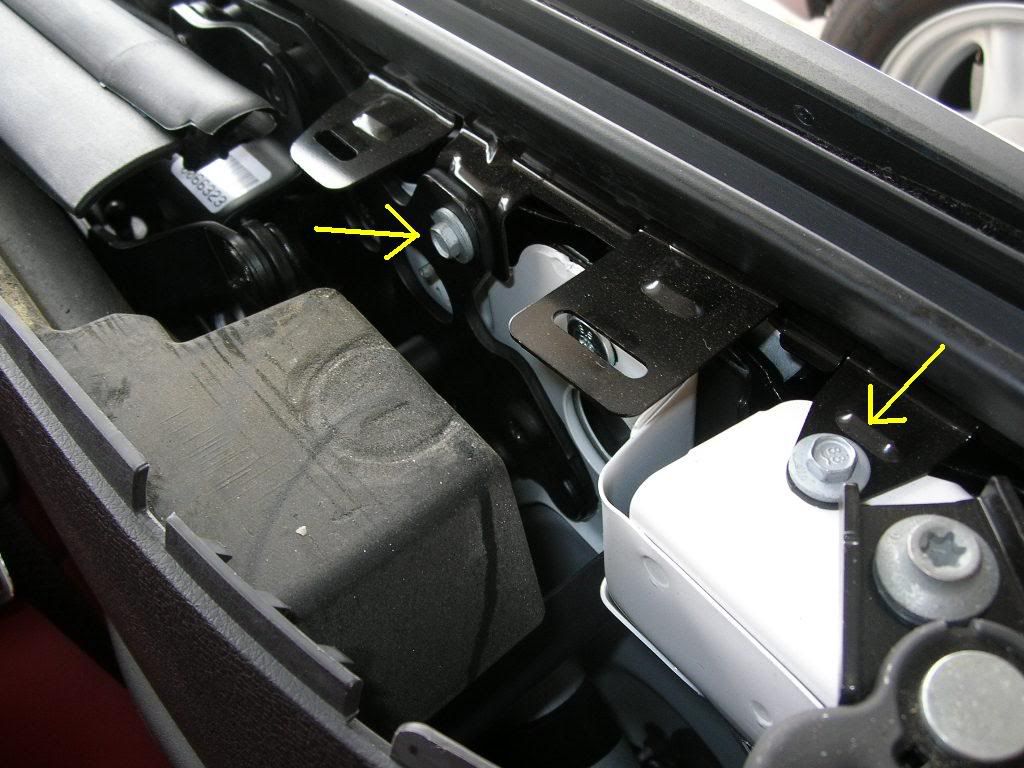 These two bolts have to be removed next using a 10mm socket. DO NOT drop the bolts or the socket down into the openings or they could be lost forever. I checked the approximate torque of the bolts before removing them and it was 100 lb-in. Remove the window trim rail.
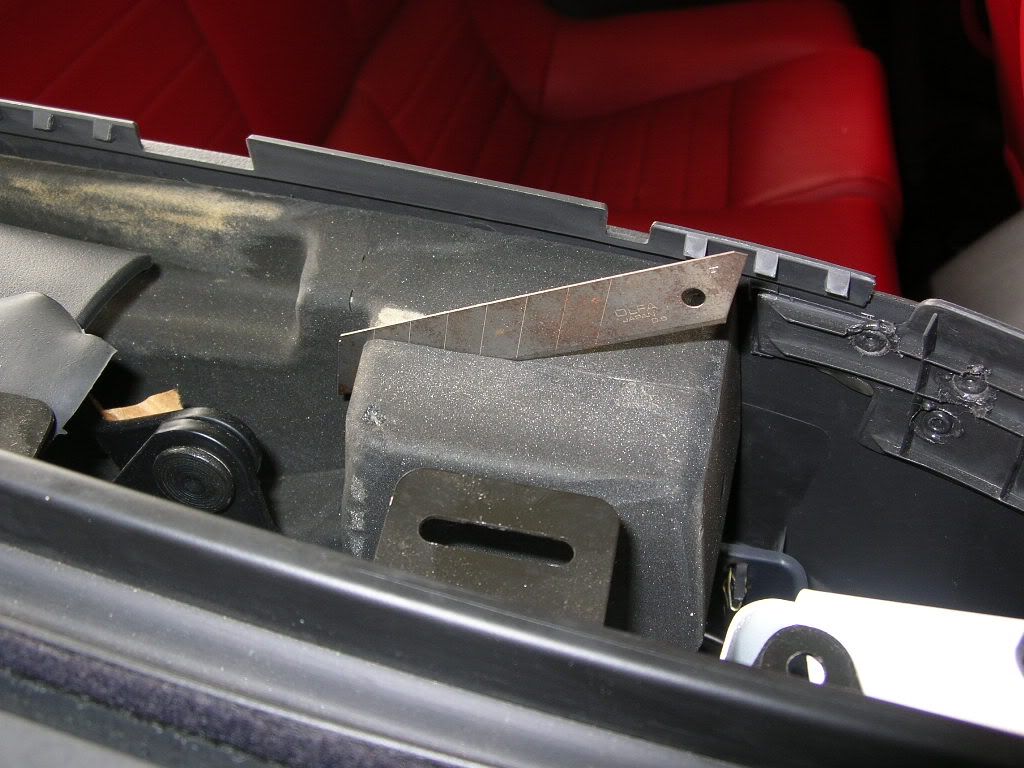
 Next, about 2" of the stabalizing foam needs to be cut away to allow clearance for the mounting bracket. I used the blade shown and just did it by hand. I sliced off what you see in the second pic. Use caution not to damage the speaker or wiring below the bracket.
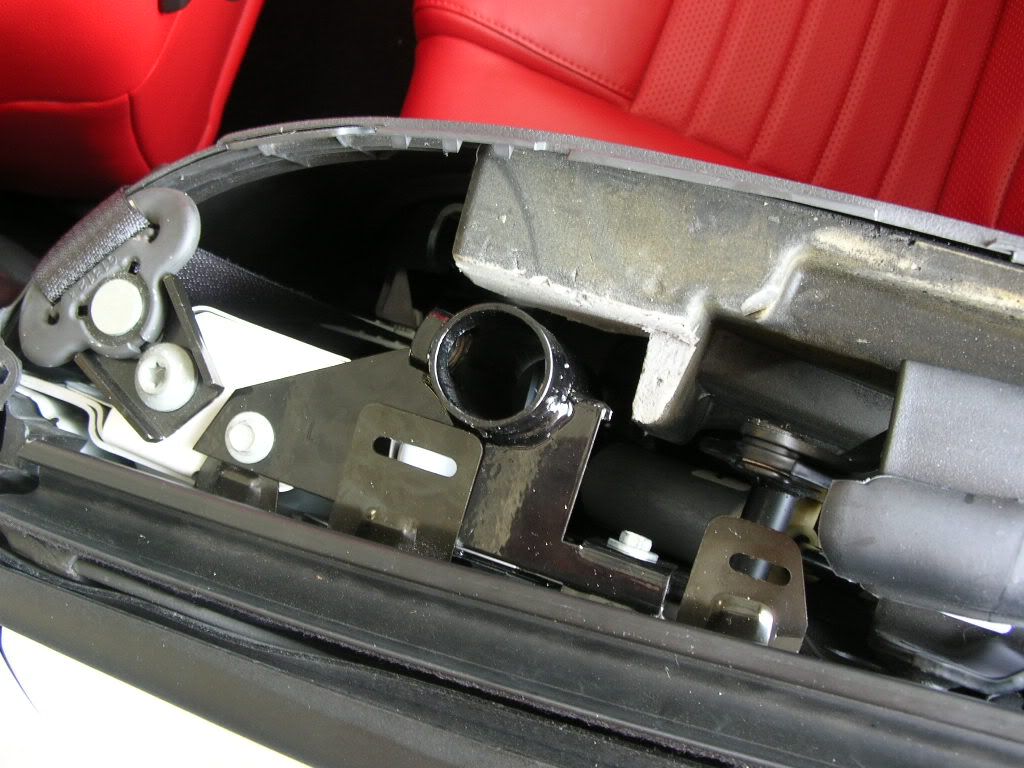
 The Sport Bar mounting bracket goes in with the window trim rail using the same bolts. Follow the supplied instructions to see exactly how the mounting bracket and the window trim rail fit together. Start the bolts by hand and start the bolt toward the rear of the car first. After both bolts are started by hand, tighten them both and then torque to 100 lb-in. The instructions don't give a torque, but I like to make sure everything is even. 100 lb-in is a hair tighter than they were from the factory, but it isn't too tight to even come close to stripping the bolts.
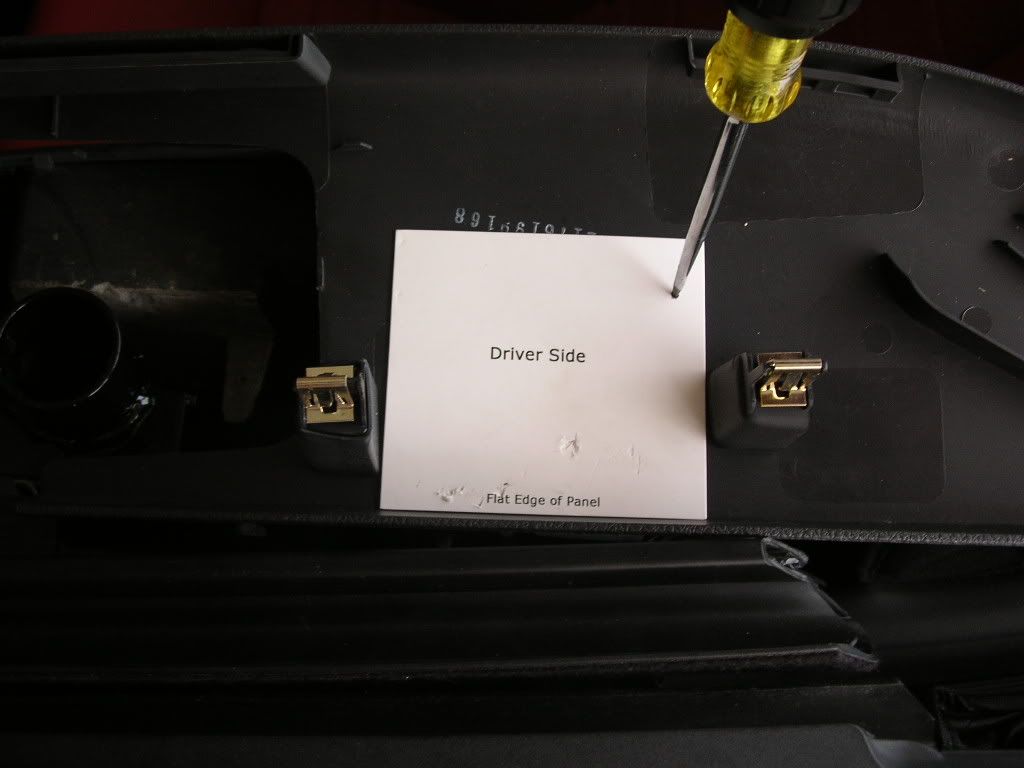 This supplied template shows exactly where to mark the center of the hole that needs to be cut into the panel removed in step #1. I used an awl to make the mark. I then drilled the hole out with a small drill bit.
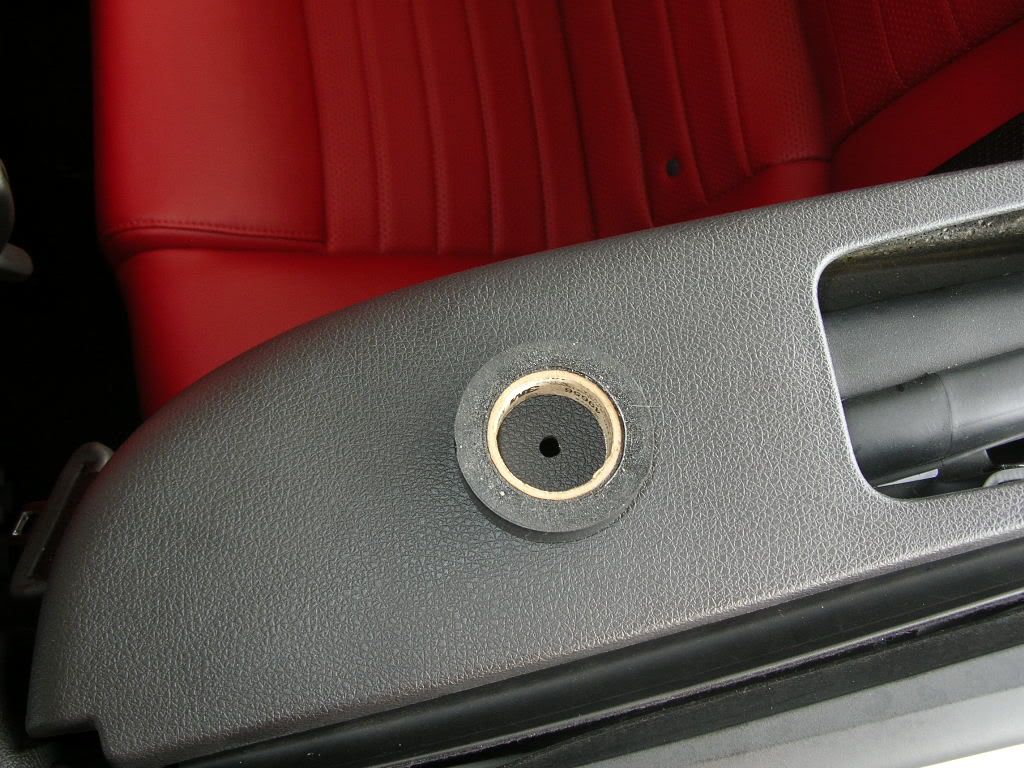 I noticed that this roll of electrical tape had the same inside diameter of the hole that needed to be cut into the panel: 1 1/4". I layed the roll of tape on the panel, putting the small hole in the center and marked the bigger hole with a Sharpie.
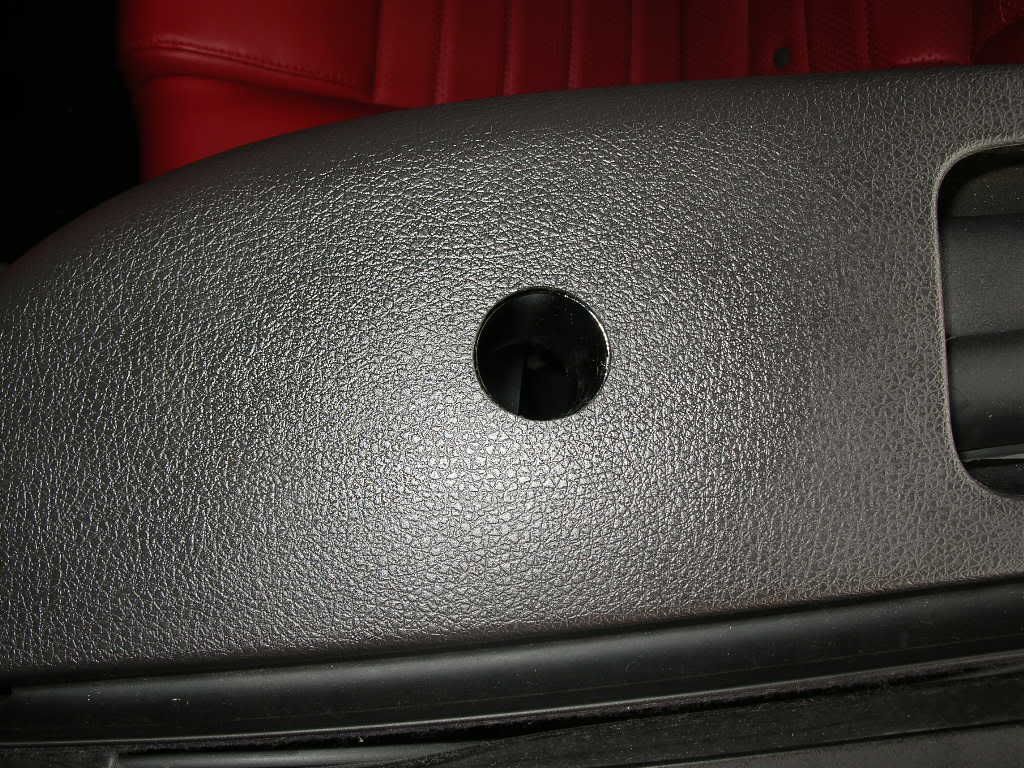 The instructions say to use a hole saw, but since I didn't have a 1 1/4" hole saw, I just used a dremel to enlarge the hole to the proper size. Here is the panel snapped back into place with the hole the perfect size for the bar to go through into the receiver. Not too shabby, if I do say so myself!
 Now just repeat everything for the other side of the car.
 Finally, you can lay the bar into place. I did it myself, but it may be easier with a helper. The suppled allen wrench fits through the seat belt opening to tighten the set screw that securely holds the Sport Bar into place. Push down on the bar slightly to get the best possible look at the area where it meets the trim panel. Don't push down too much or it could distort the edge of the foam facing outward. There's not much leverage, but you can use an adjustable wrench to turn the allen wrench and really get a good bite on the bar with the set screw.
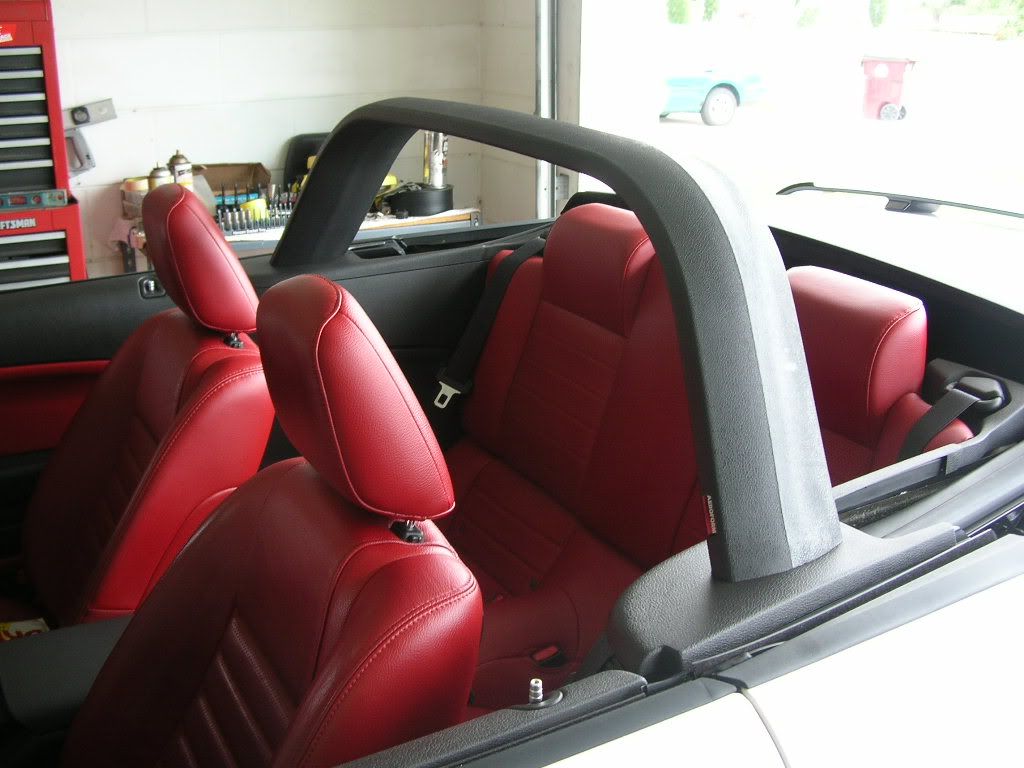 The finished product! Looks awesome and it's very easy to install.
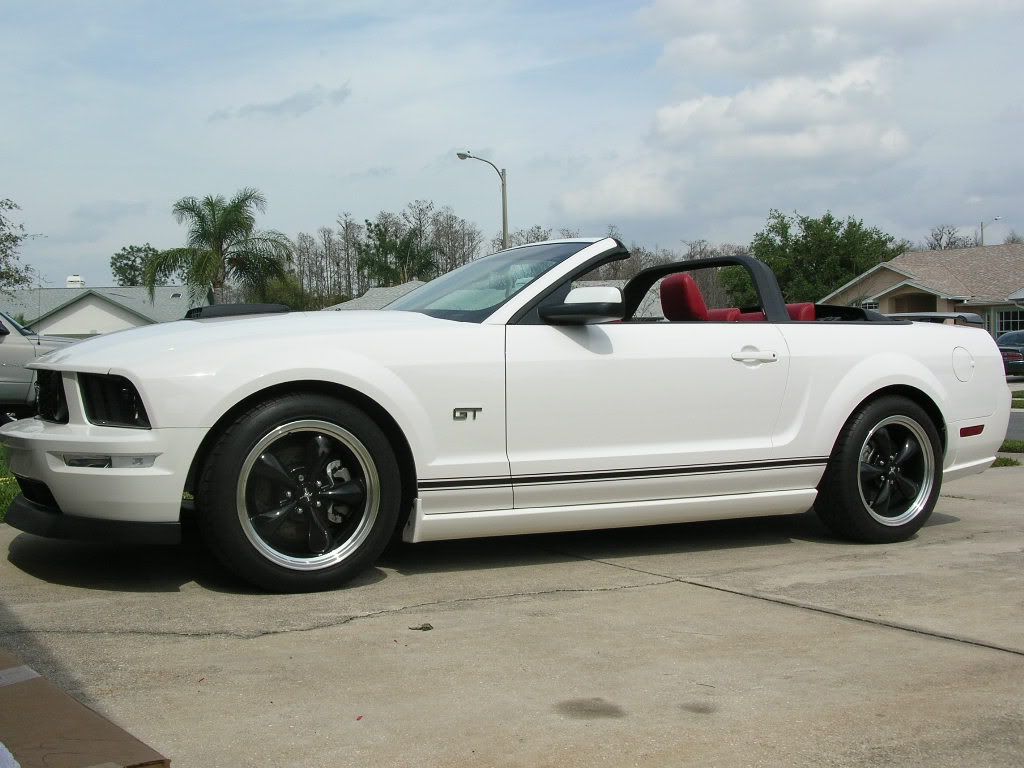
 3/2/07, 10:11 PM
#6659
Legacy TMS Member
Join Date: May 24, 2006
Location: San Diego
Posts: 7,409
Likes: 0
Received 0 Likes
on
0 Posts
3/2/07, 10:23 PM
#6660
Hey Mike, there's a few Zaino followers here (me included ), it's some pretty good stuff... but expensive.
303 is good stuff too.
I'll check it out, I'm sure it'll get the Seal of Approval.
303 is good stuff too.
If it gets the TacoBill stamp of approval, use this link, Bill:
http://forums.bradbarnett.net/showthread.php?t=61451
http://forums.bradbarnett.net/showthread.php?t=61451