When you click on links to various merchants on this site and make a purchase, this can result in this site earning a commission. Affiliate programs and affiliations include, but are not limited to, the eBay Partner Network.
Also started staging parts for my N/A build...goes into the shop on Monday!!!
Just need to keep the Mrs. from seeing this pic of mustang parts on the coffee table...
On the 05-09 cars it's under the car, driver-side, pretty much under the driver.
But the Coyote doesn't have a replaceable filter, it's part of the fuel pump
Ohh I didn't know he had an 09 or before. I thought he had an 11/12. So does that mean I don't have to worry about changing it till pump failure? Even then, is it easy to change it?
Ohh I didn't know he had an 09 or before. I thought he had an 11/12. So does that mean I don't have to worry about changing it till pump failure? Even then, is it easy to change it?
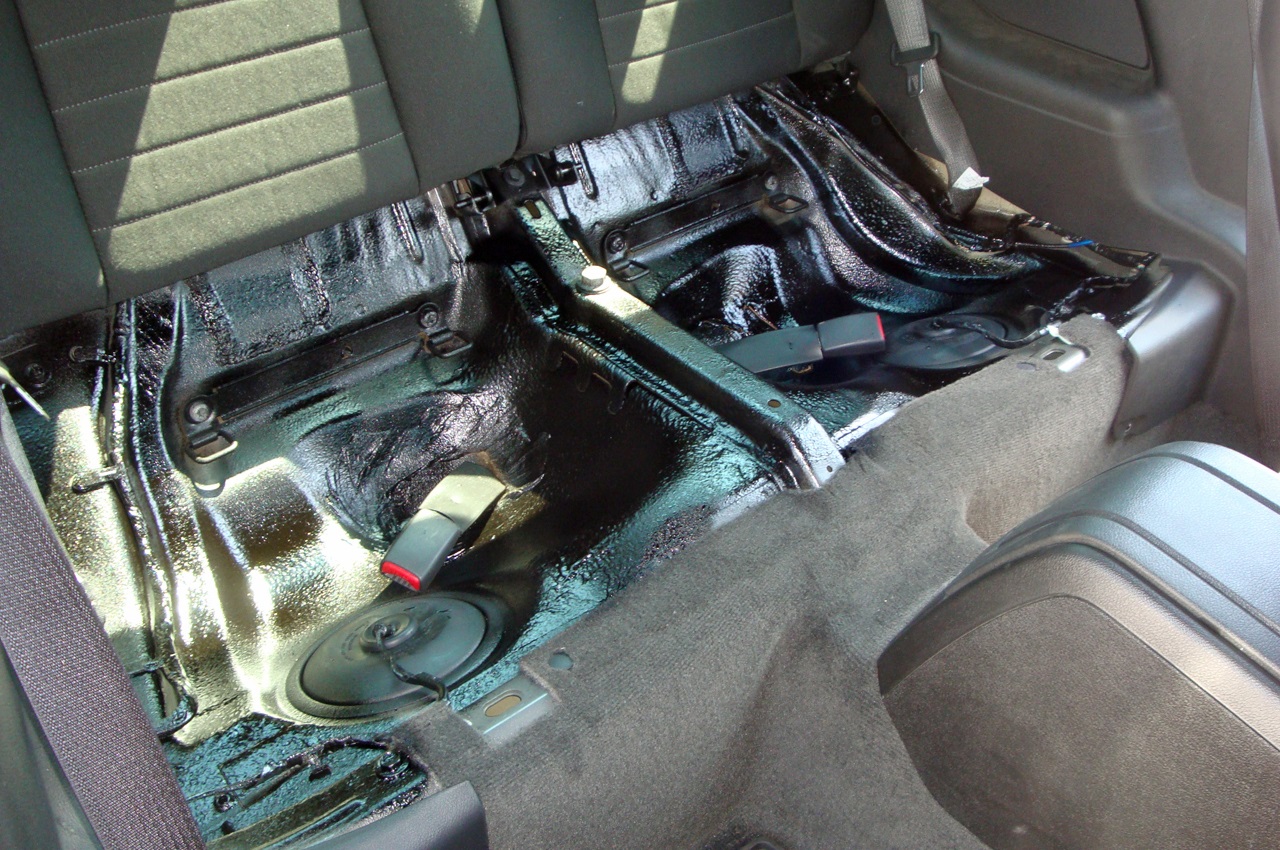
Yeah there are access holes under the rear seat bottom.
You pop out the rear seat bottom and there are 2 holes, one on the driver side for the fuel pump and one on the passenger side for the helper pump which pumps from the passenger side of the tank to the driver side.
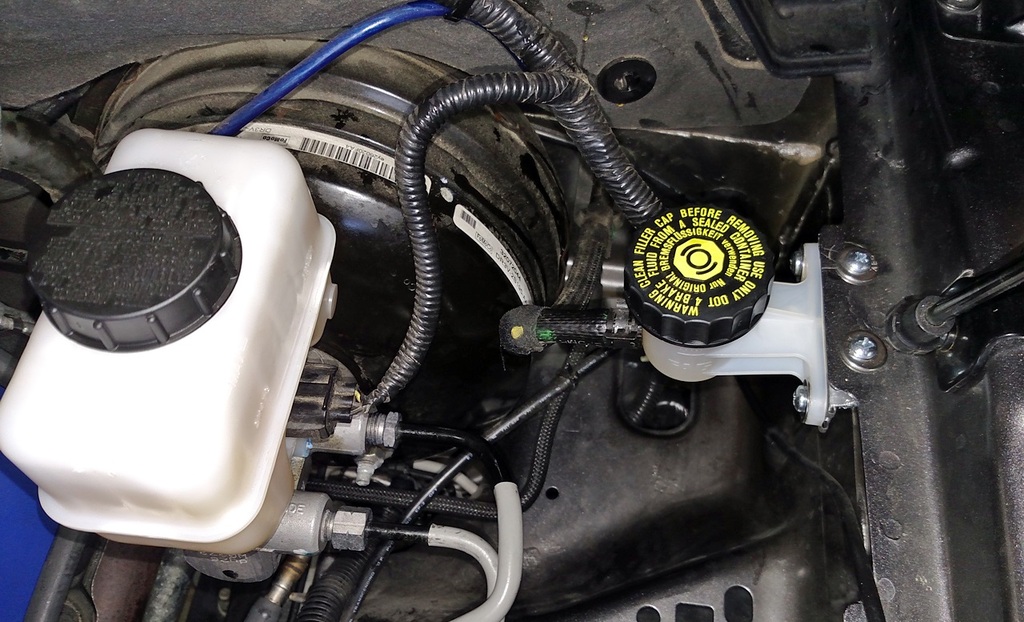
Installed the brake fluid reservoir from the auto cars, the GTO clutch fluid reservoir, and topped off the fluids with Amsoil DOT4 brake fluid.
Brake and clutch fluids are now "divorced", no longer heating each other up.
McLeod clutch line to be installed within the next few days.
The new set-up:
Installed the brake fluid reservoir from the auto cars, the GTO clutch fluid reservoir, and topped off the fluids with Amsoil DOT4 brake fluid.
Brake and clutch fluids are now "divorced", no longer heating each other up.
McLeod clutch line to be installed within the next few days.
The new set-up:
Do you have a write up that you followed on the clutch fluid reservoir install? That looks pretty neat and makes so much sense to do, even on a stock car.
Got defeated in round 1 and 2 of the steering wheel removal...UUUUG!!! needing a bit of help with this thing but it is stuck on there like gorilla glue was put in it originally
Ohh I didn't know he had an 09 or before. I thought he had an 11/12. So does that mean I don't have to worry about changing it till pump failure? Even then, is it easy to change it?
Do you have a write up that you followed on the clutch fluid reservoir install? That looks pretty neat and makes so much sense to do, even on a stock car.
There's a couple of threads on svtp but none are true "write-ups"
The swap is pretty simple, you remove the clutch fluid hose from the back of the stock brake fluid reservoir and install it onto the new clutch fluid small reservoir, then find a place for the reservoir.
I happened to see a pic on facebook where a guy made up his own bracket that allowed the mounting of the reservoir to the holes normally used for the sound tube bracket, so I copied that idea and made up my own bracket for that spot.
The hardest part of the job is swapping out the brake fluid reservoirs, and this is actually an optional item, since most guys just use some EPDM caps to cap off the nipple on the reservoir.
The automatic-cars' reservoir I used doesn't have the nipple, so it's a cleaner look, so I decided to go that route.
Ordered the reservoir from Autonation Ford (formerly Tousley) for about $43 + shipping. Part # 9R3Z-2K478-B LINK
Ordered the GM (GTO-specific) clutch fluid reservoir off a link on eBay for about $16.60 shipped. Part # 92065790 LINK
Already had some Amsoil DOT4 brake fluid that I ordered for this project months ago.
When you remove the clutch fluid line from the stock brake fluid reservoir, leave the reservoir cap fully tightened, since the vacuum with the cap on keeps the leakage from the clutch fluid nipple to a minimum. Once you remove the cap, fluid pours out.
Removing the stock brake fluid reservoir was a bit tricky, especially since it's the first time I did one.
I used a cheap Harbor Freight fluid transfer pump to suck out as much brake fluid out of the reservoir as possible.
Some fluid stayed in, so I put a bunch of rags under the reservoir, removed the stud that goes through/under the reservoir, and pried it up out of the master cylinder and out of the 2 o-rings that seal it in.
It popped out, me prying up front and rear under it, the o-rings stayed in their holes, then I removed them since the new reservoir came with 2 new ones.
I had to install the new o-rings in the master cylinder holes first, and then push down the new reservoir.
Trying to push down the reservoir with the o-rings pre-installed on it, the o-rings were getting deformed and not popping into their holes in the master cylinder.
So I got the reservoir in, re-installed the stud/bolt under it, re-connected the sensor wiring, and topped off the fluid.
Done.
I put about 150 miles on the car today after the work above, and no issues.
Awesome thanks, that helps a lot. I'm going to do the trans/brake fluid swaps soon, with the braided lines all around, and saw your post. Figured it would be the perfect time to do it!
Awesome thanks, that helps a lot. I'm going to do the trans/brake fluid swaps soon, with the braided lines all around, and saw your post. Figured it would be the perfect time to do it!
Yup, definitely!
I'm gonna make a separate thread with more pics, hope it will help whoever wants to do it.
Yeah there are access holes under the rear seat bottom.
You pop out the rear seat bottom and there are 2 holes, one on the driver side for the fuel pump and one on the passenger side for the helper pump which pumps from the passenger side of the tank to the driver side.
Thanks Gabe... do I have to worry about changing mine anytime soon? 4 years old, 13k miles
Originally Posted by Gabe
Installed the brake fluid reservoir from the auto cars, the GTO clutch fluid reservoir, and topped off the fluids with Amsoil DOT4 brake fluid.
Brake and clutch fluids are now "divorced", no longer heating each other up.
McLeod clutch line to be installed within the next few days.
The new set-up:
Same question here... sortta. Do I need to worry about replacing the fluids? I was thinking 5 years.