Boss 302 Side Exhaust Install/Discussion
 6/30/12, 05:32 PM
#221
Originally Posted by 06GT
Downshifting to every stoplight now...

I did turn the hardware around on the clamps so it was easier to access on the underside of the car.

 6/30/12, 06:20 PM
#223
 7/1/12, 08:41 PM
#224
Well, here's my suggestions/how-to for those of you doing the install:
1 - 13 & 15mm 1/2" drive sockets and ratchet wrenches are your friends. Get them ready. A second set of hands is a big help.
2 - before you tear the stock exhaust off, remove the splash guards from each side ((3) x 13mm, (2) nuts, (1) bolt).
3 - Disconnect your over axle pipes from the axle backs. This way, once the new H-pipe is in place, you can realign everything. Once the new H-pipe is in, have someone else push the over axle pipes in and tighten down the sleeves. Last, connect the axle back portions and line everything up.
4 - The side pipes are all 15mm. After I got the H-pipe attached to the upstream side, I mocked these up and started all the fasteners on them. Once I got them all aligned, I tightened it all up.
5 - The clamps that attach at the front of the H-pipe need tweaking to make your life easier. Take the bolts out and flip them so the bolt heads are facing the ground, not the body. You'll have a much easier time tightening the whole thing down.
Anyone have the Roush side splitters and this exhaust and run into problems? When I was at the local cruise last night, I noticed a lot of heat pouring up the side of the car. I still can't get over how good it sounds. I should have ordered this right after it came out. The combo with the S-Types out back is just great.
7/4/12, 06:58 PM
#227
I Have No Life
She 'spensive man!
Not to sound cheap, but I'm waiting on the other thread to find out how Sean did with the existing exhaust.
If the side pipes and hardware can save me spending 2-300, might be worth it.
Then again, who knows how much a shop is going to charge for putting it in and modifying the existing FRPP XPipe.
Not to sound cheap, but I'm waiting on the other thread to find out how Sean did with the existing exhaust.
If the side pipes and hardware can save me spending 2-300, might be worth it.
Then again, who knows how much a shop is going to charge for putting it in and modifying the existing FRPP XPipe.
Last edited by Boomer; 7/4/12 at 09:22 PM.
7/4/12, 07:32 PM
#228
Originally Posted by Boomer
She 'spensive man!
Not to sound cheap, but I'm waiting on the other thread to find out how Sean did with the existing exhaust.
If the side pipes and hardware can save me spending 2-300, might be worth it.
Then again, who knows how much a shop is going to charge for putting it in and modifying the existing FRPP XPipe.
Not to sound cheap, but I'm waiting on the other thread to find out how Sean did with the existing exhaust.
If the side pipes and hardware can save me spending 2-300, might be worth it.
Then again, who knows how much a shop is going to charge for putting it in and modifying the existing FRPP XPipe.
Last edited by Boomer; 7/4/12 at 09:22 PM.
7/4/12, 08:23 PM
#229
I Have No Life
Last edited by Boomer; 7/4/12 at 08:36 PM.
7/5/12, 05:35 AM
#230
The 11+ kit is $699, and the 05-10 kit is $649. For what he's paying to get the side pipes, it seems to make more sense to buy the whole kit and sell your current setup. I priced out the components before it was available and its close to what they sell it for through some retailers.
7/5/12, 05:58 AM
#231
Mach 1 Member

Join Date: July 13, 2007
Location: LaSalle, Ontario
Posts: 687
Likes: 0
Received 11 Likes
on
7 Posts
For us 3V peeps that are not running stock headers, paying $649 for the kit is just dumb. I am not about to buy the kit and then have a useless X-pipe in my possession, that I now have to try and sell. Just doesn't make sense. I paid $492 for the Ford parts and another $60 for a stainless steel J-pipe (for the connectors) and I have exactly what I need to get the job done. The 3V kit is not a bolt up like it is for you Coyote people. There still is alot of work needed to get it installed. I have yet to see a FRPP installation document that describes how to install the kit, since the side pipes don't have anywhere to mount on a 05-09.
The 11+ kit is $699, and the 05-10 kit is $649. For what he's paying to get the side pipes, it seems to make more sense to buy the whole kit and sell your current setup. I priced out the components before it was available and its close to what they sell it for through some retailers.
7/5/12, 06:39 AM
#233
Mach 1 Member
Join Date: July 13, 2007
Location: LaSalle, Ontario
Posts: 687
Likes: 0
Received 11 Likes
on
7 Posts
Me too. I wish FRPP would release the document so that I could see how they bolt it up. On mine, I am going to have to mimic the 11-13 setup and get a hole drilled into the frame and have a nut welded in, so that the factory bolt can secure the pipes to the frame. I do not see any other way of it working.
7/5/12, 10:08 AM
#236
Legacy TMS Member
That X-pipe is was caused me to say "bummer". I'd rather have the side pipes adapted to the stock H configuration.
7/7/12, 10:23 AM
#237
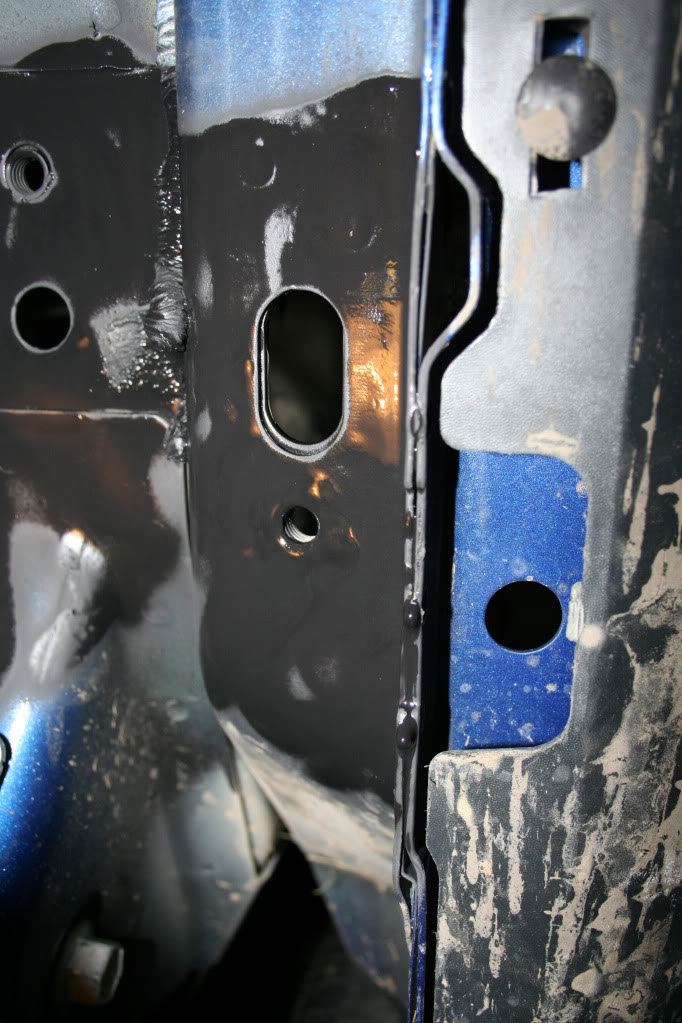
The issue at hand is the attachment point on the chassis that allows fastening the end of each sidepipe is not in place in certain model years. Curious as to when Ford started to include the necessary chassis point I was basically told the following from someone in a position to correctly answer my question...
Revised convertible v-braces went in in late 2010. That's when the weld nut was added.
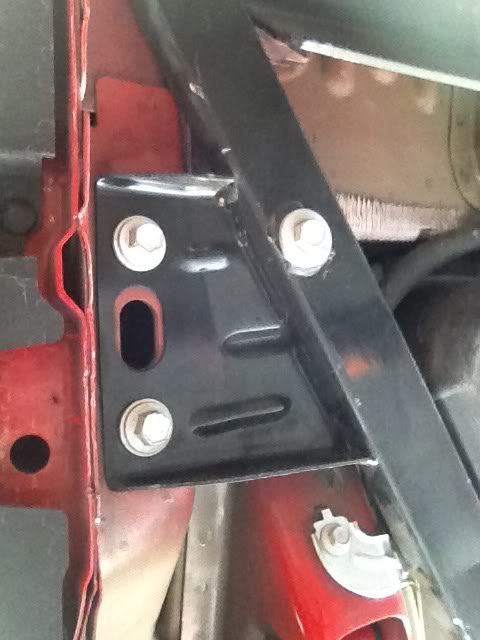
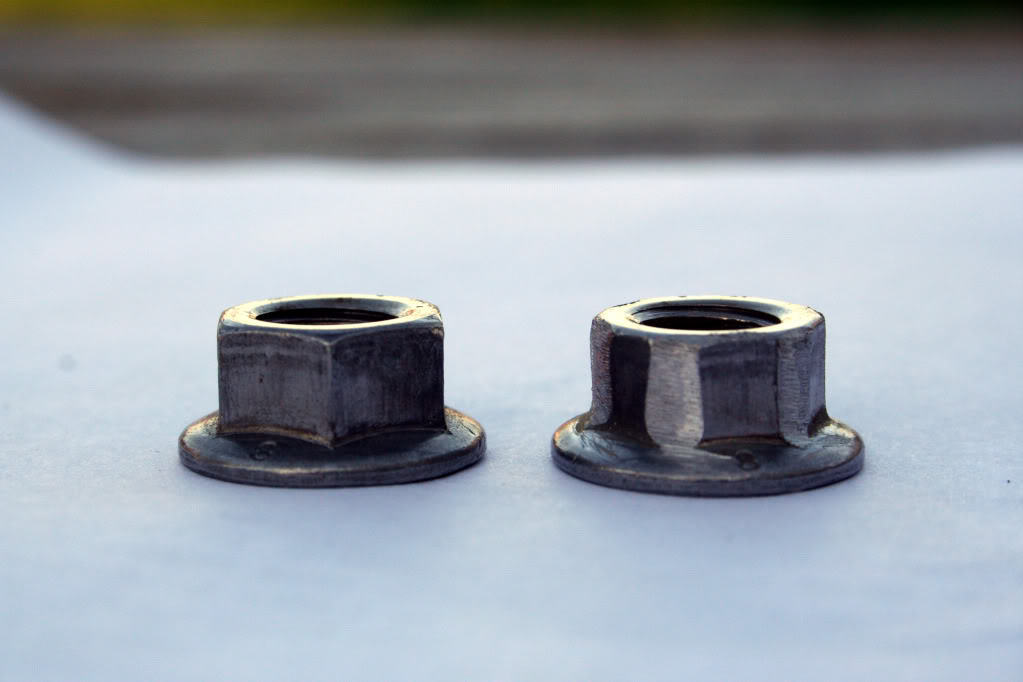
There were actually two welded nuts added on the rocker and you can see them in the following photo both atop and below the oblong or oval hole that are used to sandwich the plate that Ford welds to the square tube bracing.
____________2011GT500ragtopbracewhereBossquadneedstobe-1.jpg?t=1336836331
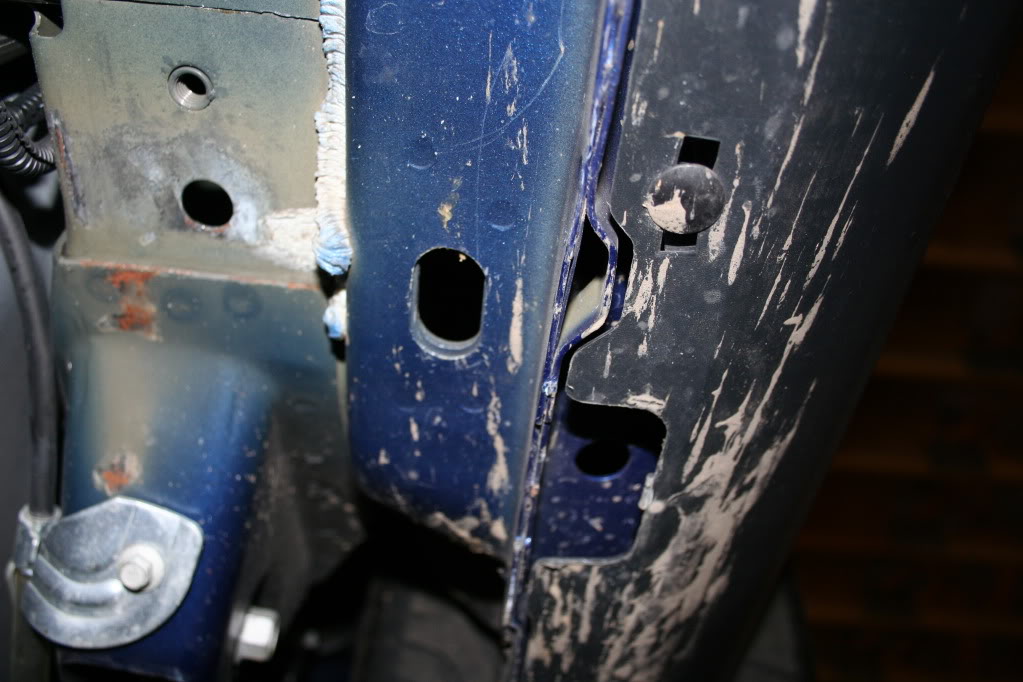
If you look at the following photo of my '09 chassis you'll see that neither of those two holes exist.
IMG_8878.jpg?t=1317942572
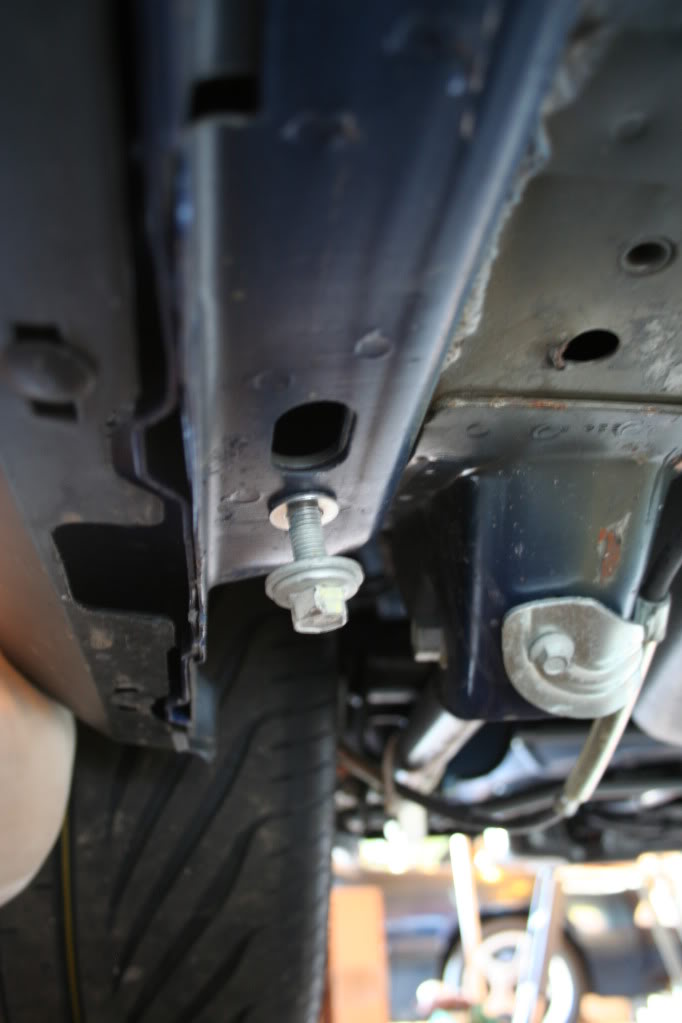
The '12/'13 Boss makes use of the rearmost threaded hole for attachment.
Boss.jpg?t=1317945599
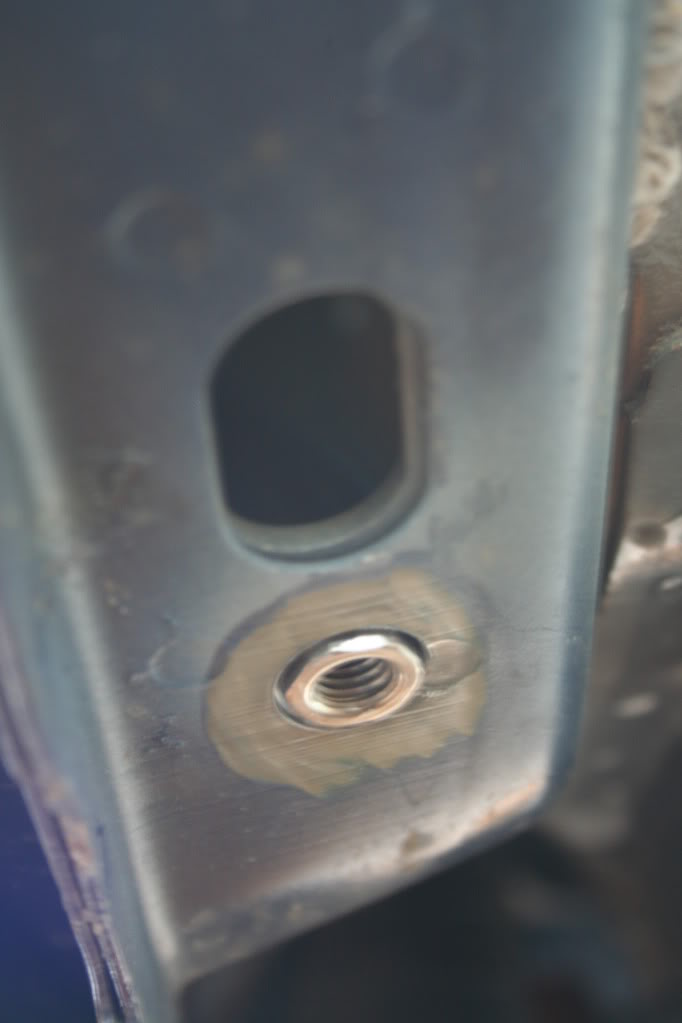
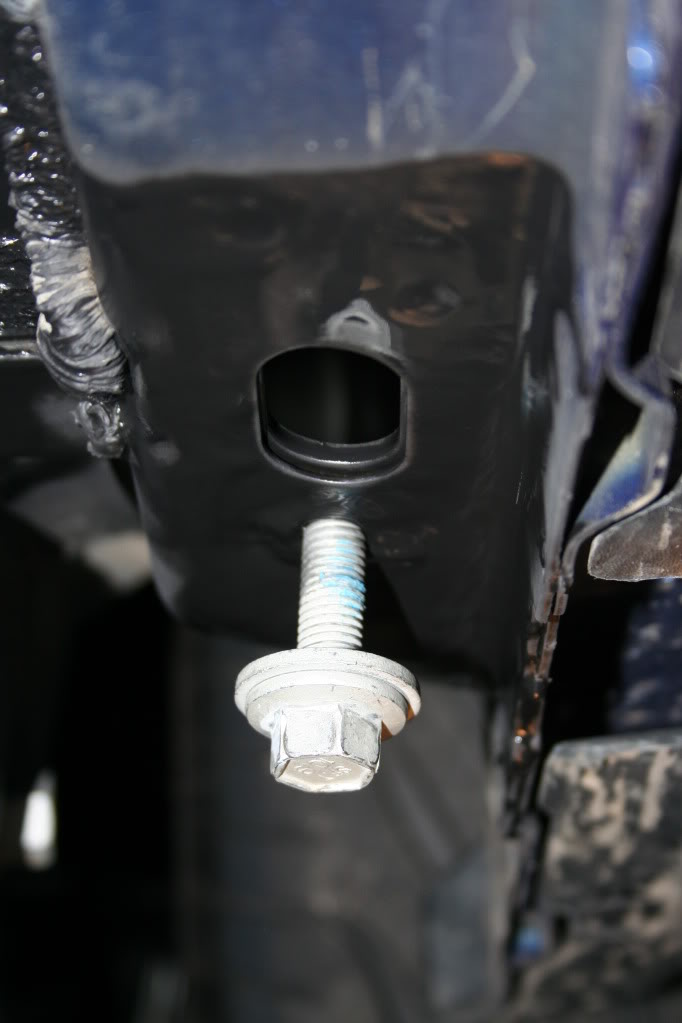
My solution, one that would allow fitting the Boss sidepipes to my 2009 GT500, was to drill a hole in the appropriate area, slip a somewhat 'rounded' nut down through the top, and then weld the nut in place. To illustrate...
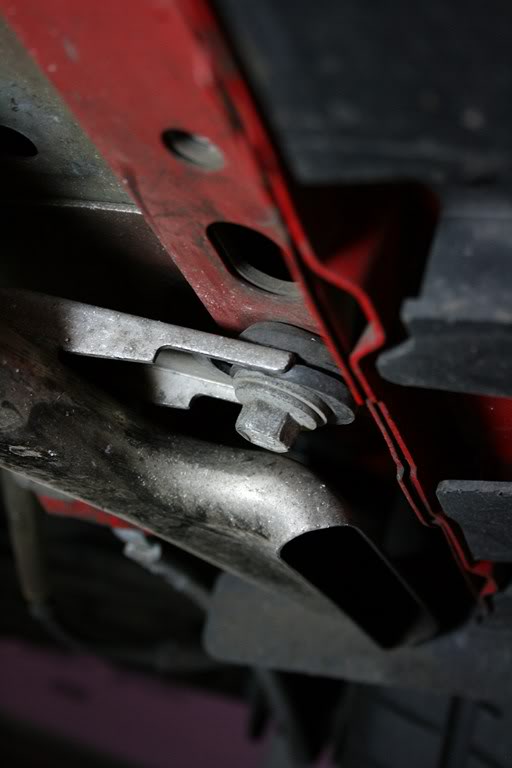
I first drilled the necessary hole, checking fitment through the bottom of the hole (note that I had knocked down the high points of the nut to allow it to fit within the round hole).
IMG_8955.jpg?t=1318204196
IMG_8947.jpg?t=1318203957
IMG_8952.jpg?t=1318203999
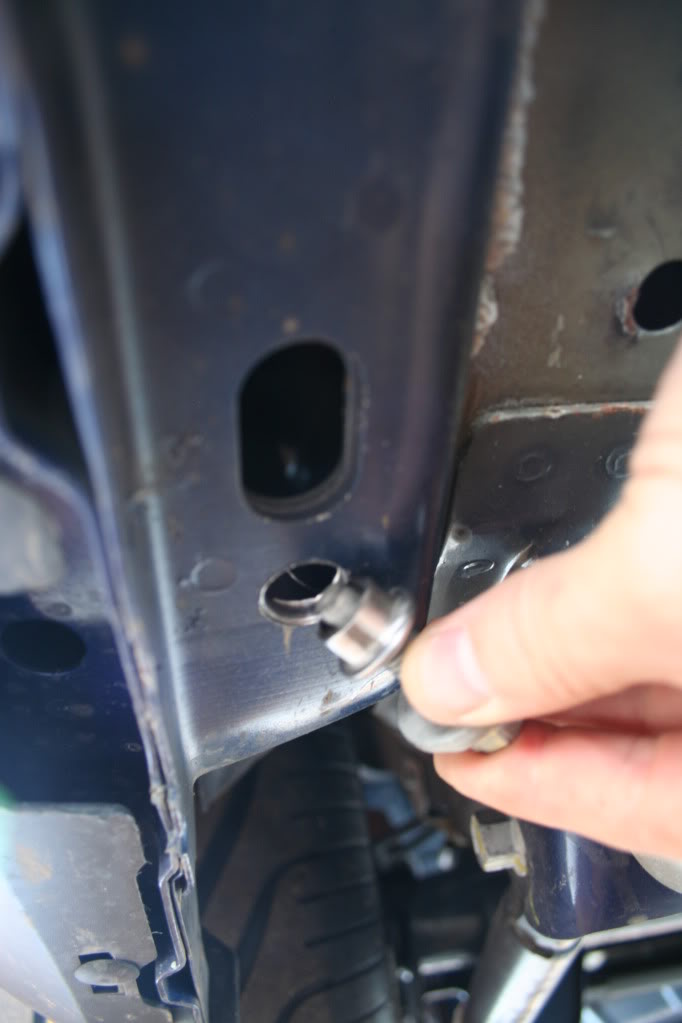
Once I had a nice tight fit, I slipped the nut up through the oval hole and then down through the hole I had drilled.
IMG_8957.jpg?t=1318204210
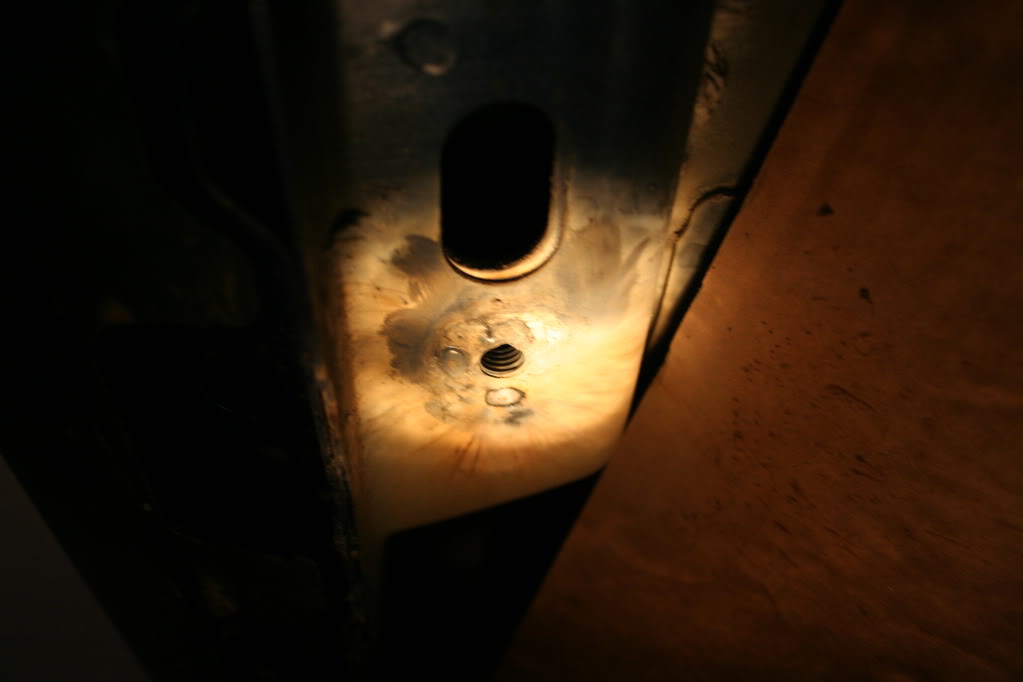
Then I broke out the MIG for a few minutes.
IMG_8959.jpg?t=1318204492
IMG_8965.jpg?t=1318205641
IMG_8967.jpg?t=1318205771
After some Vista Blue spray had setup, I could then attach the sidepipes to my '09.
IMG_9037.jpg?t=1318798310
So when I saw that FRPP was releasing a kit that included fitting the Boss pipes to S197 chassis vehicles that didn't come with the requisite in-chassis fasteners, my interest immediately piqued. I searched for a set of pdf directions as well, looking for whatever solution FRPP had come up with that would allow a bolt-on for early chassis cars.
Looks like FRPP doesn't have one (or at least yet anyway).
I think I could come up with a no-drill solution and am surprised that FRPP didn't. A plate assembly that would slip up and bolt through the oval hole, with a cantilevered extension that runs aft to the needed nut/bolt location. I'd invert a stud or bolt so that the sidepipe could be drawn up tight to the rocker, as OE, only now with a nut instead of a bolt.
If FRPP can't make it happen and anyone here needs something get a hold of me. We'll get it to work. Hope this clarifies the issue.
Tob
7/22/12, 10:18 AM
#238
Member

Join Date: July 11, 2012
Location: Cupertino, CA
Posts: 10
Likes: 0
Received 0 Likes
on
0 Posts

 eagerly waiting them to be dropped off
 7/23/12, 11:59 AM
#240
Bullitt Member
Join Date: January 19, 2011
Location: Montgomery, AL
Posts: 257
Likes: 0
Received 0 Likes
on
0 Posts
Anyone considered the side exhaust alternative from Stainless Works? It's about $250 cheaper.
http://www.pfyc.com/MU5022.html
http://www.pfyc.com/MU5022.html