
05stangkc Customers GT-500 & Gt/CS FINAL Conversion PICS! PLEASE POST HERE!
 1/2/07, 04:09 PM
#101
Team Mustang Source Legacy Member
Finally got the back cover on, with some difficulty. When I was taking the stock piece off of the car, I didn't realize it at the time, but I snapped an alignment pin off on the drivers side, where the end of the bracket I had to move over fits into the quarter panel. Also had a heck of a time with the rivets I had to remove. I tried drilling them out, but the bit just grabbed them and spun them in place after a while, which opened up the hole so they came out. I tried using a dremel on another one, but the heat from the friction melted the plastic. And I didn't get any rivets to do the move (might want to include them in your kit, Kevin, it takes 8 for the rear bumper bracket), and the local Home Depot I went to didn't have the right size. I didn't take any pictures either, I was too busy fighting with the darn thing. I didn't figure out that it would be easier if I unhooked the wiring harness until I had already messed around with it a bit. Besides those snags, it's an easy swap out if you know what you're dealing with.
There are 4 nuts to remove from inside the trunk (below the opening, behind the plastic liner), 2 screws in each wheel well at the outside , holding the bumper and the wheel well liner together, and three plastic rivets on the bottom side. And if you undo the wiring harness first, you can peel the sides away, then pull the whole thing off backwards once you've gotten all these screws/nuts/rivets. Like I said above, for me the hardest thing was transfering the plastic bracket over to the new bumper cover. I might still get that and the rivets from Kevin, to make sure I have it all done right, because right now I'm a little worried about the rivets I used coming off, since they weren't really big enough to safely do the job, but the bumper's not going to fall off because of them.
There are 4 nuts to remove from inside the trunk (below the opening, behind the plastic liner), 2 screws in each wheel well at the outside , holding the bumper and the wheel well liner together, and three plastic rivets on the bottom side. And if you undo the wiring harness first, you can peel the sides away, then pull the whole thing off backwards once you've gotten all these screws/nuts/rivets. Like I said above, for me the hardest thing was transfering the plastic bracket over to the new bumper cover. I might still get that and the rivets from Kevin, to make sure I have it all done right, because right now I'm a little worried about the rivets I used coming off, since they weren't really big enough to safely do the job, but the bumper's not going to fall off because of them.
 1/2/07, 04:43 PM
#102
Mach 1 Member
Join Date: October 14, 2006
Location: Tucson, Arizona
Posts: 716
Likes: 0
Received 0 Likes
on
0 Posts
Yeah I had more difficulty with the rear compared to the front. Those four larger rivets were a surprise to me. Once I got them out, I used four stainless 1/4-20 x 1/2" bolts, washers and nuts to hold the harness to the cover. I talked to Kevin about these rivets being larger than any of the others and he told me that his books did not list these larger rivets any differently than the smaller ones!
I got the new bumper cover all the way on, then discovered I forgot to snake the lamp harness to the trunk prior to installing the cover. It was impossible to do this with the bumper on, so off it came!! All in a day's worth of "learning"!!
Willie
I got the new bumper cover all the way on, then discovered I forgot to snake the lamp harness to the trunk prior to installing the cover. It was impossible to do this with the bumper on, so off it came!! All in a day's worth of "learning"!!
Willie
1/2/07, 05:32 PM
#103
The Analog Admin!
Thread Starter
Join Date: November 27, 2004
Location: Visalia Ca.
Posts: 10,901
Received 3,157 Likes
on
2,311 Posts
The Rear Bumper Wiring Bracket Calls for the Same Rivet as the Front Bumper uses on the Outer Edge Brackets. I ran a Build Sheet on my Car and Confirmed this. They are Supposed to Be a 4.8 x 4.8 Mm Rivet. I will include these with Future Orders. I have heard these Appear Smaller than the original but it is all that Ford Lists. Old Part # w711139s300 Replaced to Part Number w712930s437. I will order one of the Wiring Brackets and Find a Best Fit Rivet in the Mean time!
KC
KC
1/2/07, 06:13 PM
#104
Team Mustang Source Legacy Member
Kevin, I bought 5mm rivets from Home Depot and they weren't thick enough. I think I'll go the bolt/nut/washer route like Willie did. But there are 4 rivets (2 on each side) at the ends of that bracket that are needed too, I didn't notice if they were smaller then the center rivets or not, I think they're still laying around the garage, I'll see if I can find them. Can that harness bracket be bought seperately? And if so, how much? I might need one to make the left side sit flush, since the pin broke off. But the mud-flaps or whatever they're called look really good on there, thanks for suggesting them. 
1/2/07, 10:58 PM
#106
Legacy TMS Member
From the rocket ranch
B
BSemper Fi
1/3/07, 02:47 PM
#107
Team Mustang Source Legacy Member
Thought I'd post pics from this morning since I have both front and rear on the car now.
And Bob, thanks, I'll have to remember to get nylon lock nuts when I re-do the rear bumper.
And Bob, thanks, I'll have to remember to get nylon lock nuts when I re-do the rear bumper.
1/5/07, 12:24 PM
#108
The Analog Admin!
Thread Starter
Join Date: November 27, 2004
Location: Visalia Ca.
Posts: 10,901
Received 3,157 Likes
on
2,311 Posts
January Ford Parts Update was Kind to The Shelby and GT/Cs Retrofits only Small Price Increase! Updated Pricing on Hotsheets!
KC
KC
1/5/07, 02:45 PM
#109
Join Date: February 2, 2006
Posts: 1,405
Likes: 0
Received 0 Likes
on
0 Posts
Here's mine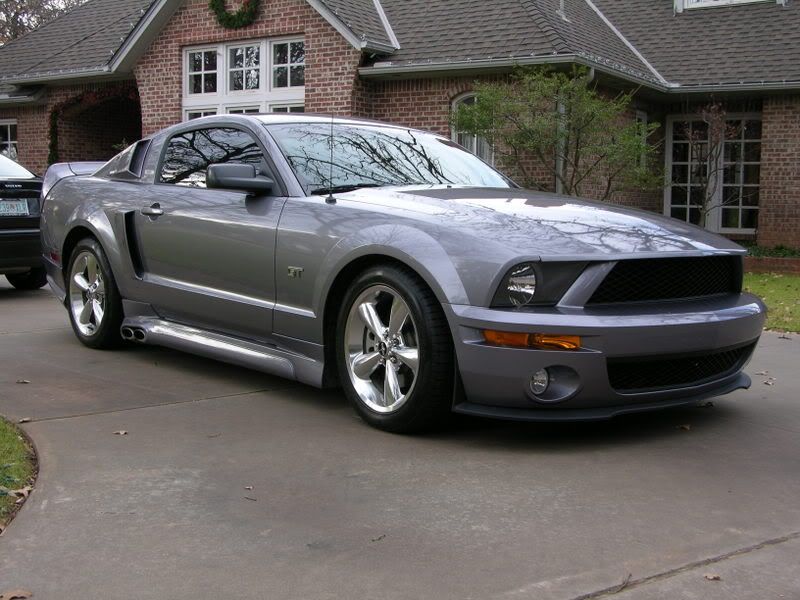
 1/21/07, 11:26 AM
#111
GT Member

Join Date: January 21, 2007
Posts: 146
Likes: 0
Received 0 Likes
on
0 Posts
Hey Kevin (or anyone)
I am looking to do the GT500 conversion. I hate the vents on the hood though....and thinking of having a body shop delete them.
Can anyone tell me what the hood is made of? Is it fiberglass or steel? Aluminum?
Thanks in advance
I am looking to do the GT500 conversion. I hate the vents on the hood though....and thinking of having a body shop delete them.
Can anyone tell me what the hood is made of? Is it fiberglass or steel? Aluminum?
Thanks in advance
1/21/07, 12:20 PM
#112
Mach 1 Member
Join Date: October 14, 2006
Location: Tucson, Arizona
Posts: 716
Likes: 0
Received 0 Likes
on
0 Posts
Welcome Dave,
The hood is aluminum; same as the stock hood. I've done the conversion and I also don't care much for the plastic vents either. I only know of one alternative:
http://www.shelbyautos.com/ShowDetail.asp?id=3
but it's not available yet. So for the time being, I'm sticking with the stock plastic vents....
1/22/07, 02:59 PM
#113
The Analog Admin!
Thread Starter
Join Date: November 27, 2004
Location: Visalia Ca.
Posts: 10,901
Received 3,157 Likes
on
2,311 Posts
Those Look Cool But Water Will be an Issue with those!
KC
KC
1/22/07, 08:45 PM
#115
GT Member

Join Date: December 11, 2006
Posts: 156
Likes: 0
Received 0 Likes
on
0 Posts
I saw a question earlier about the cost of paint for the front and rear fascia on this conversion, but not sure that I saw many answers. Any ballpark estimates on the cost to paint?
Also, which to do first--paint or install?
Also, which to do first--paint or install?
1/23/07, 03:22 PM
#116
Team Mustang Source Legacy Member
Definitely paint first. If you install first, you won't get all the parts painted that should be. I put my pieces on by myself without scratching them up, and it should be even easier if you have a buddy help out.
I paid $800 for both front and rear through a painter I know, but I don't what other places were charging. He had just done my new hood for SEMA, so I just went back to him. Now he has enough left over paint I could get the CDC rear spoiler and the SHR window louvers painted without having to pay for more supplies (VB paint isn't cheap), so that's where I'll be going.
I paid $800 for both front and rear through a painter I know, but I don't what other places were charging. He had just done my new hood for SEMA, so I just went back to him. Now he has enough left over paint I could get the CDC rear spoiler and the SHR window louvers painted without having to pay for more supplies (VB paint isn't cheap), so that's where I'll be going.
1/24/07, 08:00 AM
#118
GT Member

Join Date: August 15, 2006
Posts: 102
Likes: 0
Received 0 Likes
on
0 Posts
Don't think I'd want to trust a taped-on piece sitting above my engine (especially with all the heat build-up). Probably couldn't cause any damage, but if an aluminum tray were to fall off and down into the serpentine belt, you could be looking at some major damage.
1/30/07, 09:20 PM
#119
Legacy TMS Member
I'm paying $800 also for paint and install of the front facia, hood and rear spoiler.
2/3/07, 09:49 AM
#120
GT Member

Join Date: October 9, 2004
Posts: 114
Likes: 0
Received 0 Likes
on
0 Posts
UK Shelby front end preview.
Just completed my Shelby front bumper, huge thanks to Kevin for his excellent service, including packing all the parts specially for the UK shipping companys requirements.
Thanks to everyone who previously posted on this thread for the inspiration, all those Stangs are just
Only one sneak preview so far, will post more next week when my new rims are mounted.............
Cheers
Jeff
Thanks to everyone who previously posted on this thread for the inspiration, all those Stangs are just
Only one sneak preview so far, will post more next week when my new rims are mounted.............
Cheers
Jeff