kenwood double din dash kit

Cobra Member
Joined: February 13, 2011
Posts: 1,399
Likes: 0
From: Southern NH
On page 15 there was mention that Pioneer and Alpine units would be supported for the new 2014 model lineup of GPS double din receivers. Is there any news on this? Should this be answered in a separate thread?
Bullitt Member
Joined: January 2, 2012
Posts: 367
Likes: 1
From: S.E. Florida
All radios compatible with the maestro are found here http://maestro.idatalink.com/compatible-radios/
GT Member
Joined: August 24, 2013
Posts: 102
Likes: 0
For 2014 both Alpine and Pioneer have announced serial ports to communicate with Maestro. However, what they offer differs a bit.
Alpine:
Fully compatible: 2014 Navigation models - INE-W957HD, X008U, X009U - however, 8 and 9 inch models don't fit our dash kit.
Pioneer: Pioneer will need firmware update of radio after launch to work with Maestro.
Mostly Compatible: 2014 NEX models � AVIC-8000NEX, AVIC-7000NEX, AVIC-6000NEX, AVIC-5000NEX, AVH-4000NEX. These units will be compatible with all of our solutions, but they do not have gauges, climate control (so you can't use a Pioneer with our MUS1 dash kit), vehicle info or parking assist screens.
Cheers,
Bullitt Member
Joined: September 9, 2009
Posts: 372
Likes: 0
From: Miami
The RR is the piece that you flash. When on the website, you basically set your buttons, then you flash the module so it is setup. You do not flash the dash kit.
Cobra Member
Joined: February 13, 2011
Posts: 1,399
Likes: 0
From: Southern NH
Well I pulled the trigger on this kit with the RR module after I got them both, new in box, for $249 shipped from eBay. 
Very impressed with the fit & finish of the trim panel and the buttons. Tried to program the RR for kicks but during the setup it wants your head unit serial #, which I won't be able to order until next week.
Being able to get the TPMS readouts for each wheel will be great as the rear tires on my Boss like to lose air all summer long for some unknown reason. No more guessing which one needs air!
Does anyone know what gauge the ODB2 wires are, as well as the Sync wire? I'd like to use 3M splice connectors, and was thinking the wires look like 16-18 gauge? I would like to have all the accessories I need when my Kenwood shows up so I can bang out the install in one day.
I spent a lot of time over this winter prepping my doors and installing speakers in my GT Premium panels, and making a custom mount for the 6.5" speaker on the factory 6x8 bracket. So I can't wait to get this all done in one shot.
GT Member
Joined: August 24, 2013
Posts: 102
Likes: 0
GT Member
Joined: August 24, 2013
Posts: 102
Likes: 0
Well I pulled the trigger on this kit with the RR module after I got them both, new in box, for $249 shipped from eBay.
Very impressed with the fit & finish of the trim panel and the buttons. Tried to program the RR for kicks but during the setup it wants your head unit serial #, which I won't be able to order until next week.
Being able to get the TPMS readouts for each wheel will be great as the rear tires on my Boss like to lose air all summer long for some unknown reason. No more guessing which one needs air!
Does anyone know what gauge the ODB2 wires are, as well as the Sync wire? I'd like to use 3M splice connectors, and was thinking the wires look like 16-18 gauge? I would like to have all the accessories I need when my Kenwood shows up so I can bang out the install in one day.
I spent a lot of time over this winter prepping my doors and installing speakers in my GT Premium panels, and making a custom mount for the 6.5" speaker on the factory 6x8 bracket. So I can't wait to get this all done in one shot.
Do not use splice connectors for any of those connections. Solder and tape or use real crimp style connectors.
Cheers,
GT Member
Joined: August 24, 2013
Posts: 102
Likes: 0
I think his issue is that the MUS1 is not showing up in the accessory step. This would be the case if he has a radio that does not have a climate control screen inside (like a 2012 Kenwood model, or DDX370, DDX271 for example).
Cheers,
Cobra Member
Joined: February 13, 2011
Posts: 1,399
Likes: 0
From: Southern NH
Thanks for the reply. Can you please give me an example (link to product) of a recommended crimp connector? (I know how to solder and tape, and have them, but was looking for an alternative)
Last edited by ace72ace; Mar 27, 2014 at 01:14 PM.
Member
Joined: March 23, 2014
Posts: 7
Likes: 0
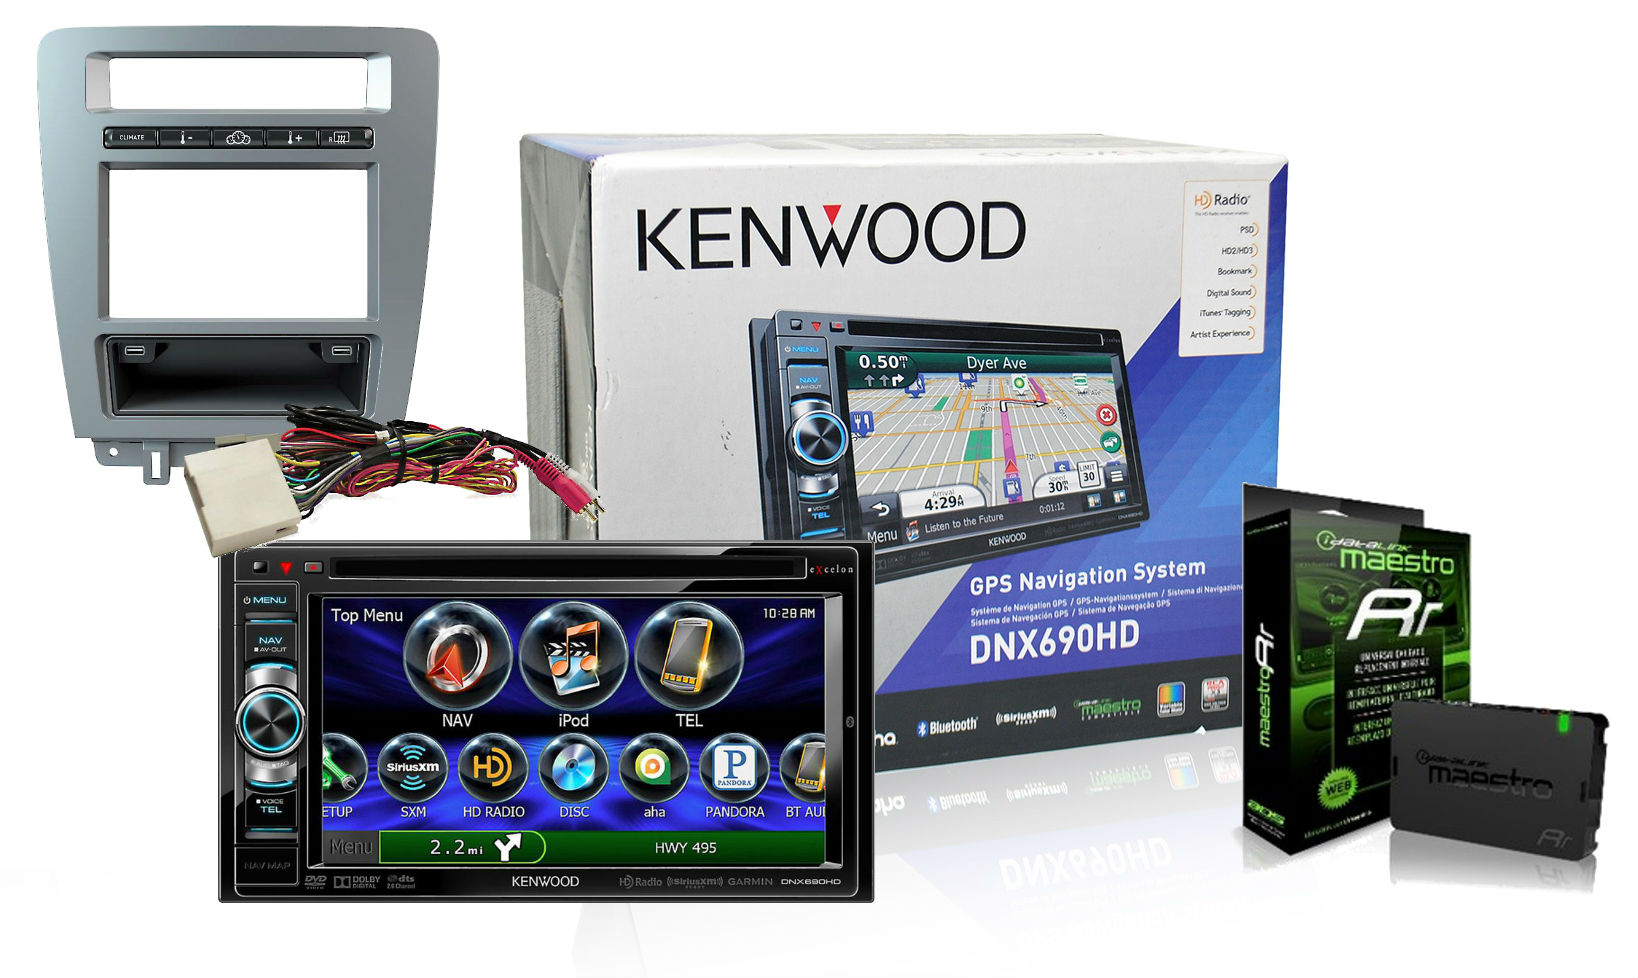
I was going to use the DNX6190HD, but was told I wouldn't be able to get the virtual gauges on the stereo, so I bought a 571HD. One question I do have is do I need to use the gps antenna and microphone that came with the stereo or will the Sync system use the factory gps antenna and factory microphone?
Last edited by wsammyboy; Mar 29, 2014 at 07:12 AM.

Member
Joined: June 22, 2011
Posts: 6
Likes: 0
From: Michigan
So I finally pulled the trigger on this set up. Also ordered a GT500 steering wheel while I was at it...and some new crossed-drilled and slotted rotors and new pads. Its been a busy few days on eBay and Amazon. I ended up getting a pretty good deal on eBay for the dash setup. Won a bid for $799.99 for the setup below, plus had a 10% code and got $16 eBay bucks to bring it to just over $700 shipped. Not the full screen but I don't mind the ***** on the DNX690HD, especially when it saves money for other "go fast" mods. Everything should be here Monday/Tuesday so I will not be working from the office Wednesday if its at all nice outside (Michigan winter from Hell and all). Wish me luck on the install, but from what I've read on this thread, it sounds like a pretty simple one.
GT Member
Joined: August 24, 2013
Posts: 102
Likes: 0
I was going to use the DNX6190HD, but was told I wouldn't be able to get the virtual gauges on the stereo, so I bought a 571HD. One question I do have is do I need to use the gps antenna and microphone that came with the stereo or will the Sync system use the factory gps antenna and factory microphone?
If you use Sync for phone calls you will not need the Kenwood microphone at all.
You will need the Kenwood GPS antenna but it works fine stuck to the top of the OEM display in top of dash. Unless you had OEM navigation you will not have a GPS antenna at your radio. The second antenna at the radio is Satellite radio (SIRIUS) that was embedded in the radio you removed.
Cheers,
GT Member
Joined: August 24, 2013
Posts: 102
Likes: 0
[QUOTE= Wish me luck on the install, but from what I've read on this thread, it sounds like a pretty simple one. [/QUOTE]
Just flash the module first, tell website your are installing the kit, choose what you want the SW buttons and button bar buttons to do, and go. At end of flashing, print out the Quick Reference card to remind you what the SW buttons do and the install guide that will appear at bottom of page. Then, for the love of my sanity, PLEASE read the guide.
A quick start guide is attached here to get you started on programming.
Cheers,
Member
Joined: March 23, 2014
Posts: 7
Likes: 0
So, the install was a success...sort of. All of the buttons on the steering wheel work as well as all of the buttons on the dash kit, but I can't get the Pandora to play sound when it connects. The Sync audio and Sync USB works great. Should the phone Bluetooth only be connected to the Sync or also the stereo? Also, I'm not sure the wire splicing with the sync wire and the OBDII wires is as good as it should be (I used Posi-Taps...and the OBDII gauges aren't working yet). Looks like I'll have to peel the insulation back and solder like everyone suggested. It's just really tight quarters under the dash for a fat boy like me. LOL
Member
Joined: June 22, 2011
Posts: 6
Likes: 0
From: Michigan
Yeah, I did not want to take on the soldering either due to the limited space and how tight the twisted pair is wound, but it really was the best way to do it. I removed the kick panel for a little bit more room, but it only helped marginally. The results were definitely worth the hassle.
Cobra Member
Joined: February 13, 2011
Posts: 1,399
Likes: 0
From: Southern NH
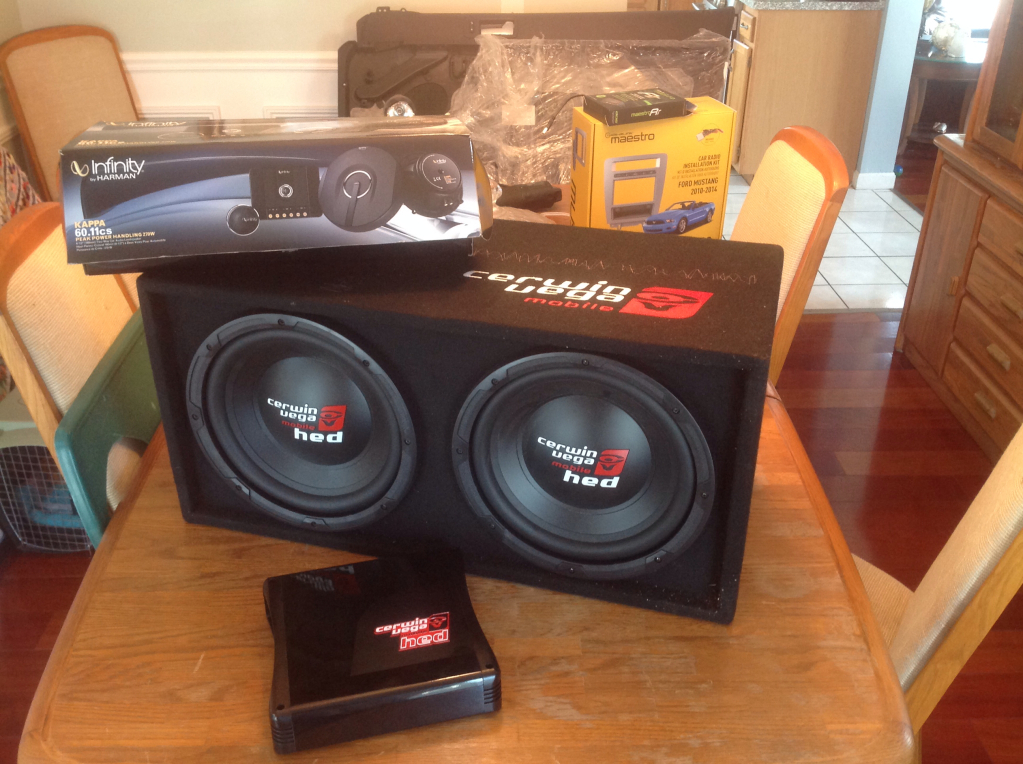
I'm taking the plunge this week too, just waiting for my DNX690HD to arrive. My build is pretty heavy duty, completely replacing the stock (base) Boss door panels with GT Premium panels, and custom mounted component speakers and 8" woofers. I just about crapped my pants when the Fedex guy showed up with my subs. You think I would have guessed 2x12's in sealed enclosure would make for a BIG BOX! haha - well i never carry anything in my trunk anyway! til now...BOOYAH!!!