
2010-2014 Ford Mustang S-197 Gen II Lets see your latest Pics PHOTO GALLERY

The following users liked this post:
Stage_3 (3/29/16)

 3/29/16, 07:12 AM
I Have No Life
You can clay anytime - wash the panel first, obviously. Thing about claying though, it micromars. So if you're picky like me, you'll want to buff (lightly) again to remove all that.
The PC is a good starter kit... but for moderate to heavy swirls, it's outmuscled. Rotation stops (you can see it when you push down on the pad to give it some pressure). When buffing, remember you need to compress the pad between 25% to 50% of original thickness. Too much pressure is bad, and so is too light a pressure. The PC stops rotating at 50% pressure, especially at denser pads (white to yellow). That's why I have my Flex (or any other heavier duty buffer). The PC is relegated simply to Sealant/Glaze application henceforth.
What did Tony do??? How did he get the thanks button?
Last edited by FromZto5; 3/29/16 at 07:14 AM.
3/29/16, 07:21 AM
Shelby GT350 Member
Gabe no worries.
You can clay anytime - wash the panel first, obviously. Thing about claying though, it micromars. So if you're picky like me, you'll want to buff (lightly) again to remove all that.
The PC is a good starter kit... but for moderate to heavy swirls, it's outmuscled. Rotation stops (you can see it when you push down on the pad to give it some pressure). When buffing, remember you need to compress the pad between 25% to 50% of original thickness. Too much pressure is bad, and so is too light a pressure. The PC stops rotating at 50% pressure, especially at denser pads (white to yellow). That's why I have my Flex (or any other heavier duty buffer). The PC is relegated simply to Sealant/Glaze application henceforth.
What did Tony do??? How did he get the thanks button?
and: https://themustangsource.com/forums/...8/#post6974525
3/29/16, 07:42 AM
I Have No Life
This is exactly why I don't think I'll EVER attempt to do any buffing or paint correction on my car myself. Very daunting task with a LOT of ways to f*** it up. I'd rather just pay a local guy that has been recommended by the car community here.
and: https://themustangsource.com/forums/...8/#post6974525
and: https://themustangsource.com/forums/...8/#post6974525
As to the detailing, it sounds daunting but it's very easy. I can guarantee I can teach ANYBODY, and yes that means even GABE HAAHAHAHAHAHA, how to detail/buff properly in less than 15 minutes. Guaranteed.
3/29/16, 07:48 AM
Legacy TMS Member
Gabe no worries.
You can clay anytime - wash the panel first, obviously. Thing about claying though, it micromars. So if you're picky like me, you'll want to buff (lightly) again to remove all that.
The PC is a good starter kit... but for moderate to heavy swirls, it's outmuscled. Rotation stops (you can see it when you push down on the pad to give it some pressure). When buffing, remember you need to compress the pad between 25% to 50% of original thickness. Too much pressure is bad, and so is too light a pressure. The PC stops rotating at 50% pressure, especially at denser pads (white to yellow). That's why I have my Flex (or any other heavier duty buffer). The PC is relegated simply to Sealant/Glaze application henceforth.
I used an orange pad with the Uber compound, then a blue pad for the Finishing Glaze, then a new white pad for the Adams Glaze.
The Flex was out of my budget, so the PC unit had to be it.
3/29/16, 08:50 AM
I Have No Life
Thanks for the pointers Burton ... I do apply some pressure, usually leave it on the setting of 5 and just change how fast I move it around the panel depending on what compound/pad I'm using.
I used an orange pad with the Uber compound, then a blue pad for the Finishing Glaze, then a new white pad for the Adams Glaze.
The Flex was out of my budget, so the PC unit had to be it.
I used an orange pad with the Uber compound, then a blue pad for the Finishing Glaze, then a new white pad for the Adams Glaze.
The Flex was out of my budget, so the PC unit had to be it.
That being said, I run all mine at highest speed 6. The faster speeds are good for polishes with micro diminishing abrasives (I think your uber compound has it).
I am wondering about your pad selection though - but perhaps the brand/color just varies depending on which you have. Just make sure you treat buffing with diff't pads/polishes like you do SANDING. In other words, start out with the roughest grit and work your way to the finest. Usually, for the Lake Country and CG pads, the scale shows that the White pad is rougher than the Blue pad. So I am worried that you are going from rough to fine back to semi-rough - so your finish won't be as glassy/fine/polished. You want to end on a Blue or Red pad.
But again, I could be wrong depending on the BRAND of pad you have. Who knows, the White you use could be finer than the blue... LOL. But USUALLY, from what I've seen, White is a polishing pad, not a finishing pad.
ccs-polishing-how-to.html
The following users liked this post:
Gabe (3/29/16)
3/29/16, 10:49 AM
Legacy TMS Member
Gabe no problem at all. I'm here to help. I wish we were close by, and I'd make you a pro in under 15 minutes, swear. lol.
That being said, I run all mine at highest speed 6. The faster speeds are good for polishes with micro diminishing abrasives (I think your uber compound has it).
I am wondering about your pad selection though - but perhaps the brand/color just varies depending on which you have. Just make sure you treat buffing with diff't pads/polishes like you do SANDING. In other words, start out with the roughest grit and work your way to the finest. Usually, for the Lake Country and CG pads, the scale shows that the White pad is rougher than the Blue pad. So I am worried that you are going from rough to fine back to semi-rough - so your finish won't be as glassy/fine/polished. You want to end on a Blue or Red pad.
But again, I could be wrong depending on the BRAND of pad you have. Who knows, the White you use could be finer than the blue... LOL. But USUALLY, from what I've seen, White is a polishing pad, not a finishing pad.
Attachment 177466
My brain's mush, I've been looking at code for over 5 hours, gonna take a break and step away from the laptop for a while ...
3/29/16, 12:17 PM
I Have No Life
I think I actually used white pads for both glaze compounds. I know the pad said it was for polishing, and then another one said for fine polishing and I know I used white on the last step and the blue would've been for the fine polishing ...
My brain's mush, I've been looking at code for over 5 hours, gonna take a break and step away from the laptop for a while ...
My brain's mush, I've been looking at code for over 5 hours, gonna take a break and step away from the laptop for a while ...
Just click on that link I pasted above, you'll see the pad scale, then go nuts!

Mine? If you mean mine, I always change it... lol Depending on how I feel that day/week/month/year.
 3/29/16, 01:17 PM
Shelby GT350 Member
3/29/16, 01:49 PM
Roush Forum Stalker
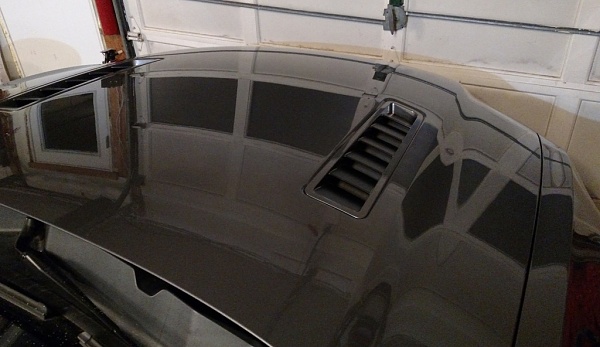
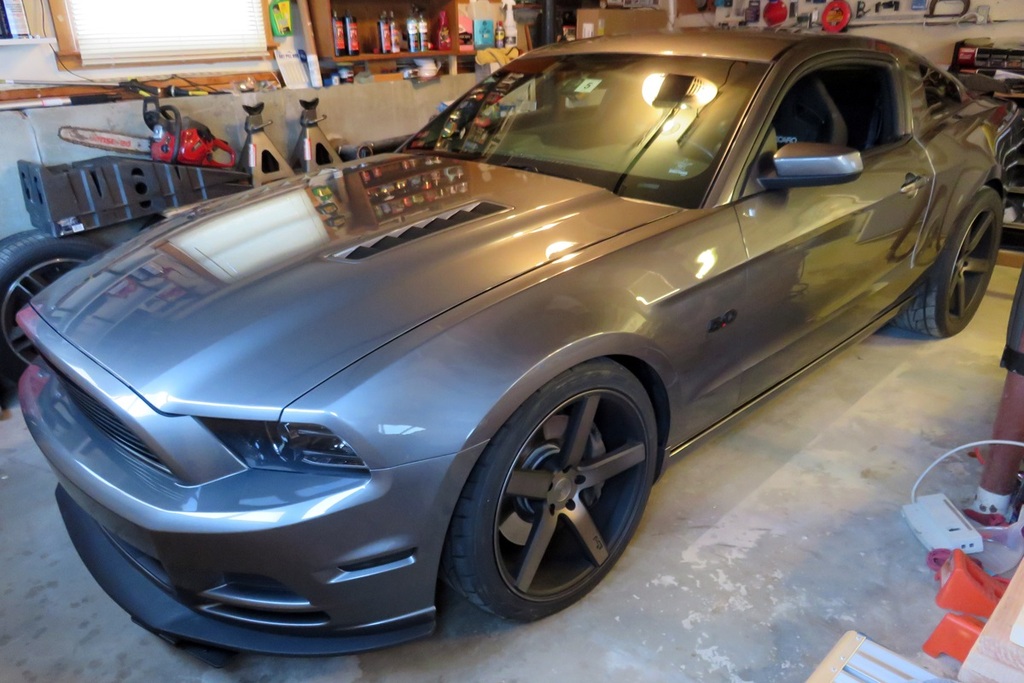
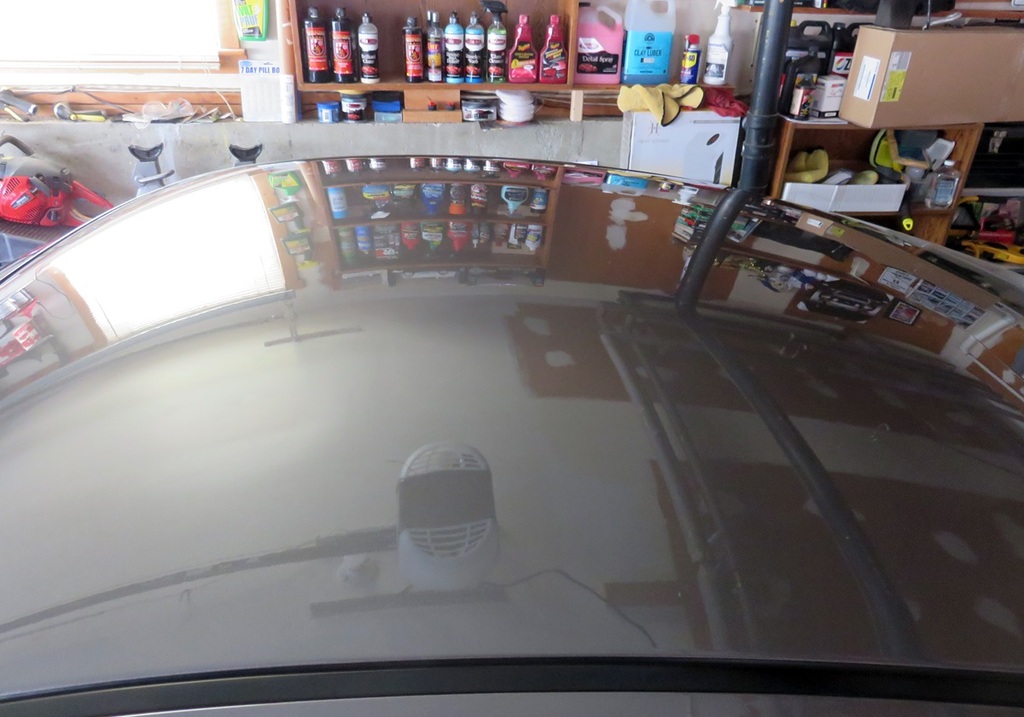
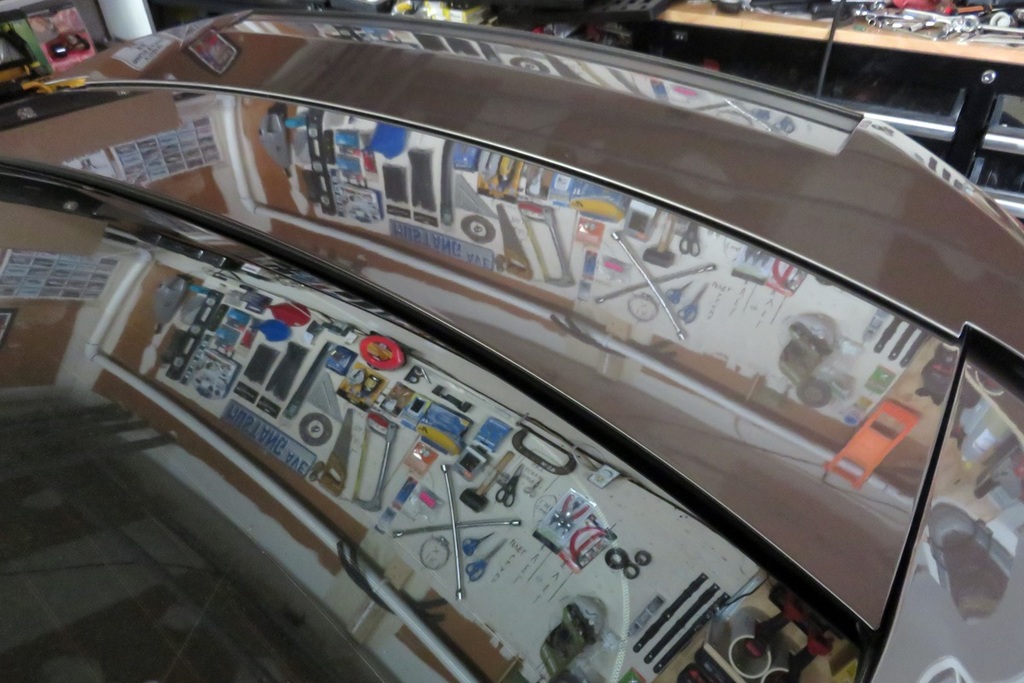
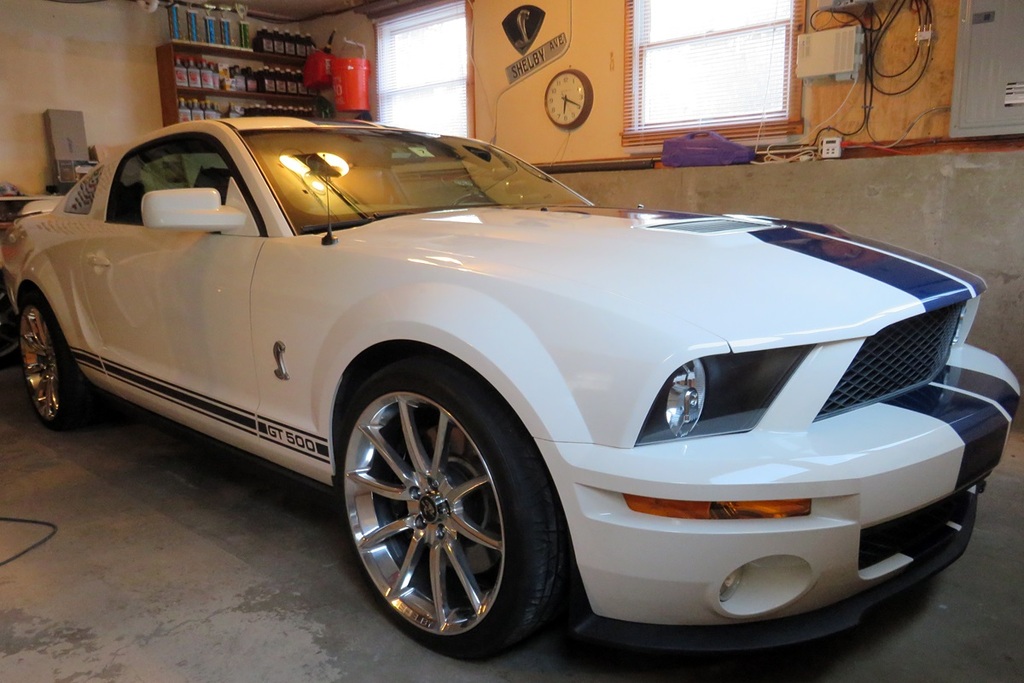
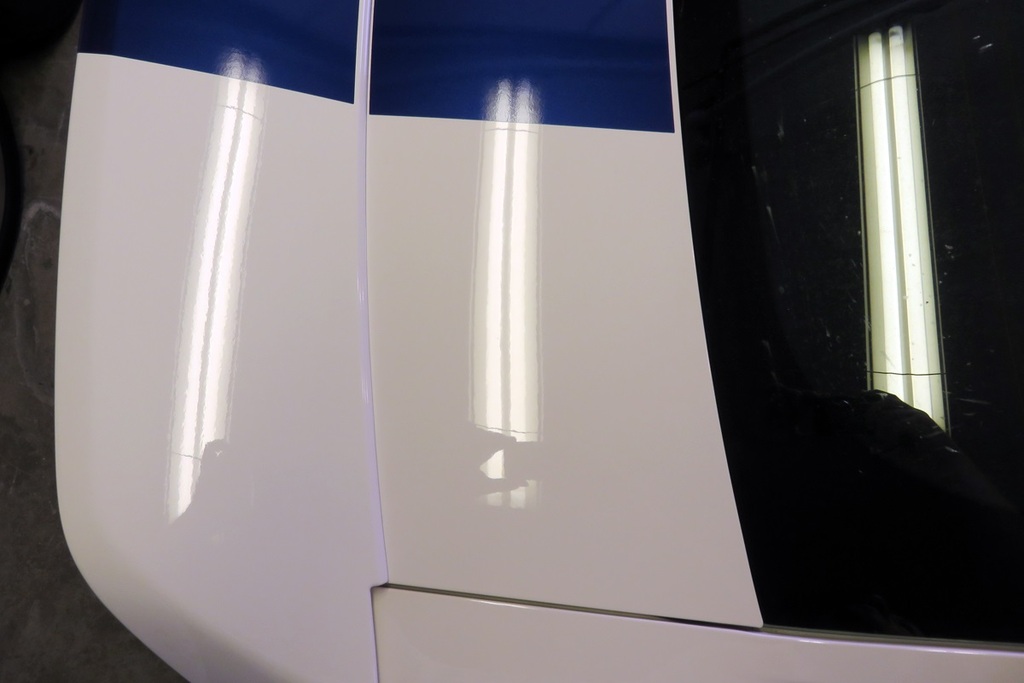
Hood, roof, and trunk lid detailed tonight.
Wolfgang Uber compound, Wolfgang finishing glaze, then Adams Brilliant Glaze.
Pictures don't do it justice, especially these phone pictures in the garage, but still show a lot of clear reflection ... and the paint is smoooooth ...
Wolfgang Uber compound, Wolfgang finishing glaze, then Adams Brilliant Glaze.
Pictures don't do it justice, especially these phone pictures in the garage, but still show a lot of clear reflection ... and the paint is smoooooth ...

Very nice. Come on nice weather.
Yes I did. You're welcome!
3/29/16, 04:38 PM
Legacy TMS Member
Even copied and pasted the "ccs-polishing-how-to.html" and still no worky
3/29/16, 05:51 PM
Roush Forum Stalker
3/29/16, 07:45 PM
I Have No Life
Originally Posted by Gabe
Link not working for me.
Even copied and pasted the "ccs-polishing-how-to.html" and still no worky
Even copied and pasted the "ccs-polishing-how-to.html" and still no worky
Try this Gabe. If it doesn't work I can text you or pm you
Paste in between my " " sign
"http://www.autogeek.net/ccs-polishing-how-to.html"
3/29/16, 07:57 PM
Legacy TMS Member
I went into my User CP, into Options, and at the bottom I un-checked something about auto-attaching linked pics ...
As far as the pads, the Autogeek ones are what I'm using.
I have the orange, white, and blue ones
Today I finished my car and did the horizontal surfaces of the GF's Shelby:
Last edited by Gabe; 3/29/16 at 07:58 PM.


 3/29/16, 09:32 PM
Legacy TMS Member
Originally Posted by steevesj
Finally got around to taking a few new pics.