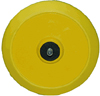
The Flex XC3401 Polisher comes with a 5 3/4 inch backing plate with Velcro® brand hook and loop fasteners.
For the Porter Cable
7424XP, you will need a
backing plate in order to attach the foam pads
onto your polisher. The backing plate has a Velcro� brand hook & loop
fasteners on the bottom of it to hold foam pads in place as you polish. You
will see it described simply as "hook & loop" on pads and backing plates
with this feature.
Note: We
recommend using a 5 inch backing plate with 6.5 inch pads to
leave a larger margin of foam between the plate and the edge of the pad.
This bigger margin of error protects the vehicle from unintentional impact
with the backing plate.
Easy on and off.
The hook and loop backing allows you to pull off a used pad and replace
it with a fresh pad in seconds. The hooks and loops provide a secure
connection combined with the ability to change the pad almost instantly.
Flat, full contact surface. Lake Country's
6.5 inch pads are perfectly flat to provide maximum pad to paint
contact. They have enough give to go over a vehicle's curves but they do
encourage the operator to use the pads flat on the surface, as they are
intended.
CCS Technology. CCS stands for closed cell
structures, which are the
small pockets the dot the front of the pads. These pockets enable the
pads to absorb less product and keep it on the work surface. They act
like little reservoirs where excess product is stored until its needed
on the work surface. This improves operator control and lessens product
waste. The pockets also reduce surface tension so flat pads move more
easily across flat panels.
Smart Foam Pad Varieties:
Yellow Cutting Foams 6.5 inch- Use this pad to apply compounds or
polishes to remove severe oxidation, swirls, and scratches. It is the
most aggressive and should only be used on oxidized and older finishes.
Always follow this pad with an orange or white pad and a fine polish to
refine the paint until it is smooth.
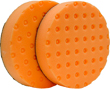
Orange Light Cutting Foam 6.5 inch- Firm, high density foam for
scratch and defect removal. Use this pad with polishes and swirl
removers. It�s an all around pad that will work on most light to
moderate imperfections.
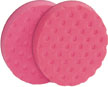
Pink Cutting/Polishing Foam 6.5 inch- This foam is of medium density with the ability to level very fine scratches and very light oxidation. Use light swirl removers with this pad.
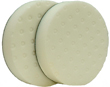
White Polishing Foam 6.5 inch- Less dense foam formula for the
application of waxes, micro-fine polishes and sealants. This pad has
very light cutting power so its perfect for pre-wax cleaners.
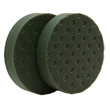
Green
Polishing/Finishing Foam 6.5 inch - Use this
foam to apply one-step cleaner waxes. It is a balance of polishing and
finishing that is perfect for all-in-one product application.
Gray Finishing Foam 6.5 inch - Composition is firm enough to
withstand added pressure during final finishing to remove buffer swirls.
It has no cut and will apply thin, even coats of waxes, sealants, and
glazes.
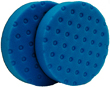
Blue Finessing Foam 6.5 inch � This blue foam pad has soft composition for applying glaze, finishing polish,
sealants, and liquid waxes. The soft pad has no cut, making it perfect for applying nonabrasive products evenly.
Red Ultrasoft Wax/Sealant Foam 6.5 inch � This soft, imported foam is ideal for applying the final coat of wax or sealant. The foam works especially well when applying liquid waxes or sealants because it is firm enough to keep the majority of the product on the paint, rather than soaking it up. The red foam has no cut or cleaning ability.
Super Soft Gold Jewelling Foam 6.5 inch � The CCS Super Soft Gold Jewelling Pad is made of Lake Country's softest foam. Use the gold pad to apply a very fine polish or glaze as the final step of the polishing process. Jewelling is the term coined for this step because it intensifies gloss and reflectivity, like a jewel. The gold foam pad also works well for wax and sealant application.
The following is a general guide to polishing. It will
take you from compounding to polishing to finishing. If your paint problems
do not require compounding, skip to polishing. If you�re not sure, start
with polishing. Always take the least aggressive approach first! If
you don�t get the desired results from polishing, then use a swirl remover
and light cutting pad.
The pads pictured at
the beginning of each section indicate what pads can be used to perform the
job described. The Meguiars G110 and the Porter Cable 7424XP have
the same speed settings so the following guide applies to both machines.
Please note: Deep scratches and swirls, and severe oxidation will
require compounding with a circular polisher. If you are inexperienced with
this type of polisher, consult a professional. If your fingernail catches
the scratch or swirl, it will require painting and must be repaired by a
professional.
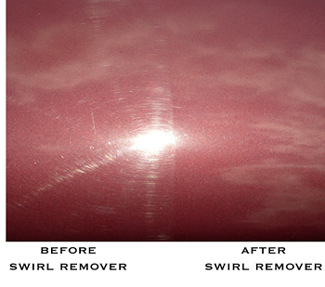
I. Compounding & Swirl
Removal
Compounding involves using the most aggressive type of
swirl remover, called a compound. Swirl removers can range from light to
heavy. The application is the same.
2. Apply a circle of swirl remover around the edge of
the pad. Some will say apply a quarter size amount. You can even apply it
directly to the paint. Ultimately you're going to spread it around so how
the swirl remover gets on the paint is up to you. Spread the swirl remover
over a small section (about 2 x 2 sq. ft.) with the polisher turned
off to prevent sling.
3. Set the maximum speed on the polisher at 5. Turn the polisher on and work the swirl remover in a
side to side, overlapping motion. Move slowly to give the abrasives time to
work.
NOTE: The Porter Cable
tells you if you're applying too much pressure. The pad will stop rotating.
Lighten up on the machine and let it do the work for you.
4.
When the swirl remover turns to a transparent film,
the abrasives have broken down. Turn off the machine and lift it off the
paint. Buff away the residue with a soft,
Cobra Microfiber Towel and inspect
your results. If you are not satisfied, repeat the process with the same
product or a more aggressive compound (like
XMT Heavy Duty Swirl Remover
#4). If you still see no results, upgrade to the yellow cutting pad.
* If you used a compound, a light haze or dullness is
normal. The next step will restore the gloss.
II. Polishing
Polishing improves the smoothness and gloss of the
paint. Use a finishing polish if you�ve just compounded or if the paint just
needs a boost.
1. Use the white or green polishing pad on your polisher. Apply the polish of your choice to the pad or to the
paint and spread it around with the machine turned off.
2. Set the maximum speed to about 4.5.
You're not trying to cut. You're just trying to burnish the paint to a high
gloss. Work in a side to side, overlapping motion until the polish turns
clear.
3. Buff with a
Cobra Microfiber Towel
and check your results. If you can still see some haze, repeat the process.
This time, be sure that the abrasives are fully broken down before you buff.
III. Finishing
You're nearing the finish line. Just a couple more steps
will make your vehicle glow.
To lock in the shine, follow up with a wax or
sealant. Application of any of these products will be as follows.
1. Attach a gray or blue pad to your
Porter Cable 7424XP. Apply the product to the paint or to the pad. Spread it
around the paint in a 2 x 2 sq. ft. section with the polisher turned off.
2. Set the maximum speed to 3 or 4. You do
not need
speed to apply nonabrasive products. Spread the product over the paint until
its sufficiently covered. There are no abrasives to break down. You are just
trying to get even coverage.
3. Buff off the product with a
Cobra Microfiber Towel
or slip a
Microfiber Bonnet
over an unused pad. The bonnet is like having a
microfiber towel on your polisher. Just be sure to put the bonnet over a
clean pad so no products will seep through the bonnet.
Detailing Tips:
The polisher will do the work for you. There's no
need to apply pressure.
Pad and product selection is not an exact science.
The severity of the imperfections, the cut of the pad, and the
aggressiveness of the product all factor into the final results. Don't be
afraid to experiment.
Start with the least aggressive method first. Go to
a more aggressive pad or polish only if necessary.
Foam & Wool Pad Cleaning
The easiest way to clean your foam and wool pads is to drop them in pad cleaner while they are still wet with polish or wax. Dried products are more difficult to remove from the pads. To do this, mix up a bucket of water and Cobra Quik Clenz Pad Cleaner or DP Polishing Pad Rejuvenator at the start of your detailing session. As you finish using each pad, drop it in the cleaning solution to soak. When you are finished with your detail, use the Foam Pad Conditioning Brush to agitate the pads. Then rinse the pads and lay out to dry.
Note: Dry pads with the hook and loop backing facing up so water drains away from it. Standing water on the backing material could eventually cause separation.
When your clean pads are dry, put them in a sealable plastic bag or container to keep them free of dust until their next use.


 small pockets the dot the front of the pads. These pockets enable the
pads to absorb less product and keep it on the work surface. They act
like little reservoirs where excess product is stored until its needed
on the work surface. This improves operator control and lessens product
waste. The pockets also reduce surface tension so flat pads move more
easily across flat panels.
small pockets the dot the front of the pads. These pockets enable the
pads to absorb less product and keep it on the work surface. They act
like little reservoirs where excess product is stored until its needed
on the work surface. This improves operator control and lessens product
waste. The pockets also reduce surface tension so flat pads move more
easily across flat panels. 


 NOTE: The Porter Cable
tells you if you're applying too much pressure. The pad will stop rotating.
Lighten up on the machine and let it do the work for you.
NOTE: The Porter Cable
tells you if you're applying too much pressure. The pad will stop rotating.
Lighten up on the machine and let it do the work for you.
 2. Set the maximum speed to 3 or 4. You do
not need
speed to apply nonabrasive products. Spread the product over the paint until
its sufficiently covered. There are no abrasives to break down. You are just
trying to get even coverage.
2. Set the maximum speed to 3 or 4. You do
not need
speed to apply nonabrasive products. Spread the product over the paint until
its sufficiently covered. There are no abrasives to break down. You are just
trying to get even coverage. The easiest way to clean your foam and wool pads is to drop them in pad cleaner while they are still wet with polish or wax. Dried products are more difficult to remove from the pads. To do this, mix up a bucket of water and


