Journal: MY American Racing LT Header install, day by day
 5/17/07, 05:33 PM
#41
Cobra R Member
Join Date: January 12, 2007
Posts: 1,875
Likes: 0
Received 0 Likes
on
0 Posts
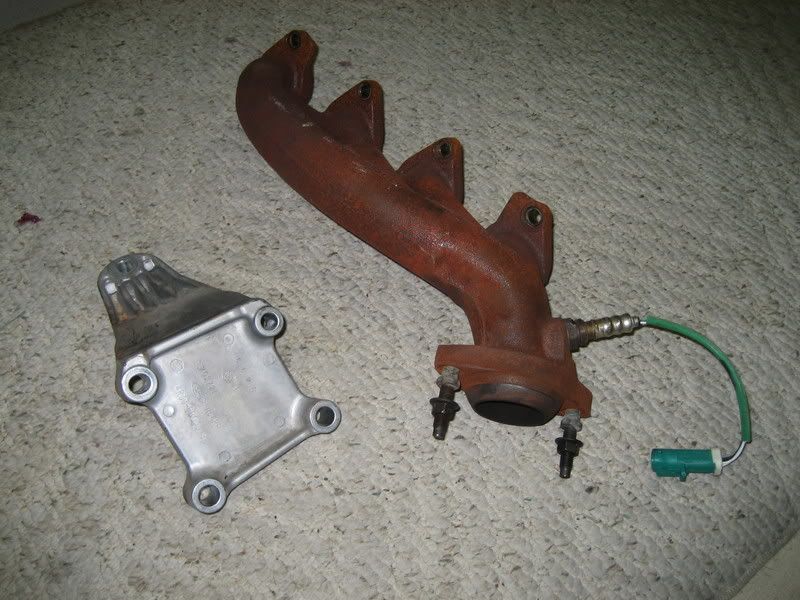
Jim i also suggest using new gaskets the old ones are aluminum or steel and there are two per manifold. Going to be annoying to get to sit right, they don't have the bolt holes in them so they wont stay where you want them. Also apply a sealing compound to around the tubing before applying the new gasket for a better seal and to hold the gasket into place.
 5/17/07, 05:40 PM
#42
Former Vendor
Join Date: January 11, 2007
Location: Aston, PA
Posts: 2,594
Likes: 0
Received 0 Likes
on
0 Posts
You could... we've reused the stock gaskets plenty of time and never had an issue as long as you're careful. Those 3/8" thick CNC flanges are so nice you could probably run them without a gasket! Either way, stock gaskets will be fine.
My honest reccomendation, get ahold of some Kooks gaskets. We're in the process of making some gaskets right now that we might sell only to those purchasing a new set of ARH's or have gotten them from us in the past. They're going to be the blow-proof gaskets!
CR
My honest reccomendation, get ahold of some Kooks gaskets. We're in the process of making some gaskets right now that we might sell only to those purchasing a new set of ARH's or have gotten them from us in the past. They're going to be the blow-proof gaskets!
CR
5/17/07, 09:07 PM
#44
Bullitt Member
Join Date: July 24, 2005
Posts: 440
Likes: 0
Received 0 Likes
on
0 Posts
I installed a set of ARH long tubes a few weeks ago and reused the stock gaskets. As CR states the flanges are so well made that there are no problems with this. Mine sealed up tight. No leaks at all.
The ARH headers fit NICE!!!! I didn't even have to remove the starter!
You WILL have to remove the engine mounts though but they have to be replaced anyway so problem there.
The ARH headers fit NICE!!!! I didn't even have to remove the starter!
You WILL have to remove the engine mounts though but they have to be replaced anyway so problem there.
5/17/07, 09:15 PM
#45
Cobra R Member
Join Date: January 12, 2007
Posts: 1,875
Likes: 0
Received 0 Likes
on
0 Posts
at least it wasn't just me with my LT's that needed the engine mounts removed, Even though those **** directions told me nothing of this. Yeah mine probably could have reused the stock, but hey they were free so what the heck. Now that I look at the stock ones they do have holes, I was day dreaming before.
I would still rather be safe than sorry and have to redo it all. I used the ehaust sealing stuff, the new gaskets, and the stage 8 locking bolts.
I would still rather be safe than sorry and have to redo it all. I used the ehaust sealing stuff, the new gaskets, and the stage 8 locking bolts.
5/17/07, 09:27 PM
#46
Former Vendor
Join Date: January 11, 2007
Location: Aston, PA
Posts: 2,594
Likes: 0
Received 0 Likes
on
0 Posts
You can't go wrong with extra seal, so what the hell? Those locking bolts are a PITA, though. They wont be too bad with the clearance on the S197, though.
CR
Tillman Speed
CR
Tillman Speed
5/18/07, 12:23 AM
#47
Bullitt Member
Join Date: July 24, 2005
Posts: 440
Likes: 0
Received 0 Likes
on
0 Posts
The BIGGEST issue I had with my LTH install was the #*$*$(@(!@)(#)$&^%@!!! electrical connector for front O2 sensor on the passenger side. 
What a PAIN IN THE ***!!!!
Took an hour and a half to unplug that stupid thing!!!
The rest of the job went very smoothly.
Some of the bolts were a little tought to get too but NOTHING like some of the cars I have worked on in the past.
What a PAIN IN THE ***!!!!
Took an hour and a half to unplug that stupid thing!!!
The rest of the job went very smoothly.
Some of the bolts were a little tought to get too but NOTHING like some of the cars I have worked on in the past.
5/18/07, 07:23 AM
#48
Mach 1 Member
Thread Starter
Join Date: December 18, 2004
Posts: 669
Likes: 0
Received 0 Likes
on
0 Posts
The BIGGEST issue I had with my LTH install was the #*$*$(@(!@)(#)$&^%@!!! electrical connector for front O2 sensor on the passenger side.
What a PAIN IN THE ***!!!!
Took an hour and a half to unplug that stupid thing!!!
The rest of the job went very smoothly.
Some of the bolts were a little tought to get too but NOTHING like some of the cars I have worked on in the past.
What a PAIN IN THE ***!!!!
Took an hour and a half to unplug that stupid thing!!!
The rest of the job went very smoothly.
Some of the bolts were a little tought to get too but NOTHING like some of the cars I have worked on in the past.
I asked Nick about the stock gaskets yesterday too. He was very confident in reusing them. Mentioned how they will last forever with the all metal, no soft compression material design they have. I plan to reuse. This gasket design is also what allows the use of regular bolts, as there is no soft material to compress/expanding during heat up and cooldown, thus leading to loosening of the header bolts.
5/18/07, 07:44 AM
#49
Mach 1 Member
Thread Starter
Join Date: December 18, 2004
Posts: 669
Likes: 0
Received 0 Likes
on
0 Posts
May 17
First wave of frustration sets in. I didn't get much accomplished today. Really it was my own fault for trying to get more done than I should have. I removed all 8 studs from the top. BTW, it is pointless to remove the nuts all the way. Just loosen them a turn or so, then grab the 5mm socket (and I used a 1/4 drive rachet) to remove the stud w/ the nut still on it. I then went under and removed 6 of the 8 stud/nuts on the bottom. So far no problems, easy stuff. This is where I should have stopped for the night.
I didn't have a jack w/ me, but I tried to push forward and get as much done as possible w/o it. The last 2 nut/studs are up above the motor mounts and difficult to reach. I was able to get out the Driver-side w/o too much trouble, especially w/ my new swivel head, racheting box end Craftsman wrench (1/2" by the way) . Then the frustration set in.
I could NOT get the manifold out. I tried to loosen the steering shaft by removing the 2 screws at the bottom, on the U-joint by the rack. The shaft would move up about 1/2", but not enough to move it out of the way. By this point, it was getting late, I was frustrated & dirty, and I didn't went to get all worked up, so I went to bed.
Sorry no pics today. The studs can be seen in some of my previous pics anyway.
The plan to make it all go easy, IMHO, will be to get the jack, and support the engine while removing a motor mount. It will make removing the stock manifold a breeze (I anticipate) and needs to be done to get the new headers in anyway. I will photograph that exercise, hopefully this w/e. I plan to operate on one side at a time: support motor, remove mount, remove manifold, install header, reinstall motor mount. Repeat for other side.
Time spent: 1.5 hrs (time wasted: 45 min) Total project time: 5 hrs
First wave of frustration sets in. I didn't get much accomplished today. Really it was my own fault for trying to get more done than I should have. I removed all 8 studs from the top. BTW, it is pointless to remove the nuts all the way. Just loosen them a turn or so, then grab the 5mm socket (and I used a 1/4 drive rachet) to remove the stud w/ the nut still on it. I then went under and removed 6 of the 8 stud/nuts on the bottom. So far no problems, easy stuff. This is where I should have stopped for the night.
I didn't have a jack w/ me, but I tried to push forward and get as much done as possible w/o it. The last 2 nut/studs are up above the motor mounts and difficult to reach. I was able to get out the Driver-side w/o too much trouble, especially w/ my new swivel head, racheting box end Craftsman wrench (1/2" by the way)
. Then the frustration set in.I could NOT get the manifold out.
I tried to loosen the steering shaft by removing the 2 screws at the bottom, on the U-joint by the rack. The shaft would move up about 1/2", but not enough to move it out of the way. By this point, it was getting late, I was frustrated & dirty, and I didn't went to get all worked up, so I went to bed.Sorry no pics today. The studs can be seen in some of my previous pics anyway.
The plan to make it all go easy, IMHO, will be to get the jack, and support the engine while removing a motor mount. It will make removing the stock manifold a breeze (I anticipate) and needs to be done to get the new headers in anyway. I will photograph that exercise, hopefully this w/e. I plan to operate on one side at a time: support motor, remove mount, remove manifold, install header, reinstall motor mount. Repeat for other side.
Time spent: 1.5 hrs (time wasted: 45 min) Total project time: 5 hrs
5/18/07, 07:53 AM
#50
 5/18/07, 08:04 AM
#51
Mach 1 Member
Thread Starter
Join Date: December 18, 2004
Posts: 669
Likes: 0
Received 0 Likes
on
0 Posts
Bill, yes all the studs have been removed. The manifold is loose, and I can move it all around up there, I even have the metal gaskets out. I just haven't found a contortion that will allow it to be removed from the car. I didnt' want to wiggle it around too much at the risk of dinging up the nice soft aluminum head sealing surface. It interfers w/ the steering shaft, motor mount, and engine/tranny bell housing. I'll go fwd w/ removing the motor mount to give me all the room I need.
Does that clear thing up?
Does that clear thing up?
5/18/07, 08:51 AM
#53
5/18/07, 09:04 AM
#54
Mach 1 Member
Thread Starter
Join Date: December 18, 2004
Posts: 669
Likes: 0
Received 0 Likes
on
0 Posts
 5/18/07, 03:44 PM
#55
V6 Member

Join Date: December 14, 2006
Posts: 98
Likes: 0
Received 0 Likes
on
0 Posts
Yup, the headers won't wanna come out as they foul on some other components. I ended up suspending the engine and removing the mount brackets as well as the starter motor on the passenger side. Not only does this make it a breeze to get the stock ones out, it makes it much easier to get the new ones in!
5/21/07, 07:07 AM
#56
Mach 1 Member
Thread Starter
Join Date: December 18, 2004
Posts: 669
Likes: 0
Received 0 Likes
on
0 Posts
I didn't do anything on Friday or Sunday, but here is a recap of Saturday nights activities:
May 19
Having left off with the stock D-side manifold off and loose, but unable to remove, I proceeded by supporting the engine with a floor jack. I placed it up front, and using some wood blocks, placed it along the front lip of the oil pan on a couple of bolts. I expected the engine to lift slightly from the car, but the whole front end moved up all together. Here are the 2 nuts to remove on the motor mounts, you can easily see/reach the single nut per side, straight down from the top:
Drivers side:
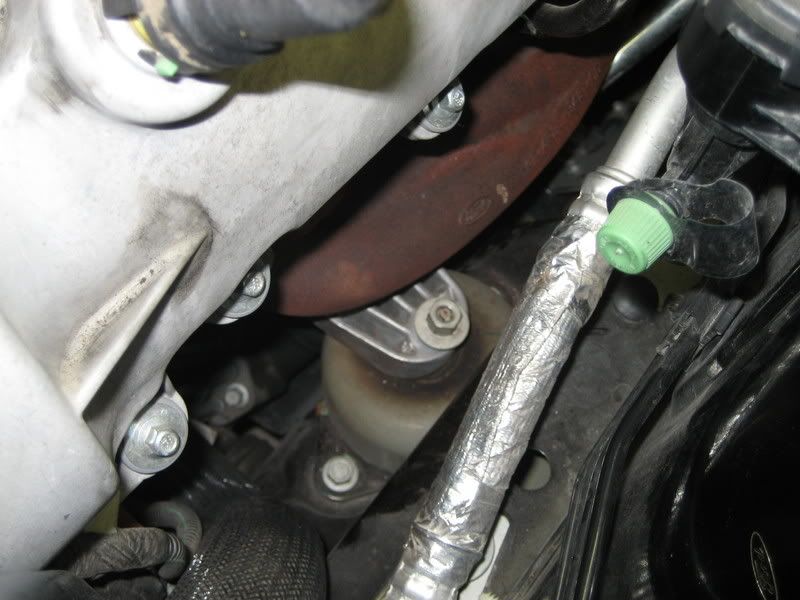
Pass. side:

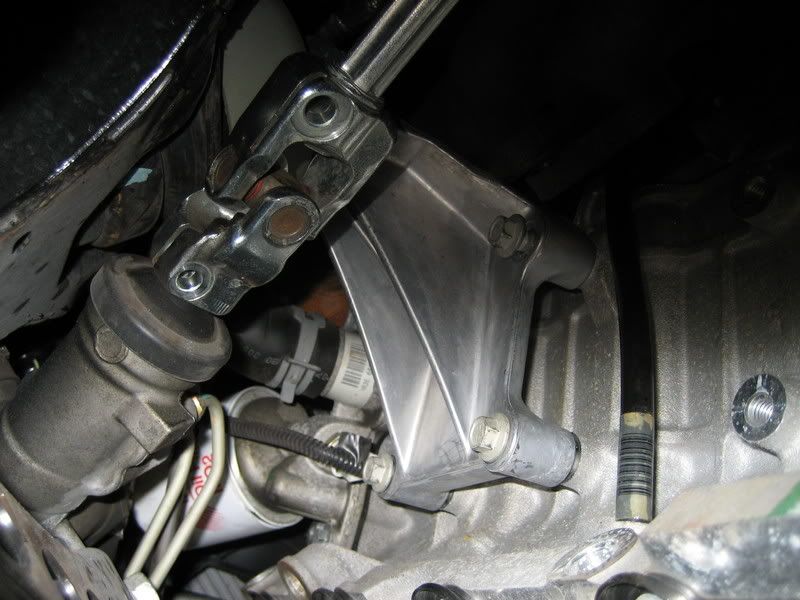
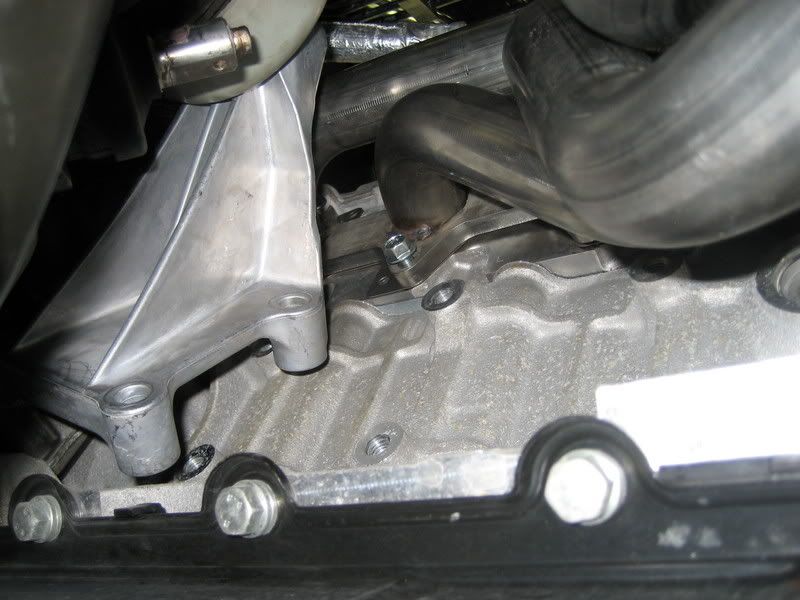
Here is the D-side motor mount from the bottom. 4 bolts and it come loose, easy stuff. Shown w/ bolts already a little loose.
I was then able to remove the motor mount, and the stock manifold dropped right out too!! YEAAA!!!
So here is the drivers side almost ready for new headers to go on. You can see the steering linkage is still in place, tho the 2 bolts have been removed. Also still in this pic is the oil dip stick tube. It needs to be removed. There is 1 bolt on a little tab to get it off. Once the bolt is out, just pull up and it will come out. There is an orange oring sealing the bottom of the tube, which provides what little resistance you may encounter:
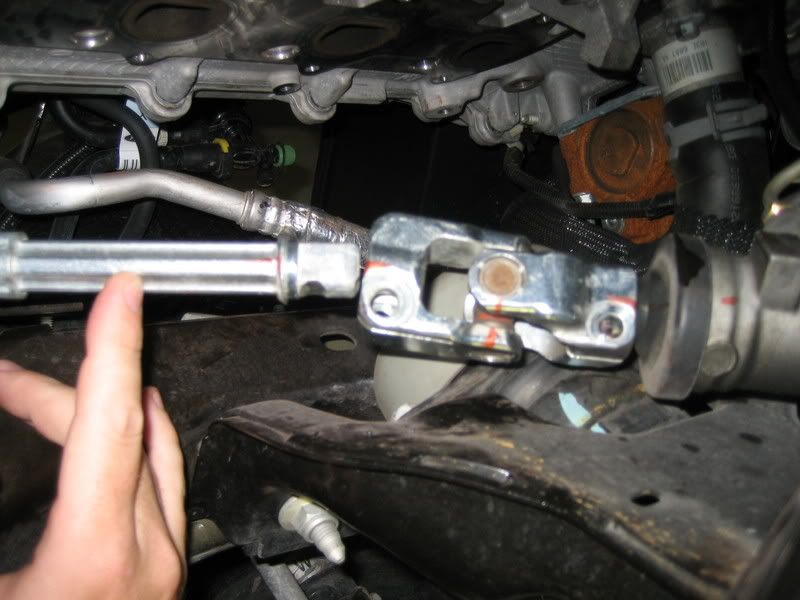
Those 2 bolts alone did not provide enough movement to get the linkage out of the way. So I heard about loosening the 2 10mm nuts inside the car, at the firewall, where the steering column comes thru. This did indeed allow enough movement to disengage the linkage. I marked everything w/ a sharpie to make sure it all lines up later.
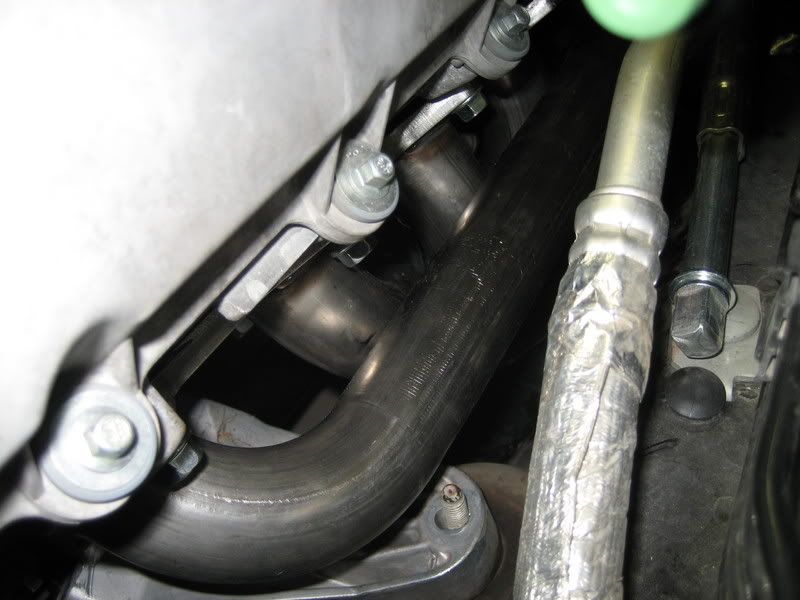
I then proceeded to fit the headers into place. With the incredible design, and the motor mount and steering link removed, they went in easily. Then I realized I could NOT get the motor mount back on w/ the header in place. SO, don't remove the D-side motor mount, just swing it out of the way.
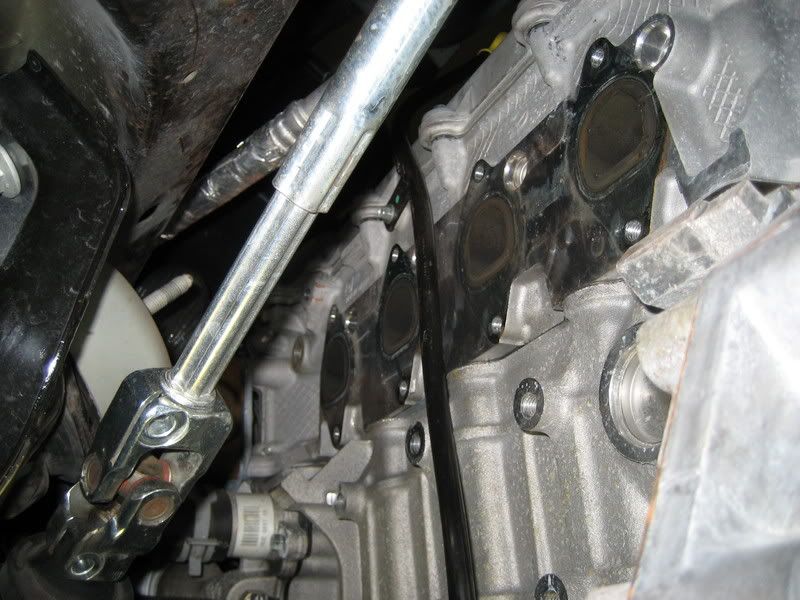
So here are some shots w/ the header in place.
You can see the steering link laying to the side here:
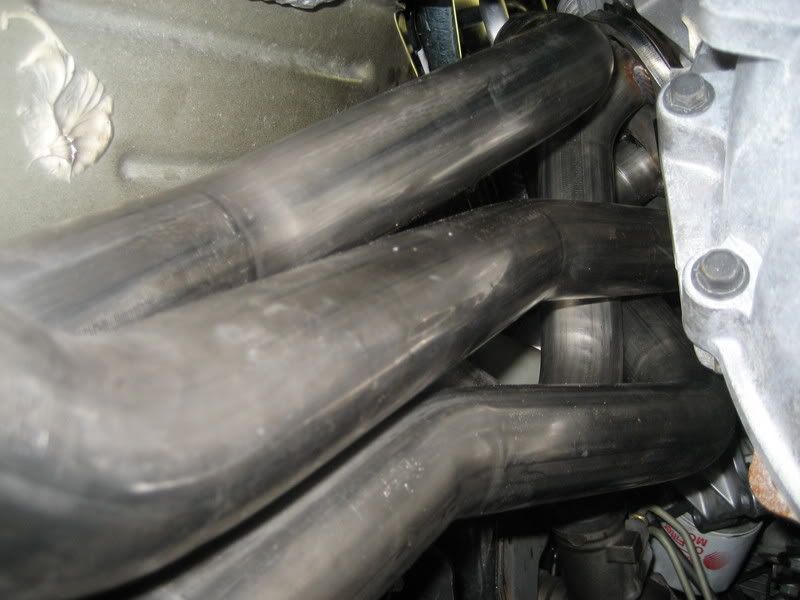
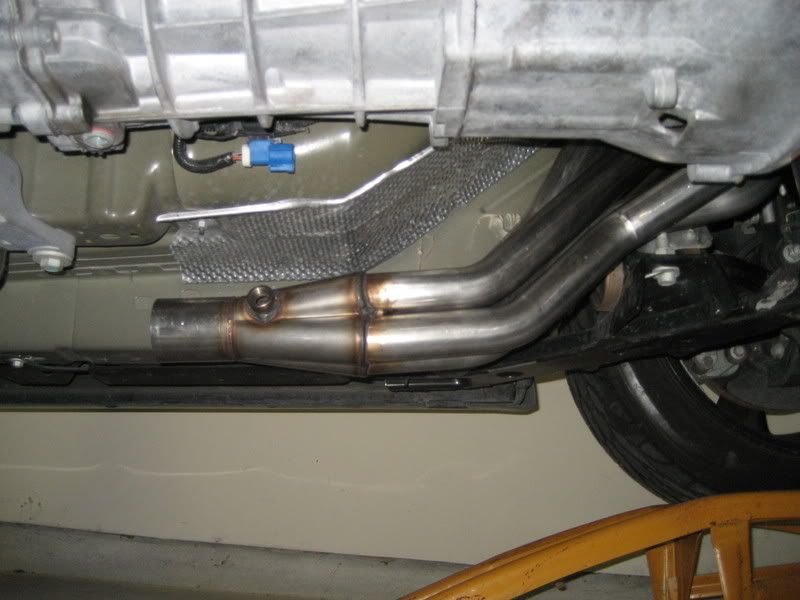

It sure looks bad azz in there!! I ended the night after I finally got the 2 piece metal gaskets in place. The 2 pieces are exactly the same. I just made sure they went back on the same way the were removed. The top 4 bolts are easy to get in, as are 2 or 3 of the bottom ones. I didn't have any anti-seize so I left it with 6 bolts holding the gaskets and header in place. Getting this far has rejuvenated my enthusiasm.
I spent 3 hrs doing this. Another person would have drasticly cut down on the time. I spent alot of time sliding in and out from under the car inserting and removing and re-inserting various header bolts in an effort to hold everything in place, yet loose enought to get the gaskets in. With help, one person can hold the gaskets in place from the bottom, while the other can run some bolts in from the top. But this little exercise is to see if 1 person can do it by themselves given enough time. So far so good.
Next step will be putting anti-seize on all the bolts, tighen everything down, reinstall steering linkage, and reinstall motor mount (all on the drivers side of course). I'm curious how easy it will be to inistall and tighten a couple of those bolts. I'm anticipating 1 or 2 of them being a real PITA!
Time spent: 3 hrs Total on project: 8 hrs
May 19
Having left off with the stock D-side manifold off and loose, but unable to remove, I proceeded by supporting the engine with a floor jack. I placed it up front, and using some wood blocks, placed it along the front lip of the oil pan on a couple of bolts. I expected the engine to lift slightly from the car, but the whole front end moved up all together. Here are the 2 nuts to remove on the motor mounts, you can easily see/reach the single nut per side, straight down from the top:
Drivers side:
Pass. side:
Here is the D-side motor mount from the bottom. 4 bolts and it come loose, easy stuff. Shown w/ bolts already a little loose.
I was then able to remove the motor mount, and the stock manifold dropped right out too!! YEAAA!!!
So here is the drivers side almost ready for new headers to go on. You can see the steering linkage is still in place, tho the 2 bolts have been removed. Also still in this pic is the oil dip stick tube. It needs to be removed. There is 1 bolt on a little tab to get it off. Once the bolt is out, just pull up and it will come out. There is an orange oring sealing the bottom of the tube, which provides what little resistance you may encounter:
Those 2 bolts alone did not provide enough movement to get the linkage out of the way. So I heard about loosening the 2 10mm nuts inside the car, at the firewall, where the steering column comes thru. This did indeed allow enough movement to disengage the linkage. I marked everything w/ a sharpie to make sure it all lines up later.
I then proceeded to fit the headers into place. With the incredible design, and the motor mount and steering link removed, they went in easily. Then I realized I could NOT get the motor mount back on w/ the header in place. SO, don't remove the D-side motor mount, just swing it out of the way.
So here are some shots w/ the header in place.
You can see the steering link laying to the side here:
It sure looks bad azz in there!! I ended the night after I finally got the 2 piece metal gaskets in place. The 2 pieces are exactly the same. I just made sure they went back on the same way the were removed. The top 4 bolts are easy to get in, as are 2 or 3 of the bottom ones. I didn't have any anti-seize so I left it with 6 bolts holding the gaskets and header in place. Getting this far has rejuvenated my enthusiasm.
I spent 3 hrs doing this. Another person would have drasticly cut down on the time. I spent alot of time sliding in and out from under the car inserting and removing and re-inserting various header bolts in an effort to hold everything in place, yet loose enought to get the gaskets in. With help, one person can hold the gaskets in place from the bottom, while the other can run some bolts in from the top. But this little exercise is to see if 1 person can do it by themselves given enough time. So far so good.
Next step will be putting anti-seize on all the bolts, tighen everything down, reinstall steering linkage, and reinstall motor mount (all on the drivers side of course). I'm curious how easy it will be to inistall and tighten a couple of those bolts. I'm anticipating 1 or 2 of them being a real PITA!
Time spent: 3 hrs Total on project: 8 hrs
