Journal: MY American Racing LT Header install, day by day
 5/16/07, 06:06 AM
#1
Mach 1 Member
Thread Starter
Join Date: December 18, 2004
Posts: 669
Likes: 0
Received 0 Likes
on
0 Posts
Journal: MY American Racing LT Header install, day by day
Perhaps a bit of a self-serving thread, I wanted to crudely document what I may go thru during the self install of the American Racing longtube, 1 3/4, catted H-pipe, header system for my 05 Mustang GT. I'm attempting to do this all myself, on ramps, in my garage. May not be the easiest, and certain not the fastest way to get it done, but shop time is BIG $$, and time is the one thing I have for this install. Maybe it will take a few days, maybe a few weeks (hopefully not a few months!). I'll be working on it off and on after work, or when the twins go to bed in the evenings.
As the install progresses, I'll try to keep up with pictures along the way. Hopefully those that have done this will keep tabs, and answer any question I may have as I run into road blocks along the way. And of course I'll try to provide any answers to ?s others my have.
I have no direct experence with these. I'm not an ASE certified master tech, or anything of the sort. I am pretty good w/ hand tools, and very mechanically inclined. So we'll see what a moding newbie can screw up.
Stay tuned and see if I'll be successful, and hopefully I won't drag this out too long.
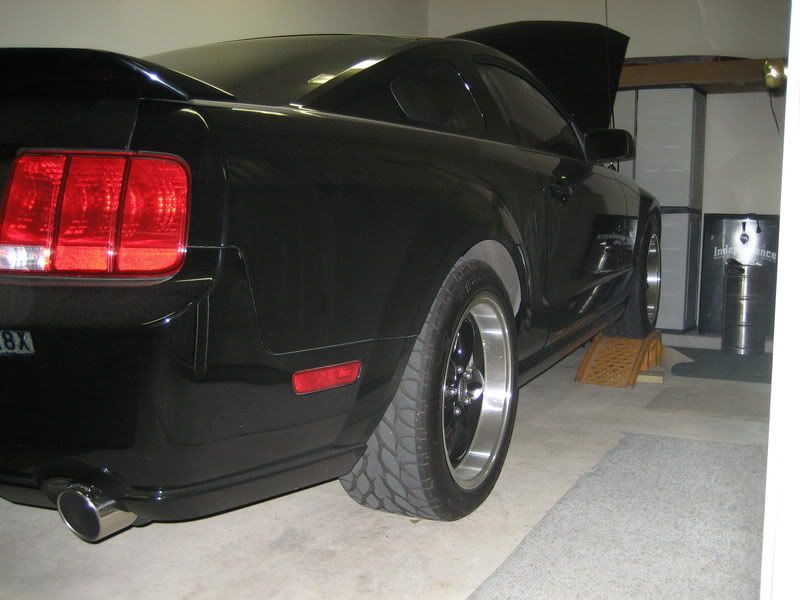
They finally arrive:
Wasn't too thrilled about the box condition, but everything looks fine:
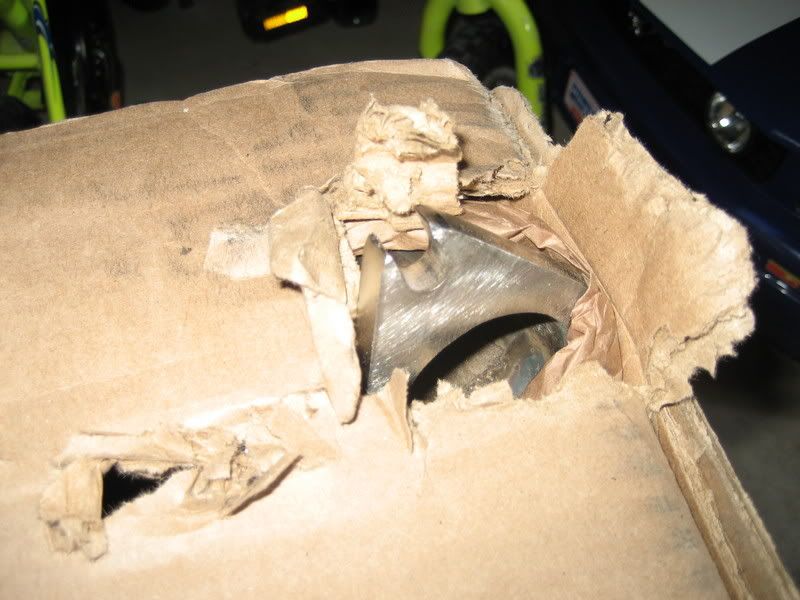
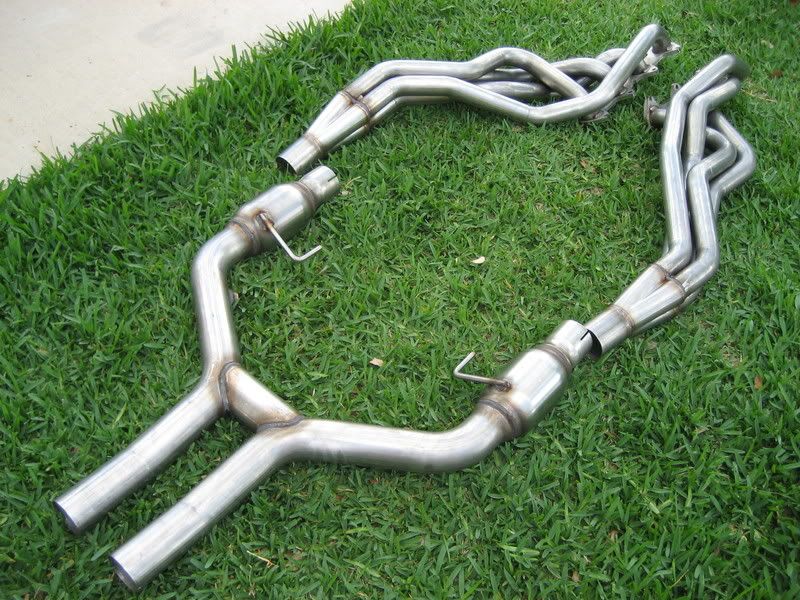
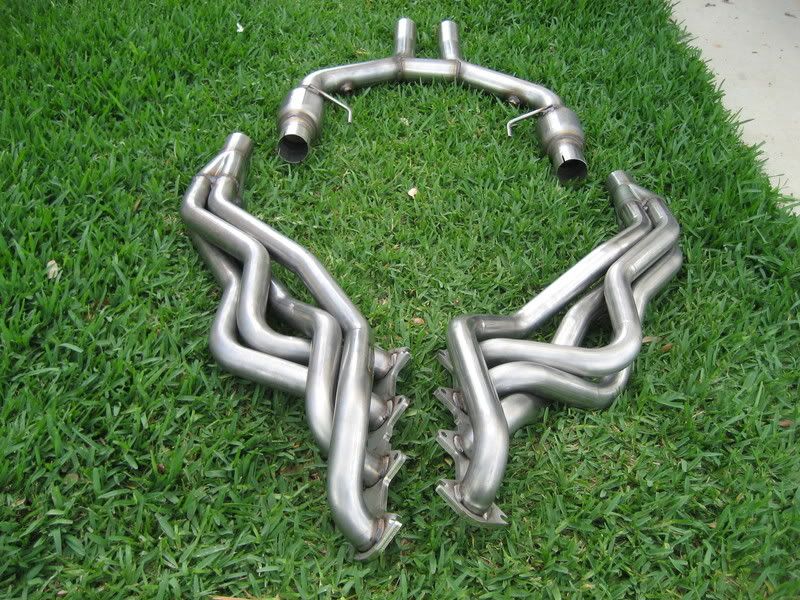
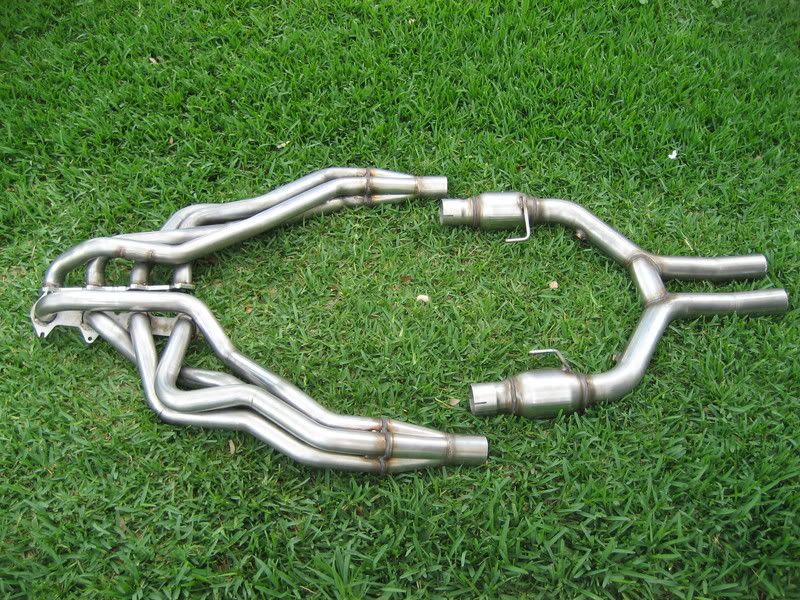
SWEEEEEEET:

As the install progresses, I'll try to keep up with pictures along the way. Hopefully those that have done this will keep tabs, and answer any question I may have as I run into road blocks along the way. And of course I'll try to provide any answers to ?s others my have.
I have no direct experence with these. I'm not an ASE certified master tech, or anything of the sort. I am pretty good w/ hand tools, and very mechanically inclined. So we'll see what a moding newbie can screw up.
Stay tuned and see if I'll be successful, and hopefully I won't drag this out too long.
They finally arrive:
Wasn't too thrilled about the box condition, but everything looks fine:
SWEEEEEEET:
 5/16/07, 06:11 AM
#2
Mach 1 Member
Thread Starter
Join Date: December 18, 2004
Posts: 669
Likes: 0
Received 0 Likes
on
0 Posts
May 14
Cleaned out garage. Got the car on ramps, had to use boards 'cause front lip hit ramp. Got a finger on all 16 manifold nuts and studs. Determined 1/2 fits more snug than 13mm, need 5mm to remove studs. Would like racheting box end wrenches.
Here are my working conditions....
Not a whole lotta room...
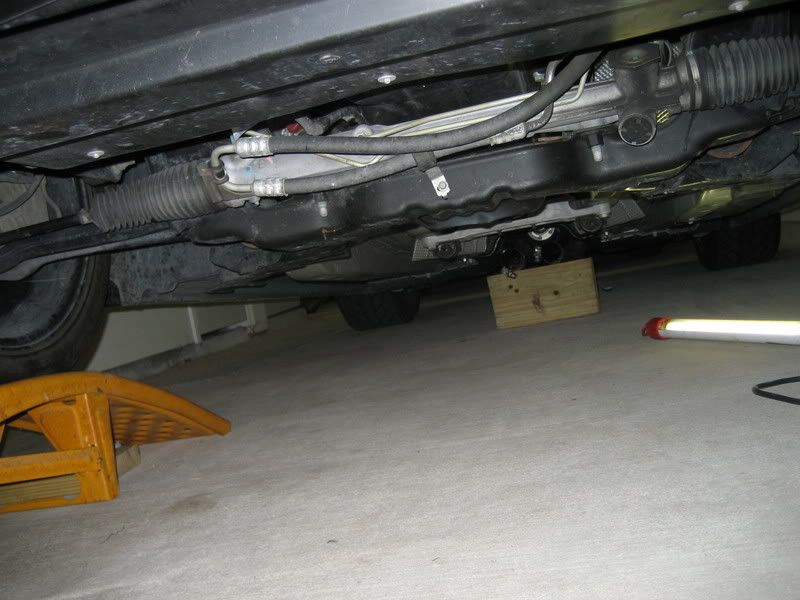
Time spent: 1 hr Total time on project: 1 hr.
Cleaned out garage. Got the car on ramps, had to use boards 'cause front lip hit ramp. Got a finger on all 16 manifold nuts and studs. Determined 1/2 fits more snug than 13mm, need 5mm to remove studs. Would like racheting box end wrenches.
Here are my working conditions....
Not a whole lotta room...
Time spent: 1 hr Total time on project: 1 hr.
5/16/07, 06:16 AM
#3
GT Member
Join Date: July 20, 2006
Posts: 121
Likes: 0
Received 0 Likes
on
0 Posts
Thank you very much for doing this. I feel like I'm some what decent with tools around the car but have always been scared of headers. I look forward to keeping up with your write up, so when I do mine, I know what I'm getting in to.
Thanks again!
Thanks again!
5/16/07, 06:22 AM
#4
Team Mustang Source
Join Date: June 19, 2004
Location: Phoenixville, PA
Posts: 6,839
Likes: 0
Received 2 Likes
on
2 Posts
Jim, your a better man than me for doing this  . Once I saw how tight it was to get in there, I wasn't going to even try to install these things. I'll look forward to reading your rightup. Just be careful when you have to take the steering assembly off, to get the headers to clear. That I think was the only tricky thing to do. That and raising the motor up an inch, or so I heard. I love mine, and Jim, you will be BLOWN AWAY by the sound of your car when you first start it up,drive it down the street and give it one WOT run!!
. Once I saw how tight it was to get in there, I wasn't going to even try to install these things. I'll look forward to reading your rightup. Just be careful when you have to take the steering assembly off, to get the headers to clear. That I think was the only tricky thing to do. That and raising the motor up an inch, or so I heard. I love mine, and Jim, you will be BLOWN AWAY by the sound of your car when you first start it up,drive it down the street and give it one WOT run!!
5/16/07, 06:29 AM
#5
Your trial and tribulations doiing this will determine what I do. My own install or a shop install. I am already leaning towards doing it myself also because of a JBA LT write up I found elsewhere. This will nice to see.
Thanks!!
Thanks!!
5/16/07, 06:30 AM
#6
Mach 1 Member
Thread Starter
Join Date: December 18, 2004
Posts: 669
Likes: 0
Received 0 Likes
on
0 Posts
May 15
Started turning wrenches. Got the stock H-pipe off. Removed 3 of 4 O2 sensors. Thought I was stuck forever as I wedged my hand above the starter to unplug the upper passenger side O2 sensor. By FAR the most difficult to undo. I could barely depress the little tab to disconnect, but I prevailed. I had loosened the pipes to gain a little access, but it then pinned my hand against the starter/ tranny bell housing. Just as I had endured enough crushing pain and was about to yell for help, I lifted the H-pipe with my free arm, and provided just enough space to get unstuck.
Loosening the (easily accessable) bottom bolt of the clamp holding the pipe to the manifolds, made it easy to loosen the upper (not as easily accessable) bolt. Took some Liquid Wrench and serious force to break the first ones loose. See that little green/red connector in the upper left corner, yeah....have fun with that one .
.
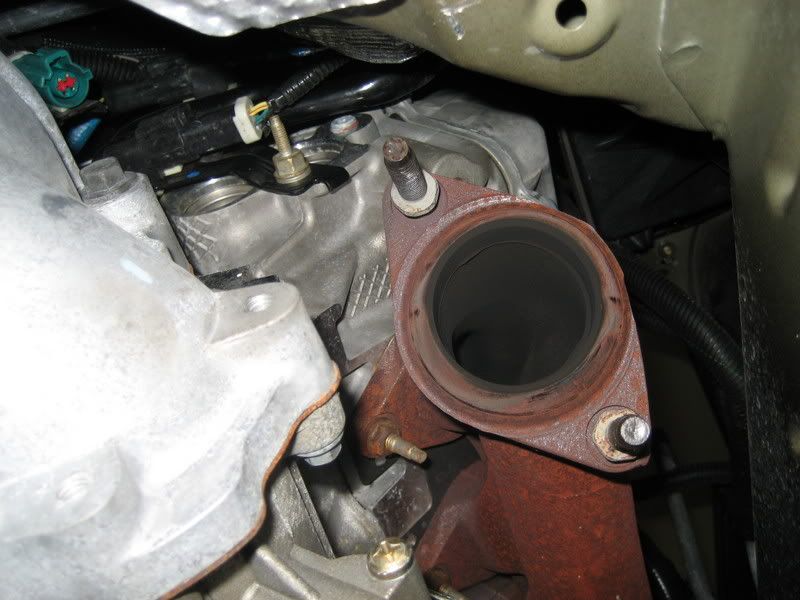
Here is the drivers side. 4th O2 sensor still in manifold, but unplugged.
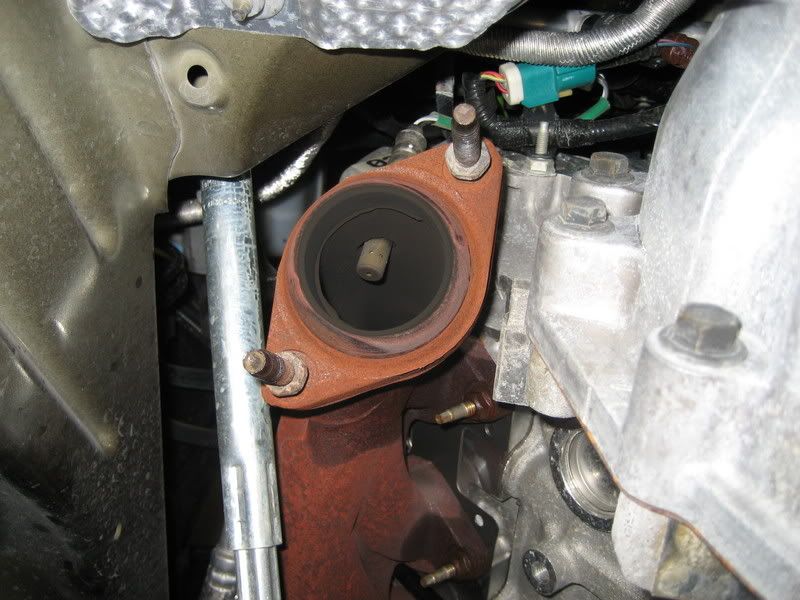
There wasn't even room to pull the catted H-pipe out, but some tilting and sliding across some cardboard and the stock setup is out!
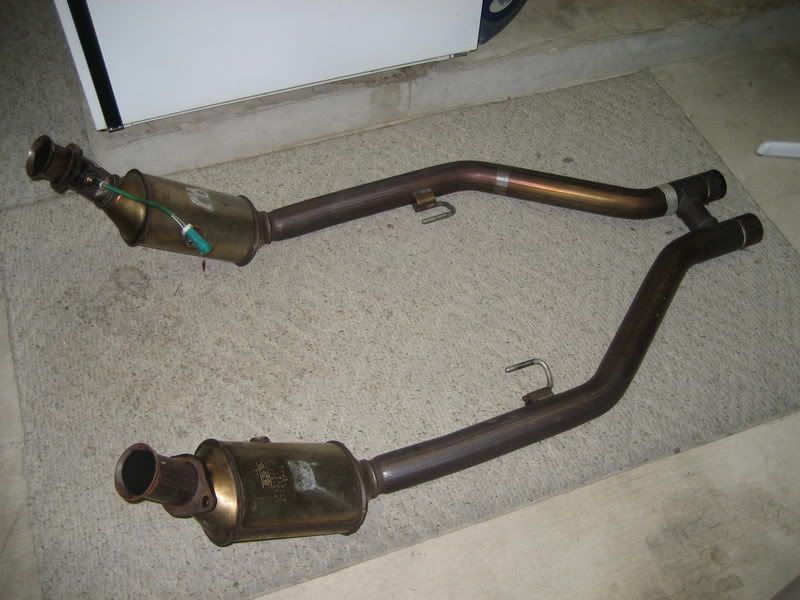
Time spent: 1.5 hrs Total project time: 2.5 hrs
Started turning wrenches. Got the stock H-pipe off. Removed 3 of 4 O2 sensors. Thought I was stuck forever as I wedged my hand above the starter to unplug the upper passenger side O2 sensor. By FAR the most difficult to undo. I could barely depress the little tab to disconnect, but I prevailed. I had loosened the pipes to gain a little access, but it then pinned my hand against the starter/ tranny bell housing. Just as I had endured enough crushing pain and was about to yell for help, I lifted the H-pipe with my free arm, and provided just enough space to get unstuck.
Loosening the (easily accessable) bottom bolt of the clamp holding the pipe to the manifolds, made it easy to loosen the upper (not as easily accessable) bolt. Took some Liquid Wrench and serious force to break the first ones loose. See that little green/red connector in the upper left corner, yeah....have fun with that one
.Here is the drivers side. 4th O2 sensor still in manifold, but unplugged.
There wasn't even room to pull the catted H-pipe out, but some tilting and sliding across some cardboard and the stock setup is out!
Time spent: 1.5 hrs Total project time: 2.5 hrs
5/16/07, 06:45 AM
#9
Mach 1 Member
Thread Starter
Join Date: December 18, 2004
Posts: 669
Likes: 0
Received 0 Likes
on
0 Posts
I wouldn't have thought about touching one of todays advanced cars for modding a year or 2 ago. But the experience I've learned here, and the relative ease of the things I've done so far (CAI, mufflers, UDPs, front and back turn signals stuff), and the reported quality fitment of the ARH system, has given me the confidence to give it a go. Fortunately for me, I have another vehicle (Dodge truck) to drive around, so I can take my time, and not stress out over any road blocks that come along. If I don't have the right tool, fine, I'll stop, go to bed, get the tool, and continue later.
5/16/07, 06:52 AM
#10
Legacy TMS Member
Good luck Jim! This is great that you're doing this. The only advice I can give you, is to make sure you stay properly refreshed during this whole ordeal. 
5/16/07, 07:26 AM
#11
Bullitt Member

Join Date: January 9, 2005
Posts: 243
Likes: 0
Received 0 Likes
on
0 Posts
Looking good. Did you remove the battery to unplug the top sensor on the passanger side? Makes reaching it a snap and you might need the room later anyway.
If you do end up needing a hand, send me a PM.
If you do end up needing a hand, send me a PM.
5/16/07, 07:31 AM
#12
Cobra R Member
Join Date: February 25, 2004
Posts: 1,796
Likes: 0
Received 0 Likes
on
0 Posts
i still believe that anyone that can spin a wrench can do anything to any car. I do everything to my own cars. engine swaps, clutch jobs, trans swaps, carb rebuilds/ tuning, whichever. to me half of the fun and pride i take in my car is the fact that a tech hasnt touched it since the PDI, mods are done by me. maintenance is done by me. Jeff's advise is good, you need to watch that steering linkage.
my other tip, make sure you use a good torque wrench to tighten the bolts down, you dont want to be chasing gasket leaks after the fact. other than that remember if your in a tight spot, and what ever is in the way is removeable, take it out/off, it helps so much to get stuff out of the way.
my other tip, make sure you use a good torque wrench to tighten the bolts down, you dont want to be chasing gasket leaks after the fact. other than that remember if your in a tight spot, and what ever is in the way is removeable, take it out/off, it helps so much to get stuff out of the way.
5/16/07, 08:04 AM
#13
Mach 1 Member
Thread Starter
Join Date: December 18, 2004
Posts: 669
Likes: 0
Received 0 Likes
on
0 Posts
As for the steering. Anything special or tricky? I noticed one bolt at the bottom of the silver shaft, didn't notice how it's attached up top. Guess I'll find out later.
5/16/07, 08:21 AM
#14
V6 Member

Join Date: December 14, 2006
Posts: 98
Likes: 0
Received 0 Likes
on
0 Posts
Having been through this myself a couple of weeks ago, hopefully my website will help you:
http://www.mustang-gtcs.info/mods01.htm#exhaust
There's plenty of other stuff on there that I installed too for reference
http://www.mustang-gtcs.info/mods01.htm#exhaust
There's plenty of other stuff on there that I installed too for reference
5/16/07, 08:37 AM
#15
Mach 1 Member
Join Date: May 11, 2006
Posts: 845
Likes: 0
Received 0 Likes
on
0 Posts
Having been through this myself a couple of weeks ago, hopefully my website will help you:
http://www.mustang-gtcs.info/mods01.htm#exhaust
There's plenty of other stuff on there that I installed too for reference
http://www.mustang-gtcs.info/mods01.htm#exhaust
There's plenty of other stuff on there that I installed too for reference
wow, nice site you have there!
 5/16/07, 08:45 AM
#17


Pulling the battery and tray would've made access to the O2 sensor plug much easier. I think I've read that the battery and tray needs to go anyway to access some of the nuts on the manifold.
btw, I noticed in your first set of pics that the rear tires aren't chocked. If they are, good for you. If not, go and do it! And, don't forget to wear eye protection under there, especially when spraying penetrating oil.
Personally, I'd go invest in some tall jack stands and a floor jack to give yourself another foot of breathing and working room. It won't be a waste as I'm sure you'll use them again and again.
Good luck!
 5/16/07, 08:48 AM
#18
Cobra R Member
Join Date: February 25, 2004
Posts: 1,796
Likes: 0
Received 0 Likes
on
0 Posts
Yeah, I probably should have just pullied the battery. I'll probably do that tonight, along with the starter and steering linkage.
As for the steering. Anything special or tricky? I noticed one bolt at the bottom of the silver shaft, didn't notice how it's attached up top. Guess I'll find out later.
As for the steering. Anything special or tricky? I noticed one bolt at the bottom of the silver shaft, didn't notice how it's attached up top. Guess I'll find out later.
nothing too crazy, just that you have to keep track of where the shaft goes into the column and the rack. so that everything will line up with the wheel and the tires when you get it all back together last thing you need is to have the wheel pointing the wrong direction
5/16/07, 09:11 AM
#20
Cobra Member
Join Date: February 2, 2005
Location: Aurora, IL
Posts: 1,221
Likes: 0
Received 0 Likes
on
0 Posts
For the steering shaft, also make sure that the steering column is locked so that the wheel will not be able to spin freely. Having the wheel spin easily could cause damage to the clockspring and you'll get an airbag light, along with an inoperative horn and cruise control. The electrical ribbon in the clockspring is quite sensitive.