Going to make my own brake duct kit

 3/30/10, 10:06 AM
#22
Cobra Member
Join Date: April 20, 2005
Location: Orlando, FL
Posts: 1,477
Likes: 0
Received 0 Likes
on
0 Posts
I saw a couple of listings on ebay for $175 now, they used to be $350. Brake dust shields and ducts, for our GTs...
Shelby was working on a CF dust shield for 13" rotors, but after testing, apparently the CF was melting under the high temp. I don't know whatever came after that because I cancelled my order with Moss Mustang and got the FRPP kit off of ebay.
Shelby was working on a CF dust shield for 13" rotors, but after testing, apparently the CF was melting under the high temp. I don't know whatever came after that because I cancelled my order with Moss Mustang and got the FRPP kit off of ebay.
Last edited by rony1976; 3/30/10 at 10:13 AM.
3/30/10, 09:40 PM
#24
Mach 1 Member
Thread Starter
Join Date: September 24, 2004
Location: Victoria, BC, Canada
Posts: 901
Likes: 0
Received 1 Like
on
1 Post
Got the sub box ports today and proceeded to heat and squish them to an oval shape to fit the opening in the lower grill. Left round, they were a little too big. Hopefully open up the grill and fit them in a couple days.
3/31/10, 08:03 PM
#26
Mach 1 Member
Thread Starter
Join Date: September 24, 2004
Location: Victoria, BC, Canada
Posts: 901
Likes: 0
Received 1 Like
on
1 Post
Okay, I have the holes cut and fit the inlets in them, looks good. Now the question, leave them black or paint chrome with the aluminum or stainless screen?
4/1/10, 11:18 AM
#27
GT Member
Join Date: September 22, 2008
Location: Eastern Shore of Virginia
Posts: 175
Likes: 0
Received 0 Likes
on
0 Posts
This is a sweet project. Nice work with the brake dust shields. I work in a building with at 25,000 sq. ft. machine shop and would use it at my disposal if I were to do this.
4/1/10, 08:00 PM
#28
Cobra R Member
I dont care for those inlets. Looks like a Hamster Habitat.
Did you see where that guy sliced the back off to keep the grill?
That would be the way to go IMHO....
You can fab up a reducer from aluminum for the back to tie the piping in.
Did you see where that guy sliced the back off to keep the grill?
That would be the way to go IMHO....
You can fab up a reducer from aluminum for the back to tie the piping in.
4/2/10, 03:18 PM
#29
That's too bad,because you could market these brake caliper spindle attachments and make good money. might think about doing a patent on the brake caliper design that you have and find a company to make and distribute .
Last edited by flamin ponyexpress; 4/2/10 at 03:20 PM.
4/2/10, 05:46 PM
#30
Mach 1 Member
Thread Starter
Join Date: September 24, 2004
Location: Victoria, BC, Canada
Posts: 901
Likes: 0
Received 1 Like
on
1 Post
Painted the inlets and loosely installed the lower grill. There will be a honeycomb stainless steel grill recessed about 1" back, but I have to wait up to 2 weeks for some material to come in. The grill will look just like the one posted above, but it will be slightly oval to fit mine. I have also temporarily tried the hose and it fits perfect.
The front bumper is filthy and has some double sided tape on it from removing my chin spoiler.
The front bumper is filthy and has some double sided tape on it from removing my chin spoiler.
Last edited by cop on my back; 4/2/10 at 05:47 PM.
4/2/10, 11:45 PM
#31
Looks great and some nice fabrication work. You may want to consider trimming the backing plate so the radius matches the inner rotor hat, then adding a ring at a right angle so it comes close to the rotor--basically almost sealing to the rotor. Right now you have a heat shield that is reflecting rotor heat back to the inner braking surface. Not only does it limit the cooling, it could stress the rotor due to the differential cooling on the two faces, ending up with a cracked rotor. Where it really becomes a problem is in the paddock after a hard run and the rotors start to cool.
Here are the ducts I bought off a guy on cornercarvers.com (not my pic, but to better explain):
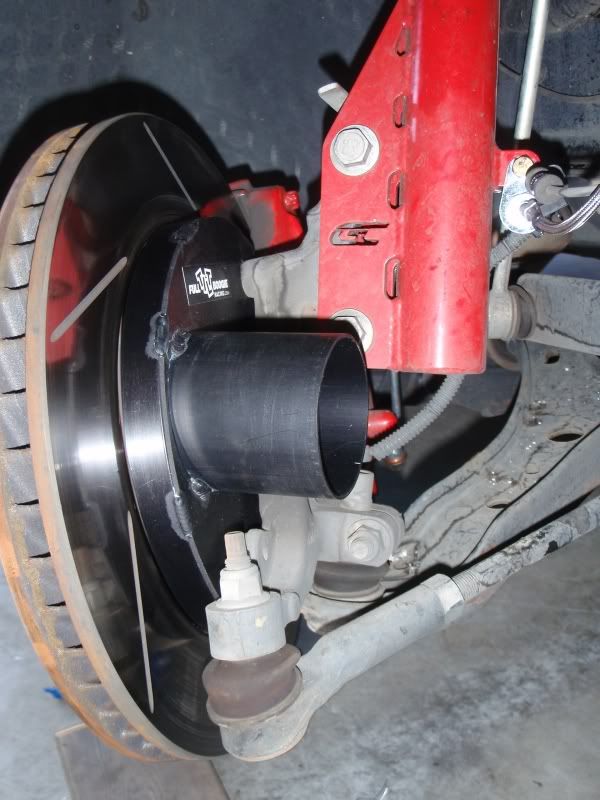
And since you are making them, a really clever setup I saw had ducts similar to those pictured, but they left a 1-2" wide projection coming off them to act as a heat shield for the tie rod boot. Basically, if you trimmed yours to a smaller radius, leave a section to protect the tie rod. I wrap mine in the good foil duct sealing tape and haven't had a melted boot yet, but it can be a hassle replacing the tape every few months.
Edit: just looked at your pictures again and noticed it looks like you have machined spacers to get it mounted close to the rotor--nice, and it makes it even easier to modify. Just trim until the diameter exposes the full braking face.
Here are the ducts I bought off a guy on cornercarvers.com (not my pic, but to better explain):
And since you are making them, a really clever setup I saw had ducts similar to those pictured, but they left a 1-2" wide projection coming off them to act as a heat shield for the tie rod boot. Basically, if you trimmed yours to a smaller radius, leave a section to protect the tie rod. I wrap mine in the good foil duct sealing tape and haven't had a melted boot yet, but it can be a hassle replacing the tape every few months.
Edit: just looked at your pictures again and noticed it looks like you have machined spacers to get it mounted close to the rotor--nice, and it makes it even easier to modify. Just trim until the diameter exposes the full braking face.
Last edited by Import-Slaya; 4/2/10 at 11:50 PM.
4/3/10, 07:37 AM
#32
Mach 1 Member
Thread Starter
Join Date: September 24, 2004
Location: Victoria, BC, Canada
Posts: 901
Likes: 0
Received 1 Like
on
1 Post
Yes, I have spacers, so it would be very easy to make some about .200 thicker to get it closer to the rotor. I may also have to get some "ribs" welded to the back to make it a little more stiff. I think on hard cornering the plate will flex more than I want.
Thanks for the advice and pictures, good stuff.
Thanks for the advice and pictures, good stuff.
4/3/10, 07:42 AM
#33
Painted the inlets and loosely installed the lower grill. There will be a honeycomb stainless steel grill recessed about 1" back, but I have to wait up to 2 weeks for some material to come in. The grill will look just like the one posted above, but it will be slightly oval to fit mine. I have also temporarily tried the hose and it fits perfect.
The front bumper is filthy and has some double sided tape on it from removing my chin spoiler.
The front bumper is filthy and has some double sided tape on it from removing my chin spoiler.
If you don't mind,where did you get the hose ? And what size is it ? Thank you.
4/3/10, 07:58 AM
#34
Mach 1 Member
Thread Starter
Join Date: September 24, 2004
Location: Victoria, BC, Canada
Posts: 901
Likes: 0
Received 1 Like
on
1 Post
It is 3" and I got it from a local hydraulic shop supplier. They have fittings and all kinds of hydraulic hoses along with these types of hoses. It was $50 for 8' of hose.
Total kit cost to date, about $85 with just a couple more things to get.
Total kit cost to date, about $85 with just a couple more things to get.
4/4/10, 03:16 PM
#35
Mach 1 Member
Thread Starter
Join Date: September 24, 2004
Location: Victoria, BC, Canada
Posts: 901
Likes: 0
Received 1 Like
on
1 Post
Another update. I have both inlets done and the hose attached on one side (store only had 5 feet and I needed 4 per side)
So the only thing left is the stainless screens but that will probably be a couple weeks for the material to come in.
Note the chin spoiler is removed after hitting a rabbit the other day (the furry kind). It has to be resprayed after the clear coat is all cracked to hell.
So the only thing left is the stainless screens but that will probably be a couple weeks for the material to come in.
Note the chin spoiler is removed after hitting a rabbit the other day (the furry kind). It has to be resprayed after the clear coat is all cracked to hell.

Thread
Thread Starter
Forum
Replies
Last Post
AMWill
Vendor Showcase
12
7/20/15 08:40 AM