
Rotorpros Cross-Drilled/Gas Slotted rotors install (w/pics)


Rotorpros Cross-Drilled/Gas Slotted rotors install (w/pics)
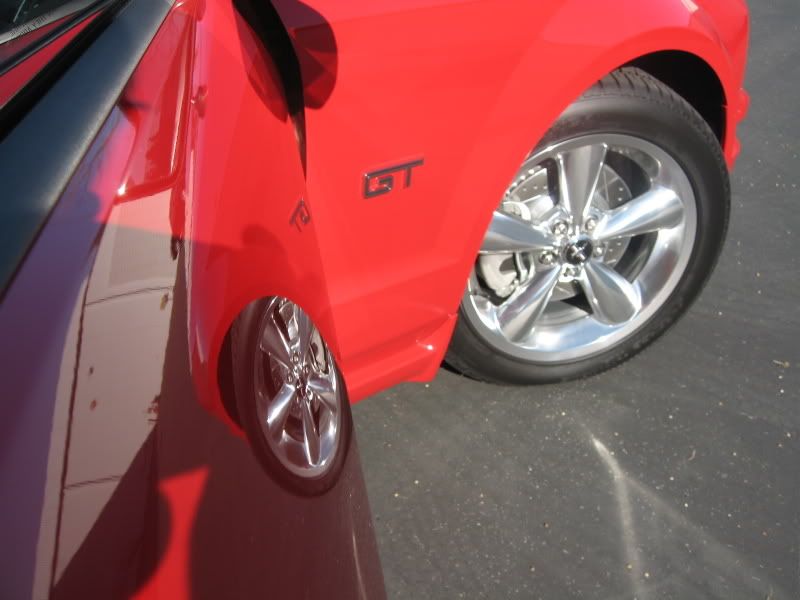
This install covers the installation of rotors (both front and rear) on a 2006 Mustang GT.
Rotors are of the cross-drilled/gas slotted type from Rotorpros.
Install
Jacking: Use your preferred method to get the front wheels off the ground high enough to remove the wheel and tire.
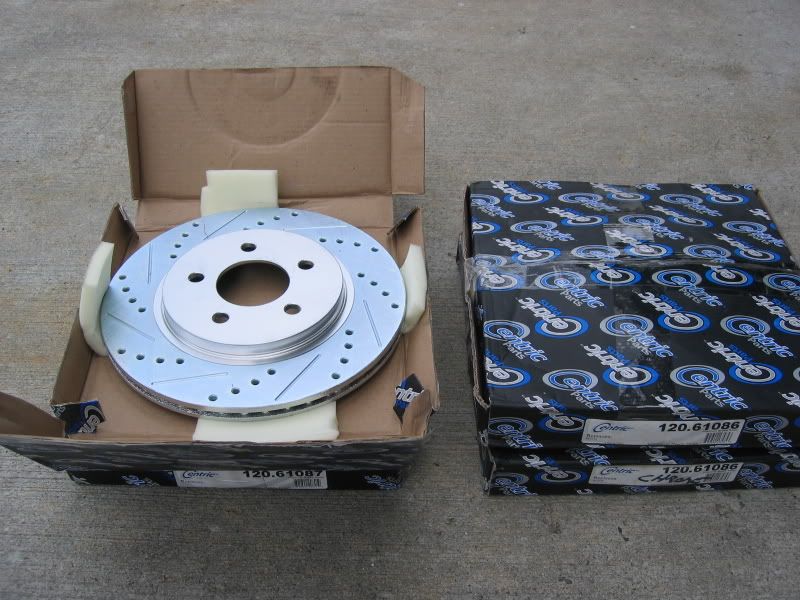
Rotors: Packaged well and they're very heavy. Overall quality/workmanship I give it a 9 (scratch on the silver painted hub surface, not a big deal, non-appearance), drilled holes and gas slots look great.
Front Install: Those 2 bolts holding the caliper assembly to the spindle were on TIGHT! (you can see the factory blue Loctite everywhere), had to use a 1/2" breaker bar just to crack them loose. In hindsight, I would've sprayed some penetrant oil on the bolts.
The calipers slid off the OEM rotors no problem. I had a helper swap out the rotors while I held the calipers up. Can be done alone, just need to get a little creative.
Re-installation of the caliper assembly was no problem either; slid right back on. Installed the the 2 bolts, slapped the wheels back on.. done.
As you'll see from the pics below, just rolling back down the driveway, the rotors are starting to get a more 'shiny' finish to them from the 'frost' machined finish. I'm sure after several miles of driving/braking, most all the frost will be gone.
Sound: Because my OEM pads haven't mated with the new rotors, is sounded very 'gritty' (best way to describe it). After a short time of driving, all is quiet.
Here's the pics...
Fresh out of the box (notice the different part numbers for front & rear).
Easy way to tell the difference, just like the stock ones, thicker rotors go up front, narrower rotors out back.
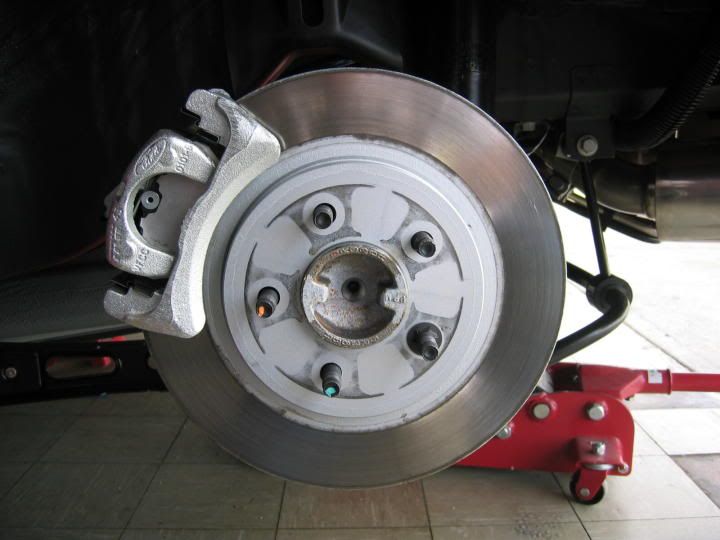
Stock - DRIVERS SIDE - FRONT
Backside - the 2 bolts that must be removed - silver caliper to black spindle.

Retaining rings removed and discarded (not required, only used for assembly at the factory).
Note: Some wheels may have as many as 3 of these retaining rings.
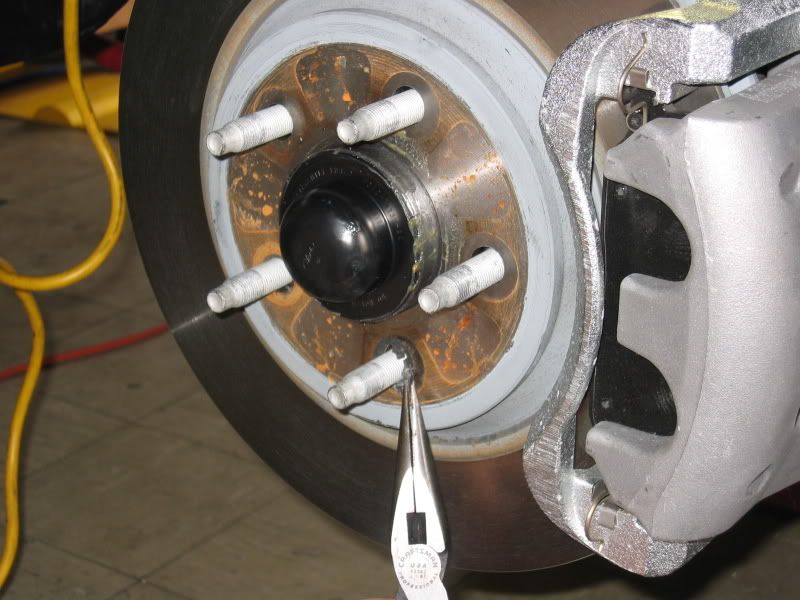
Remove the 2 caliper bolts referenced above. Use penetrant oil and breaker bar as required.
Once the bolts are out, the caliper can simply be slid out from the rotor.
The rotor is now free, it can be pulled off.
Note: If the factory rotor won't budge and feels like it's frozen on the hub, don't worry, it's just surface rust that's sticking them together. Get a hammer, place something solid and flat up against the rotor and shock it (ie. hit it with the hammer like you're playing 'Whack-A-Mole').
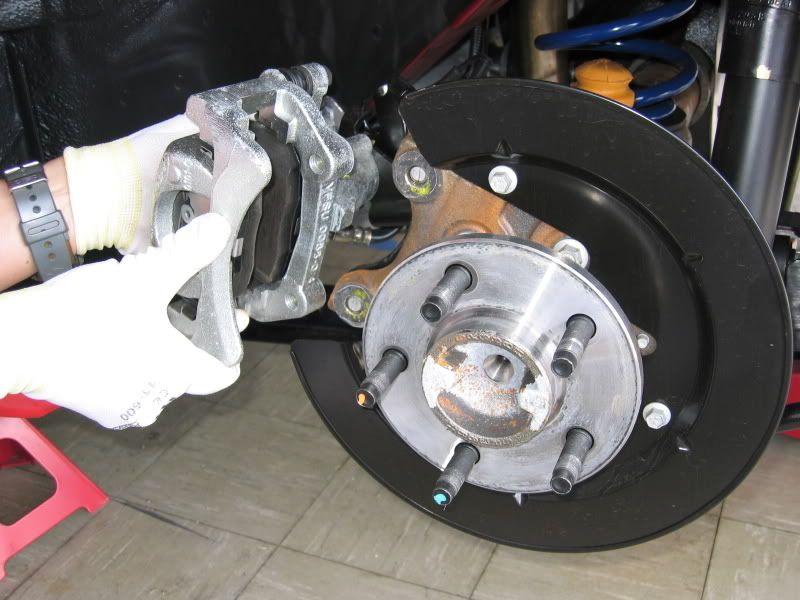
OEM rotor removed and caliper assembly supported by me.
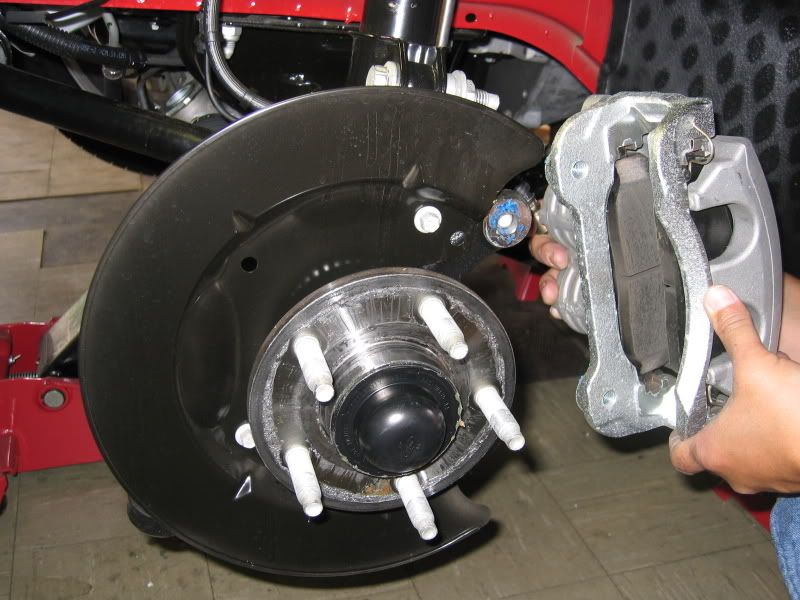
Position new rotor onto the studs and slide the caliper back on. Re-install the 2 bolts and tighten.
Torque: 115Nm (85 lb-ft)
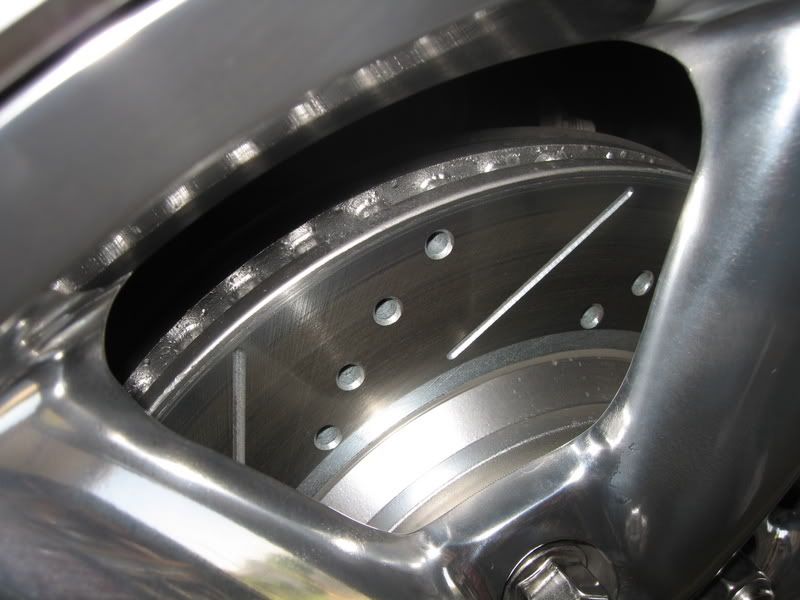
IMPORTANT: Pay particular attention to the rotational direction of the drilled holes and slotted vanes. The inner most holes (closest to the hub) contact the brake pad FIRST when rolling forward. This orientation has been verified by Rotorpros.
Note: Different rotor manufacturers may differ in the rotational direction of the holes and/or vanes.
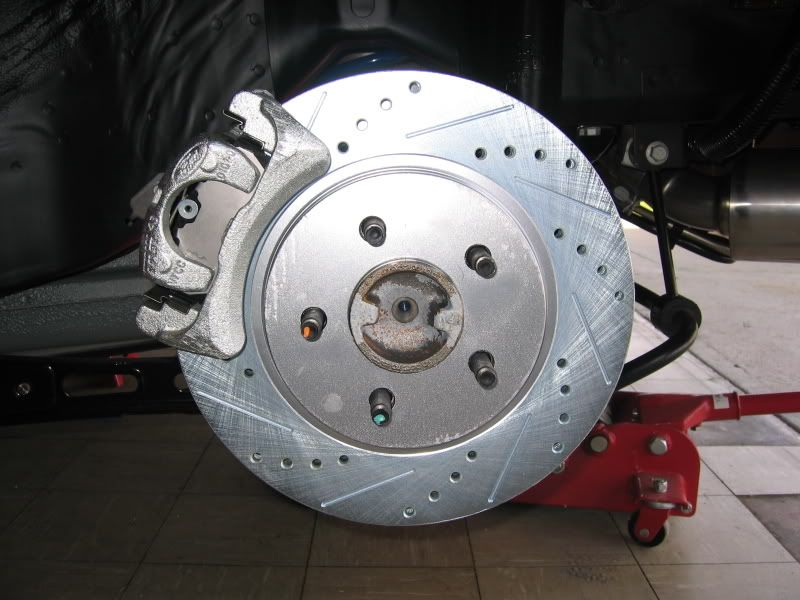
Rotorpros rotor installed.
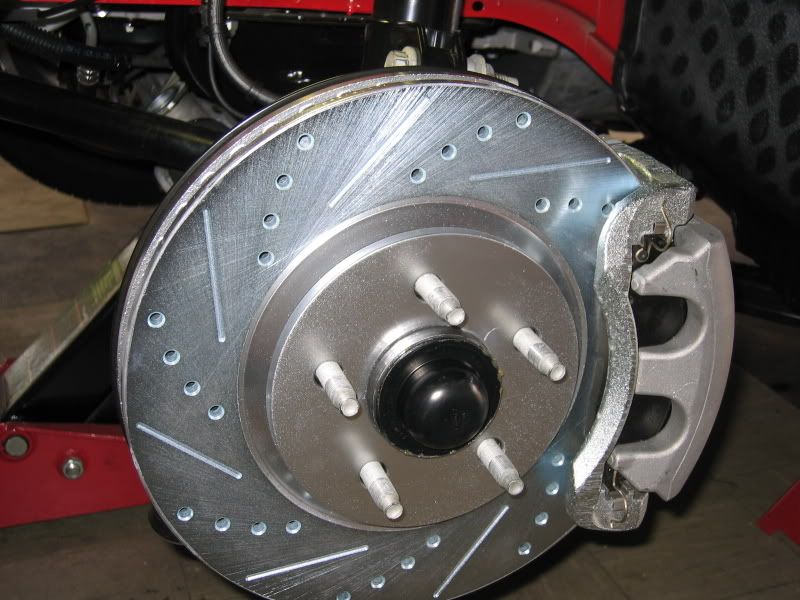
Front rotors complete
Rear rotor install
Install seemed easier than the fronts, maybe because I had a clue what was going on this time around.
Installation directions are exactly as the fronts.
The bolts (2 each, like the fronts) broke loose much easier than the front ones, which is a good thing because a 1/2" breaker bar will not fit due to tighter clearance to the parking brake mechanism and the brass fitting of the brake line. A 3/8" breaker worked like a charm.
Note: Spray penetrant oil on bolts if required.
Stock - DRIVERS SIDE - REAR
Caliper removal bolts

Caliper removed
Position new rotor onto the studs and slide the caliper back on. Re-install the 2 bolts and tighten.
Torque: 103Nm (76 lb-ft)
IMPORTANT: Pay particular attention to the rotational direction of the drilled holes and slotted vanes. The inner most holes (closest to the hub) contact the brake pad FIRST when rolling forward. This orientation has been verified by Rotorpros.
New rotor installed - lower caliper bolt not in yet, that's why it looks a bit crooked in this pic.
Rear rotors complete
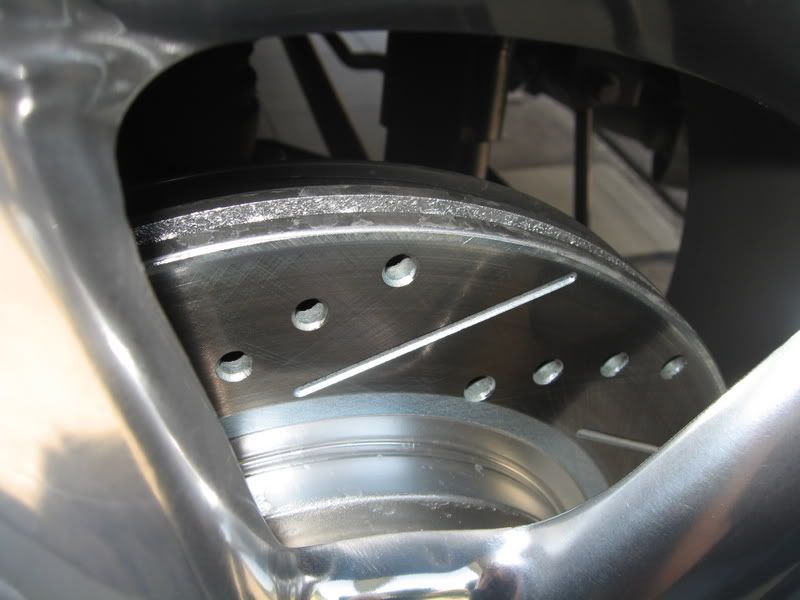
After several hundred miles, the Rotorpros have a nice silver finish to them.
Front:
Rear:
Rotors are of the cross-drilled/gas slotted type from Rotorpros.
Install
Jacking: Use your preferred method to get the front wheels off the ground high enough to remove the wheel and tire.
Rotors: Packaged well and they're very heavy. Overall quality/workmanship I give it a 9 (scratch on the silver painted hub surface, not a big deal, non-appearance), drilled holes and gas slots look great.
Front Install: Those 2 bolts holding the caliper assembly to the spindle were on TIGHT! (you can see the factory blue Loctite everywhere), had to use a 1/2" breaker bar just to crack them loose. In hindsight, I would've sprayed some penetrant oil on the bolts.
The calipers slid off the OEM rotors no problem. I had a helper swap out the rotors while I held the calipers up. Can be done alone, just need to get a little creative.
Re-installation of the caliper assembly was no problem either; slid right back on. Installed the the 2 bolts, slapped the wheels back on.. done.
As you'll see from the pics below, just rolling back down the driveway, the rotors are starting to get a more 'shiny' finish to them from the 'frost' machined finish. I'm sure after several miles of driving/braking, most all the frost will be gone.
Sound: Because my OEM pads haven't mated with the new rotors, is sounded very 'gritty' (best way to describe it). After a short time of driving, all is quiet.
Here's the pics...
Fresh out of the box (notice the different part numbers for front & rear).
Easy way to tell the difference, just like the stock ones, thicker rotors go up front, narrower rotors out back.
Stock - DRIVERS SIDE - FRONT
Backside - the 2 bolts that must be removed - silver caliper to black spindle.
Retaining rings removed and discarded (not required, only used for assembly at the factory).
Note: Some wheels may have as many as 3 of these retaining rings.
Remove the 2 caliper bolts referenced above. Use penetrant oil and breaker bar as required.
Once the bolts are out, the caliper can simply be slid out from the rotor.
The rotor is now free, it can be pulled off.
Note: If the factory rotor won't budge and feels like it's frozen on the hub, don't worry, it's just surface rust that's sticking them together. Get a hammer, place something solid and flat up against the rotor and shock it (ie. hit it with the hammer like you're playing 'Whack-A-Mole').
OEM rotor removed and caliper assembly supported by me.
Position new rotor onto the studs and slide the caliper back on. Re-install the 2 bolts and tighten.
Torque: 115Nm (85 lb-ft)
IMPORTANT: Pay particular attention to the rotational direction of the drilled holes and slotted vanes. The inner most holes (closest to the hub) contact the brake pad FIRST when rolling forward. This orientation has been verified by Rotorpros.
Note: Different rotor manufacturers may differ in the rotational direction of the holes and/or vanes.
Rotorpros rotor installed.
Front rotors complete
Rear rotor install
Install seemed easier than the fronts, maybe because I had a clue what was going on this time around.
Installation directions are exactly as the fronts.
The bolts (2 each, like the fronts) broke loose much easier than the front ones, which is a good thing because a 1/2" breaker bar will not fit due to tighter clearance to the parking brake mechanism and the brass fitting of the brake line. A 3/8" breaker worked like a charm.
Note: Spray penetrant oil on bolts if required.
Stock - DRIVERS SIDE - REAR
Caliper removal bolts
Caliper removed
Position new rotor onto the studs and slide the caliper back on. Re-install the 2 bolts and tighten.
Torque: 103Nm (76 lb-ft)
IMPORTANT: Pay particular attention to the rotational direction of the drilled holes and slotted vanes. The inner most holes (closest to the hub) contact the brake pad FIRST when rolling forward. This orientation has been verified by Rotorpros.
New rotor installed - lower caliper bolt not in yet, that's why it looks a bit crooked in this pic.
Rear rotors complete
After several hundred miles, the Rotorpros have a nice silver finish to them.
Front:
Rear:
Thanks all, this was a re-hash from a while back.
Thanks to Superman who pointed out that the link from my 'How-To' only went to the rear install. I just decided to make a new thread to address both front and rear installations.
Thanks to Superman who pointed out that the link from my 'How-To' only went to the rear install. I just decided to make a new thread to address both front and rear installations.
Mach 1 Member
Joined: December 12, 2004
Posts: 674
Likes: 0
Bill, now when you installed these rotors. Did you keep the stock pads? If not which ones did you go with? I read somewhere in here that if you keep the pads that you should sand them down. How would I do that?? what kind of sand paper would I need?? any suggestions would be appreciated.
Bill, now when you installed these rotors. Did you keep the stock pads? If not which ones did you go with? I read somewhere in here that if you keep the pads that you should sand them down. How would I do that?? what kind of sand paper would I need?? any suggestions would be appreciated.
I have 2 friends (Leo_06GT and 89_Trooper) who installed the Rotorpros and still used their stock pads (with several thousand miles on them).
However, if your stock pads are pretty much worn, Rotorpros does sell some 'low dust' performance pads as part of a package price.
Legacy TMS Member
Joined: January 9, 2005
Posts: 6,982
Likes: 6
From: New Carlisle, Ohio (20 miles north of Dayton)
Bill,
Your timing with this post is dead on for me. I am going to order these rotors this week. I am not going to install Hawk pads as alot of guys have because of the noise issues I read about. I have amost 17k on my car so I will not reuse the existing pads but will get a new OEM set when I do my install. As always...outstanding write up. Also, Bill did you buy direct from RotoPro or another distributor?
Scott
Your timing with this post is dead on for me. I am going to order these rotors this week. I am not going to install Hawk pads as alot of guys have because of the noise issues I read about. I have amost 17k on my car so I will not reuse the existing pads but will get a new OEM set when I do my install. As always...outstanding write up.
Also, Bill did you buy direct from RotoPro or another distributor?Scott
Perfect timing, Scott! 
I got mine directly from Rotorpros. Rich (the owner) posts here in TMS every once in a while. He was recently offering a deal to TMS'rs. Might want to shoot him an e-mail or call him and see about any special member rates.
I got mine directly from Rotorpros. Rich (the owner) posts here in TMS every once in a while. He was recently offering a deal to TMS'rs. Might want to shoot him an e-mail or call him and see about any special member rates.
Team Mustang Source
Joined: October 13, 2004
Posts: 2,842
Likes: 0
From: MD
Oh nice write up Bill, I was going to do one but I figured you'd get around to doing it.

Legacy TMS Member
Joined: January 9, 2005
Posts: 6,982
Likes: 6
From: New Carlisle, Ohio (20 miles north of Dayton)
Scott


Must be from my Southern California costal air! Just goes to show you, even when it never sees rain, certain parts still begin to rust.

If it gets bad enough, I'll do what others have done and spray paint the axle black.
Legacy TMS Member
Joined: November 13, 2005
Posts: 2,193
Likes: 46
Bill, do you ever DRIVE your 'Stang??!??
I have NEVER seen such clean calipers, dust boots, etc... OMG that is AMAZING!!!
Great write up as usual! My question is: Did you notice any improvement in stopping power as a result of the new rotors?
I have NEVER seen such clean calipers, dust boots, etc... OMG that is AMAZING!!!
Great write up as usual! My question is: Did you notice any improvement in stopping power as a result of the new rotors?

j/k... I don't take it out as much as I should, but when I do, watch out!
To answer your question, yes I did feel the brakes grab a bit harder. Maybe it's just in my head, but the brakes felt better, not Brembo kind of better, but better than stock.
Legacy TMS Member
Joined: January 9, 2005
Posts: 6,982
Likes: 6
From: New Carlisle, Ohio (20 miles north of Dayton)
Hey Tom,
You know when you were painting your calipers a couple of weeks ago you should have done this mod. It just might be the final Blinggggg mod your car needs. I went back and looked at your pictures of you painted calipers ( which looked awesome) and just couldn't take my eyes off those plain...Jane rotors.
Scott