Upcoming Audio Build - Detailed w/Pics and Data
 6/29/13, 06:55 AM
#61
Bullitt Member
Thread Starter
So I had some free time this afternoon...
...and decided to do some soldering! I'm a bit out of practice, so forgive some of the uneven solders. I decided to get the wiring harness all assembled and ready to go, so I broke out the old soldering iron, heat shrink, "helping hands", and went to work.

This one looks a bit better...


Now we're back in the swing of things!
16 wires later:

SNEAK PEAK: I couldn't let it rest, I just HAD to test it out...


Also, I decided to start to get the amp mounting board ready, so I took some measurements and made my template:
I decided on using the spare tire well after all. I'm going to put the pump and funnel in a bag and store it either in the trunk or behind the passenger seat.


I found a 12v switched power lead I can use as my remote on wire. It's a lead that goes to the antenna module. The blue wire can be tapped and used as a remote trigger. It's located behind the carpet on the passenger side, directly under where the antenna is mounted on the car.

The wheel well is appx. 27" from the flat back to the deepest part of the arched front (sorry for the blurry photo):

...and approx. the same width:

In order to clear the mounting cleat in the bottom of the well, I'm going to have to mount the board 3" from the bottom. I'm debating on if I want to drill into the well and mount anchors or if I just want to put feet on the bottom and stick it to the bottom with Velcro:

My finished template (made from cardboard). Measurements are tight, I'll probably shave it 1/2" just for "wiggle room" and to allow for carpeting.

Today (if it stops raining) I'm going to start running some wires and build the amp board. I also have to finish installing the head unit (temporarily) with the Metra kit just so I have something to play with. As a quick review, for anyone thinking about wanting to upgrade from the Shaker 500 system - DO IT! You have no idea how bad that system is until you hear a proper system in the car. It's a night-and-day difference! I'll post a full review when it's all done, but the car sounds 1000% better with just this basic setup using the Kenwood to drive the Alpines, without having upgrading the 8"'s in the door yet, and having not added the amps or sub yet.
Anyway, more to come - stay tuned!
This one looks a bit better...
Now we're back in the swing of things!
16 wires later:
SNEAK PEAK: I couldn't let it rest, I just HAD to test it out...
Also, I decided to start to get the amp mounting board ready, so I took some measurements and made my template:
I decided on using the spare tire well after all. I'm going to put the pump and funnel in a bag and store it either in the trunk or behind the passenger seat.
I found a 12v switched power lead I can use as my remote on wire. It's a lead that goes to the antenna module. The blue wire can be tapped and used as a remote trigger. It's located behind the carpet on the passenger side, directly under where the antenna is mounted on the car.
The wheel well is appx. 27" from the flat back to the deepest part of the arched front (sorry for the blurry photo):
...and approx. the same width:
In order to clear the mounting cleat in the bottom of the well, I'm going to have to mount the board 3" from the bottom. I'm debating on if I want to drill into the well and mount anchors or if I just want to put feet on the bottom and stick it to the bottom with Velcro:
My finished template (made from cardboard). Measurements are tight, I'll probably shave it 1/2" just for "wiggle room" and to allow for carpeting.
Today (if it stops raining) I'm going to start running some wires and build the amp board. I also have to finish installing the head unit (temporarily) with the Metra kit just so I have something to play with. As a quick review, for anyone thinking about wanting to upgrade from the Shaker 500 system - DO IT! You have no idea how bad that system is until you hear a proper system in the car. It's a night-and-day difference! I'll post a full review when it's all done, but the car sounds 1000% better with just this basic setup using the Kenwood to drive the Alpines, without having upgrading the 8"'s in the door yet, and having not added the amps or sub yet.
Anyway, more to come - stay tuned!
 6/29/13, 08:18 AM
#62
Legacy TMS Member
One thing to consider - with my comprehensive insurance, I only get the full value of my installed aftermarket goodies if they're *bolted* down to the car - Velcro doesn't count. It's a stupid policy, but I'd look into it. If someone broke in to my car and took an amp or sub box that's just laying in there, they wouldn't cover it.
6/29/13, 09:54 AM
#63
Bullitt Member
Thread Starter
One thing to consider - with my comprehensive insurance, I only get the full value of my installed aftermarket goodies if they're *bolted* down to the car - Velcro doesn't count. It's a stupid policy, but I'd look into it. If someone broke in to my car and took an amp or sub box that's just laying in there, they wouldn't cover it.
6/29/13, 09:55 AM
#64
Bullitt Member
Thread Starter
One thing to consider - with my comprehensive insurance, I only get the full value of my installed aftermarket goodies if they're *bolted* down to the car - Velcro doesn't count. It's a stupid policy, but I'd look into it. If someone broke in to my car and took an amp or sub box that's just laying in there, they wouldn't cover it.
p.s. - the rain is back....I really hate Florida........
7/1/13, 08:16 PM
#67
Bullitt Member
Thread Starter
LOL, no. Sorry I've been quiet the past few days, but I've been busy tearing the car apart and getting wire runs in. I'll post a bunch of pictures tomorrow. For a teaser, here's a shot of where the 4g Power and Ground wires were run. This is about the easiest access you can get - simply run them through the rubber grommet by cutting off the 'nipple' and then pass it into the engine compartment through the hole behind the wiring bundle in the picture. Wire winds up right under the battery - easy, clean access! To get to this, simply remove the plastic splash guard inside the passenger side wheel well. Four pop-locks hold it in place.


So far, I've got all of my wires in the car, but I need to finish zip-tying the passenger door bundle inside/under the dash. I also have to splice the Maestro kit into the Ford Sync harness and the OBD-II cables. I hope to have all this tomorrow.
I've got the amplifier board cut and ready to drill my holes so I can mount my gear - also hope to have that done tomorrow.
Tomorrow AM I have to go to Holly Hill and meet up with some engineers for Metra who are going to re-flash my dash kit. It's not powering off when the car turns off, so I have to unplug it every night to keep it from killing the battery.
Thanks all for your patience - I promise the payoff will be worth it!
7/2/13, 07:08 PM
#68
Bullitt Member
Thread Starter
Man, I'm old....and sore....and tired....and giddy!
So I've been a busy little beaver the past several days.
I tore the interior out to run the new wires (sorry, no pics - I was working between the raindrops to get everything done), but I've got some pics of my status so far:
1) Sunday I chose to run a 4g Power and a 4G Ground directly to the battery. I ran them along the passenger side (as that's where the battery and the entry into the engine compartment is). I pulled the front passenger wheel well cover off the rear of the well and exposed the grommet into the passenger compartment as well as found the wiring harness that ran into the engine compartment. I zip tied onto that harness and ran right up to the battery. I'll be hooking them up probably late tomorrow, but here's a few shots:


I ran it along the inside of the passenger side of the cabin, pulling the plastics (the door sills are a ***** to get off - PROTIP: Use a pry bar and work from the cabin-side of the sill. DO NOT try to lift them from the outside (the "MUSTANG" side)). I pulled the rear seats and rear side panels (simple), and then dropped them into the spare tire well until I can hook them up tomorrow.

Signal and Speaker wires went along the driver's side. Now let me explain something - I'm running separate runs for the Tweets, the Mids, and the Mid-Bass. THREE 14g speaker wires PER DOOR. PLUS three pair of signal cables (Front HIGH/Front LOW/Sub). That's a LOT of cable. It disappears quite nicely. A little planning ahead of time and it's easier than you think. Now the HARD part is getting those cables into the doors themselves. The problem is the main wiring harness that leads into the door. There's no room to run any wires through the cabin into that harness and then through the rubber conduit into the door cavity. I had to drill new holes for the speaker cables and then tap into the grommet in the door panel. Talk about a PiTA! I spent HOURS trying to find a way. I was even tempted to pull the doors off...nope. I'll post pics of the finished product tomorrow - I forgot to take some pics today.
Running the speaker wire across through the dash is a piece of cake. Pop the glove box, pull the radio, and use a glow rod to fish it straight across. Zip tie the bundle to the wiring harness that's already there, and it vanishes.
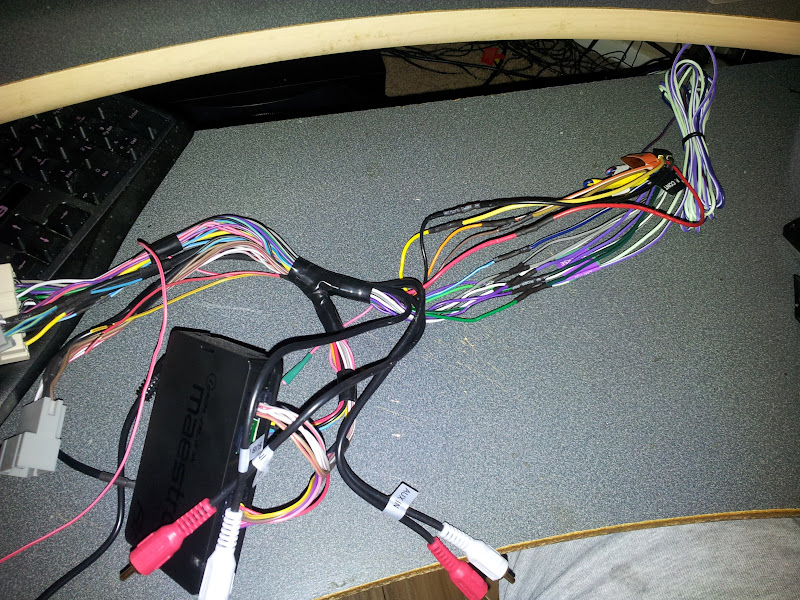
Anyway, here's a shot of the signal wires in the back running to the spare tire well:


...and here's everything waiting to be connected to the amp board:

Speaking of which - tomorrow's project:

So if you've every wondered what Metra's corporate headquarters looks like, here it is:

Here's the warehouse (yes, that's your's truly's 5.0 GT under the Metra sign):

So why was I here? Glad you asked. I bought the Metra 99-5826CH dash kit off Amazon.com (because I'm impatient and couldn't wait for the iDataLink kit any longer. I'll buy it when it's ready and swap it out). It came in the other day and I installed it, only to find out it's not working right. The backlight doesn't shut off when I turn the car off. It blinks from on white to on black about every 8-10 seconds. I called customer service on Saturday and talked with a nice guy named Mark Tirotta. First he sent me new firmware to flash, which I could not get the unit to be recognized by either my PC or my laptop. I was poking around on their website and checked the Contact Us page and found out their address was in Holly Hill, FL, which is just north of Daytona Beach, about a 45 minute drive from me. So I emailed back, and asked if I could come by and have them look at it instead of wasting the time to ship it back, wait for a new one, etc. Mark said I could come by on Monday or Tuesday (I was busy Monday). So I hoofed it over this morning and met with Mark:

(I'm the short fat guy, Mark's the tall gent.)
Anyway, he re-flashed the unit to the latest firmware. I grabbed the unit and off I went. I should have checked it there, but was in a hurry. Turns out the firmware update didn't fix the problem, so I'm working out with him a time to go back and get it squared away. It works for now, but I have to unplug it when I shut the car off, or it'll drain my battery.
And finally, while I was wrapping up tonight, I decided to go ahead and pull the tapeworm out of the engine compartment - SOUND TUBE DELETE! Yeah, I know technically it's not an interior mod, but as it affects sound, I guess it qualifies. Anyway...
The parts:
1-1/2 SCH40 plug (SKU#449015 - $1.60, Lowes)

Brake Master Cylinder Gasket (42098 - $6.49, Advance Auto Parts)

Rust-Oleum Flat Black High Heat Engine Enamel Spray Paint (15952 - $4.98, Lowes)

A small black screw (scavenged from the Alpine speaker kit).
Time to complete (not including waiting for the paint to dry on the cap: about 5 minutes.
So anyway, I wanted to see if this was as easy as everyone says it is. Yep, it is!
I pulled the front of the tube off to test the plug to make sure it fit. There was a little wiggle there, so I decided to wrap the tube throat with some black electrical tape so it was even with the 'lip' at the end. Once I did that, it fits nice and snug. PROTIP: Use some dish soap to help slip the cap on.


ONE 10mm bolt later, I removed the entire tube:

Looks so much better already!

The firewall hole - before:

and after:

The plug painted:

...and installed!

I put the screw in so I wouldn't have to worry about losing the cap, but I could remove it if I had to.

The finished product:

Well kiddies, I'm off to bed. This old man is TIRED. Besides, I gotta get up early tomorrow and get that amp board assembled and get everything connected. Pics to come. In the meantime, stay thirsty, my friends!
I tore the interior out to run the new wires (sorry, no pics - I was working between the raindrops to get everything done), but I've got some pics of my status so far:
1) Sunday I chose to run a 4g Power and a 4G Ground directly to the battery. I ran them along the passenger side (as that's where the battery and the entry into the engine compartment is). I pulled the front passenger wheel well cover off the rear of the well and exposed the grommet into the passenger compartment as well as found the wiring harness that ran into the engine compartment. I zip tied onto that harness and ran right up to the battery. I'll be hooking them up probably late tomorrow, but here's a few shots:
I ran it along the inside of the passenger side of the cabin, pulling the plastics (the door sills are a ***** to get off - PROTIP: Use a pry bar and work from the cabin-side of the sill. DO NOT try to lift them from the outside (the "MUSTANG" side)). I pulled the rear seats and rear side panels (simple), and then dropped them into the spare tire well until I can hook them up tomorrow.
Signal and Speaker wires went along the driver's side. Now let me explain something - I'm running separate runs for the Tweets, the Mids, and the Mid-Bass. THREE 14g speaker wires PER DOOR. PLUS three pair of signal cables (Front HIGH/Front LOW/Sub). That's a LOT of cable. It disappears quite nicely. A little planning ahead of time and it's easier than you think. Now the HARD part is getting those cables into the doors themselves. The problem is the main wiring harness that leads into the door. There's no room to run any wires through the cabin into that harness and then through the rubber conduit into the door cavity. I had to drill new holes for the speaker cables and then tap into the grommet in the door panel. Talk about a PiTA! I spent HOURS trying to find a way. I was even tempted to pull the doors off...nope. I'll post pics of the finished product tomorrow - I forgot to take some pics today.
Running the speaker wire across through the dash is a piece of cake. Pop the glove box, pull the radio, and use a glow rod to fish it straight across. Zip tie the bundle to the wiring harness that's already there, and it vanishes.
Anyway, here's a shot of the signal wires in the back running to the spare tire well:
...and here's everything waiting to be connected to the amp board:
Speaking of which - tomorrow's project:
So if you've every wondered what Metra's corporate headquarters looks like, here it is:
Here's the warehouse (yes, that's your's truly's 5.0 GT under the Metra sign):
So why was I here? Glad you asked. I bought the Metra 99-5826CH dash kit off Amazon.com (because I'm impatient and couldn't wait for the iDataLink kit any longer. I'll buy it when it's ready and swap it out). It came in the other day and I installed it, only to find out it's not working right. The backlight doesn't shut off when I turn the car off. It blinks from on white to on black about every 8-10 seconds. I called customer service on Saturday and talked with a nice guy named Mark Tirotta. First he sent me new firmware to flash, which I could not get the unit to be recognized by either my PC or my laptop. I was poking around on their website and checked the Contact Us page and found out their address was in Holly Hill, FL, which is just north of Daytona Beach, about a 45 minute drive from me. So I emailed back, and asked if I could come by and have them look at it instead of wasting the time to ship it back, wait for a new one, etc. Mark said I could come by on Monday or Tuesday (I was busy Monday). So I hoofed it over this morning and met with Mark:
(I'm the short fat guy, Mark's the tall gent.)
Anyway, he re-flashed the unit to the latest firmware. I grabbed the unit and off I went. I should have checked it there, but was in a hurry. Turns out the firmware update didn't fix the problem, so I'm working out with him a time to go back and get it squared away. It works for now, but I have to unplug it when I shut the car off, or it'll drain my battery.
And finally, while I was wrapping up tonight, I decided to go ahead and pull the tapeworm out of the engine compartment - SOUND TUBE DELETE! Yeah, I know technically it's not an interior mod, but as it affects sound, I guess it qualifies. Anyway...
The parts:
1-1/2 SCH40 plug (SKU#449015 - $1.60, Lowes)
Brake Master Cylinder Gasket (42098 - $6.49, Advance Auto Parts)
Rust-Oleum Flat Black High Heat Engine Enamel Spray Paint (15952 - $4.98, Lowes)
A small black screw (scavenged from the Alpine speaker kit).
Time to complete (not including waiting for the paint to dry on the cap: about 5 minutes.
So anyway, I wanted to see if this was as easy as everyone says it is. Yep, it is!
I pulled the front of the tube off to test the plug to make sure it fit. There was a little wiggle there, so I decided to wrap the tube throat with some black electrical tape so it was even with the 'lip' at the end. Once I did that, it fits nice and snug. PROTIP: Use some dish soap to help slip the cap on.
ONE 10mm bolt later, I removed the entire tube:
Looks so much better already!
The firewall hole - before:
and after:
The plug painted:
...and installed!
I put the screw in so I wouldn't have to worry about losing the cap, but I could remove it if I had to.
The finished product:
Well kiddies, I'm off to bed. This old man is TIRED. Besides, I gotta get up early tomorrow and get that amp board assembled and get everything connected. Pics to come. In the meantime, stay thirsty, my friends!
7/3/13, 03:56 PM
#69

metra seems kind of like a hit and miss deal. I have heard others saying it drains the battery and problems like that.
I wish knew how to do this stuff myself, hope you have walk me through amping my speakers down the road.
I wish knew how to do this stuff myself, hope you have walk me through amping my speakers down the road.
7/3/13, 04:03 PM
#70
Bullitt Member
Thread Starter
As for helping you out - just say the word. I'll be happy to help!
7/3/13, 05:37 PM
#71
Member

Join Date: April 21, 2013
Posts: 27
Likes: 0
Received 0 Likes
on
0 Posts
Awesome project man, and the detail/progress pics are off the map. I am piecing mine together as cash comes available, but for the moment I have to replace the door subs as I have popped 'em! Did you find the ZR800s to be a hot swap? Can I stick them in without drama? I have the shaker system with the head unit Kenwood DNX6990HD.
It helps when you live 1/2 hour from Metra's corporate HQ and you can go knock on the door when you need to...having said that, I'm most likely sending this kit back as defective and ordering the Scosche until I get the iDataLink I want.
As for helping you out - just say the word. I'll be happy to help!
As for helping you out - just say the word. I'll be happy to help!
7/3/13, 05:52 PM
#72
Bullitt Member
Thread Starter
Awesome project man, and the detail/progress pics are off the map. I am piecing mine together as cash comes available, but for the moment I have to replace the door subs as I have popped 'em! Did you find the ZR800s to be a hot swap? Can I stick them in without drama? I have the shaker system with the head unit Kenwood DNX6990HD.
Last edited by ColSaulTigh; 7/3/13 at 05:54 PM.
7/4/13, 08:49 PM
#74
Bullitt Member
Thread Starter
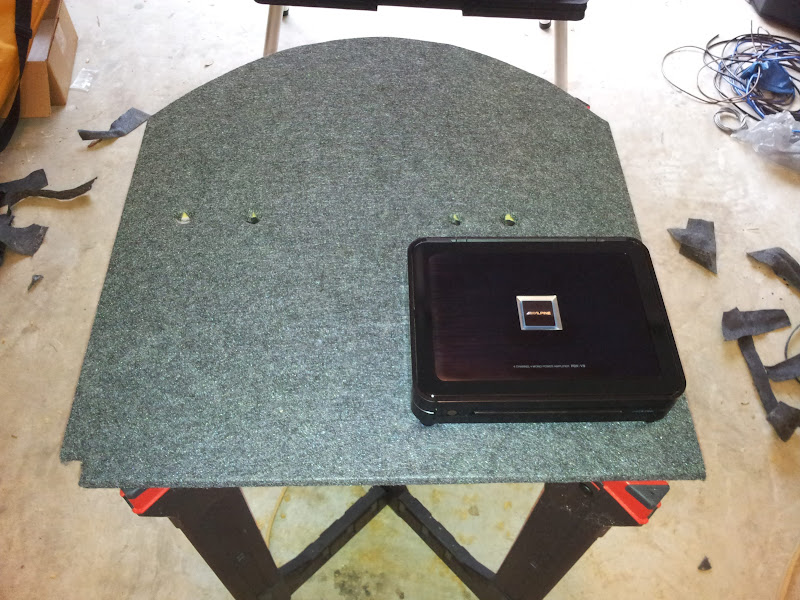
The amp board is ready to go in the car...
Last night I got the amp board ready for today. I measured out the location of all the holes I needed and got them drilled:

Next it was time to cut the carpet down to size:

Today I had some time after the 4th of July picnic to work on the amp board. Fortunately the rain held off until after the picnic, but it started as soon as I got home:


Since I couldn't work in the trunk, I decided to mount the amps and distribution blocks to the amp board first. I used 1/2" spacers to lift the amps off the board to allow for some extra air circulation:


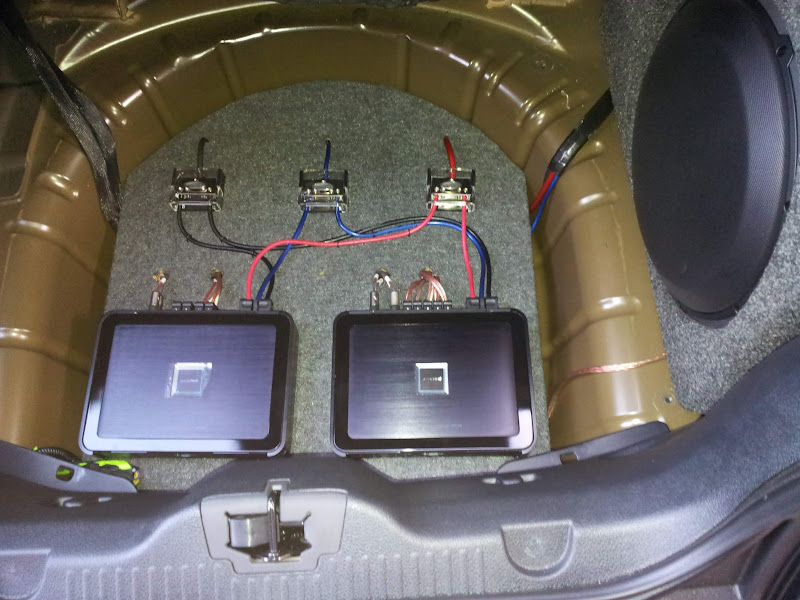
After I got the amps mounted, I added the distribution blocks:

[IMGhttps://lh3.googleusercontent.com/-3exIrk4YmLI/UdYUjkMeKXI/AAAAAAAAQcw/YNprM-R7enE/s800/20130704_200011.jpg[/IMG]

(Yes, the logos are upside-down. I'll probably take the heat gun to them and either remove them altogether or try turning them around.)
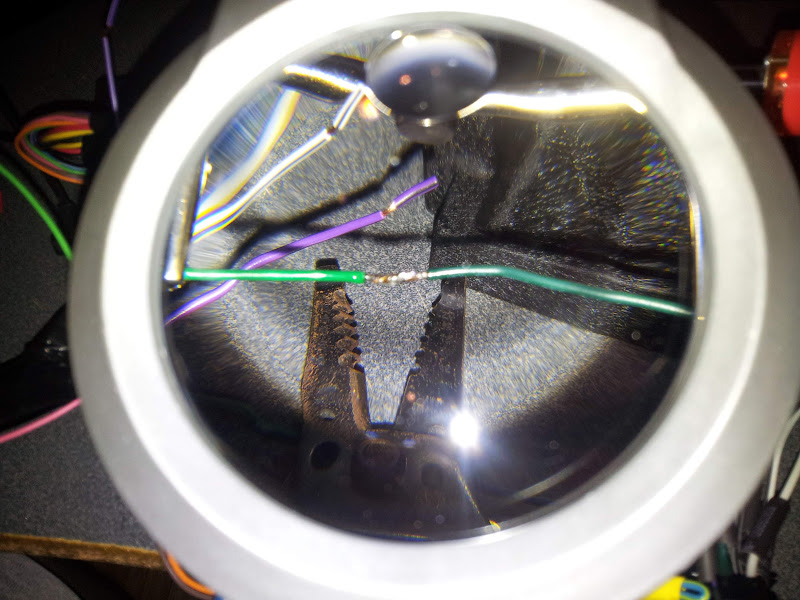
It finally stopped raining, so I added the 12v remote power wire:

It was a hard solder job, and not the prettiest, but it'll do, pig, it'll do. I trimmed the excess wire, wrapped it up (couldn't heat shrink it - none big enough in my kit), and tucked it behind the carpet. Then I zip tied my cables in prep for putting them in nylon wrap in the morning.
Finally, I wired up the amps to the distribution block. RED = Battery +, BLUE = Remote 12V +, BLACK = Battery - (Ground). I'm running 8g from the distribution blocks to the amps:


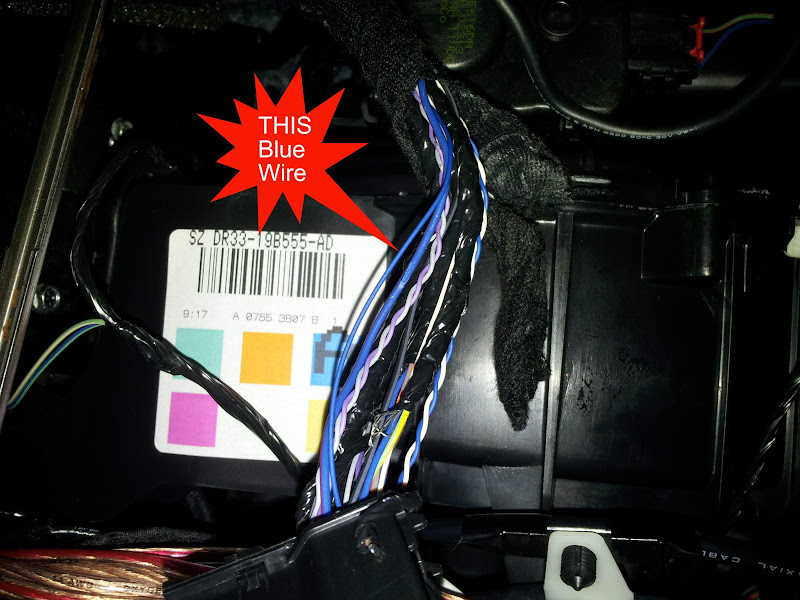
Also, as an FYI, if you ever decide to tie in an iDataLink Maestro RR into the Ford SYNC system, you'll need to tap a blue wire in the SYNC harness. It's not well documented, but you need to find a SMALL blue wire that's by itself (not part of a sub-bundle). For reference, here it is:
Tomorrow is a big day - my JL ZR800's are due to arrive, and I'm going to connect the amps to the system. By the end of the day, we should be about done. In the words of Emperor Palaptine: "Now witness the firepower of this fully ARMED and OPERATIONAL battle station!"
Next it was time to cut the carpet down to size:
Today I had some time after the 4th of July picnic to work on the amp board. Fortunately the rain held off until after the picnic, but it started as soon as I got home:
Since I couldn't work in the trunk, I decided to mount the amps and distribution blocks to the amp board first. I used 1/2" spacers to lift the amps off the board to allow for some extra air circulation:
After I got the amps mounted, I added the distribution blocks:
[IMGhttps://lh3.googleusercontent.com/-3exIrk4YmLI/UdYUjkMeKXI/AAAAAAAAQcw/YNprM-R7enE/s800/20130704_200011.jpg[/IMG]
(Yes, the logos are upside-down. I'll probably take the heat gun to them and either remove them altogether or try turning them around.)
It finally stopped raining, so I added the 12v remote power wire:
It was a hard solder job, and not the prettiest, but it'll do, pig, it'll do. I trimmed the excess wire, wrapped it up (couldn't heat shrink it - none big enough in my kit), and tucked it behind the carpet. Then I zip tied my cables in prep for putting them in nylon wrap in the morning.
Finally, I wired up the amps to the distribution block. RED = Battery +, BLUE = Remote 12V +, BLACK = Battery - (Ground). I'm running 8g from the distribution blocks to the amps:
Also, as an FYI, if you ever decide to tie in an iDataLink Maestro RR into the Ford SYNC system, you'll need to tap a blue wire in the SYNC harness. It's not well documented, but you need to find a SMALL blue wire that's by itself (not part of a sub-bundle). For reference, here it is:
Tomorrow is a big day - my JL ZR800's are due to arrive, and I'm going to connect the amps to the system. By the end of the day, we should be about done. In the words of Emperor Palaptine: "Now witness the firepower of this fully ARMED and OPERATIONAL battle station!"
7/5/13, 06:23 PM
#75
Bullitt Member
Thread Starter
Almost done....tomorrow is the big day!
So my JL Audio ZR800's finally arrived today.....19 days later :/


I was beginning to think they'd never show up. Of course, they didn't get here until after 3pm, so I couldn't do much with them as I was in the process of wiring up the amp board and installing the sub:

So tomorrow I'll install the JL ZR800's in the doors, finish wiring up the speakers to the amps, power this baby up, and FIRE!!! I need to be done by 4pm so I can meet up with the Mustang Club and show off my new toys - CAN'T.FRAKKIN.WAIT!
I was beginning to think they'd never show up. Of course, they didn't get here until after 3pm, so I couldn't do much with them as I was in the process of wiring up the amp board and installing the sub:
So tomorrow I'll install the JL ZR800's in the doors, finish wiring up the speakers to the amps, power this baby up, and FIRE!!! I need to be done by 4pm so I can meet up with the Mustang Club and show off my new toys - CAN'T.FRAKKIN.WAIT!
7/5/13, 06:37 PM
#76
Shelby GT350 Member
So my JL Audio ZR800's finally arrived today.....19 days later :/
I was beginning to think they'd never show up. Of course, they didn't get here until after 3pm, so I couldn't do much with them as I was in the process of wiring up the amp board and installing the sub:
So tomorrow I'll install the JL ZR800's in the doors, finish wiring up the speakers to the amps, power this baby up, and FIRE!!! I need to be done by 4pm so I can meet up with the Mustang Club and show off my new toys - CAN'T.FRAKKIN.WAIT!
 7/5/13, 06:45 PM
#77
Bullitt Member
Thread Starter
To quote Toby Keith - "I ain't as good as I once was".
My arthritis is starting to bother me (I've got some in my hands). If I don't give it a break, I can't work my tools at all. That, plus I spent half the day bent over in the trunk soldering and wiring up the amps and distribution blocks and my back is aching, too.
Don't worry, I'll be up early tomorrow and I'll have it up and running by noon. Then a couple of hours of tweaking (I WISH I still had my AudioControl SA-3050a spectrum analyzer) and I'll be good to go.
Besides, I'd rather take my time and avoid any screw-ups because I'm too tired, frustrated, or sore. You've waited this long, what's another 18 hours....
7/5/13, 07:01 PM
#78
Cobra R Member
Join Date: September 22, 2012
Location: Ontario, California
Posts: 1,691
Likes: 0
Received 17 Likes
on
17 Posts
To quote Toby Keith - "I ain't as good as I once was".
My arthritis is starting to bother me (I've got some in my hands). If I don't give it a break, I can't work my tools at all. That, plus I spent half the day bent over in the trunk soldering and wiring up the amps and distribution blocks and my back is aching, too.
Don't worry, I'll be up early tomorrow and I'll have it up and running by noon. Then a couple of hours of tweaking (I WISH I still had my AudioControl SA-3050a spectrum analyzer) and I'll be good to go.
Besides, I'd rather take my time and avoid any screw-ups because I'm too tired, frustrated, or sore. You've waited this long, what's another 18 hours....
7/5/13, 07:40 PM
#79
Shelby GT350 Member
To quote Toby Keith - "I ain't as good as I once was".
My arthritis is starting to bother me (I've got some in my hands). If I don't give it a break, I can't work my tools at all. That, plus I spent half the day bent over in the trunk soldering and wiring up the amps and distribution blocks and my back is aching, too.
Don't worry, I'll be up early tomorrow and I'll have it up and running by noon. Then a couple of hours of tweaking (I WISH I still had my AudioControl SA-3050a spectrum analyzer) and I'll be good to go.
Besides, I'd rather take my time and avoid any screw-ups because I'm too tired, frustrated, or sore. You've waited this long, what's another 18 hours....

