Upcoming Audio Build - Detailed w/Pics and Data
 6/15/13, 02:50 PM
#21
Bullitt Member
Thread Starter
It Has Begun!!!!
UPDATE - 6/15/13
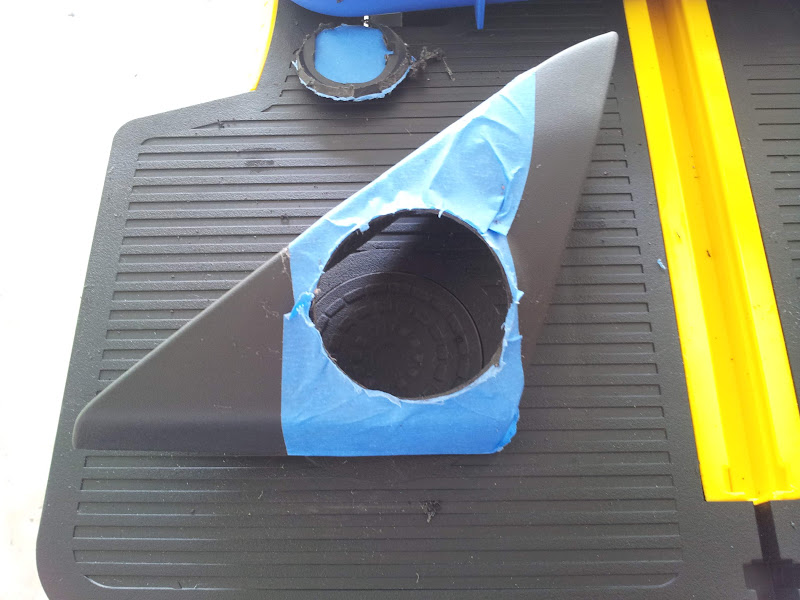
Well gang, today I decided to rip the door off and see what I could do with the Alpine SPX-17PRO's. First thing I decided to tackle was the tweeter placement. I've decided I'm going to relocate the power window switch to the door panel where the power windows are. I removed the triangle panel and started to take some measurements. I also made a pattern of the existing cutout for when I make the hole in the door panel for the relocation. Because of the weird 'angle' on the driver's side, I decided to work towards the center, so I could reduce as much of it as possible. Also, the tweeters in this thing are HUGE, so I needed a fairly massive hole. After a bit of persuasion from my lead installer, I decided to get started.

Here's a "BEFORE" shot of the power mirror switch and the triangle:

...and with the switch removed:

...and the tweeter & housing for comparison:

Now let's do some damage! Dremel is at the ready, and my hole has been traced and measured (twice) to 2 1/4". Time to start cutting plastic!

After some sanding, I think it's just about right:
Time to test fit the mounting ring:

...and now to mount the tweeter!


...and finally, on the door to test clearance:

Now with the tweeter done, it's time to work on the driver. I won't bother showing you how to remove the door panel - if you need instructions, here's a video someone did already:
Once I got the panel off, I discovered that the Shaker 500 system has some unique speakers. This wasn't going to be as simple as pulling the old ones out and dropping the new driver in with an adapter plate. Observe:


On the plus side - they are separate speakers (tweeter & mid-driver). On the minus side, it meant they had to go. So after a little persuasion, I was left with this:

Not being one to pass up a challenge, I taped up the front, traced a pattern from the included adapter plate, and took my trusty Dremel in hand and went to work:

When I was done, I was left with this:

The speaker fits without depth issues, and I was able to salvage the original housing.
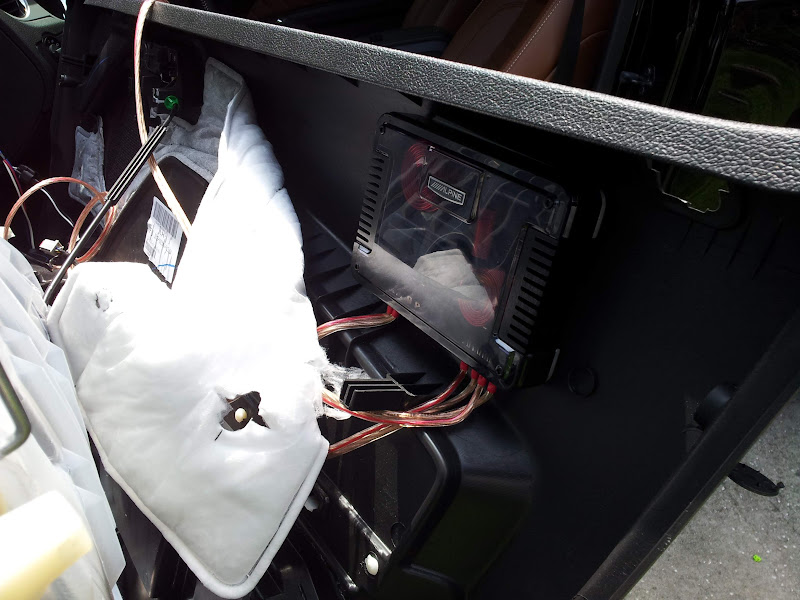
Now, since I'm hooking these up to the factory head unit for now, I needed to install the crossover somewhere in the door. This proved harder than thought as there isn't much room inside the door, especially given how large these crossovers are. Eventually, I came up with this (thanks to some industrial-strength Velcro):
With my wiring all complete, the only thing left to do was reassemble the door and test it out:

Now mind you, I only had time to do one door today, and I didn't get a chance to relocate the mirror switch yet. That comes tomorrow. In the meantime, if you have any questions, please let me know.
As for the sound quality, let me put it to you this way - there's a reason the Shaker 500 system sounds crappy. The components used are terrible. Yes, they are separates. Yes the tweeter is a dome tweeter and not a piezo POS. But they're still terrible. The single Alpine sounds 100x better for simply throwing it in the door. Tomorrow, with both speakers installed, I'll post a more thorough review.
Well gang, today I decided to rip the door off and see what I could do with the Alpine SPX-17PRO's. First thing I decided to tackle was the tweeter placement. I've decided I'm going to relocate the power window switch to the door panel where the power windows are. I removed the triangle panel and started to take some measurements. I also made a pattern of the existing cutout for when I make the hole in the door panel for the relocation. Because of the weird 'angle' on the driver's side, I decided to work towards the center, so I could reduce as much of it as possible. Also, the tweeters in this thing are HUGE, so I needed a fairly massive hole. After a bit of persuasion from my lead installer, I decided to get started.
Here's a "BEFORE" shot of the power mirror switch and the triangle:
...and with the switch removed:
...and the tweeter & housing for comparison:
Now let's do some damage! Dremel is at the ready, and my hole has been traced and measured (twice) to 2 1/4". Time to start cutting plastic!
After some sanding, I think it's just about right:
Time to test fit the mounting ring:
...and now to mount the tweeter!
...and finally, on the door to test clearance:
Now with the tweeter done, it's time to work on the driver. I won't bother showing you how to remove the door panel - if you need instructions, here's a video someone did already:
Once I got the panel off, I discovered that the Shaker 500 system has some unique speakers. This wasn't going to be as simple as pulling the old ones out and dropping the new driver in with an adapter plate. Observe:
On the plus side - they are separate speakers (tweeter & mid-driver). On the minus side, it meant they had to go. So after a little persuasion, I was left with this:
Not being one to pass up a challenge, I taped up the front, traced a pattern from the included adapter plate, and took my trusty Dremel in hand and went to work:
When I was done, I was left with this:
The speaker fits without depth issues, and I was able to salvage the original housing.
Now, since I'm hooking these up to the factory head unit for now, I needed to install the crossover somewhere in the door. This proved harder than thought as there isn't much room inside the door, especially given how large these crossovers are. Eventually, I came up with this (thanks to some industrial-strength Velcro):
With my wiring all complete, the only thing left to do was reassemble the door and test it out:
Now mind you, I only had time to do one door today, and I didn't get a chance to relocate the mirror switch yet. That comes tomorrow. In the meantime, if you have any questions, please let me know.
As for the sound quality, let me put it to you this way - there's a reason the Shaker 500 system sounds crappy. The components used are terrible. Yes, they are separates. Yes the tweeter is a dome tweeter and not a piezo POS. But they're still terrible. The single Alpine sounds 100x better for simply throwing it in the door. Tomorrow, with both speakers installed, I'll post a more thorough review.
Last edited by ColSaulTigh; 6/16/13 at 06:47 PM.

 6/15/13, 03:32 PM
#23
Bullitt Member
Thread Starter
On the same panel where the window switches are. I'm going to basically do what this guy did.
I'll post my own pics tomorrow after I get done.
I'll post my own pics tomorrow after I get done.
6/16/13, 05:48 AM
#26
Bullitt Member
Thread Starter
That's why I promoted him to Lead Installer. He's pretty good with a Dremel and knows his way around an electrical system. That, and he works for treats, so he comes cheap....
Today I have more time so I plan on doing the other door, rewiring the power mirror switch and relocating it to the window switch panel, and measuring the "subwoofer" enclosure. Stay tuned.
Today I have more time so I plan on doing the other door, rewiring the power mirror switch and relocating it to the window switch panel, and measuring the "subwoofer" enclosure. Stay tuned.
6/16/13, 06:44 PM
#27
Bullitt Member
Thread Starter
On the same panel where the window switches are. I'm going to basically do what this guy did.
I'll post my own pics tomorrow after I get done.
I'll post my own pics tomorrow after I get done.

Looks like it was made to go there. Had to lengthen 2 wires, the rest I just unwrapped the tape, move the plug, and re-taped the bundle up. Easy 30 minute mod.
Last edited by ColSaulTigh; 7/5/13 at 06:56 PM.
6/16/13, 07:27 PM
#29
Bullitt Member
Thread Starter
They're the two short ones that connect from the switch directly to the driver's side mirror - one of them is blue/beige, and the other was beige/something (can't remember). You'll know them immediately since they're the only two short ones going to the switch plug. I went to Home Depot and got some 18/2 wire and just used that and butt connectors (too lazy to solder). Works like a charm.
Last edited by ColSaulTigh; 6/16/13 at 07:30 PM.
6/16/13, 07:49 PM
#30
Member
Join Date: April 23, 2013
Posts: 34
Likes: 0
Received 0 Likes
on
0 Posts
They're the two short ones that connect from the switch directly to the driver's side mirror - one of them is blue/beige, and the other was beige/something (can't remember). You'll know them immediately since they're the only two short ones going to the switch plug. I went to Home Depot and got some 18/2 wire and just used that and butt connectors (too lazy to solder). Works like a charm.
 6/16/13, 07:54 PM
#31
Bullitt Member
Thread Starter
6/16/13, 09:54 PM
#32
Bullitt Member
Join Date: September 28, 2007
Location: Metro Detroit
Posts: 402
Likes: 0
Received 0 Likes
on
0 Posts
very cool, love the location for the tweets and the power mirror control. how is the imaging for the tweeters in that location and does your cat do side jobs? i'm pretty sure the shops around here would find a way to quote 300+ for that job.
6/16/13, 10:18 PM
#33
NTTAWWT
neat looking project. Locating the crossovers can be a major pain in the Mustangs, there's just no good place for them anywhere. Mine are mounted in the passenger footwell, since hardly anyone rides there.
6/17/13, 06:26 AM
#35
Bullitt Member
Thread Starter
That spot in the door works, as long as you don't mind disassembling the door every time you want to get at them. Like I said earlier, these are just temporary until I get the new head unit and amp in, then I'll be running the separates active.
6/17/13, 07:06 PM
#36
Bullitt Member
Thread Starter
Update - 6/17/13 - Ordered more parts!
Ok, so I went ahead and ordered some more parts for the build....
1st up, to replace the door subs:
Mid-Bass Drivers - JL Audio ZR800-CW - Retail: $229.99 ea. Purchase Price: $168.97 ea (free shipping!) (eBay)

Justification: Yeah, the factory mid-bass just sucks.
Needed Accessories: Looks like I'm going to need a 2-channel amp...
Next up:
Subwoofer - JL Audio Stealthbox SB-F-MUCUPE2/13W3v3 - Retail: $699.99. Purchase Price: $599.99 (free shipping!) (SonicElectronix.com)


Justification: In for a penny, I guess. Actually, I just got an unexpected check, so I've got some extra scratch to blow. Besides, I might as well do it now. Plus, I can sell my old JL BassWedge on Craigslist and make $75-$100 on it. PLUS PLUS I don't have to mess with building my own box, and can just slap this in and call it a day.
Needed Accessories: None. I've already got the amp and wire (just need to run it to the trunk).
Anyway, the delivery fairies should be dropping these off either by the end of this week or early next week, so I've got another project to work on - YAY!
1st up, to replace the door subs:
Mid-Bass Drivers - JL Audio ZR800-CW - Retail: $229.99 ea. Purchase Price: $168.97 ea (free shipping!) (eBay)
Justification: Yeah, the factory mid-bass just sucks.
Needed Accessories: Looks like I'm going to need a 2-channel amp...
Next up:
Subwoofer - JL Audio Stealthbox SB-F-MUCUPE2/13W3v3 - Retail: $699.99. Purchase Price: $599.99 (free shipping!) (SonicElectronix.com)
Justification: In for a penny, I guess. Actually, I just got an unexpected check, so I've got some extra scratch to blow. Besides, I might as well do it now. Plus, I can sell my old JL BassWedge on Craigslist and make $75-$100 on it. PLUS PLUS I don't have to mess with building my own box, and can just slap this in and call it a day.
Needed Accessories: None. I've already got the amp and wire (just need to run it to the trunk).
Anyway, the delivery fairies should be dropping these off either by the end of this week or early next week, so I've got another project to work on - YAY!
Last edited by ColSaulTigh; 6/17/13 at 07:10 PM.
6/17/13, 07:31 PM
#37
Member
Join Date: April 23, 2013
Posts: 34
Likes: 0
Received 0 Likes
on
0 Posts
I do not have a Premium sound system so I do not have door subs. Is their space to add them and could I get away with putting a hole in the lower door panel? Do you recommend getting a Premium door panel instead?
6/17/13, 07:35 PM
#38
Bullitt Member
Thread Starter
You could probably make a ring, or maybe even buy one online somewhere. Take your door panel off and see if your door has the hole near the bottom corner to accommodate the needed depth, you could always make a fiberglass back box if necessary...
6/17/13, 07:49 PM
#39
Bullitt Member
Join Date: April 2, 2012
Location: Texas
Posts: 286
Likes: 0
Received 0 Likes
on
0 Posts
Very nice so far...can't wait to see it all together!! The window switch was the exact location I was thinking for a tweeter as well. How hard was the other side with it not have a hole to start with? What type of amp are you running to the JL doors?
6/17/13, 07:59 PM
#40
Bullitt Member
Thread Starter
As for the JL door speakers, I'm researching that now. I'm debating on whether I'm going to run them off the Alpine PDX-V9 subwoofer channel and get an Alpine PDX-M12 for the sub in the trunk, or just get a PDX-F4 for the JL doors and use the V9 for the trunk sub. If I know me (and I do), odds are I'll just spend the extra $200 and get the M12.....
Also, I think I'm going to need to research crossovers now. Any suggestions? I've used AudioControl in the past, and someone's recommended Audison Bit 10 or Bit 1. I've never used them before so I need to do some homework.