'10-14 Interior and Audio Place to discuss 2010-2014 interior and audio type modifications.

Adding the OEM nav

Thread Tools
 
Search this Thread
 
Old Mar 10, 2014 | 09:54 AM
  #321  
LEXiiON's Avatar
Mach 1 Member
 
Joined: May 29, 2012
Posts: 791
Likes: 23
From: Westminster, CO
According to the picture i posted above, it might be the GPS module.
LEXiION

Last edited by LEXiiON; Mar 10, 2014 at 11:54 AM.
Reply
Old Mar 10, 2014 | 09:58 AM
  #322  
zeroaviation's Avatar
Mach 1 Member
 
Joined: March 1, 2007
Posts: 669
Likes: 5
From: Kansas City
You are correct. That is the GPS module.

It will not be reused.

-Matt
Reply
Old Mar 10, 2014 | 10:11 AM
  #323  
LEXiiON's Avatar
Mach 1 Member
 
Joined: May 29, 2012
Posts: 791
Likes: 23
From: Westminster, CO
Ok. Got it. Looked at the wiring diagrams and they only show the GPS module without Navigation.

Thanks,

LEXiiON

Last edited by LEXiiON; Mar 10, 2014 at 08:52 PM.
Reply
Old Mar 10, 2014 | 10:41 AM
  #324  
jim010's Avatar
Thread Starter
Legacy TMS Member
 
Joined: November 7, 2006
Posts: 2,792
Likes: 57
From: Alberta
Matt is correct. You will not reuse the GPS module that was in your car. Take it out.
Reply
Old Mar 10, 2014 | 11:18 AM
  #325  
defiance772's Avatar
V6 Member
 
Joined: July 1, 2013
Posts: 80
Likes: 1
Cool Great thanks guys. Hey Jim how did you take out that climate control module from the center dash part. Do I have to push the clips in?
Reply
Old Mar 10, 2014 | 12:28 PM
  #326  
jim010's Avatar
Thread Starter
Legacy TMS Member
 
Joined: November 7, 2006
Posts: 2,792
Likes: 57
From: Alberta
Yes, those clip need to be carefully pushed in and then the module is pryed out.
Reply
Old Mar 11, 2014 | 07:12 PM
  #327  
defiance772's Avatar
V6 Member
 
Joined: July 1, 2013
Posts: 80
Likes: 1
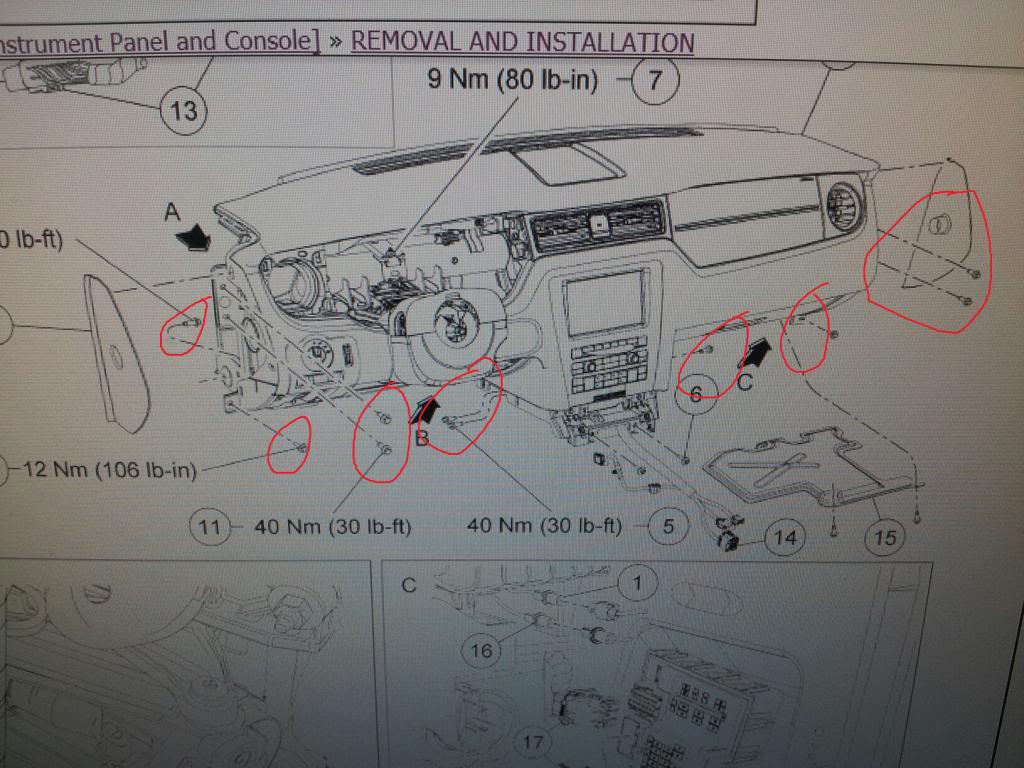
Hey Jim and muskoka or anybody else I unbolted everything and me and my buddy are trying to remove the dash it's loose but something it's not budging I feel like were missing a bolt but don't know where it is what section of the service manual does it show where the bolts are located I been looking like crazy. I removed all the bolts circled.


Name:  20140311_215333_resized.jpg
Views: 571
Size:  113.8 KB

Last edited by defiance772; Mar 11, 2014 at 08:21 PM.
Reply
Old Mar 11, 2014 | 08:55 PM
  #328  
Muskoka's Avatar
Member
 
Joined: December 4, 2013
Posts: 28
Likes: 2
Hi
Look under the drivers section and there is a bolt holding the door speaker amp. One bolt going to the left. You have circled it however it is often overlooked. In total there are 12 bolts to undo.
Reply
Old Mar 11, 2014 | 08:58 PM
  #329  
Muskoka's Avatar
Member
 
Joined: December 4, 2013
Posts: 28
Likes: 2
Hi
You have not circled the two bolts under the ACM by the shifter.
Reply
Old Mar 12, 2014 | 12:08 AM
  #330  
defiance772's Avatar
V6 Member
 
Joined: July 1, 2013
Posts: 80
Likes: 1
Hey Muskoka thanks for the help you were right those were the screws lol. Well dash is out but were confused about the Dual evaporater housing are we suppose to take the whole entire housing and switch and switch it with the single. We tried removing the whole single evaporator housing from the car but couldnt figure out how to remove it. Were stumped.
Reply
Old Mar 12, 2014 | 12:22 AM
  #331  
defiance772's Avatar
V6 Member
 
Joined: July 1, 2013
Posts: 80
Likes: 1
Hi Muskoka. After I remove the plenum which im guessing is the top part of the housing what do I do with the rest of the dual zone housing. So basically you keep the single zone housing with the dual zone plenum.
Reply
Old Mar 12, 2014 | 10:04 AM
  #332  
defiance772's Avatar
V6 Member
 
Joined: July 1, 2013
Posts: 80
Likes: 1
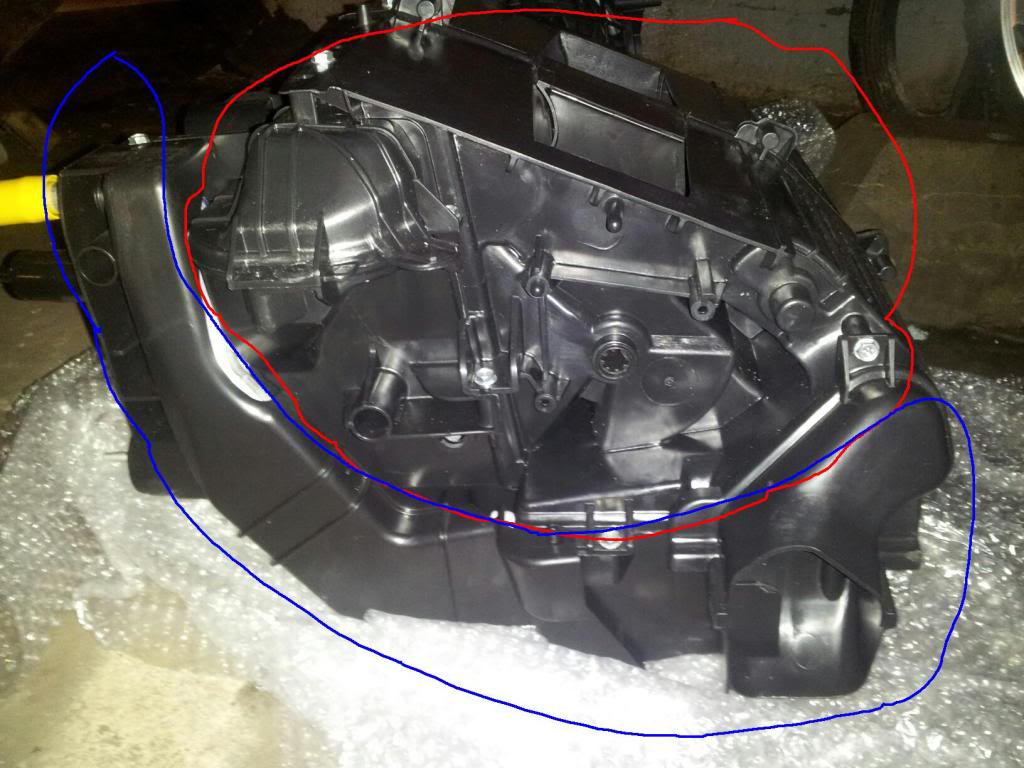
Heres a pic. Do I remove the top which is the red circled part away from the blue circled part on the dual evaporator. and then put that on the single evaporator bottom part of the single evaporator. Basically what i'm trying to find out if the evaporator dual or single is 2 pieces put together in the picture

Name:  Evap_1.jpg
Views: 591
Size:  101.6 KB
Reply
Old Mar 12, 2014 | 10:37 AM
  #333  
Trevor08gt's Avatar
V6 Member
 
Joined: July 21, 2012
Posts: 86
Likes: 0
From: Missouri
This is what I have. Do you guys think I'm missing anything?
Attached Thumbnails Adding the OEM nav-img_3838.jpg  
Reply
Old Mar 12, 2014 | 11:46 AM
  #334  
jim010's Avatar
Thread Starter
Legacy TMS Member
 
Joined: November 7, 2006
Posts: 2,792
Likes: 57
From: Alberta
Looks like you have everything. Hard to tell if you have all the harnesses.

What about the amp?
Reply
Old Mar 12, 2014 | 12:19 PM
  #335  
Trevor08gt's Avatar
V6 Member
 
Joined: July 21, 2012
Posts: 86
Likes: 0
From: Missouri
Originally Posted by jim010
Looks like you have everything. Hard to tell if you have all the harnesses.

What about the amp?
I'm going to contact him right now to see if he has the amp or not. I need the amp, amp bracket and the pigtail right?
Reply
Old Mar 12, 2014 | 12:37 PM
  #336  
jim010's Avatar
Thread Starter
Legacy TMS Member
 
Joined: November 7, 2006
Posts: 2,792
Likes: 57
From: Alberta
Yes.

You also need the right side steering wheel switch to get the phone button to work. Part number I added to the post at the beginning of the thread.
Reply
Old Mar 12, 2014 | 01:06 PM
  #337  
Muskoka's Avatar
Member
 
Joined: December 4, 2013
Posts: 28
Likes: 2
Hi Defiance
In your pic. Remove the parts circled in Blue. that will give you access to the additional screws to remove the plenum from the housing.
Yes you only replace the plenum and leave the rest of the single zone housing in place.
There is one screw on the underside of the housing that is hidden from view in the evaporator housing in the dash. If you have removed the plenum from the replacement evaporator housing then you know how to install the new one. Just be careful not to damage the fins of the AC evaporator and the Heater core when you remove and replace the plenum.
Hope that this helps.
Reply
Old Mar 12, 2014 | 01:08 PM
  #338  
Muskoka's Avatar
Member
 
Joined: December 4, 2013
Posts: 28
Likes: 2
The red area is what you are replacing only. You leave the blue area in the car.
Reply
Old Mar 12, 2014 | 01:48 PM
  #339  
defiance772's Avatar
V6 Member
 
Joined: July 1, 2013
Posts: 80
Likes: 1
Muskoka your awesome dude. Great So the housing is the different part and the other long piece the rest of the evaporator is the same. Will go work on that today. Also the new motor that I need to attach to the new housing on the driver side it doesn't fit correctly. Is there something I need to know
Reply
Old Mar 12, 2014 | 02:26 PM
  #340  
Muskoka's Avatar
Member
 
Joined: December 4, 2013
Posts: 28
Likes: 2
Hi
Rotate the door actuator ( on the plenum,that connects with the motor) with a screw driver, insert the motor until the three holes line up, screw in the three screws.
Reply


All times are GMT -6. The time now is 08:04 PM.