
Making mods to my '13 PW GT

Thread Starter
GT Member
Joined: January 19, 2013
Posts: 149
Likes: 0
I'll have them install the stripes, I have no experience with that work.
http://decalshoppe.com/ford_mustang_stripe_kits_
GTR Member
Joined: October 18, 2006
Posts: 5,553
Likes: 11
From: England
I like the Nova wheels you've chosen..........but with your user name, I thought you might like these 
http://www.tirerack.com/wheels/Wheel...utoModClar=1SS

http://www.tirerack.com/wheels/Wheel...utoModClar=1SS

Mach 1 Member
Joined: March 24, 2004
Posts: 686
Likes: 0
From: St.Thomas ,Ontario, CANADA
 Wow ! You have really been busy ,great transformation ,doesn't look like the same car. The lowering ,imho, is the greatest improvement that you can make to a GT. Got my springs, just have to do it.
Bullitt Member
Joined: October 22, 2012
Posts: 343
Likes: 4
From: West Bend, Wisconsin
Olds442- Is that Roush front splitter hollow? I bought a coping saw to cut with as I dont trust my hands with an air saw, but it looks like it is solid. Could you elaborate on your cutting experience?
Thread Starter
GT Member
Joined: January 19, 2013
Posts: 149
Likes: 0
I like the Nova wheels you've chosen..........but with your user name, I thought you might like these
http://www.tirerack.com/wheels/Wheel...utoModClar=1SS
http://www.tirerack.com/wheels/Wheel...utoModClar=1SS
Thread Starter
GT Member
Joined: January 19, 2013
Posts: 149
Likes: 0
It's not a bad job. You need a spring compressor for the strut springs and an impact gun makes it much easier to get the strut nut off. Give yourself a good chunk of a day, it won't take that long but some things you'll want to think through, for safety if nothing else.
Thread Starter
GT Member
Joined: January 19, 2013
Posts: 149
Likes: 0
Get the front of the car up in the air high enough so you can slide under and see what you're looking at. Give yourself 2-3 hours to do the job and take your time and think it through. It's not complicated but measure twice and cut once. A short socket and ratchet are needed for the original splitter in the wheel openings otherwise a nut driver was the way to go for me.. Go for it, it's not hard, you'll do fine!
Thread Starter
GT Member
Joined: January 19, 2013
Posts: 149
Likes: 0
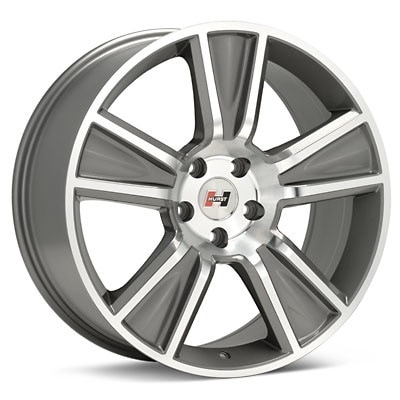
I ordered the American Racing Nova wheels. I also special ordered a set of Toyo Proxes 4+ tires from Discount Tire.
I ordered a set of 295/30/20 for the rear they have a section width of 11.9" and a tread width of 11.6" with a height of 27.1". The section width is 1.9" wider than the wheel or 0.95" per side. The tread width is a whopping 3.4" wider than the 235/50/18 stock tires! They are 0.15" shorter, hopefully that won't be an issue with looks. The wheels are 20x10
I ordered a set of 255/35/20 front tires with a section width of 10" or .75" per side and a tread width of 8.7" that is about 0.5" wider than stock and about 0.25" shorter than stock. The wheels are 20x8.5
The sidewall bulge from the section width is close to the same and the height is very close so looking at the tires they should appear to fit the wheels identical, giving the same look. The Toyo tires are MUCH cheaper than other tires I was looking at. About $240 for the rears each and $198 each for the fronts. I'll reuse the pressure sensors for the factory wheels into the American Racing wheels.
Last edited by Olds442; Mar 1, 2013 at 06:51 PM.
Shelby GT500 Member
Joined: July 15, 2012
Posts: 2,708
Likes: 2
From: Germany
This is a great thread. I like what you have done so far. The string trick to align the rear end with the PHB is a great idea. I like the stance and I'm looking forward to seeing what the new wheels and hood look like once they all come in.
Thread Starter
GT Member
Joined: January 19, 2013
Posts: 149
Likes: 0
I went to Discount Tire to pay for my tires, when the wheels get here I'll get them mounted and installed. The rears are W I D E! I hope they don't stick out past the wheel opening! You can see the front and rear tires are the same height so the stance won't change from what I have now.

Last edited by Olds442; Apr 25, 2014 at 07:05 AM.
Thread Starter
GT Member
Joined: January 19, 2013
Posts: 149
Likes: 0

Thread Starter
GT Member
Joined: January 19, 2013
Posts: 149
Likes: 0
My Cervini Type IV Ram Air hood and side scoops came today. My son, Brad, came over to help me install the hood. I put the side scoops on while waiting for him to get to my place.
I bought the parts prepainted and the color matches great. Everything was well packaged and there were no chips or scratches.


I bought the parts prepainted and the color matches great. Everything was well packaged and there were no chips or scratches.


Last edited by Olds442; Apr 25, 2014 at 04:21 PM.
Thread Starter
GT Member
Joined: January 19, 2013
Posts: 149
Likes: 0
I did a test fit of the side scoops and placed a strip of painters tape along the top of the scoop so I had something to align to. The side and bottom pieces provide a guide to show me where I need to clean before sticking the scoops on.

The scoops fit very well and I like the shape of the Cervini scoops better than the triangular Ford scoops.


The scoops fit very well and I like the shape of the Cervini scoops better than the triangular Ford scoops.

Last edited by Olds442; Apr 25, 2014 at 04:22 PM.
Thread Starter
GT Member
Joined: January 19, 2013
Posts: 149
Likes: 0
The hood install wasn't too bad, it took about 2 hours by the time it was completed. The drivers side required a 3/16 shim at the hinge to raise it to the fender height, the passenger side was high in the front corner. Adjusting the front hood bumpers fixed the front alignment.
I had to remove the front cover to get easy access to the hood latch. The latch had to be slid about 3/8" so there wasn't interference when closing the hood.

The windshield washer plumbing didn't go as well as I would have liked. The washer lines were plumbed through the weatherstripping and where I cut holes in the weatherstrip it tended to tear. I'll probably have to replace it at some point. If I do it again I will probably be able to make a cleaner install.

Last edited by Olds442; Apr 25, 2014 at 04:25 PM.