When you click on links to various merchants on this site and make a purchase, this can result in this site earning a commission. Affiliate programs and affiliations include, but are not limited to, the eBay Partner Network.
Glad you got it working. Every time I read this thread, I was wanting to go out and see how a stock 13 worked for you, but was in a position where I could't go check.
Glad you got it working. Every time I read this thread, I was wanting to go out and see how a stock 13 worked for you, but was in a position where I could't go check.
Thank you and its fine, I managed to find a jay leno's garage episode where they we're driving the boss 302 and I could get about a 1 second look at the switch back. But thanks for trying and telling me how those switchbacks are supposed to work!
First off, Big thanks to LEXiiON and SpectreH for all the Help they provided this would not of been possible without them!
Write Up
You will need:
2 20 Amp fuses
1 LH 2013 HID light with bulbs and ballast
1 RH 2013 HID light with bulbs and ballast
1 2013/2014 SJB that you are confident in
1 IDS and VCM II tool is recommended but not required.
Lots of wire and Lots of patience.
The Prep Work
To start you need to remove the front bumper of your car.
Here is a good video on how to, this method is 99% the same between 10-14.
2010-12 will have 2 extra bolts to remove on the bumper that are attached to the headlights.
Once you get your bumper off there are three 10mm bolts and a push pin holding your headlight housing together . Remove them to take your headlight out then disconnect the 2 connectors. The SJB
STOP Before you continue make sure YOU HAVE DISCONNECTED THE BATTERY! I am not responsible if you forget to disconnect the battery when screwing around with any electronics in the car, more or less the SJB.
When you install a new SJB you will NEED to have the PATS relearned on your car. When you first test this with the new SJB your keys will not work on your car, this means you will not be able to start the car with your keys. You either need your own IDS and VCM (Recommended) Or Wait until you get to a dealership for them to do the PAT for you once you put in the new box. MAKE SURE THEY DO NOT FLASH OR PROGRAM THE BOX OR YOU WILL BE SCREWED!
This is the whole build right here if your not making a harness you will need a 2013/14 SJB or this will not work, From what I have seen you cannot reprogram a 2010-12 SJB the circuitry is completely different for the headlights. the 10-12 uses a Micro in the diagram, the 2013 and 14 use logic in the diagrams. This is something YOU CANNOT PROGRAM.
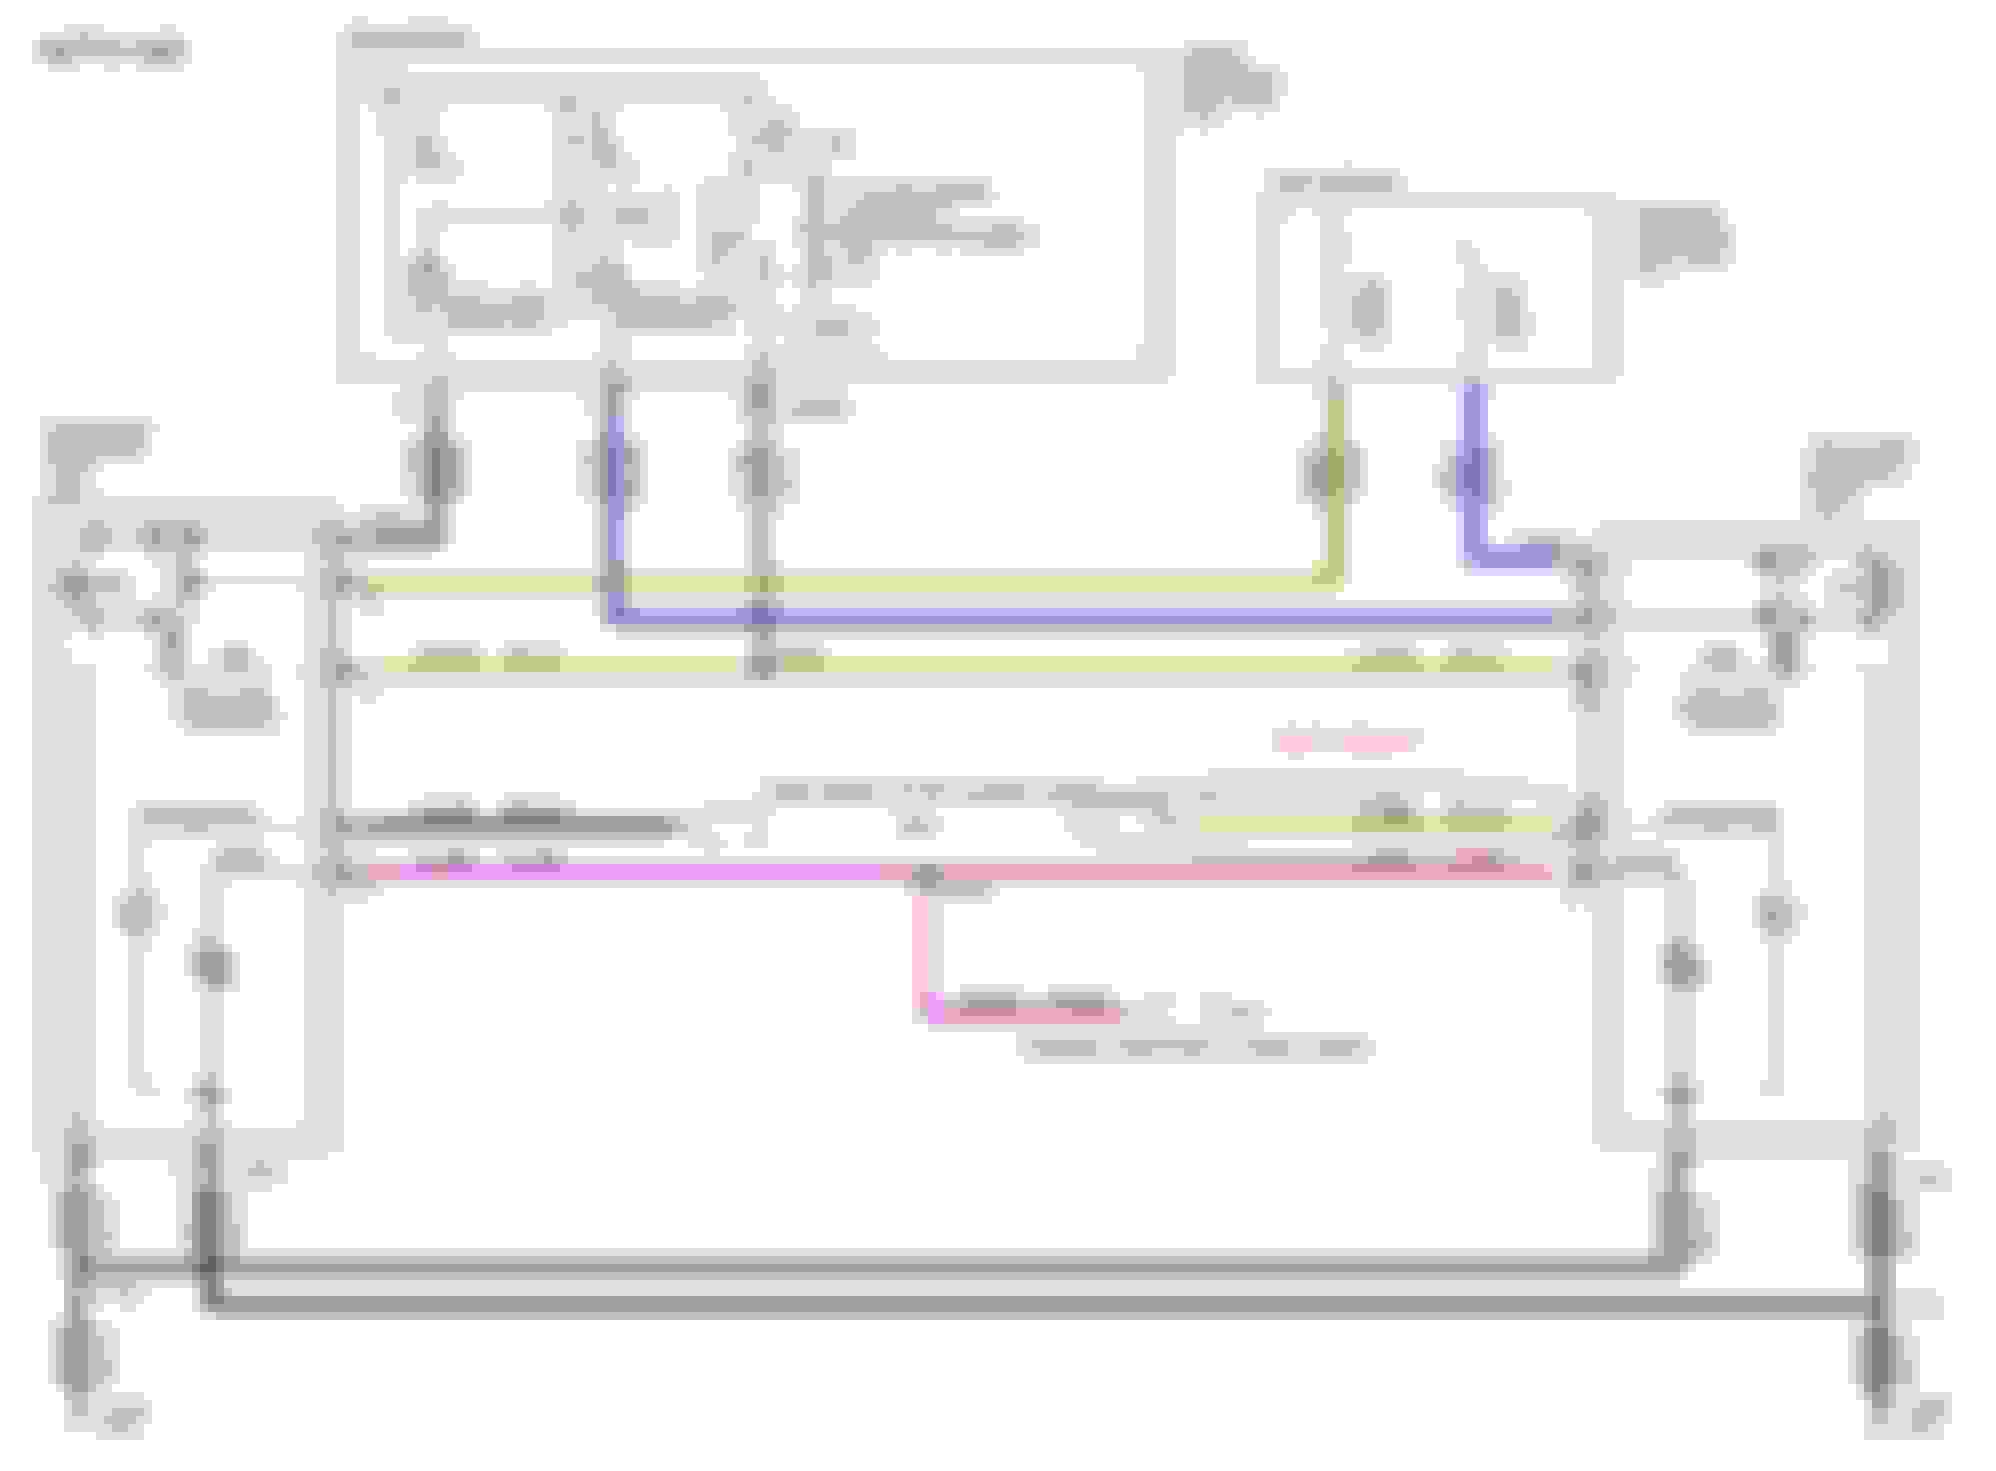
Once removed locate Plug F.
Use this friendly diagram to locate this plug.
F is highlighted in yellow!
Now you will notice that this plug does not have a lot of wires maybe 4-6. and on the SJB it is missing like 12 pins. If this is right then you found the right plug. You need to add wires to pins 17 and 19 on this connector. How you do it is up to you.
If I remember correctly pin 19 is passenger side and pin 17 is driver side. If not just switch them in the connector.
Run these wires to the appropriate headlight housings, again how you do this is up to you, personally I used a gasket that is under the driver dash and leads right out into the engine bay.
You should now hook your SJB back in.
The BJB Fuse 26 and 27
Now move into the fuse box in the engine compartment and find fuse 26 and 27, there shouldn't be anything there unless you have HIDs. Next devise a method of running wires on the cold end of the fuse to each headlight assembly. 26 is Left and 27 is right. You will need a 20 amp fuse for each light. Once you have those ran to the headlight housings you can begin the fun part.
The Wiring
This was the hardest part of the build and I cant shed to much light on it. Like LEXiiON said you should wire your lights up light the diagram has it. Except in a few spots.
Pay attention to your grounds. If you dont the switchbacks will not work correctly. You need them wired to the T. And when you test your DRL make sure the parking brake is OFF!
The turn signal is easy. Keep the ground and the turn signal wire, the parking light wire can move to pin 5 on the HID connector. Attach the ground to the A position in the new connector and the turn signal goes to B or the middle. If it does not work reverse the pin that you have the ground on. LEXiiON has a diagram for the connector somewhere.
If wired correctly it should all work.
Testing
Make sure your side marker lamps are connected or this will not work properly.
For a comprehensive test have a buddy or a camera setup at you lights. Start by trying the locking and unlock features, when unlocking the car should flash the blinkers and the DRL should come on with the side markers and stay on for roughly 30 seconds. Next check the lock the blinkers should flash once and nothing else no DRL nothing just blinkers. Then test to see if you have a bright DRL when you turn the key to ON. Next test switchbacks On each turn signal. The DRL on the side turning should shut off when the blinker is on. If they are backwards, Like the driver side DRL shuts off but the passenger turn signal is on, the wires in the SJB need to swap places. Once that is done make sure the DRL go off with the hand brake. (If your DRL dont work at all make sure the Parking brake is off.) Next see you have all the same function in Auto headlamp mode (if equipped). Then see is your DRL dim when your turn on parking or headlight, then test to see if you Have a switch back function or not. You should not have any switch backs with the parking lights or headlights on. Next check your high beams and your flash to pass. (In the off position in the light switch my flash to pass stays on for a second the shuts off)
If all works well then congratulations the wiring is complete, But before you put the bumper on and button stuff up I encourage you to take this time to adjust your headlights.
Adjustment
Look on page 245 and 246 for adjustment instructions.
Finishing Up
Make sure all your wiring is how you want it and that the headlights are properly adjusted. Then proceed to cover your SJB and BJB up again and reattach the battery if you haven't already, You can now put the bumper back on make sure that you put the side marker lamps back in and the air temperature senor is refastened. Then once you are all buttoned up I would either have a dealer clear any DTC that came up during the disconnection or use your own VCM II (Highly Recommended).
If anyone needs any help with this you can send a message on this thread or PM LEXiiON or I.
This concludes the write up for this install I hope you liked it now for some pictures of the finished product.
Excellent work! Looks like it is working like my '13. The HIDs blinded the camera so I couldn't make out the LED strips vs turn signals. With headlights on, my LEDs stay on with the turn signals. With headlights off, they behave just like your car.
Excellent work! Looks like it is working like my '13. The HIDs blinded the camera so I couldn't make out the LED strips vs turn signals. With headlights on, my LEDs stay on with the turn signals. With headlights off, they behave just like your car.
I will try to get a better video, but yes that how mine are working!