Upcoming Audio Build - Detailed w/Pics and Data
 7/7/13, 06:48 AM
#81
Bullitt Member
Thread Starter
It is done!!!
So yesterday I finally finished the install!!! It was hotter than hell outside, and I got a bad sunburn on my back, but it's finally finished!
First off, I promised shots of how I ran the speaker wires to the doors. There are rubber grommets on both doors (you can't see them in the pics) and I used split-loom to dress the wires as neatly as possible. Here's the driver's door:

Same thing on the passenger's side.
So I started off by pulling the factory "subwoofer" out of the door. After I pulled the 8 screws...

...and couldn't pull the driver out, I realized that there's a 10mm bolt on the back holding the speaker in place. Once I undid that, the driver popped right out.

BTW, I did some checking - the factory driver runs at 2ohms, so you can't just use the factory amp to drive the JL ZR800's (not that I would anyway, someone asked).
Anyway, I pulled all of my temporary wiring out, and soldered on my new wiring. I thought I had put enough through to reach the speakers directly, but apparently not. Oh well...

Once I had all the connections soldered up, I reassembled the door panels. Here's a note of interest - the woofer cover is not of even depth from one side to the other - it sits on a slight tilt. It took me about 1/2 hour to figure out why it wouldn't pop on flush. After I realized that, it popped right on. That's what happens when you try to work in 95*F direct sun....

Last step was to connect up the + and - to the battery and see if it worked. I did some basic math. The last car I put my own full-blown system in was my 1997 Chevy Camaro, so it's been 16 years since I did anything more complicated than replacing a head unit with a wiring harness adapter. 42 days of ordering parts, pulling 7 plastics & 1 rear seat, running 185 feet of wires, scraping 2 hands and arms (14 separate scratches!), inflaming arthritis in 2 hands, banging 1 head, re-soldering 1 wire (yes, I screwed one of the speaker runs up), and major heat exhaustion and 1 sunburn later, and it worked. Everything fired up just like it should:

OBD-II diagnostics and gauges work:


I hid the GPS antenna inside the dash and it's working perfectly. Don't let people tell you it has to sit up on the dash or rear deck - it works fine as long as it's not obstructed by metal:


WiFi streaming works fine from both my home network as well as my WiFi hotspot feature on the phone:


(BTW, check out the Junkman's videos if you want some good tips on detailing your car and correcting paint - Thanks, Junkman!)

With regard to the "Big 3 Upgrade", I don't think it's needed. I'm running two amps and a decent blast here, and the voltmeter never drops below 13.5v, usually hovering around 13.6v/13.7v:

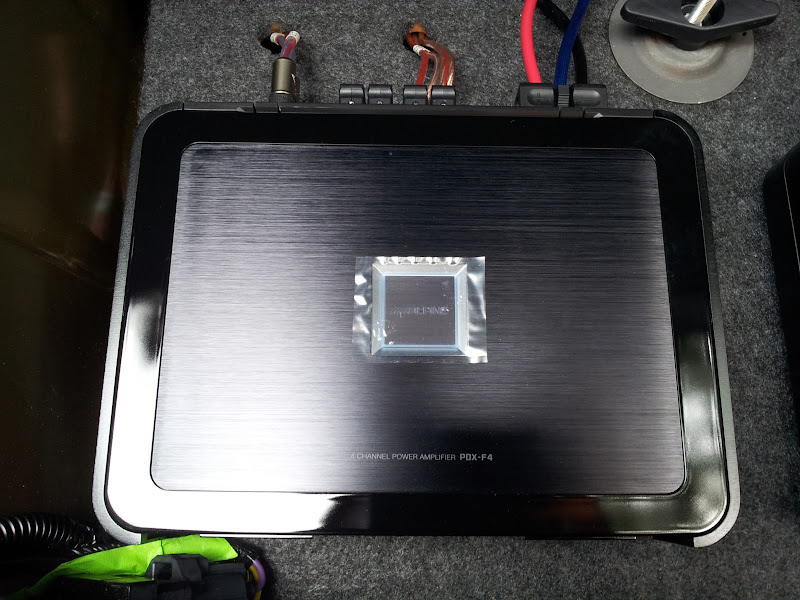
Finally, some close-ups of the amps and wiring:


I did some basic tweaking last night before I had to get ready for the local Mustang Club meeting. I have to work on the mid-bass and sub settings - and yes, I'm going to have to Dynamat - there are some serious buzzing and rattles that need to be addressed. That'll be updated later on. I've gotta track down an RTA/Spectrum Analyzer. I use to have a nice AudioControl SA-3050a, but got rid of it when I closed my business. I keep checking eBay for a deal, but they're all overpriced now. So in the meantime, I've gotta tune by ear...
Anyway, I'll leave you with some pics from yesterday's Mustang Club meet-up:


First off, I promised shots of how I ran the speaker wires to the doors. There are rubber grommets on both doors (you can't see them in the pics) and I used split-loom to dress the wires as neatly as possible. Here's the driver's door:
Same thing on the passenger's side.
So I started off by pulling the factory "subwoofer" out of the door. After I pulled the 8 screws...
...and couldn't pull the driver out, I realized that there's a 10mm bolt on the back holding the speaker in place. Once I undid that, the driver popped right out.
BTW, I did some checking - the factory driver runs at 2ohms, so you can't just use the factory amp to drive the JL ZR800's (not that I would anyway, someone asked).
Anyway, I pulled all of my temporary wiring out, and soldered on my new wiring. I thought I had put enough through to reach the speakers directly, but apparently not. Oh well...
Once I had all the connections soldered up, I reassembled the door panels. Here's a note of interest - the woofer cover is not of even depth from one side to the other - it sits on a slight tilt. It took me about 1/2 hour to figure out why it wouldn't pop on flush. After I realized that, it popped right on. That's what happens when you try to work in 95*F direct sun....
Last step was to connect up the + and - to the battery and see if it worked. I did some basic math. The last car I put my own full-blown system in was my 1997 Chevy Camaro, so it's been 16 years since I did anything more complicated than replacing a head unit with a wiring harness adapter. 42 days of ordering parts, pulling 7 plastics & 1 rear seat, running 185 feet of wires, scraping 2 hands and arms (14 separate scratches!), inflaming arthritis in 2 hands, banging 1 head, re-soldering 1 wire (yes, I screwed one of the speaker runs up), and major heat exhaustion and 1 sunburn later, and it worked. Everything fired up just like it should:
OBD-II diagnostics and gauges work:
I hid the GPS antenna inside the dash and it's working perfectly. Don't let people tell you it has to sit up on the dash or rear deck - it works fine as long as it's not obstructed by metal:
WiFi streaming works fine from both my home network as well as my WiFi hotspot feature on the phone:
(BTW, check out the Junkman's videos if you want some good tips on detailing your car and correcting paint - Thanks, Junkman!)
With regard to the "Big 3 Upgrade", I don't think it's needed. I'm running two amps and a decent blast here, and the voltmeter never drops below 13.5v, usually hovering around 13.6v/13.7v:
Finally, some close-ups of the amps and wiring:
I did some basic tweaking last night before I had to get ready for the local Mustang Club meeting. I have to work on the mid-bass and sub settings - and yes, I'm going to have to Dynamat - there are some serious buzzing and rattles that need to be addressed. That'll be updated later on. I've gotta track down an RTA/Spectrum Analyzer. I use to have a nice AudioControl SA-3050a, but got rid of it when I closed my business. I keep checking eBay for a deal, but they're all overpriced now. So in the meantime, I've gotta tune by ear...
Anyway, I'll leave you with some pics from yesterday's Mustang Club meet-up:
Last edited by ColSaulTigh; 7/7/13 at 06:51 AM.

The following users liked this post:
cholmes1 (6/5/20)
7/7/13, 11:58 AM
#83
Legacy TMS Member
Awesome man, good job! When you go to sell your car, let me know first since you already did everything I'd do haha. Lets see some whole car shots too! I really don't like that center console though - can't wait til you get the other one in.
7/7/13, 12:48 PM
#84
Bullitt Member
Thread Starter
Here's a few whole-car shots for you:


 7/7/13, 04:41 PM
#85
GT Member
Join Date: April 20, 2012
Location: Los Angeles
Posts: 165
Likes: 0
Received 0 Likes
on
0 Posts
Looks like a real good install. Congrats and thanks for The detailed pics. If it wouldn't be too much trouble would you mind doing a video walk through for the obd2 connections on the radio? I haven't seen one of those in a real consumer car yet. And i was thinking of Getting that unit. Either way great job once again.
Last edited by mac951; 7/7/13 at 04:42 PM.
7/7/13, 05:48 PM
#86
Bullitt Member
Join Date: September 9, 2009
Location: Miami
Posts: 372
Likes: 0
Received 0 Likes
on
0 Posts
Very nice install and setup. It looks real good. I will probably pick up the 870 version of the Kenwood, and the I-Datalink panel when it comes out. Will truly not being doing all you did. I will repalce my door speakers, and yeah....thats it as far as that goes.
Would like to see the OBDII setup as well. Does it do AI temps as well ?
Would like to see the OBDII setup as well. Does it do AI temps as well ?
7/7/13, 06:59 PM
#87
Bullitt Member
Thread Starter
Looks like a real good install. Congrats and thanks for The detailed pics. If it wouldn't be too much trouble would you mind doing a video walk through for the obd2 connections on the radio? I haven't seen one of those in a real consumer car yet. And i was thinking of Getting that unit. Either way great job once again.
Very nice install and setup. It looks real good. I will probably pick up the 870 version of the Kenwood, and the I-Datalink panel when it comes out. Will truly not being doing all you did. I will repalce my door speakers, and yeah....thats it as far as that goes.
Would like to see the OBDII setup as well. Does it do AI temps as well ?
Would like to see the OBDII setup as well. Does it do AI temps as well ?

Last edited by ColSaulTigh; 7/7/13 at 07:05 PM.
 7/11/13, 06:36 AM
#89
Bullitt Member
Thread Starter
I'll do a video of the OBDII tomorrow, but it's super-simple. There are two wires coming off the iDataLink that go to pins 6 and 14. I just peeled back some insulation and soldered them in, then wrapped them in tape. Simple 10 minute job. As for what it reads, yes it does AI (assuming you mean Air Intake), plus a bunch of others. I'll put together a little video listing all the options.
Let me know if you have any other questions.
7/11/13, 08:59 AM
#90
Bullitt Member
Join Date: September 9, 2009
Location: Miami
Posts: 372
Likes: 0
Received 0 Likes
on
0 Posts
Thanx for that. Yeah, definitely buying a Kenwood setup. The ODBII setup is truly worth the price of admission on its own. The fact that it can do AI readings, along with MAF, and the Exhaust Temp ???? Really ???? The cost of a AEM dual gauge setup is dam near the price of a Kenwood unit. Then you need to have gauge pods, or a pillar.......with this, the setup is like how it is on GTR's. Oh yeah...looking cool at the car shows !
That is so cool. Dam. Yep This setup is what I will be going with. Will solve everything in one shot, and with the new face plate I-data link have, it will even look good
Edit: One other question. Did the Sat antenna hook into this system or you had to buy another ? Also how close to the dash did you have to get the GPS antenna ? When I did the OttoNAvi, I had it on top of the climate control bar, and it seemed to work. I was wondering if there was a better spot.
Last edited by Ninjak; 7/11/13 at 10:33 AM.
7/11/13, 10:50 AM
#91
Bullitt Member
Thread Starter
Thanx for that. Yeah, definitely buying a Kenwood setup. The ODBII setup is truly worth the price of admission on its own. The fact that it can do AI readings, along with MAF, and the Exhaust Temp ???? Really ???? The cost of a AEM dual gauge setup is dam near the price of a Kenwood unit. Then you need to have gauge pods, or a pillar.......with this, the setup is like how it is on GTR's. Oh yeah...looking cool at the car shows !
That is so cool. Dam. Yep This setup is what I will be going with. Will solve everything in one shot, and with the new face plate I-data link have, it will even look good
Edit: One other question. Did the Sat antenna hook into this system or you had to buy another ? Also how close to the dash did you have to get the GPS antenna ? When I did the OttoNAvi, I had it on top of the climate control bar, and it seemed to work. I was wondering if there was a better spot.
That is so cool. Dam. Yep This setup is what I will be going with. Will solve everything in one shot, and with the new face plate I-data link have, it will even look good
Edit: One other question. Did the Sat antenna hook into this system or you had to buy another ? Also how close to the dash did you have to get the GPS antenna ? When I did the OttoNAvi, I had it on top of the climate control bar, and it seemed to work. I was wondering if there was a better spot.
7/13/13, 08:23 AM
#94
Bullitt Member
Join Date: September 9, 2009
Location: Miami
Posts: 372
Likes: 0
Received 0 Likes
on
0 Posts
I will ! Though lol my write up will be pretty short I think. I already ordered my door speakers, Pioneer Pioneer TS-A6885R's and I will just change the H/U and the face plate. Thats it.
Think I'll be more than satisfied with those changes. Had considered doing the OEM swap, but after seeing the gauges in action, also the fact the havoc controls are in the unit as well, combined with the new faceplate, I'm sold.
Think I'll be more than satisfied with those changes. Had considered doing the OEM swap, but after seeing the gauges in action, also the fact the havoc controls are in the unit as well, combined with the new faceplate, I'm sold.
7/15/13, 06:10 AM
#96
Bullitt Member
Thread Starter
I've been tweaking and tuning the system over the past couple of weeks, and now that I've got it close to dialed in, I have to say, they sound great!
There's the occasional mechanical "slapping" sound, which I think is because of the cover I have over them. I need to remove the factory plate and test that theory. If not, it might be because they're in the sealed enclosure and they might need to breathe. I'll be doing some research on that and get back to you.
I plan on doing a full write-up/review once I get everything tweaked exactly the way I want it. Stay (wait for it....) tuned. Stay tuned! Get it?
 7/15/13, 09:44 AM
#98
Legacy TMS Member
I've been tweaking and tuning the system over the past couple of weeks, and now that I've got it close to dialed in, I have to say, they sound great!
There's the occasional mechanical "slapping" sound, which I think is because of the cover I have over them. I need to remove the factory plate and test that theory. If not, it might be because they're in the sealed enclosure and they might need to breathe. I'll be doing some research on that and get back to you.
I plan on doing a full write-up/review once I get everything tweaked exactly the way I want it. Stay (wait for it....) tuned. Stay tuned! Get it?
7/15/13, 09:55 AM
#99
Bullitt Member
Thread Starter
I'll take the dremel to the back of the enclosure and see how it does. Any idea of how large a hole I need to cut?
7/15/13, 10:06 AM
#100
Legacy TMS Member
I can't recall, but I want to say they cut the whole backing out. I wasn't present when they worked on a Roush that had them installed. So essentially, you'd only be using the factory mounting ring to the door. You could always start with a small hole (port) and test, then cut more material?...