Jimmy's Boss Thread
 7/4/11, 12:44 PM
#61
V6 Member
Join Date: March 26, 2011
Location: Colorado
Posts: 90
Likes: 0
Received 0 Likes
on
0 Posts
I may have missed it but did you check the condition of the break pads after?


 7/5/11, 08:41 AM
#65
V6 Member

Join Date: May 21, 2010
Posts: 62
Likes: 0
Received 0 Likes
on
0 Posts
Jimmy,
I can't believe how blessed you are to live in Austin. Not only do you have this track, but soon you will have Circuit of the Americas too. All of this makes me want to move out there.
Definitely planning on coming next year for the F1 race.
I can't believe how blessed you are to live in Austin. Not only do you have this track, but soon you will have Circuit of the Americas too. All of this makes me want to move out there.
Definitely planning on coming next year for the F1 race.
7/5/11, 08:58 AM
#66
FR500 Member

Join Date: July 1, 2008
Location: Oxford, UK
Posts: 3,336
Likes: 0
Received 0 Likes
on
0 Posts
I just brought my 07 GT/CS in to get the tracking system removed. After driving my Boss, being behind the wheel of my GT/CS feels like driving a bus. The stock seat is so much higher, I keep reaching for the adjuster to make sure it's all the way down, and the stock shifter is a joke compared to the Boss. Night and day difference. I love my Boss!
9/22/11, 09:27 PM
#67
GT Member
Thread Starter
Join Date: May 10, 2011
Location: Austin, TX
Posts: 176
Likes: 0
Received 0 Likes
on
0 Posts
Hey guys, it's been a little while since I checked-in. Honestly, with Texas feeling like the surface of Mercury for the last couple of months, I have been staying indoors. Managed to get a few mods done, though. Next chapter will be performance mods. More track days will follow after that.
From my personal blog here. Thanks for reading!
From my personal blog here. Thanks for reading!
(Ch. 6) First Boss Mods
At the top of the slippery slope.
My 2012 Boss 302 had barely cooled-off from its first drive home, when I made the first modification – opening-up the exhaust by removing the sound attenuation discs that were clogging the side pipes. I have had the car for two months now and have made a few other modifications, most of them just general appearance items and upgrades to cheap components that were no doubt specified by Ford to hit their target costs.
1. Airbag Sticker Delete


The first mod to any car that I own is the removal of the obnoxious airbag warning stickers from the sun visors (always present on the driver’s side, too, just in case you are strapping your baby in to drive and you look up to see that your baby should never ever drive an airbag-equipped car).
Cost: Free!
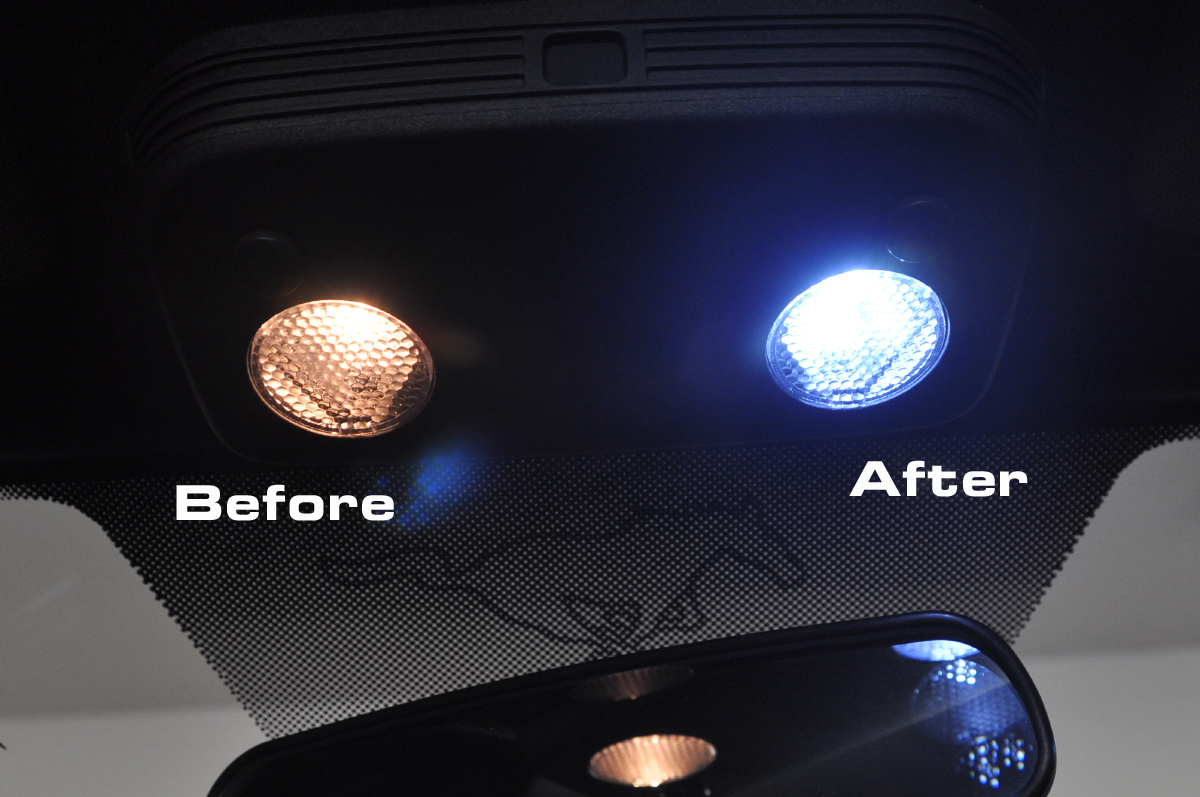
2. LED Lights

I replaced the map lights, trunk light, and license plate lights with LEDs from HIDguy.com. This made a huge improvement all around, especially with the interior lights. The first time I opened the door at night with the new lights, I thought I was being abducted by aliens. The intense white light looks modern and more appropriate for a brand new car, especially one which already has such nice instrument panel lighting. This mod is a must.
Cost: $43.
3. Alcantara* Shift Boot

In every other sports car that has ever been equipped with an Alcantara-covered steering wheel, at a minimum, the shift boot has also been Alcantara. For the Boss, Ford has the steering wheel covered in fake suede, the shift boot made out of fake leather, and the parking brake boot made out of some other kind of fake leather. Look, the collar should match the cuffs. It’s as simple as that. It isn’t as if any of this were actual leather, it is just three different kinds of fake leather. Why couldn’t they be the same? Was there a cost savings somewhere? Are there really grades of polyvinyl chloride fake leather?
Anyway, this bugged me, so I ordered a new shift boot and parking brake boot from www.redlinegoods.com, a Polish company. That’s right, to get a proper shift boot for my American car, I had to have one shipped from Poland. Well, good on them, because I am very pleased with their service and with the quality of their work. Instructions for installation are here, but I have added larger photos and a few extra comments here.

1. Remove the shift **** by rotating it counter clockwise. That’s all that Redline tells you, but you need to know something about that shift ****, or you are likely to get a hernia. It’s held on with blue Loctite. That’s right, Ford fitted this car with a Chinese transmission made from the melted-down pots and pans of dead dissidents and it’s almost certainly destined to fall apart faster than a student protest. But by God they don’t want that shift **** falling off. No sir.
Check the forums for ideas on how to remove the shift ****. You might get a musclehead friend or somebody on PCP who doesn’t feel pain. You also might try applying heat to break the Loctite bond. A rubber-strap oil filter wrench might work, too. I’m not going to tell you what I did, but let’s just say that now I have to order a new shift ****.

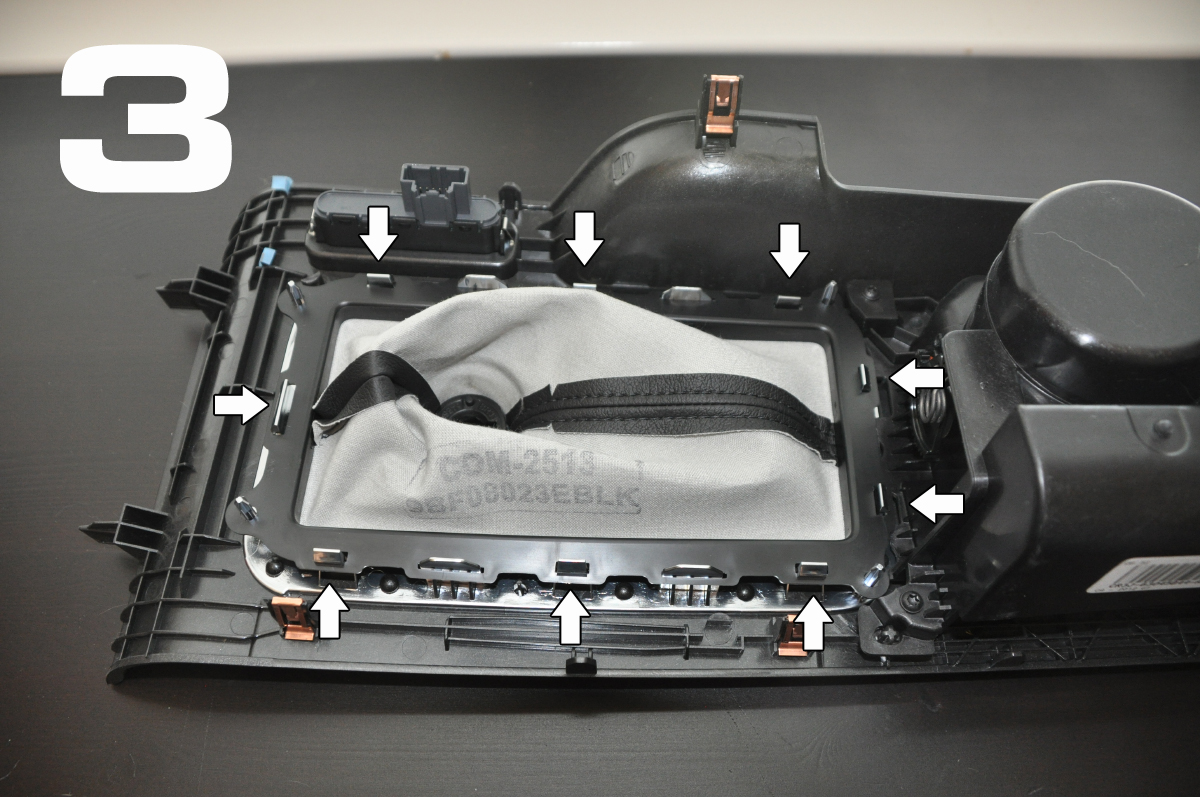
2. Open the storage compartment and then pull the center console trim piece by pulling up here. It will unclip easily. Unplug the traction control/hazard/trunk release connector and remove the trim piece, sliding the boot over the gear change lever.

3. Remove the shift boot by unclipping the plastic mounting ring from the indicated clips.

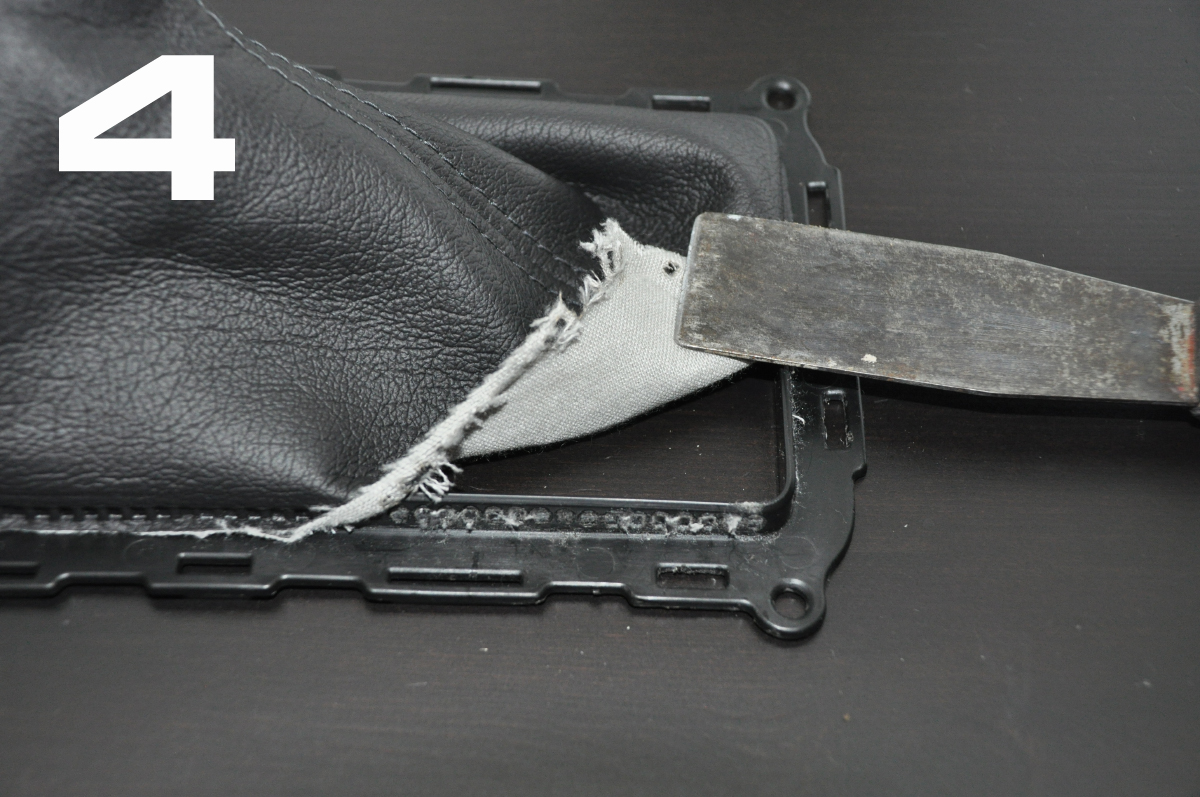
4. Once the shift boot has been removed from the center console trim, use a putty knife, gasket scraper, or flathead screwdriver to remove to separate the shift boot from the plastic mounting ring.

5. I used a hot glue gun to glue the new boots to the plastic mounting rings. Because hot glue guns are dangerous, I had a safety officer present.

6. Detail. This is from the parking brake boot. In this area, the fitment can be very tight. In my case, the fabric was pulled so tightly at the bottom that it began to curl and it would not adhere. So, I made a 2-3mm cut in the fabric at the bottom, which was just enough to alleviate the tension and allow the fabric to lay flat and adhere to the plastic ring.

7. I used binder clips to clamp the boot to the plastic ring after I had applied the hot glue. They worked perfectly.

8. The finished boots!

I am very pleased with the quality of these pieces, but I have to say that the change is so subtle, that most will find this mod not worth the trouble. Also, the boots do not exactly match the color of the steering wheel. The boots are closer to black, while the steering wheel is a charcoal grey. In fact, to my eye, there is even a little bit of almost purple tint to the steering wheel cover. **** retentive detail oriented people might try to wash or fade the material to get a closer match and folks with serious issues could just send the company a spare steering wheel and have them find the dye lot with the closest match. The original pieces didn’t match in color either, so I’m just happy that the material looks the same. The difference is subtle, but pleasing to me.
* I am using Alcantara generically, because it is easier than saying faux suede. Alcantara is a brand name and only the faux suede on the Recaro seats is actually Alcantara. Neither the steering wheel cover nor the boots provided by Redline Automotive Accessories Corp. are made from Alcantara.
Cost: $78
4. Window Tint

My car sits outside during the day, while I am at work and I live in Texas. That means window tint is mandatory. I took my car to Dave Angenend at Sideways Auto Salon and he tinted my windows with 30% Wincos film, a new Japanese product that features very high heat rejection, no RF interference, and a lifetime warranty. Dave managed the up-sell, because he happened to catch me during the hottest Summer in Texas history. Worth every penny. The film works as advertised, is the perfect tint level for me, and looks beautiful on the car.
Cost: $375
5. License Plate

The standard Texas license plate is an atrocity. It looks like a 3rd-grader’s art project (don’t bother with the emails, 3rd-graders). Luckily, there are lots of options available for a modest fee. I selected this popular design, which fits nicely with the Boss livery.
Cost: $55
6. Stereo

The Boss comes with the base stereo and no option to upgrade from the factory. There is a head unit, AM/FM, CD, aux input and four 6�8 speakers. The bass is muddy and the sound is terrible. I took my car back to Dave Angenend at Sideways Auto Salon and he hooked me up with a nice mid-range upgrade. Dave said there was no reason to replace the head unit for sound quality reasons, until I moved even further towards high-end speakers (or if I wanted more functions and features). I like this, because the car retains a completely stock appearance, until you look in the trunk (more on that in a moment).
Easily, the most important upgrade was to replace the front speakers with Hybrid Audio Technology 6.5″ Imagine Series speakers. The front sound stage is now clean and crystal clear. Just like tires are ultimately the most important performance components of a car, the front speakers are the most important performance components of a car audio system. If you have a limited budget, put all of your money there.

The stock 6x8 door speaker. Photo: Sideways Auto Salon

Constructing a frame to fit a round peg into a square(ish) hole. Photo: Sideways Auto Salon

The Hybrid Imagine. Photo: Sideways Auto Salon
A Diamond Audio 10″ subwoofer, and a Diamond Audio D300.4 (50 x 4 watt) amplifier round-out the modifications. The stock rear speakers are still driven by the head unit and are retained to provide fill, if so desired.

The amplifier is mounted on the back of the fold-down back seat. I admit that I didn’t specify where I wanted the amp and I don’t like it here. It’s fine for now, but I will most likely move it later.

The seat has to be folded down in order to access the amplifier controls.

A subwoofer enclosure could have been built into the car, which would have looked better and taken less trunk space, but I specified an enclosure that could be easily removed for track days. To keep the enclosure from moving around the trunk, I made a couple of tethers that snap to the underside of the package shelf and then to the front of the sub box.
This system can be reproduced with more reasonably-priced components for just a few hundred dollars and it will still be a vast improvement over stock. I invested in higher-priced components and am very happy. The front speakers are especially pleasing to me. Clear, transparent, and they never seem to be straining at any frequency or volume level. Sometimes I catch myself grinning, not because of the music itself, but rather because of how well the speakers are handling the music. The sub is nice for really deep tones, but the stock rears can’t keep-up with the mid-bass. So, I will probably swap those at some point, put them on the current amp with the fronts and then give the sub its own amplifier. For now, this was far-and-away the most expensive mod, but for something I use every day, it was well worth it.
Cost: $1100
In the next chapter, I will install a few performance-oriented modifications.
J I M M Y
At the top of the slippery slope.
My 2012 Boss 302 had barely cooled-off from its first drive home, when I made the first modification – opening-up the exhaust by removing the sound attenuation discs that were clogging the side pipes. I have had the car for two months now and have made a few other modifications, most of them just general appearance items and upgrades to cheap components that were no doubt specified by Ford to hit their target costs.
1. Airbag Sticker Delete


The first mod to any car that I own is the removal of the obnoxious airbag warning stickers from the sun visors (always present on the driver’s side, too, just in case you are strapping your baby in to drive and you look up to see that your baby should never ever drive an airbag-equipped car).
Cost: Free!
2. LED Lights
I replaced the map lights, trunk light, and license plate lights with LEDs from HIDguy.com. This made a huge improvement all around, especially with the interior lights. The first time I opened the door at night with the new lights, I thought I was being abducted by aliens. The intense white light looks modern and more appropriate for a brand new car, especially one which already has such nice instrument panel lighting. This mod is a must.
Cost: $43.
3. Alcantara* Shift Boot

In every other sports car that has ever been equipped with an Alcantara-covered steering wheel, at a minimum, the shift boot has also been Alcantara. For the Boss, Ford has the steering wheel covered in fake suede, the shift boot made out of fake leather, and the parking brake boot made out of some other kind of fake leather. Look, the collar should match the cuffs. It’s as simple as that. It isn’t as if any of this were actual leather, it is just three different kinds of fake leather. Why couldn’t they be the same? Was there a cost savings somewhere? Are there really grades of polyvinyl chloride fake leather?
Anyway, this bugged me, so I ordered a new shift boot and parking brake boot from www.redlinegoods.com, a Polish company. That’s right, to get a proper shift boot for my American car, I had to have one shipped from Poland. Well, good on them, because I am very pleased with their service and with the quality of their work. Instructions for installation are here, but I have added larger photos and a few extra comments here.

1. Remove the shift **** by rotating it counter clockwise. That’s all that Redline tells you, but you need to know something about that shift ****, or you are likely to get a hernia. It’s held on with blue Loctite. That’s right, Ford fitted this car with a Chinese transmission made from the melted-down pots and pans of dead dissidents and it’s almost certainly destined to fall apart faster than a student protest. But by God they don’t want that shift **** falling off. No sir.
Check the forums for ideas on how to remove the shift ****. You might get a musclehead friend or somebody on PCP who doesn’t feel pain. You also might try applying heat to break the Loctite bond. A rubber-strap oil filter wrench might work, too. I’m not going to tell you what I did, but let’s just say that now I have to order a new shift ****.

2. Open the storage compartment and then pull the center console trim piece by pulling up here. It will unclip easily. Unplug the traction control/hazard/trunk release connector and remove the trim piece, sliding the boot over the gear change lever.
3. Remove the shift boot by unclipping the plastic mounting ring from the indicated clips.
4. Once the shift boot has been removed from the center console trim, use a putty knife, gasket scraper, or flathead screwdriver to remove to separate the shift boot from the plastic mounting ring.

5. I used a hot glue gun to glue the new boots to the plastic mounting rings. Because hot glue guns are dangerous, I had a safety officer present.

6. Detail. This is from the parking brake boot. In this area, the fitment can be very tight. In my case, the fabric was pulled so tightly at the bottom that it began to curl and it would not adhere. So, I made a 2-3mm cut in the fabric at the bottom, which was just enough to alleviate the tension and allow the fabric to lay flat and adhere to the plastic ring.

7. I used binder clips to clamp the boot to the plastic ring after I had applied the hot glue. They worked perfectly.

8. The finished boots!

I am very pleased with the quality of these pieces, but I have to say that the change is so subtle, that most will find this mod not worth the trouble. Also, the boots do not exactly match the color of the steering wheel. The boots are closer to black, while the steering wheel is a charcoal grey. In fact, to my eye, there is even a little bit of almost purple tint to the steering wheel cover. **** retentive detail oriented people might try to wash or fade the material to get a closer match and folks with serious issues could just send the company a spare steering wheel and have them find the dye lot with the closest match. The original pieces didn’t match in color either, so I’m just happy that the material looks the same. The difference is subtle, but pleasing to me.
* I am using Alcantara generically, because it is easier than saying faux suede. Alcantara is a brand name and only the faux suede on the Recaro seats is actually Alcantara. Neither the steering wheel cover nor the boots provided by Redline Automotive Accessories Corp. are made from Alcantara.
Cost: $78
4. Window Tint

My car sits outside during the day, while I am at work and I live in Texas. That means window tint is mandatory. I took my car to Dave Angenend at Sideways Auto Salon and he tinted my windows with 30% Wincos film, a new Japanese product that features very high heat rejection, no RF interference, and a lifetime warranty. Dave managed the up-sell, because he happened to catch me during the hottest Summer in Texas history. Worth every penny. The film works as advertised, is the perfect tint level for me, and looks beautiful on the car.
Cost: $375
5. License Plate

The standard Texas license plate is an atrocity. It looks like a 3rd-grader’s art project (don’t bother with the emails, 3rd-graders). Luckily, there are lots of options available for a modest fee. I selected this popular design, which fits nicely with the Boss livery.
Cost: $55
6. Stereo

The Boss comes with the base stereo and no option to upgrade from the factory. There is a head unit, AM/FM, CD, aux input and four 6�8 speakers. The bass is muddy and the sound is terrible. I took my car back to Dave Angenend at Sideways Auto Salon and he hooked me up with a nice mid-range upgrade. Dave said there was no reason to replace the head unit for sound quality reasons, until I moved even further towards high-end speakers (or if I wanted more functions and features). I like this, because the car retains a completely stock appearance, until you look in the trunk (more on that in a moment).
Easily, the most important upgrade was to replace the front speakers with Hybrid Audio Technology 6.5″ Imagine Series speakers. The front sound stage is now clean and crystal clear. Just like tires are ultimately the most important performance components of a car, the front speakers are the most important performance components of a car audio system. If you have a limited budget, put all of your money there.

The stock 6x8 door speaker. Photo: Sideways Auto Salon

Constructing a frame to fit a round peg into a square(ish) hole. Photo: Sideways Auto Salon

The Hybrid Imagine. Photo: Sideways Auto Salon
A Diamond Audio 10″ subwoofer, and a Diamond Audio D300.4 (50 x 4 watt) amplifier round-out the modifications. The stock rear speakers are still driven by the head unit and are retained to provide fill, if so desired.

The amplifier is mounted on the back of the fold-down back seat. I admit that I didn’t specify where I wanted the amp and I don’t like it here. It’s fine for now, but I will most likely move it later.

The seat has to be folded down in order to access the amplifier controls.

A subwoofer enclosure could have been built into the car, which would have looked better and taken less trunk space, but I specified an enclosure that could be easily removed for track days. To keep the enclosure from moving around the trunk, I made a couple of tethers that snap to the underside of the package shelf and then to the front of the sub box.
This system can be reproduced with more reasonably-priced components for just a few hundred dollars and it will still be a vast improvement over stock. I invested in higher-priced components and am very happy. The front speakers are especially pleasing to me. Clear, transparent, and they never seem to be straining at any frequency or volume level. Sometimes I catch myself grinning, not because of the music itself, but rather because of how well the speakers are handling the music. The sub is nice for really deep tones, but the stock rears can’t keep-up with the mid-bass. So, I will probably swap those at some point, put them on the current amp with the fronts and then give the sub its own amplifier. For now, this was far-and-away the most expensive mod, but for something I use every day, it was well worth it.
Cost: $1100
In the next chapter, I will install a few performance-oriented modifications.
J I M M Y
Last edited by Jimmy Pribble; 9/24/11 at 01:46 PM. Reason: Added photo of window tint.
9/23/11, 05:00 AM
#68
GT Member

Join Date: March 27, 2011
Posts: 119
Likes: 0
Received 0 Likes
on
0 Posts
Jimmy,
Nice mods!! Your car looks great!
After you took the airbag stickers off, was there a residual sticker glue mess?
I've been wanting to take my stickers off, but I was worried about the glue.
Nice mods!! Your car looks great!
After you took the airbag stickers off, was there a residual sticker glue mess?
I've been wanting to take my stickers off, but I was worried about the glue.
9/23/11, 06:03 AM
#69
Bullitt Member
Join Date: December 2, 2010
Location: Ontario
Posts: 326
Likes: 0
Received 0 Likes
on
0 Posts
I am curious about this too. Would love to take it off but am affraid of what will remain behind..

 9/23/11, 08:25 AM
#71
GT Member
Thread Starter
Join Date: May 10, 2011
Location: Austin, TX
Posts: 176
Likes: 0
Received 0 Likes
on
0 Posts

This is what is left after you peel away the sticker (which you can do by hand). On the one hand, there isn't much left and most of it is around the outside edges. On the other hand, the glue really gets into the fabric and is difficult to clean-off.
To remove the sticker, I found it easiest to just work one corner and then work down the side. Once the side is unstuck, you can work you hand behind the sticker and then pull it off. The glue is VERY strong and the sticker can tear. Not a big deal, just work slowly. After the sticker has been removed, I cleaned the residue with soap, water, and Goo-Gone. I tried to use as little Goo-Gone as possible, since it is oil-based and I didn't want to stain the fabric. I won't lie, this required a ton of elbow grease. Way more than I would have thought. So much, in fact, that I was worried that I was going to permanently stretch the fabric from my scrubbing. In the end, it was no problem and the fabric is pretty resilient.
Jimmy
Last edited by Jimmy Pribble; 9/23/11 at 09:24 AM. Reason: Grammar stuff.
9/23/11, 08:34 AM
#72
Tasca Super Boss 429 Member
Join Date: December 18, 2010
Location: NorCal
Posts: 3,708
Likes: 0
Received 0 Likes
on
0 Posts
I used a hair dryer to get mine nice and warm before starting to peel it off. You'll have some minor residue left over and I used goo gone like Jimmy although it didn't do much. I think the flash on Jimmy's camera exaggerates the residue. Although I have some residue I don't notice it when I'm inside the car unless I look for it.
9/23/11, 09:23 AM
#74
GT Member
Thread Starter
Join Date: May 10, 2011
Location: Austin, TX
Posts: 176
Likes: 0
Received 0 Likes
on
0 Posts

Also, to be clear, the photo is from before I cleaned the residue from the airbag sticker. The hairdryer idea is a good one. Thanks!
Jimmy
10/1/11, 10:44 AM
#77
V6 Member
Join Date: September 28, 2011
Location: Austin, TX
Posts: 93
Likes: 0
Received 0 Likes
on
0 Posts
Great story!
Jimmy, I am new to this forum and a fellow Austinite - just picked up my RR Boss (#1580) about 2 weeks ago from McCombs in San Antonio. Traded a black/tan '00 GT convertible with mainly suspension mods and mufflers. It was a mild upgrade, right??? 
Love your story - I was close to a Kona Blue they had on the lot, but I used to have a Red/Black 1972 Mach I, and it was my first mustang, so the red one on the showroom floor came home with me. Right now I have 320 miles, breaking her in so I can hit a track day in October and see what she can do.
I will be looking around town for your Kona Boss!
10/2/11, 12:24 AM
#78
GT Member
Thread Starter
Join Date: May 10, 2011
Location: Austin, TX
Posts: 176
Likes: 0
Received 0 Likes
on
0 Posts
Welcome, George! Congrats on the new car! I'll keep my eyes peeled. A friend saw another KB in town and there is a Black Laguna Seca in the area, too. I'm sure we will run into each other at some point, especially if you plan to track your car. Let's stay in touch.
Jimmy
Jimmy
10/6/11, 07:47 PM
#79
GT Member
Thread Starter
Join Date: May 10, 2011
Location: Austin, TX
Posts: 176
Likes: 0
Received 0 Likes
on
0 Posts
From my personal blog here. Thanks for reading!
(Ch. 7) Performance Mods
ON the slippery slope.
My mod mania continues with a few performance oriented upgrades for the Boss. These are all designed to help the Boss manage heat while on the track.
1. Grille Mod
The original 1969 Boss Mustang deleted the front fog lights and replaced them with mesh to improve airflow to the radiator. The new Boss Mustang pays homage to this by also deleting the fog lights, but then replacing them with blanks that have been embossed with a non-functional mesh design. For a car with so much emphasis on function, this detail is out-of-step with the rest of the car. The Boss 302S and 302R race cars both replace the fog light blanks with actual mesh grilles. Furthermore, on hot days and at high revs on a race track, the Boss does have some heat management issues. So, the Boss could stand to have more air flow to the radiator. Even if that weren�t the case, I hate the fake grilles as much as I hate any other fake hood scoop, or the like. So, I drilled them out and made them functional.


Cost: Free!
2. Brake Cooling Ducts

2010-2012 MUSTANG BRAKE DUCT KIT � Ford Racing p/n: M-2004-MB

Contents of the kit.

The front bumper valence pieces were missing from the kit, so I had to call Ford Racing. I faxed my receipt and they sent the pieces out straight away.

The only difference is that the foglight blank is drilled-out.

The high-temp hose that comes with the kit does not fit around the backing plate duct. One solution is to modify the hose itself by cutting and/or removing the wire reinforcements within the hose. I wanted the hose to retain its full integrity, so I chose to cut the backing plate to allow the hose to fit. I don�t like cutting on brand new racing parts, so I had a Newcastle to take the edge off.

This is the backing plate after I modified it. Using a cut-off wheel, I made eight cuts into the duct and then bent the tabs slightly inward, which allows the hose to slide on easily. Then I painted the duct with high temp (1200 F) paint. The paint has a matte finish, so the texture should help the hose adhere to the duct.

Another thing Ford Racing didn�t get quite right were the installation instructions. First of all, the photos are so small and dark that they are almost useless. In the example I show above�I mean, I can see somebody�s meat hook, but what is it doing exactly? They don�t supply a list of tools needed, nor do they specify bolt sizes (although, they do provide torque specs which is very nice). They also recommend removing the whole lower front facia, which I think is completely unnecessary. Most importantly, the instructions are the bare minimum and do not address fitment issues which almost everyone will have, most notably, the interference of the horn assembly and the windshield washer fluid reservoir.
What follows are an alternate set of installation instructions. These instructions only apply to the Boss 302, WITHOUT the Laguna Seca splitter.
Tools:
Instructions for the Left (Driver) Side:

1. Jack up the car and secure with jack stands.

2. Remove the front wheel (13/16″ socket and breaker bar).


3. Remove inner fender liner. The fender liner is held on with (3) 7 mm bolts and several plastic push-style clips.

4. Relocate electrical harness. Just pull the harness holder from it�s current location and move it up to the hole indicated in the photo.


5. Relocate horns. In simple terms, this just means flipping the horn bracket 180 degrees to gain clearance for the hose. The correct way to do this for maximum clearance and to relieve stress on the electrical harness is to remove the horn assembly (one 7 mm bolt) and lay it on the undertray. Remove the (2) 8 mm nuts holding the bracket to the horns and turn the bracket 180 degrees. Then rotate the horns until the harness and connectors are in a position that will not cause interference with the hose and where there is no stress on the harness. Tighten down the (2) 8 mm nuts and then reinstall the horn assembly with the 7 mm bolt.

Remove the stock bumper valence piece, which can be done easily from the outside with a paint scraper (or similar). Insert a paint scraper behind the part of the bumper valence piece that is towards the middle of the car and use it to pry that side free. Simultaneously, pull on the inside of the foglight blank to free the other side (towards outside of car). The valance piece will pop-out easily.

Insert the hose from the front of the car and check for hose clearance. Also note in this photo that there is no reason to cut the foglight mounts. They do not in any way interfere with the hose. In fact, they fit perfectly against the hose and help secure it in place.

6. Remove brake caliper. Remove the (2) 15 mm bolts that hold the brake caliper to the brake carrier. Use a bungee cord (or similar) to support the weight of the brake caliper. I suspended the caliper from the front spring. Never allow the weight of the caliper to be supported by the brake line! This can cause a failure of the brake line, resulting in catastrophic brake failure!

7. Remove brake rotor. The rotor might have these retaining clips that keep the rotor snug against the hub when the wheel is off. I don�t know how to remove these properly, so I used a paint scraper, a flat-head screwdriver, and lots of swearing. After I worked them away from the rotor, I found I could rotate them off. I�m not a fan of unthreaded metal clips on my wheel studs, nor the risk of galling the threads while I am trying to work the clips off. If they were plastic, I would probably like them, but since they aren�t all that useful, I did not reinstall them.

8. Remove splash guard. Remove the (3) 10 mm bolts holding the splash guard to the brake carrier assembly.

9. Install the new backing plate with (3) new 12 mm bolts (included with kit) and torque to 15 ft.-lb.

10. Slide the brake cooling hose over the backing plate and secure with hose clamp (included with kit).

11. Secure hose to body with tie wrap (included in kit). Optionally, you can tie wrap the hose to the anti roll bar. Cut or grind down the plastic undertray shark fins that might cut or abrade the hose.


12. Cut excess hose length from front of car. Make sure there is enough free play in the hose to accommodate wheels turned to full lock (both directions) and the suspension at both full droop and full compression. You could skip this step until both sides are done and free play has been fully tested to your satisfaction. Install brake cooling hose to bumper valence insert and secure with hose clamp (included with kit). Push bumper valence insert firmly into place.


13. Cut inner fender liner to clear brake cooling hose. I followed a natural straight line that was in the liner, but it wasn�t quite enough and I had to make another cut to adequately clear the hose. This photo also gives a better view of my tie wrap point and how it holds the hose up off of the cut shark fin.
14. Reinstall inner fender liner.
15. Reinstall brake rotor.
16. Reinstall brake caliper. Apply blue Loctite and torque (2) 15 mm bolts to 85 ft.-lb.
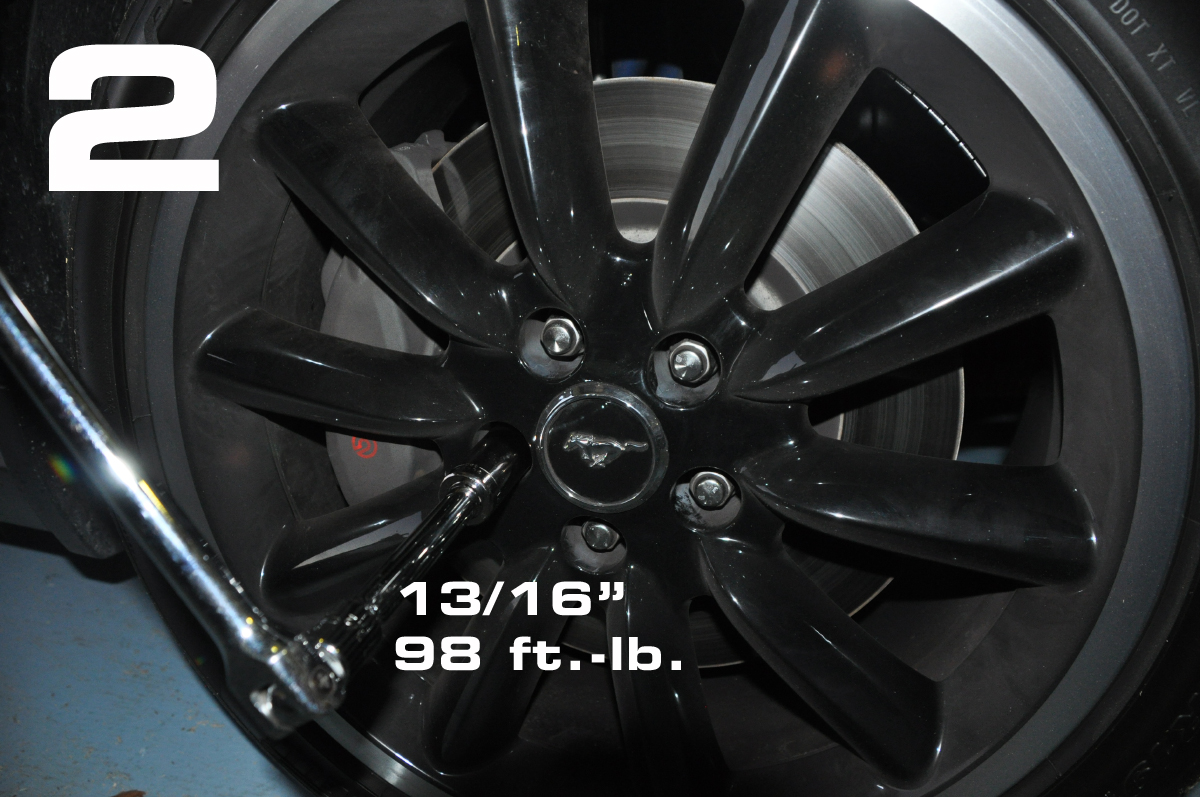
17. Reinstall wheel. Torque (5) 13/16″ lug nuts to 98 ft.-lb.
18. Lower car and recheck all clearance points for interference and free-play.
Instructions for the Right (Passenger) Side:
Instructions for the left (driver) side of the car apply to the right (passenger) side of the car, except that instead of relocating the horn (Step 5), you might want to relocate the windshield washer reservoir. This requires some additional hardware (available at your favorite big box hardware store):


For the left side mount, first remove the stud by sliding it to the right and then pulling it out. From the backside, thread the new long bolt through the same hole, making sure that you use a washer to keep it from pulling through. Thread the nylon spacer onto the bolt, followed by the mounting tab of the reservoir. Secure with a washer and locking nut.

For the right side, thread the new long bolt (and washer) through the front of the mounting tab, then through the nylon spacer, and then tighten into the speed-nut that is in the factory mounting location.

For the upper mount, drill the upper mounting tab and secure using the factory hardware and mounting point. Press the washer pump back into the reservoir and refill.

This the location of the filler neck after the relocation.

Moving the windshield washer reservoir just 1″ allowed enough clearance for the brake cooling hose.
Test and Verify Fitment!

After a couple of days, I checked the fitment of the kit and discovered that on the right side, the wheel had come in contact with the hose and pushed it under a part of the body that then began to saw into the hose. So, I cut the tie wrap that secured the hose to the body, but left the hose tie-wrapped to the front sway bar. This allowed the hose to sit lower and avoid contact with the body. Things move around in there and it wouldn�t take much to destroy an expensive cooling hose, so go for a test drive and then verify that there is still adequate clearance.
Cost: $215
3. Transmission Cooling Scoop

Ford Racing p/n: M-5025-MBR (yes, it�s just a baking pan that has been welded to a steel dowel).

Installation requires removing the (4) 15 mm nuts that hold the rear support brace to the subframe. Replace the rear support brace with the cooling scoop. Install the (4) nuts and torque to 46 ft.-lb.
Cost: $95
4. Rear Splash Guard Delete


Ford Racing recommends removing the rear splash guards for better cooling of the rear brakes. Like the fronts, the rear splash guards are secured with (3) 10 mm bolts. Unlike the fronts, there is enough room between the rotor and the splash guard to fit a 10 mm wrench in-between to remove the bolts, so no need to remove the rear caliper. Remove the bolts, remove the splash guard, reinstall the wheel. Torque (5) 13/16" lug nuts to 98 ft.-lb.
Cost: Free!
In an upcoming chapter, I will have a Boss 302R wing installed and painted.
J I M M Y
ON the slippery slope.
My mod mania continues with a few performance oriented upgrades for the Boss. These are all designed to help the Boss manage heat while on the track.
1. Grille Mod
The original 1969 Boss Mustang deleted the front fog lights and replaced them with mesh to improve airflow to the radiator. The new Boss Mustang pays homage to this by also deleting the fog lights, but then replacing them with blanks that have been embossed with a non-functional mesh design. For a car with so much emphasis on function, this detail is out-of-step with the rest of the car. The Boss 302S and 302R race cars both replace the fog light blanks with actual mesh grilles. Furthermore, on hot days and at high revs on a race track, the Boss does have some heat management issues. So, the Boss could stand to have more air flow to the radiator. Even if that weren�t the case, I hate the fake grilles as much as I hate any other fake hood scoop, or the like. So, I drilled them out and made them functional.


Cost: Free!
2. Brake Cooling Ducts

2010-2012 MUSTANG BRAKE DUCT KIT � Ford Racing p/n: M-2004-MB

Contents of the kit.

The front bumper valence pieces were missing from the kit, so I had to call Ford Racing. I faxed my receipt and they sent the pieces out straight away.

The only difference is that the foglight blank is drilled-out.

The high-temp hose that comes with the kit does not fit around the backing plate duct. One solution is to modify the hose itself by cutting and/or removing the wire reinforcements within the hose. I wanted the hose to retain its full integrity, so I chose to cut the backing plate to allow the hose to fit. I don�t like cutting on brand new racing parts, so I had a Newcastle to take the edge off.

This is the backing plate after I modified it. Using a cut-off wheel, I made eight cuts into the duct and then bent the tabs slightly inward, which allows the hose to slide on easily. Then I painted the duct with high temp (1200 F) paint. The paint has a matte finish, so the texture should help the hose adhere to the duct.

Another thing Ford Racing didn�t get quite right were the installation instructions. First of all, the photos are so small and dark that they are almost useless. In the example I show above�I mean, I can see somebody�s meat hook, but what is it doing exactly? They don�t supply a list of tools needed, nor do they specify bolt sizes (although, they do provide torque specs which is very nice). They also recommend removing the whole lower front facia, which I think is completely unnecessary. Most importantly, the instructions are the bare minimum and do not address fitment issues which almost everyone will have, most notably, the interference of the horn assembly and the windshield washer fluid reservoir.
What follows are an alternate set of installation instructions. These instructions only apply to the Boss 302, WITHOUT the Laguna Seca splitter.
Tools:
- 7 mm socket
- 10 mm socket
- 12 mm socket
- 15 mm socket and/or wrench/ratcheting-wrench
- 13/16″ deep socket
- Dremel Tool with cutting wheel and/or hacksaw
- Small Phillips screwdriver
- Small flat-head screwdriver
- Paint scraper
- Sandpaper
- Bungee cord
- Jack and jack stands (or lift)
- Breaker bar
- Torque wrench
- Blue loctite
Instructions for the Left (Driver) Side:

1. Jack up the car and secure with jack stands.
2. Remove the front wheel (13/16″ socket and breaker bar).
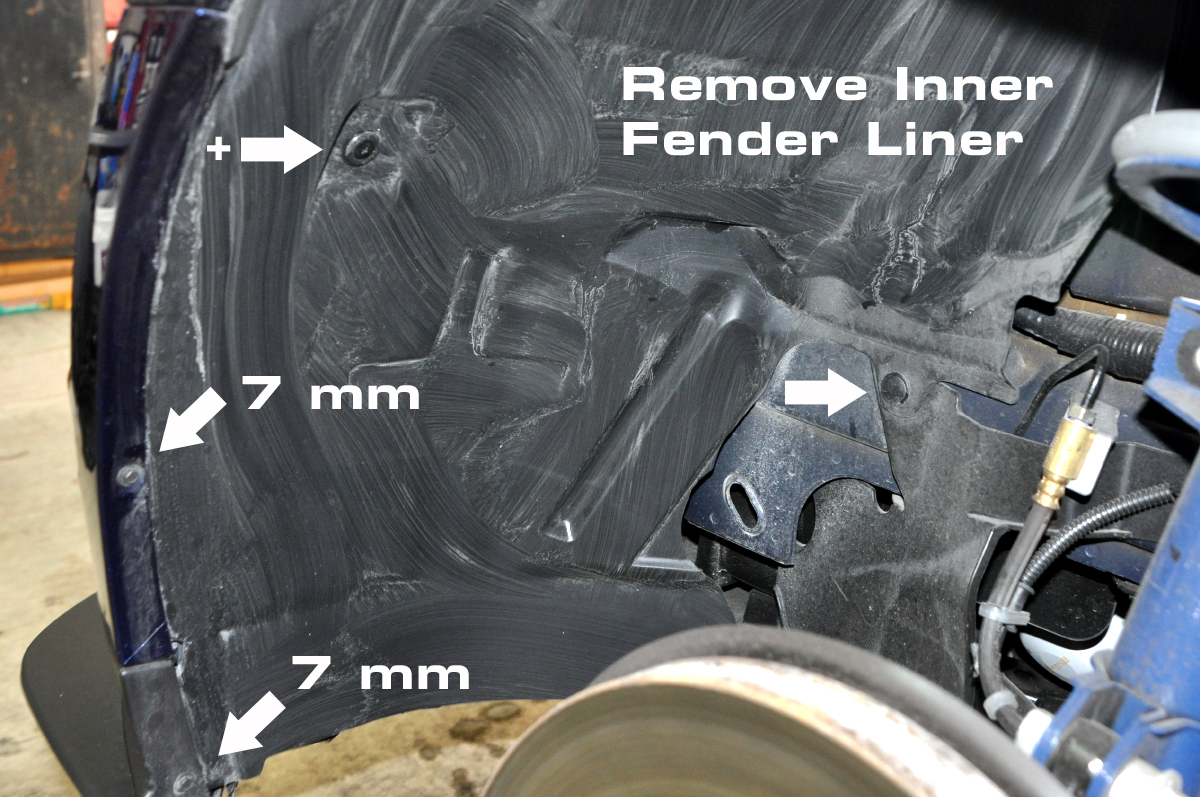


3. Remove inner fender liner. The fender liner is held on with (3) 7 mm bolts and several plastic push-style clips.

4. Relocate electrical harness. Just pull the harness holder from it�s current location and move it up to the hole indicated in the photo.


5. Relocate horns. In simple terms, this just means flipping the horn bracket 180 degrees to gain clearance for the hose. The correct way to do this for maximum clearance and to relieve stress on the electrical harness is to remove the horn assembly (one 7 mm bolt) and lay it on the undertray. Remove the (2) 8 mm nuts holding the bracket to the horns and turn the bracket 180 degrees. Then rotate the horns until the harness and connectors are in a position that will not cause interference with the hose and where there is no stress on the harness. Tighten down the (2) 8 mm nuts and then reinstall the horn assembly with the 7 mm bolt.

Remove the stock bumper valence piece, which can be done easily from the outside with a paint scraper (or similar). Insert a paint scraper behind the part of the bumper valence piece that is towards the middle of the car and use it to pry that side free. Simultaneously, pull on the inside of the foglight blank to free the other side (towards outside of car). The valance piece will pop-out easily.

Insert the hose from the front of the car and check for hose clearance. Also note in this photo that there is no reason to cut the foglight mounts. They do not in any way interfere with the hose. In fact, they fit perfectly against the hose and help secure it in place.

6. Remove brake caliper. Remove the (2) 15 mm bolts that hold the brake caliper to the brake carrier. Use a bungee cord (or similar) to support the weight of the brake caliper. I suspended the caliper from the front spring. Never allow the weight of the caliper to be supported by the brake line! This can cause a failure of the brake line, resulting in catastrophic brake failure!
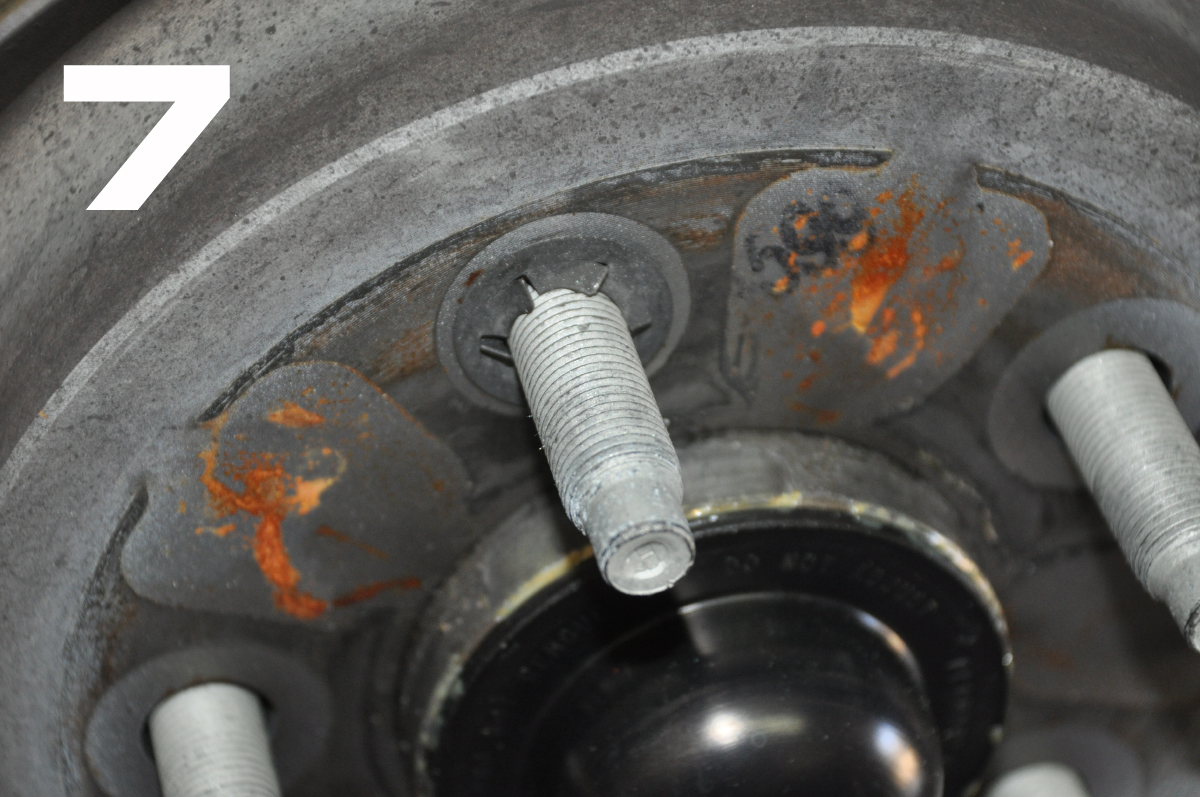
7. Remove brake rotor. The rotor might have these retaining clips that keep the rotor snug against the hub when the wheel is off. I don�t know how to remove these properly, so I used a paint scraper, a flat-head screwdriver, and lots of swearing. After I worked them away from the rotor, I found I could rotate them off. I�m not a fan of unthreaded metal clips on my wheel studs, nor the risk of galling the threads while I am trying to work the clips off. If they were plastic, I would probably like them, but since they aren�t all that useful, I did not reinstall them.

8. Remove splash guard. Remove the (3) 10 mm bolts holding the splash guard to the brake carrier assembly.

9. Install the new backing plate with (3) new 12 mm bolts (included with kit) and torque to 15 ft.-lb.

10. Slide the brake cooling hose over the backing plate and secure with hose clamp (included with kit).

11. Secure hose to body with tie wrap (included in kit). Optionally, you can tie wrap the hose to the anti roll bar. Cut or grind down the plastic undertray shark fins that might cut or abrade the hose.
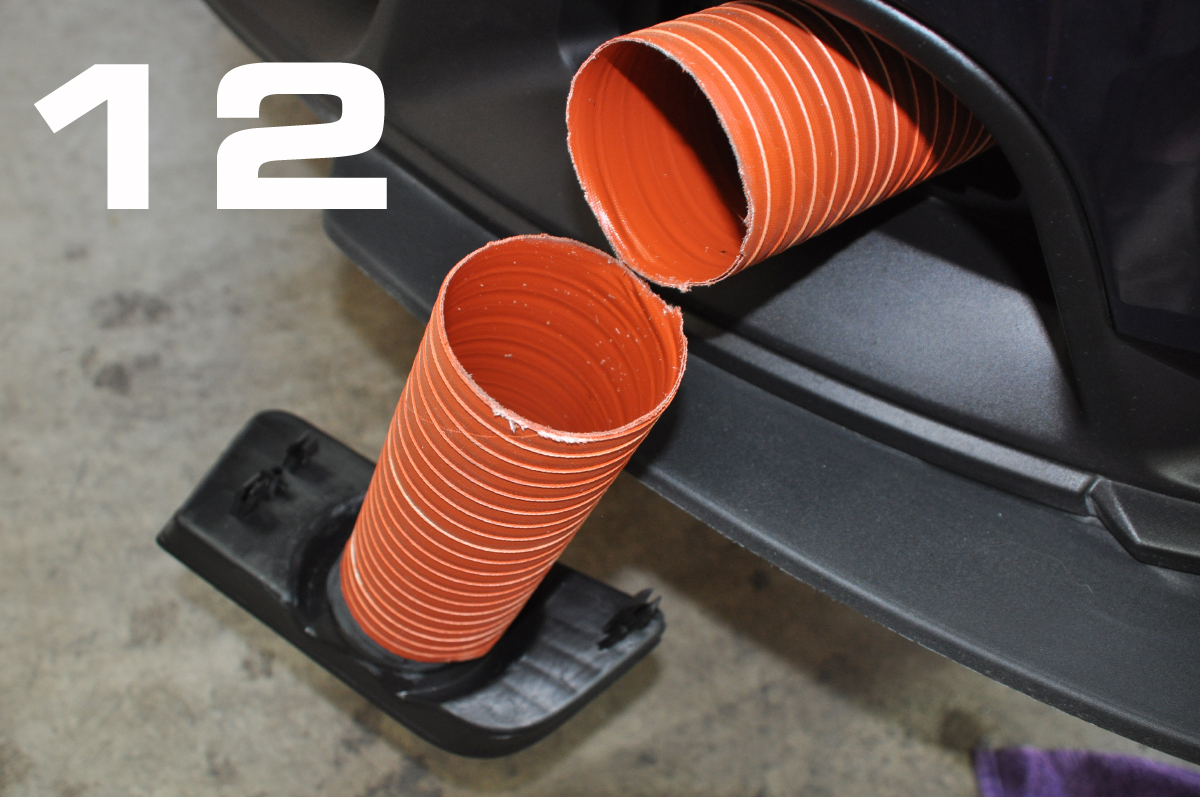

12. Cut excess hose length from front of car. Make sure there is enough free play in the hose to accommodate wheels turned to full lock (both directions) and the suspension at both full droop and full compression. You could skip this step until both sides are done and free play has been fully tested to your satisfaction. Install brake cooling hose to bumper valence insert and secure with hose clamp (included with kit). Push bumper valence insert firmly into place.


13. Cut inner fender liner to clear brake cooling hose. I followed a natural straight line that was in the liner, but it wasn�t quite enough and I had to make another cut to adequately clear the hose. This photo also gives a better view of my tie wrap point and how it holds the hose up off of the cut shark fin.
14. Reinstall inner fender liner.
15. Reinstall brake rotor.
16. Reinstall brake caliper. Apply blue Loctite and torque (2) 15 mm bolts to 85 ft.-lb.
17. Reinstall wheel. Torque (5) 13/16″ lug nuts to 98 ft.-lb.
18. Lower car and recheck all clearance points for interference and free-play.
Instructions for the Right (Passenger) Side:
Instructions for the left (driver) side of the car apply to the right (passenger) side of the car, except that instead of relocating the horn (Step 5), you might want to relocate the windshield washer reservoir. This requires some additional hardware (available at your favorite big box hardware store):
- (2) M6-1.0 x 50 mm bolts
- (3) 6 mm flat washers
- (1) 6 mm lock nut
- (2) 1/2 x .194 x 1″ nylon spacer (I had to drill these out a bit to fit the M6 bolts.)
- Drill


For the left side mount, first remove the stud by sliding it to the right and then pulling it out. From the backside, thread the new long bolt through the same hole, making sure that you use a washer to keep it from pulling through. Thread the nylon spacer onto the bolt, followed by the mounting tab of the reservoir. Secure with a washer and locking nut.

For the right side, thread the new long bolt (and washer) through the front of the mounting tab, then through the nylon spacer, and then tighten into the speed-nut that is in the factory mounting location.

For the upper mount, drill the upper mounting tab and secure using the factory hardware and mounting point. Press the washer pump back into the reservoir and refill.

This the location of the filler neck after the relocation.

Moving the windshield washer reservoir just 1″ allowed enough clearance for the brake cooling hose.
Test and Verify Fitment!

After a couple of days, I checked the fitment of the kit and discovered that on the right side, the wheel had come in contact with the hose and pushed it under a part of the body that then began to saw into the hose. So, I cut the tie wrap that secured the hose to the body, but left the hose tie-wrapped to the front sway bar. This allowed the hose to sit lower and avoid contact with the body. Things move around in there and it wouldn�t take much to destroy an expensive cooling hose, so go for a test drive and then verify that there is still adequate clearance.
Cost: $215
3. Transmission Cooling Scoop
Ford Racing p/n: M-5025-MBR (yes, it�s just a baking pan that has been welded to a steel dowel).
Installation requires removing the (4) 15 mm nuts that hold the rear support brace to the subframe. Replace the rear support brace with the cooling scoop. Install the (4) nuts and torque to 46 ft.-lb.
Cost: $95
4. Rear Splash Guard Delete


Ford Racing recommends removing the rear splash guards for better cooling of the rear brakes. Like the fronts, the rear splash guards are secured with (3) 10 mm bolts. Unlike the fronts, there is enough room between the rotor and the splash guard to fit a 10 mm wrench in-between to remove the bolts, so no need to remove the rear caliper. Remove the bolts, remove the splash guard, reinstall the wheel. Torque (5) 13/16" lug nuts to 98 ft.-lb.
Cost: Free!
In an upcoming chapter, I will have a Boss 302R wing installed and painted.
J I M M Y