
Anyone changing the Boss 302 graphics . . .
 10/4/11, 04:58 PM
#41
Cobra Member
 10/4/11, 05:42 PM
#42
Still got my stripes, they're not leaving the vehicle anytime soon!
10/4/11, 11:09 PM
#43
Do the guys that wear stripes behind bars doing 20 years to life have CHARACTER?
If you remove the graphics from any model Mustang they will just all look alike. How many different colors and wheels can there be. graphics are good. it gives you the freedom to express your Mustang in any way you choose and can be changed form time to time and very little cost compared to paint. I myself want my Mustang to stand apart from someone else's Mustang. I have no problem with zit faced teeny boppers slobbering all over themselfs wishing they owned it (LOL....Sorry). As for the Law Man he to can enjoy looking at the car. it sounds like you like to have just a little to much fun on the street and feel the need not to draw attenision. Your Kona Blue Stang will look like any other Kona Blue Stang. Good luck to you on your quest to go un-noticed.
If you remove the graphics from any model Mustang they will just all look alike. How many different colors and wheels can there be. graphics are good. it gives you the freedom to express your Mustang in any way you choose and can be changed form time to time and very little cost compared to paint. I myself want my Mustang to stand apart from someone else's Mustang. I have no problem with zit faced teeny boppers slobbering all over themselfs wishing they owned it (LOL....Sorry). As for the Law Man he to can enjoy looking at the car. it sounds like you like to have just a little to much fun on the street and feel the need not to draw attenision. Your Kona Blue Stang will look like any other Kona Blue Stang. Good luck to you on your quest to go un-noticed.
http://www.svtperformance.com/forums...pes-gt500.html
The zit faces won't know what hit them.
10/5/11, 10:42 AM
#44
You've mistaken my quest for someone else's...
http://www.svtperformance.com/forums...pes-gt500.html
The zit faces won't know what hit them.
http://www.svtperformance.com/forums...pes-gt500.html
The zit faces won't know what hit them.
10/5/11, 03:43 PM
#45
I hope any of you Boss owners can help me out here. I laid under my GT500 and mocked up fitment of the "quad pipes" in the general area where they will eventually reside. I noticed a couple of things immediately...
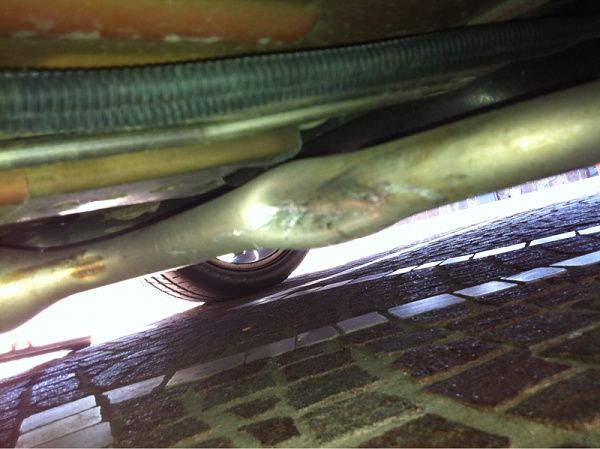
1) The plastic rock deflectors that are located just before the gas tank are in the way. From the best I can tell, Ford simply eliminated them on the Boss. Interesting if I'm correct, as I would have thought convection from the quad pipes could raise fuel temps a bit. Is there no deflector at all and/or are the fuel lines wrapped or protected in any way where the quad pipes run underneath them?
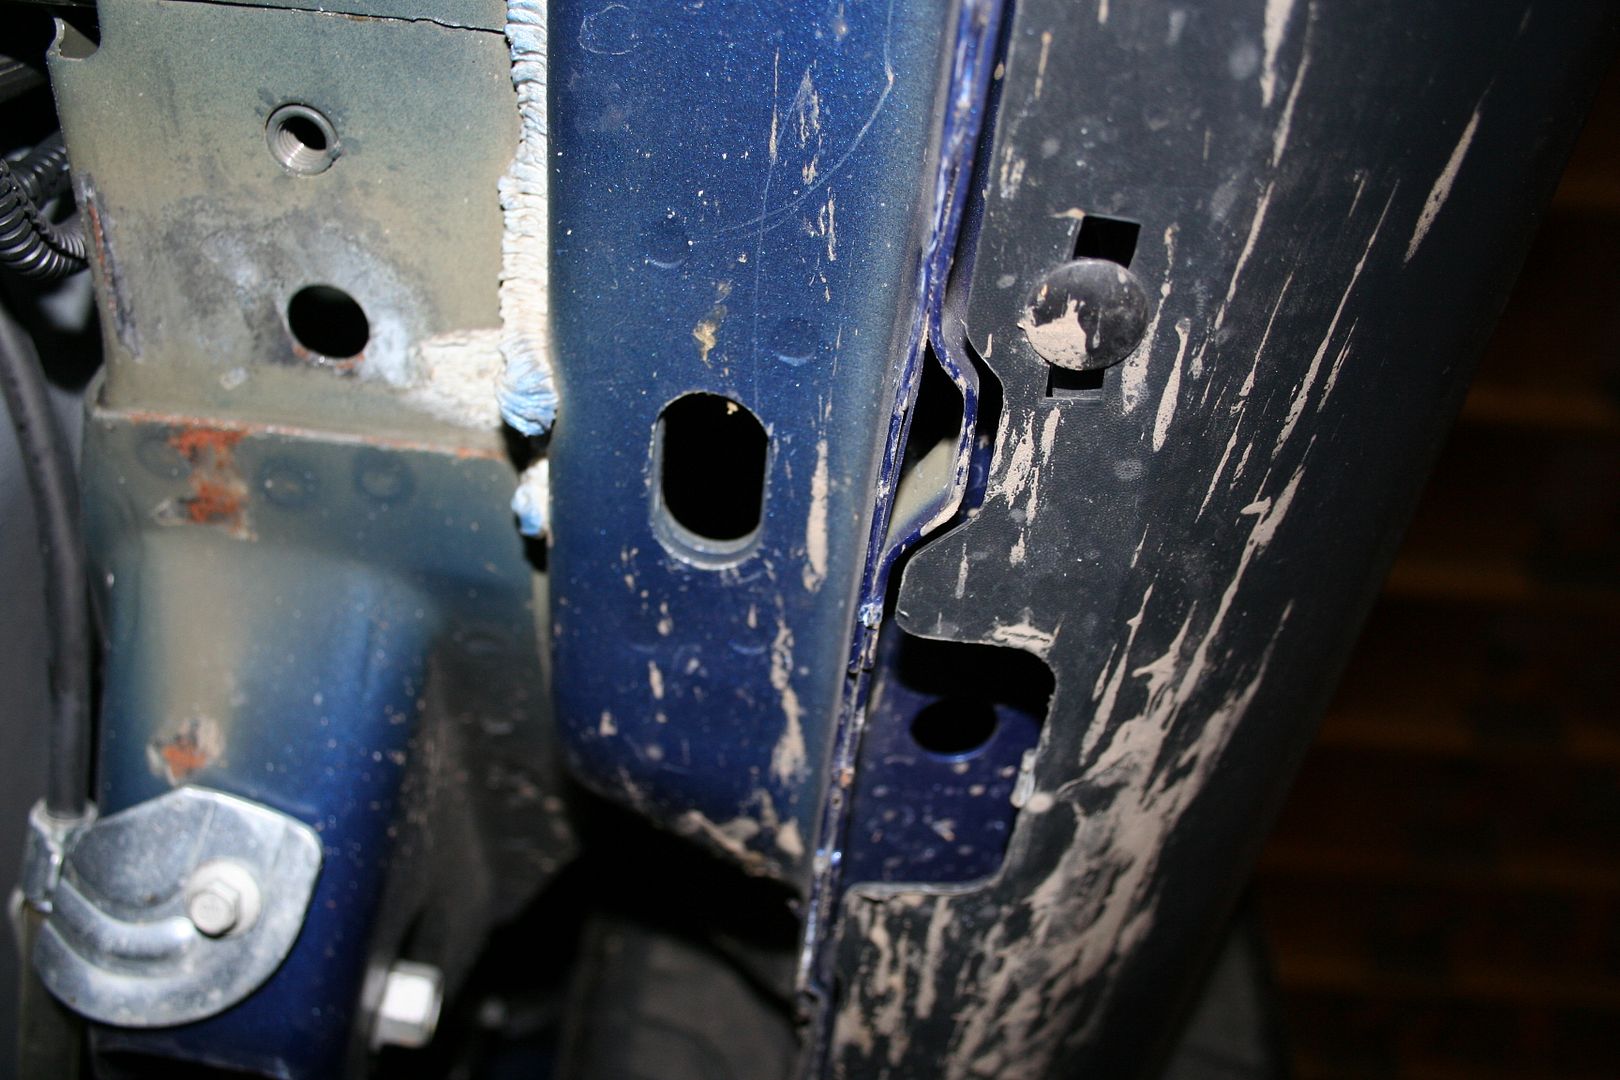
2) Where the polished exit is bolted to the chassis at the rocker...I'm well aware of the hardware shown used on the pipe (the windshield wiper grommet and bolt) but I can't tell what is in use on the body. Is there a nut welded somewhere inside the rocker (or near the rocker) or is it attached to the underside face of the floorpan. I can't find any closeups of it on the web, just shots that capture the pipe exit (and not the hardware at the body). Any photos would help me out here - bigtime.
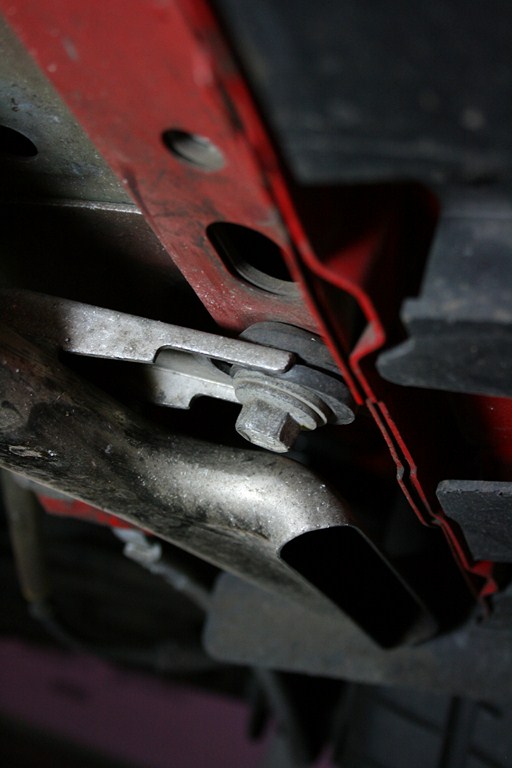
Here's a shot where you can see some of the hardware but not all of it at the quad exit...
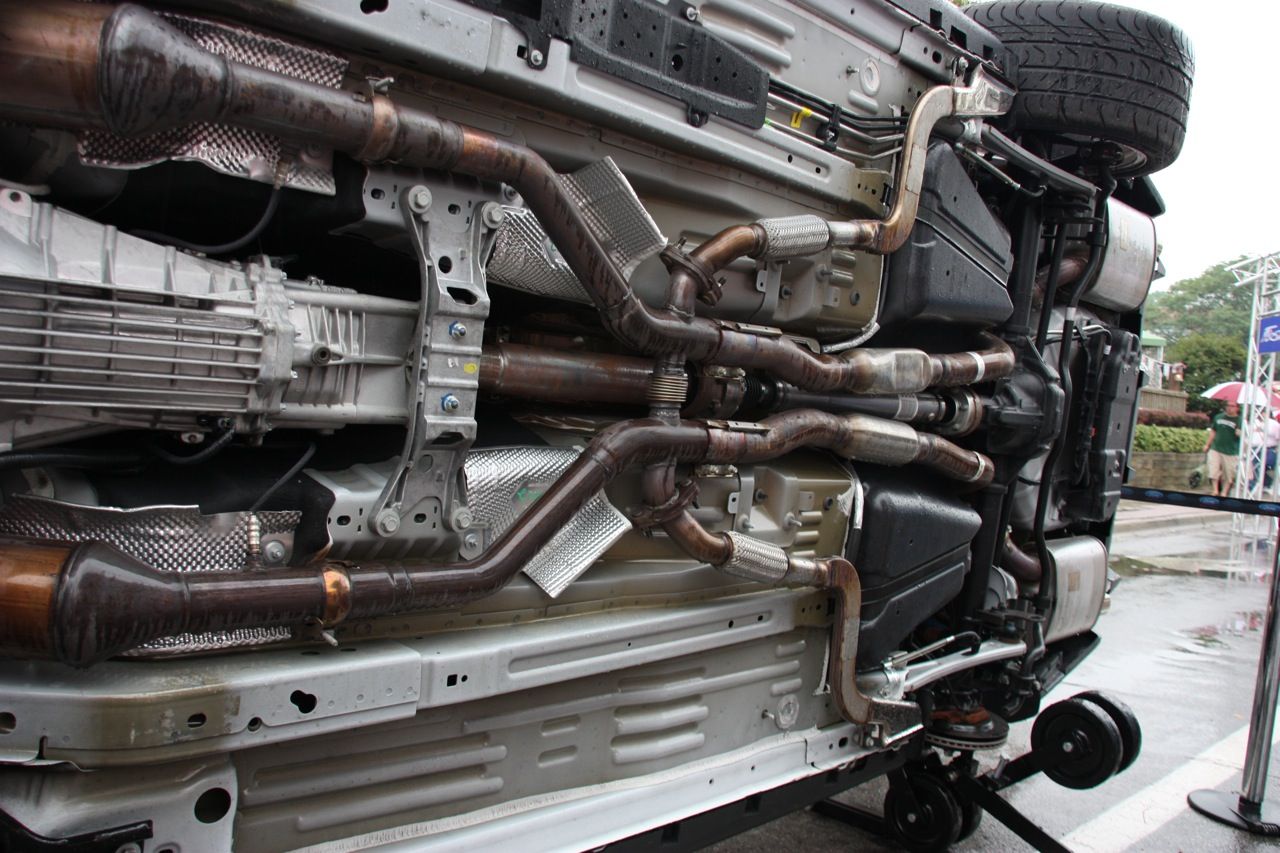
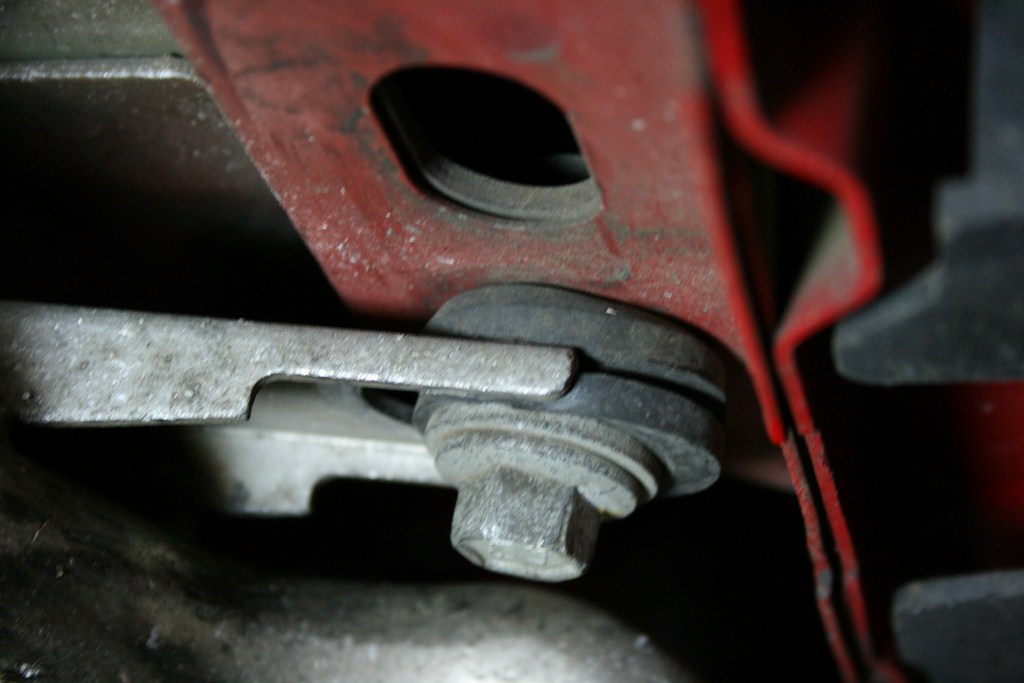
On edit....here's a better shot. It almost looks as though the tip exit connection point has the rubber grommet tight to the floorpan. If so, I'd assume there is a hole (similar to the unused threaded hole before the large oblong hole) with a nut inside and above it, yes?

It definitely looks as though the deflectors are omitted on the Boss, but I do see what I think are the brake cables and they look insulated...
1) The plastic rock deflectors that are located just before the gas tank are in the way. From the best I can tell, Ford simply eliminated them on the Boss. Interesting if I'm correct, as I would have thought convection from the quad pipes could raise fuel temps a bit. Is there no deflector at all and/or are the fuel lines wrapped or protected in any way where the quad pipes run underneath them?
2) Where the polished exit is bolted to the chassis at the rocker...I'm well aware of the hardware shown used on the pipe (the windshield wiper grommet and bolt) but I can't tell what is in use on the body. Is there a nut welded somewhere inside the rocker (or near the rocker) or is it attached to the underside face of the floorpan. I can't find any closeups of it on the web, just shots that capture the pipe exit (and not the hardware at the body). Any photos would help me out here - bigtime.
Here's a shot where you can see some of the hardware but not all of it at the quad exit...
On edit....here's a better shot. It almost looks as though the tip exit connection point has the rubber grommet tight to the floorpan. If so, I'd assume there is a hole (similar to the unused threaded hole before the large oblong hole) with a nut inside and above it, yes?
It definitely looks as though the deflectors are omitted on the Boss, but I do see what I think are the brake cables and they look insulated...
Last edited by Tob*; 10/5/11 at 04:38 PM.
10/5/11, 04:37 PM
#46
2) Where the polished exit is bolted to the chassis at the rocker...I'm well aware of the hardware shown used on the pipe (the windshield wiper grommet and bolt) but I can't tell what is in use on the body. Is there a nut welded somewhere inside the rocker (or near the rocker) or is it attached to the underside face of the floorpan. I can't find any closeups of it on the web, just shots that capture the pipe exit (and not the hardware at the body). Any photos would help me out here - bigtime.
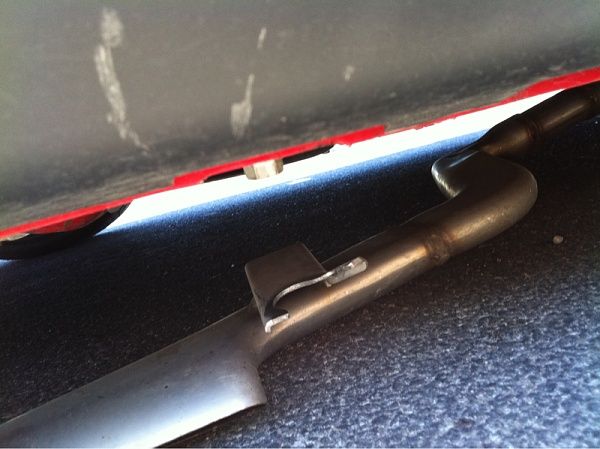
Here's a shot where you can see some of the hardware but not all of it at the quad exit...
Here's a shot where you can see some of the hardware but not all of it at the quad exit...
https://themustangsource.com/f813/an...5/#post6079958
You can see the same bolt in your picture also. I do not know if the nut is welded in place but I suspect so, just never looked that close. It is in the rocker and I do not think it goes through the floor pan, it looks like it has a box like structure added to hold the nut. You can see that in the pic I posted, see if you have that first and then if you still need more photos let me know.
Last edited by 2012YellowBoss; 10/5/11 at 04:39 PM.
 10/5/11, 06:04 PM
#48
On the other hand a setup like the one pictured may work, just don't know if it would be too low. (nut welded below the rocker)
To get a better picture I need to take the rocker bolt out. I can try to get a pic soon if no one else has one handy.
Last edited by 2012YellowBoss; 10/5/11 at 06:06 PM.
10/5/11, 06:44 PM
#49
Scott, I'd appreciate it if you could get a shot but maybe you wouldn't have to....
Let me ask. Is the "nut above the sheetmetal" done the same way as the one situated on the other side of the oblong hole? Does the rubber grommet seat against the sheetmetal, unlike what the above photo shows?
Let me ask. Is the "nut above the sheetmetal" done the same way as the one situated on the other side of the oblong hole? Does the rubber grommet seat against the sheetmetal, unlike what the above photo shows?
10/5/11, 08:39 PM
#50
Scott, I'd appreciate it if you could get a shot but maybe you wouldn't have to....
Let me ask. Is the "nut above the sheetmetal" done the same way as the one situated on the other side of the oblong hole? Does the rubber grommet seat against the sheetmetal, unlike what the above photo shows?
Let me ask. Is the "nut above the sheetmetal" done the same way as the one situated on the other side of the oblong hole? Does the rubber grommet seat against the sheetmetal, unlike what the above photo shows?
Is the "nut above the sheetmetal" done the same way as the one situated on the other side of the oblong hole?
Last edited by 2012YellowBoss; 10/5/11 at 08:41 PM.
10/5/11, 11:38 PM
#52
hang on I'll go jack mine up...
10/5/11, 11:59 PM
#53
There is a nut welded inside the chassis on both holes fore and aft of the oblong hole. Not sure what the thread on the front one is, but the one for the side pipe takes an M15 socket. There is no additional spacer, just the rubber grommet.
10/6/11, 12:03 AM
#54
Without reading the last several posts, I'll assume this thread has, like most others in this section, gone off track. Why else would there be undercarriage pics in a thread about stripes/graphics?

10/6/11, 12:45 AM
#55
10/6/11, 04:16 AM
#56
Drew, huge help. I'll assume the oblong hole to be in the same spot on the earlier '07-'09 chassis. What would you say the distance was between hole centerlines, an inch to an inch and a half?
And offtrack? This isn't an Obama redirect, etc, it is an extension of "making changes" to our beloved S197 chassis vehicles. Huge help from you guys and it is much appreciated.
And offtrack? This isn't an Obama redirect, etc, it is an extension of "making changes" to our beloved S197 chassis vehicles. Huge help from you guys and it is much appreciated.
10/6/11, 06:54 AM
#57
Tob I didn't take a good look at the hole positioning but I believe that both holes are the same distance from the oblong hole. Does your car have either of the F/R holes?
I believe the oblong hole is likely used for chassis positioning during movement at AAI, so probably in the same place for all S197s.
I believe the oblong hole is likely used for chassis positioning during movement at AAI, so probably in the same place for all S197s.
10/6/11, 07:30 AM
#58
Your logic mirrors the assumption I had in mind regarding the oblong hole and AAI.
Off the top of my head I believe I have the forward hole. I'll check it out after work today. You've been a great help. Thank you.
Off the top of my head I believe I have the forward hole. I'll check it out after work today. You've been a great help. Thank you.
10/6/11, 05:57 PM
#59
Drats. No hole fore or aft.
If you get bored Drew, could you give me a dimension from the oblong hole (1-1/4" would be my guess from the closest edge of the oblong hole).
I figure I can drill a hole where I need it, then insert a nut with an integral washer upside down into the hole and then weld around the perimeter of the washer.
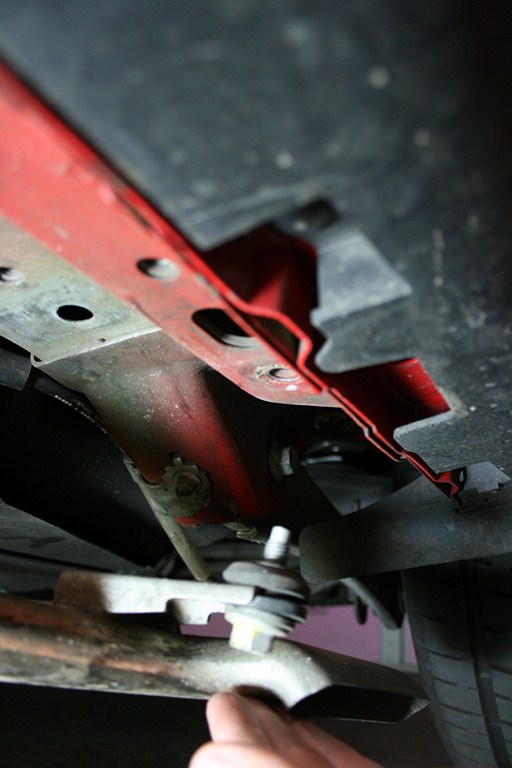
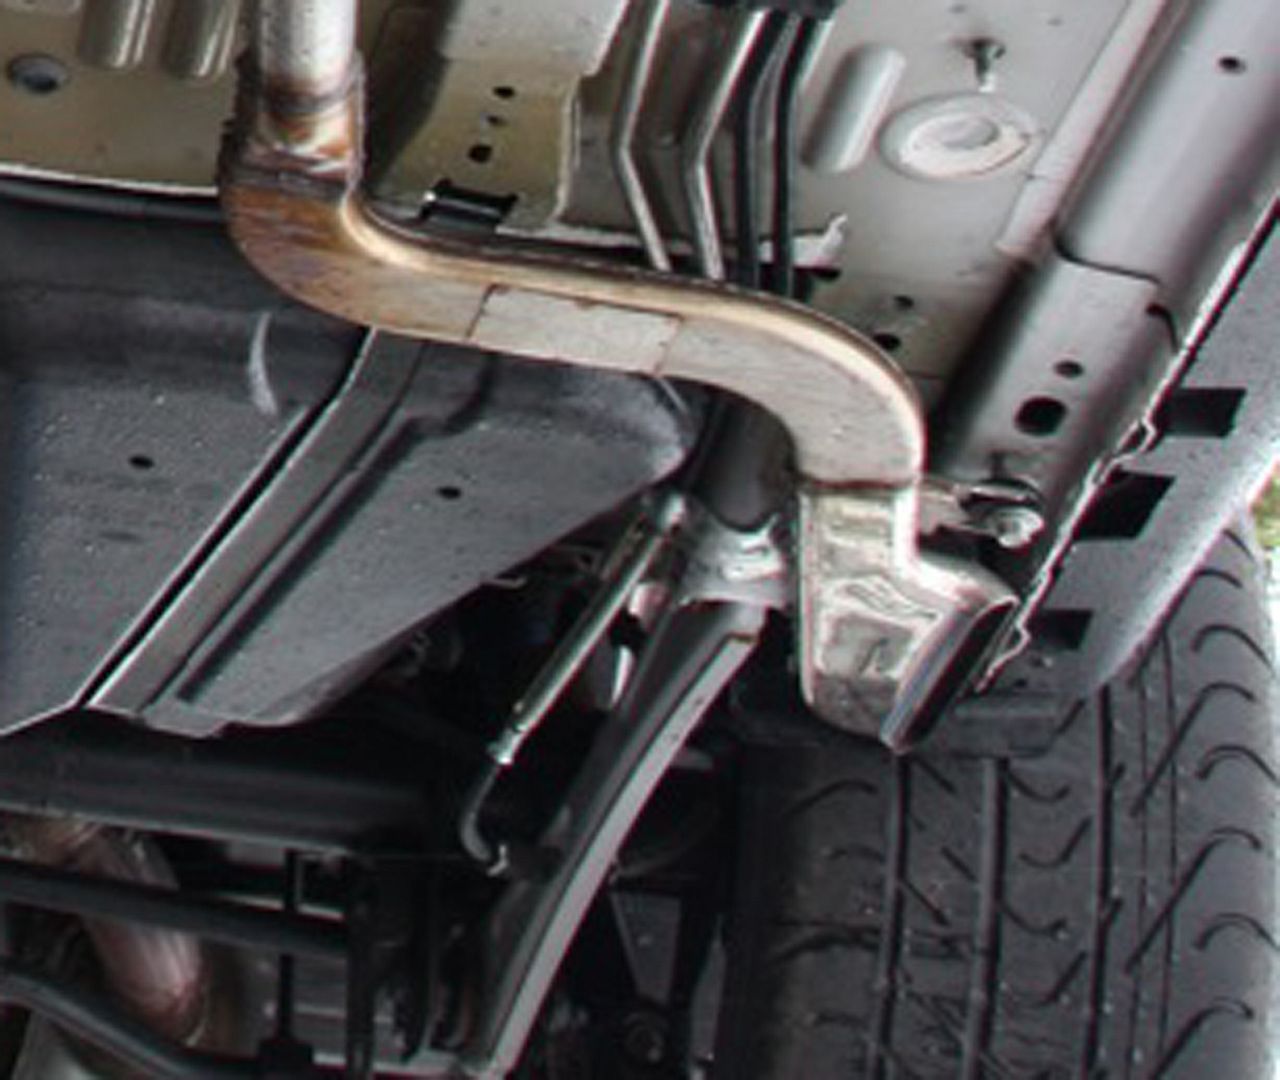
On edit...what is really odd is that I found a thread where a guy in Europe says his Boss was delivered with one of the quad pipes damaged. His photos seem to depict a nut on the surface of the floorpan, like the display car at Woodward (third photo)...
Weird.
If you get bored Drew, could you give me a dimension from the oblong hole (1-1/4" would be my guess from the closest edge of the oblong hole).
I figure I can drill a hole where I need it, then insert a nut with an integral washer upside down into the hole and then weld around the perimeter of the washer.
On edit...what is really odd is that I found a thread where a guy in Europe says his Boss was delivered with one of the quad pipes damaged. His photos seem to depict a nut on the surface of the floorpan, like the display car at Woodward (third photo)...
Weird.
Last edited by Tob*; 10/6/11 at 06:55 PM.
10/6/11, 08:40 PM
#60
Yeah ill get some measurements later tonight for you
Edit: The battery for the digital readout on my calipers is dead, but looks like 1.125" from edge of the oblong hole to C/L of the threaded hole, or about 1.75" center of threaded hole to midpoint of oblong hole.
Just to be sure you might want to install the new pipe setup, and put a thick dab of paint on the top of the sidepipe bolt, then just touch the bolt to the chassis as it would sit. Boom, instant marking.
Last edited by 06GT; 10/6/11 at 10:15 PM.

Thread
Thread Starter
Forum
Replies
Last Post