Adding the OEM nav
 2/26/14, 02:58 PM
#281
Legacy TMS Member
Thread Starter
If you are asking if you can take a 2010/14 interior with nav and put it in a 07, then yes. But lots involved here.
If you are asking if you can put a nav meant for an 07/09 Mustang in a Mustang that doesn't have nav, then yes.

 2/26/14, 03:19 PM
#283
Legacy TMS Member
Thread Starter
The interior parts should just be direct fits. Even the door panels.
2/26/14, 06:20 PM
#284
V6 Member
Join Date: July 21, 2012
Location: Missouri
Posts: 86
Likes: 0
Received 0 Likes
on
0 Posts
Hi
Jim and I have been PMing regarding the nav and dual zone upgrade that my son and I have done in his 2012 Premium Race Red.
We were able to purchase a nav system from a 2011 Shelby GT 500.
We followed Jims directions regarding the necessary components to install for a nav system.
I decided to also install the necessary components to get the dual zone system working as well.
My concern was that, I did not want to drain the coolant, as well as the AC freon and felt that even though Ford only sells the HVAC evaporator box as a complete unit (either single or dual zone) that there must be a way to convert a single zone car to a dual zone without too much difficulty. I was right.
The main difference is the air distribution plenum on the HVAC evaporator box, as well as one control door motor and the wiring harness.
The necessary components to do this conversion is as follows:
The included photo shows the difference from the single (still installed) and the double (on the transmission hump)
The only difference is that there is an extra temperature blend door actuator motor located on the drivers side of the plenum. When you purchase the evaporator housing using an 8MM socket set remove the self tapping screws holding the blend door housing onto the main evaporator housing. Using some of the removed screws install the new temperature blend door actuator motor onto the end of the drivers side blend door (see photo) .
Next remove the single zone evaporator housing (9 screws)( one is underneath) and remove the two existing blend door actuator motors being careful to install them in the same position on the dual zone plenum ( as they were on the single zone plenum) as they are different motors with different wiring connectors.
Install the dual zone plenum ( 9 screws) ( and two additional for the side housing) install the new wiring harness and when you replace the dash with the nav unit you now have dual zone HVAC controlled by the nav unit.
In the photo the single zone plenum is still installed. You can see on the drivers side of the dual zone the additional temperature blend door motor that we have installed. The whole conversion took us about 1 hour.
I also purchased a Rear spoiler with camera.
Since the existing 14A005 main wiring harness did not have the wiring for the OEM amp (located in the trunk) or the necessary wiring harness for the spoiler mounted backup camera, I decided to replace the main wiring harness.
We installed a Lockpic with cameras installed in the license plate lower bolt hole and one on the passenger side mirror.
All in all the whole system works very well.
The only reason that I started on this is that my 21 year old son is very directionally challenged and having the nav unit has allowed him to get around without the distraction of looking at his phone.
If you have any questions I would be pleased to answer to the best of my ability

Jim and I have been PMing regarding the nav and dual zone upgrade that my son and I have done in his 2012 Premium Race Red.
We were able to purchase a nav system from a 2011 Shelby GT 500.
We followed Jims directions regarding the necessary components to install for a nav system.
I decided to also install the necessary components to get the dual zone system working as well.
My concern was that, I did not want to drain the coolant, as well as the AC freon and felt that even though Ford only sells the HVAC evaporator box as a complete unit (either single or dual zone) that there must be a way to convert a single zone car to a dual zone without too much difficulty. I was right.
The main difference is the air distribution plenum on the HVAC evaporator box, as well as one control door motor and the wiring harness.
The necessary components to do this conversion is as follows:
- DR3Z-19850-B evaporator housing $254.79
- AR3Z-18B574-B dual zone wiring harness $27.55
- AR3Z-19E616-A Temperature blend door actuator motor $20.30
The included photo shows the difference from the single (still installed) and the double (on the transmission hump)
The only difference is that there is an extra temperature blend door actuator motor located on the drivers side of the plenum. When you purchase the evaporator housing using an 8MM socket set remove the self tapping screws holding the blend door housing onto the main evaporator housing. Using some of the removed screws install the new temperature blend door actuator motor onto the end of the drivers side blend door (see photo) .
Next remove the single zone evaporator housing (9 screws)( one is underneath) and remove the two existing blend door actuator motors being careful to install them in the same position on the dual zone plenum ( as they were on the single zone plenum) as they are different motors with different wiring connectors.
Install the dual zone plenum ( 9 screws) ( and two additional for the side housing) install the new wiring harness and when you replace the dash with the nav unit you now have dual zone HVAC controlled by the nav unit.
In the photo the single zone plenum is still installed. You can see on the drivers side of the dual zone the additional temperature blend door motor that we have installed. The whole conversion took us about 1 hour.
I also purchased a Rear spoiler with camera.
- AR3Z-6344210-BA $284.31
Since the existing 14A005 main wiring harness did not have the wiring for the OEM amp (located in the trunk) or the necessary wiring harness for the spoiler mounted backup camera, I decided to replace the main wiring harness.
- CR3Z-14A005-KB $320.61
We installed a Lockpic with cameras installed in the license plate lower bolt hole and one on the passenger side mirror.
All in all the whole system works very well.
The only reason that I started on this is that my 21 year old son is very directionally challenged and having the nav unit has allowed him to get around without the distraction of looking at his phone.
If you have any questions I would be pleased to answer to the best of my ability
2/26/14, 06:50 PM
#285
V6 Member
Join Date: July 21, 2012
Location: Missouri
Posts: 86
Likes: 0
Received 0 Likes
on
0 Posts
Here is a comparison between the single and dual.
Orange is where the blend doors are located in the climate box.
Green and blue are the parts that are different. The harness and the climate box.
Red are the parts that are to be added. Another adjusting motor and temp sensor.
Orange is where the blend doors are located in the climate box.
Green and blue are the parts that are different. The harness and the climate box.
Red are the parts that are to be added. Another adjusting motor and temp sensor.
2/26/14, 08:11 PM
#286
Tms Mustang Member ------ The Customizer!

Are you asking if a 2010/14 nav will go in a 07? If so, then no.
If you are asking if you can take a 2010/14 interior with nav and put it in a 07, then yes. But lots involved here.
If you are asking if you can put a nav meant for an 07/09 Mustang in a Mustang that doesn't have nav, then yes.
If you are asking if you can take a 2010/14 interior with nav and put it in a 07, then yes. But lots involved here.
If you are asking if you can put a nav meant for an 07/09 Mustang in a Mustang that doesn't have nav, then yes.

If I were to add the interior from a 2010 to a 07, would I have to replace the whole front dash or just the center radio part?
I am already planning on adding a 2010 center console w/ shifter and the 2010 gt500 steering wheel.
2/26/14, 08:59 PM
#287
Legacy TMS Member
Thread Starter
Thanks Jim. I was asking if the 2010 will fit in a 07...Looks like I will have to replace the whole dash in order to do this. ugh the $$$$$..this is going to be one costly project!
If I were to add the interior from a 2010 to a 07, would I have to replace the whole front dash or just the center radio part?
I am already planning on adding a 2010 center console w/ shifter and the 2010 gt500 steering wheel.
If I were to add the interior from a 2010 to a 07, would I have to replace the whole front dash or just the center radio part?
I am already planning on adding a 2010 center console w/ shifter and the 2010 gt500 steering wheel.
You would be the pioneer on this.
2/26/14, 09:00 PM
#288
Legacy TMS Member
Thread Starter
The actuator is not enough. Both blend doors move as one. You need the part that Muskoka described. I'll be doing the same as Muskoka in the next little while.
2/27/14, 03:31 PM
#289
Tms Mustang Member ------ The Customizer!
You would need the entire dash as well as the center console. I suppose you could just use the existing dash harness and cluster, but you would have to do some wiring to get the steering wheel switches to work. Cruise might not work, but not sure. Another member said he put in a new steering wheel into a 05/09 and said everything on the wheel worked. But considering the trouble we have been having, I'm not so sure.
You would be the pioneer on this.
You would be the pioneer on this.
2/27/14, 05:45 PM
#290
Legacy TMS Member
Thread Starter
Just got my new switch today along with my pony puddle/heated/blind spot mirrors today. Dropping to -30 C tomorrow, so I won't be doin the mirrors this weekend.
Switch was easy, though.
You can see the difference here. The nav switch does not have OK on it. Thanks Muskoka for figuring this one out. I suspected, but never got around to checking it out as it was no big deal to me. Cheap fix.
Switch was easy, though.
You can see the difference here. The nav switch does not have OK on it. Thanks Muskoka for figuring this one out. I suspected, but never got around to checking it out as it was no big deal to me. Cheap fix.
2/27/14, 05:48 PM
#291
Legacy TMS Member
Thread Starter
Are you refering to keeping your existing dash in your 2007 and having the 2010/14 nav installed? That won't work as it physically would not fit. It would be a nightmarish failure.
Couple of reasons:
It won't work because the nav is hooked into the HVAC. Without the 2010/14 HVAC, there will be issues with the nav. Nav may not even work at all.
Also the 2010/14 HVAC panel is not a direct fit into the 05/09 cars. You would be doing some pretty fancy chopping and sanding to get it to look even remotely half crappy. You NEED the 2010/14 dash to fit the HVAC panel.
But let's say you could do this. Then the HVAC will have different connectors then what the 05/09 has, so custom wiring would be needed. And if that could even be figured out, I doubt that the signals being sent by the newer HVAC would be recognized by the car's computer modules.
Also, the ACM is separate from the nav screen. The ACM is mounted lower than the screen is. There is no way of fitting the nav screen with the ACM directly behind as you would need in the 05/09, either. While the ACM will fit in the double din spot, you will have nowhere to put the screen. And even if you could mount it in front of the ACM, you'd be blocking the CD slot.
If you really wanted to have this, you'd pretty much be forced to get the dash and center console. And since we are talking about a different HVAC unit, probably you'd need the newer climate system as well. And if you did that, then you'd probably need the SJB. And on and on it goes. You'd have to do what this other guy did and transfer the interior and all modules and wiring and drivetrain into your car.
Last edited by jim010; 2/27/14 at 08:15 PM.
2/28/14, 07:35 AM
#293
Tms Mustang Member ------ The Customizer!
Thing is, I would like to install a Nav unit, and after seeing the 10+ version, it looks and probably functions tons better then the older style.
But seeing as this would probably cost more then buying a new car itself
 , I think ill just stick with the older version . Sucks though cause the 10+ is really really nice.
 2/28/14, 10:07 AM
#295
Legacy TMS Member
Thread Starter
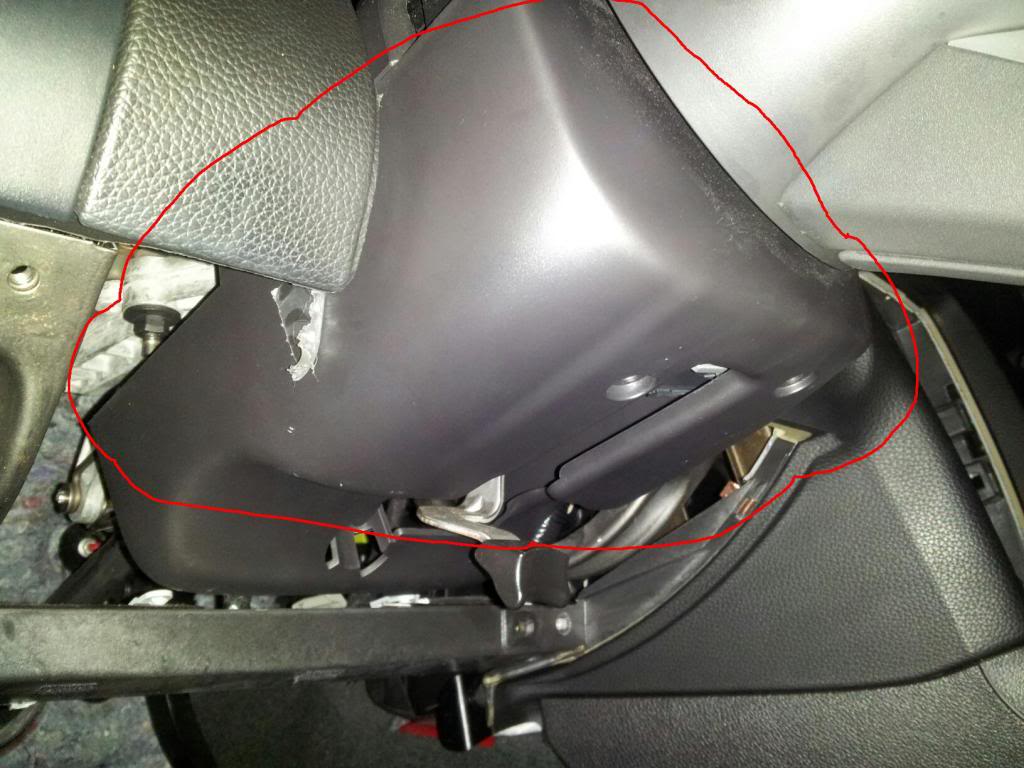
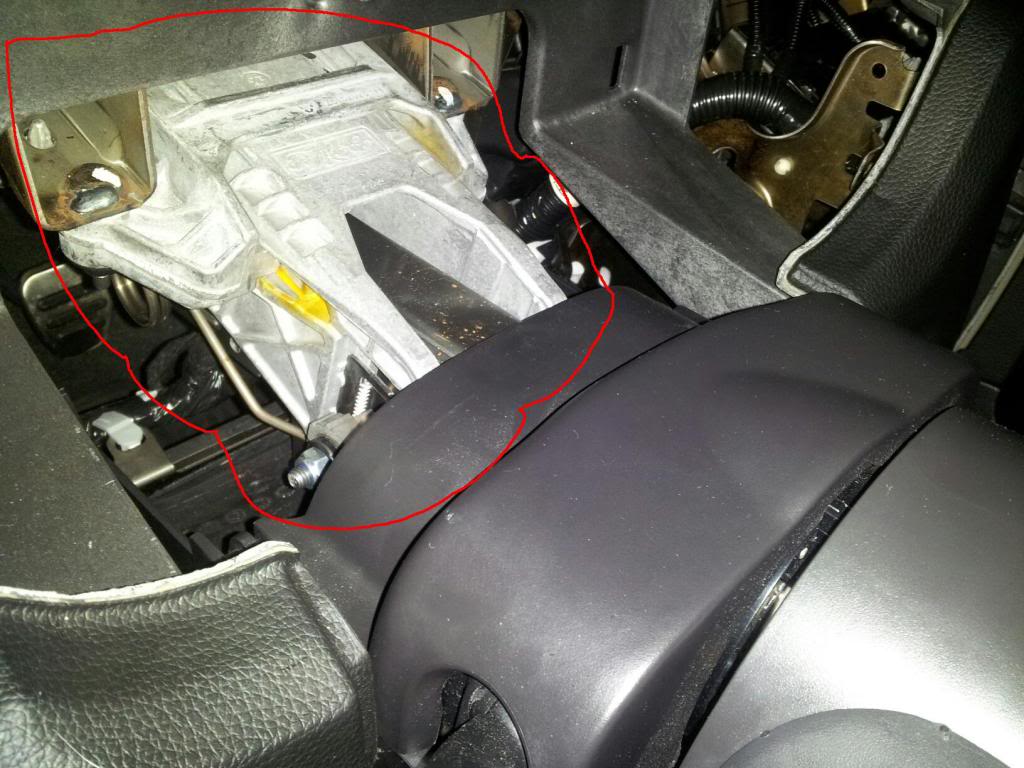
You need to take off the black plastic trim around the steering column.
crawl under the steering wheel and get into the footwell. You will see a steel shaft going from where the pedals are to the steering column. The shaft is in 2 parts. There will be a part where one part of the shaft slides into the second part. It is there that you will see a bolt that holds it together. Take that bolt out.
crawl under the steering wheel and get into the footwell. You will see a steel shaft going from where the pedals are to the steering column. The shaft is in 2 parts. There will be a part where one part of the shaft slides into the second part. It is there that you will see a bolt that holds it together. Take that bolt out.
 2/28/14, 11:03 AM
#299
Legacy TMS Member
Thread Starter
The CD Muskoka suggested is a great idea. But since you are in the middle of doing this the service department at the dealer can print off for you the instructions on how to remove the dash.