Custom Leather shift boot-with pony ball
 10/21/05, 02:12 PM
#261
Bullitt Member

Join Date: February 7, 2005
Posts: 249
Likes: 0
Received 0 Likes
on
0 Posts
Hi!
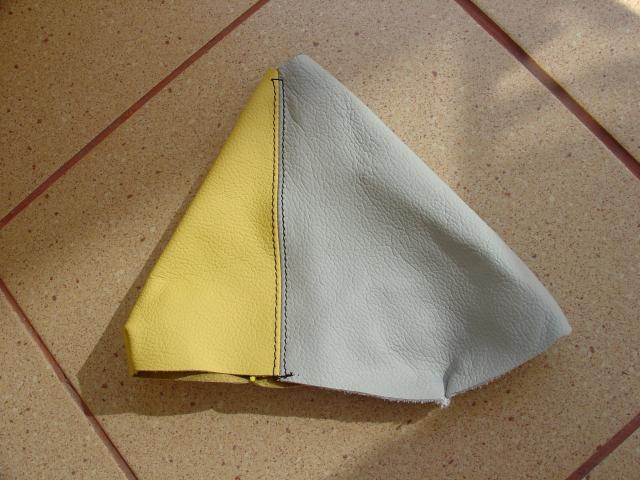
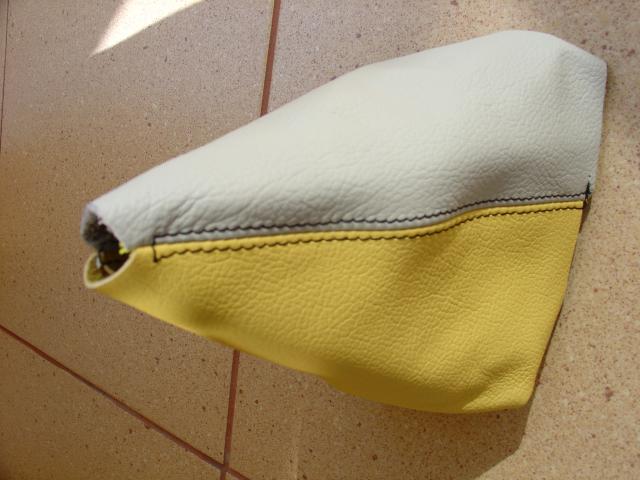
Another month has almost passed by, so here's another discount code, with a new color suggestion.
This is YELLOW-LIGHT GRAY two-tone. It looks much better in person, these pictures do not do it justice.
Here's the code. Valid until the end of October!
3590PBRD0U3
Thank you,
Maciek
 10/22/05, 01:30 PM
#262
Member

Join Date: September 24, 2004
Posts: 12
Likes: 0
Received 0 Likes
on
0 Posts
So was there ever a determination on what the best match was for the medium parchment interiors? The seirra looks a little dark, but I could probably live with it if it's the closest match.
10/22/05, 06:43 PM
#263
Shelby GT350 Member
Join Date: May 17, 2005
Location: Chesapeake, VA
Posts: 2,072
Likes: 0
Received 0 Likes
on
0 Posts
Originally posted by SFGrimoire@October 22, 2005, 2:33 PM
So was there ever a determination on what the best match was for the medium parchment interiors? The seirra looks a little dark, but I could probably live with it if it's the closest match.
So was there ever a determination on what the best match was for the medium parchment interiors? The seirra looks a little dark, but I could probably live with it if it's the closest match.
 10/24/05, 04:49 AM
#267
Bullitt Member
Join Date: February 7, 2005
Posts: 249
Likes: 0
Received 0 Likes
on
0 Posts
I'd recommend a LIGHT GRAY/BLACK two-tone, it should look FABULOUS with your black center console.
Thank you,
Maciek
11/11/05, 10:44 AM
#268
Bullitt Member
Join Date: February 7, 2005
Posts: 249
Likes: 0
Received 0 Likes
on
0 Posts
Hi everyone!
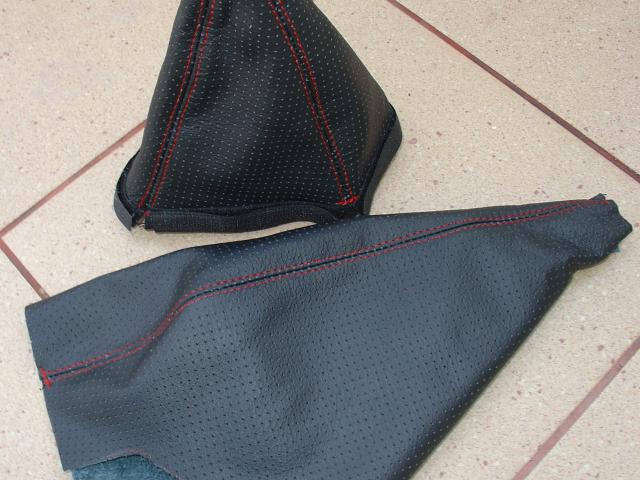
Some important news and updated regarding the RedlineGoods color selection!
We have added PERFORATED LEATHERS to our color collection recently. Here are some pictures:

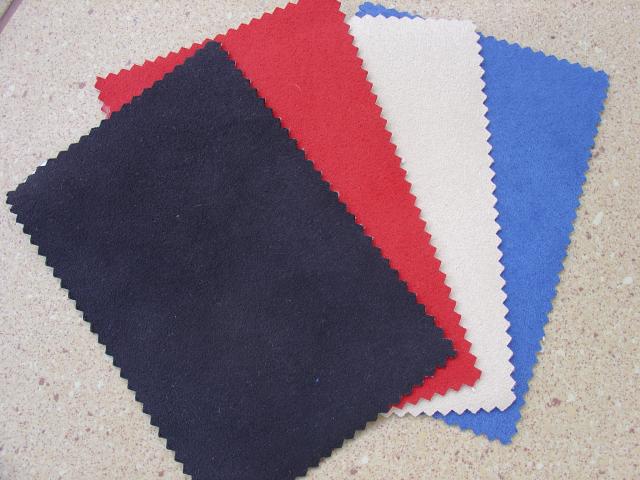
Here are some sample pics of the FAUX-ALCANTARA materials available as of today on our site. We offer black, blue, red and beige. The material is not genuine Alcantara/Ultrasuede, which is licensed and very expensive. The material we are using is almost identical in look and feel to the real thing, while remaining reasonably priced.
These new materials are available as a color option on our website for ordering purposes. And here's another discount code for them. Valid until next Sunday (November 20th).
35M8IT8H6D0
Thank you,
Maciek
11/15/05, 09:11 PM
#269
Team Mustang Source
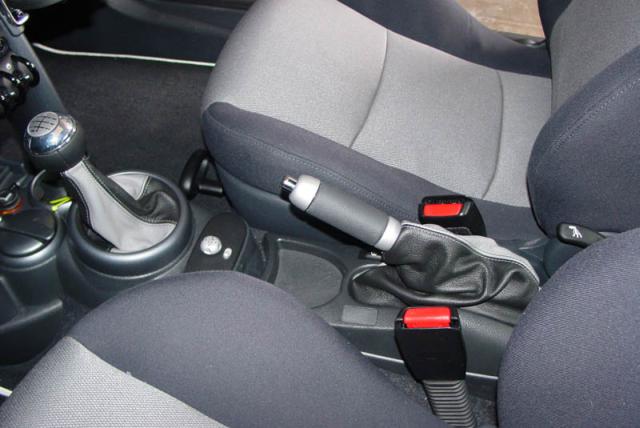
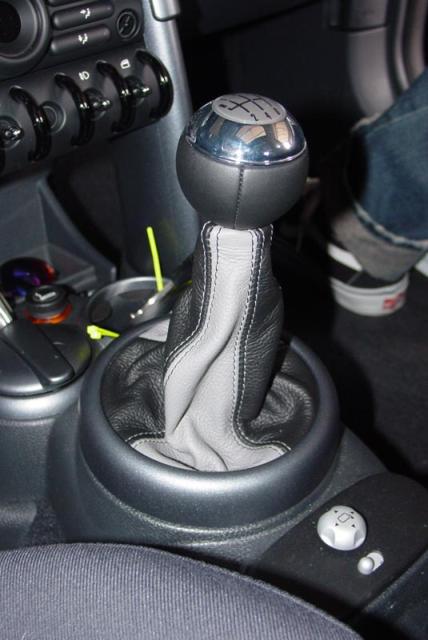
I just received my Redline shift boot. Great quality leather and flawless workmanship (pics tomorrow after I get it installed. Wish I'd popped for the console cover and ebrake boot now too.
EDIT: Here's a shot of the new boot installed
[attachmentid=38816]
EDIT: Here's a shot of the new boot installed
[attachmentid=38816]
11/25/05, 12:09 PM
#270
Bullitt Member
Join Date: February 7, 2005
Posts: 249
Likes: 0
Received 0 Likes
on
0 Posts
Hi everyone!
New sample pics of the FAUX-ALCANTARA materials available on our site. We offer black, blue, red and beige. The material is not genuine Alcantara/Ultrasuede, which is licensed and very expensive. The material we are using is almost identical in look and feel to the real thing, while remaining reasonably priced.
It combines very well with other materials (smooth or perforated leathers), as you can see:
These new materials are available as a color option on our website for ordering purposes. And here's another discount code for them. Valid until November 30th. IT IS THE LAST DISCOUNT CODE WE WILL RELEASE THIS YEAR!
35YG88WBN90
Thank you and HAPPY THANKSGIVING,
Maciek
12/9/05, 12:41 PM
#271
Bullitt Member
Join Date: February 7, 2005
Posts: 249
Likes: 0
Received 0 Likes
on
0 Posts
Hi everyone!
There is NO DISCOUNT CODE this time. However, our CHRISTMAS SPECIAL - FREE SHIPPING is available all through December! Make sure you take advantage of that when shopping for Christmas presents for your family and friends (or make sure to let them know if you want to be the lucky recipient of these great products!)
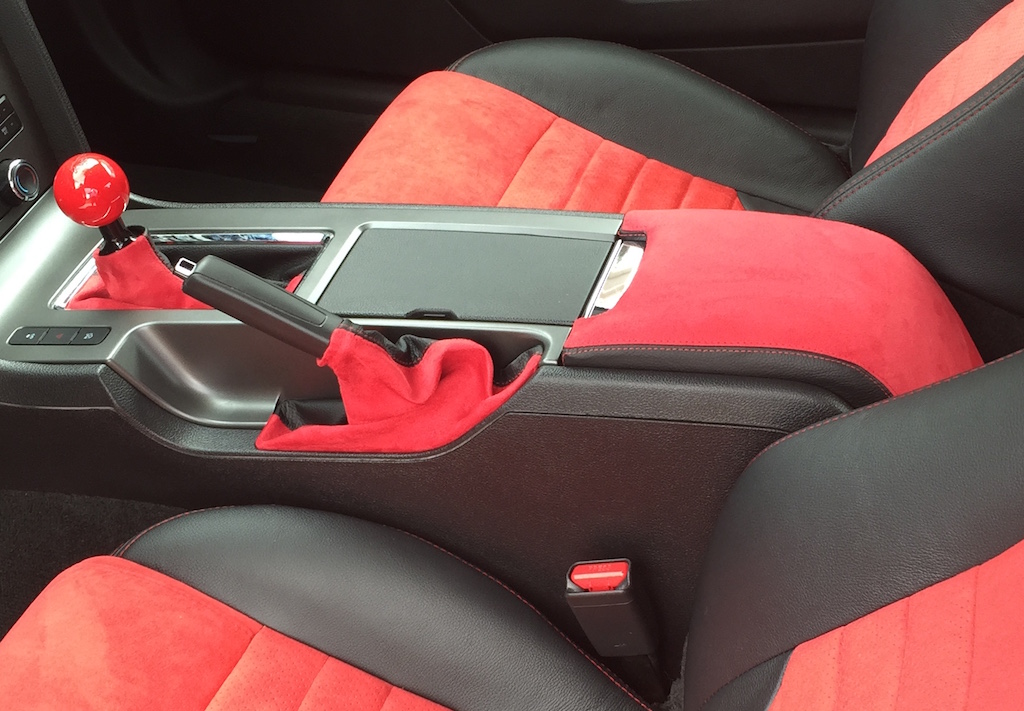
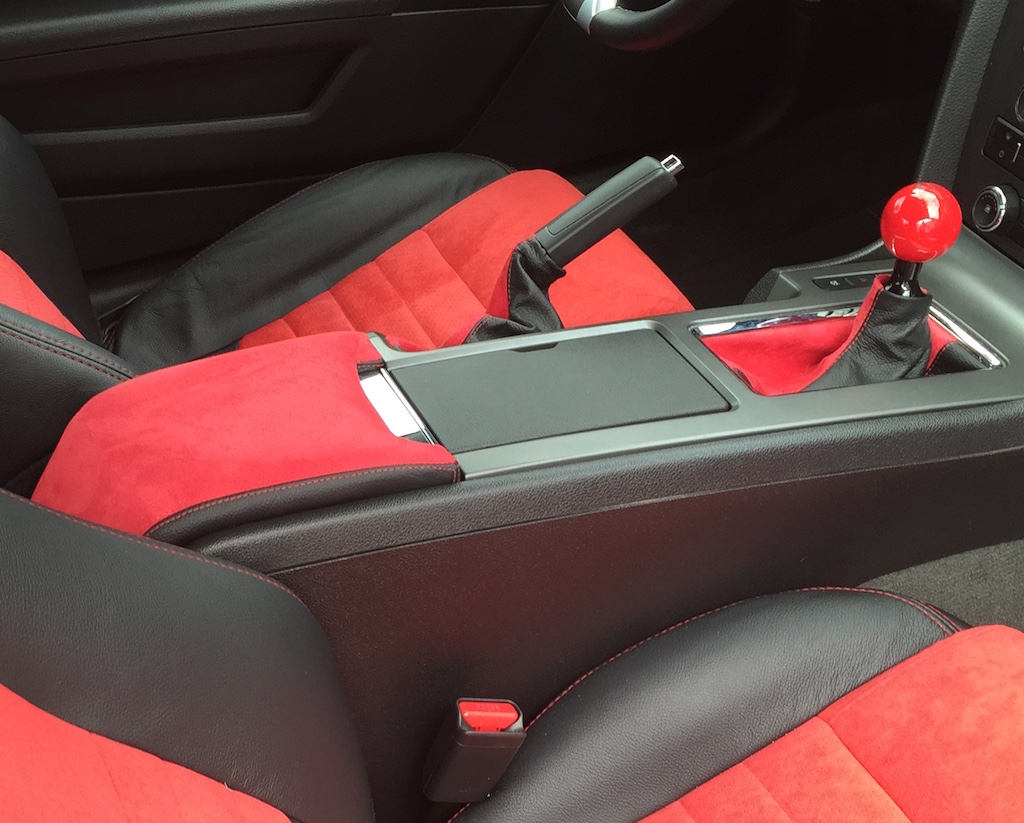
Some recent pictures we find particularly appealing:
Thank you and enjoy the coming Christmas season!
Maciek
12/9/05, 02:33 PM
#272
Banned
Join Date: October 13, 2004
Location: Honey Harbour, Ontario, Canada
Posts: 822
Likes: 0
Received 0 Likes
on
0 Posts
Hi Maciek,
Question,
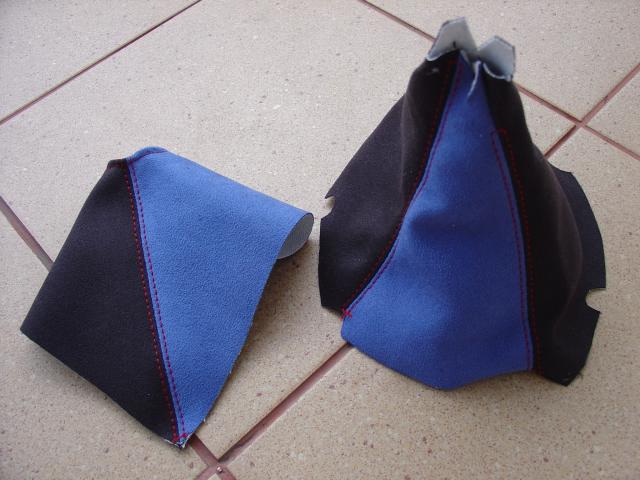
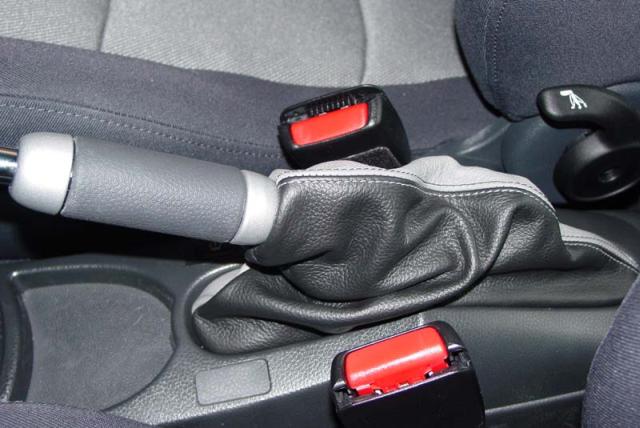
I ordered the boots for my 'stang back in June 05. But after seeing a bunch of pictures... I wonder if the stitching is wrong ?

As you can see the beige thread just ends? On the front of the boot, the thread goes all the up the neck of the boot.
On the back (what you see), the thread just stops as you can see....
Are people just feeding the boot through more to hide the missing stitching?
Question,
I ordered the boots for my 'stang back in June 05. But after seeing a bunch of pictures... I wonder if the stitching is wrong ?
As you can see the beige thread just ends? On the front of the boot, the thread goes all the up the neck of the boot.
On the back (what you see), the thread just stops as you can see....
Are people just feeding the boot through more to hide the missing stitching?
12/9/05, 02:44 PM
#273
Bullitt Member
Join Date: February 7, 2005
Posts: 249
Likes: 0
Received 0 Likes
on
0 Posts
Originally posted by Fastrack@December 9, 2005, 10:36 PM
I ordered the boots for my 'stang back in June 05. But after seeing a bunch of pictures... I wonder if the stitching is wrong ?
As you can see the beige thread just ends? On the front of the boot, the thread goes all the up the neck of the boot.
I ordered the boots for my 'stang back in June 05. But after seeing a bunch of pictures... I wonder if the stitching is wrong ?
As you can see the beige thread just ends? On the front of the boot, the thread goes all the up the neck of the boot.
Thank you,
Maciek
12/9/05, 04:27 PM
#274
Team Mustang Source
Originally posted by RedlineGoods@December 9, 2005, 4:47 PM
Actually I think you installed it backwards the shorter stitching should be facing the front of the car so that it's not visible.
Thank you,
Maciek
Actually I think you installed it backwards the shorter stitching should be facing the front of the car so that it's not visible.
Thank you,
Maciek
12/9/05, 04:50 PM
#275
Banned
Join Date: October 13, 2004
Location: Honey Harbour, Ontario, Canada
Posts: 822
Likes: 0
Received 0 Likes
on
0 Posts
Originally posted by RedlineGoods@December 9, 2005, 4:47 PM
Actually I think you installed it backwards the shorter stitching should be facing the front of the car so that it's not visible.
Thank you,
Maciek
Actually I think you installed it backwards the shorter stitching should be facing the front of the car so that it's not visible.
Thank you,
Maciek
Ok I'll give that a shot in the spring, since my car is in storage. But based on what your saying my boot is the same as the rest.
Great products!
The e-brake boot should look great with the e-brake handle by MGW.
http://forums.bradbarnett.net/index.php?sh...ndpost&p=582708
P_Kiley, I agree I don't think the mounting plate cares (it looked the same from what I remember)
Thanks!
12/13/05, 10:56 AM
#276
Bullitt Member
Join Date: February 8, 2005
Posts: 230
Likes: 0
Received 0 Likes
on
0 Posts
I just installed armrest, ebrake, and shifter boot last night. I have to say this is a great product and looks completely stock. I used the same material as post 268 (blk perferated with red thread) in my ICAP equiped tungsten and it looks awsome. Very good mod that I would suggest to anyone. Getting the center console out for the ebrake boot was a pain in my hiney though. Everything was worth the effort. Now I just need that Hurst shifter from Santa.
12/13/05, 11:28 AM
#277
Banned
Join Date: October 13, 2004
Location: Honey Harbour, Ontario, Canada
Posts: 822
Likes: 0
Received 0 Likes
on
0 Posts
Originally posted by Angry Irishman@December 13, 2005, 12:59 PM
I just installed armrest, ebrake, and shifter boot last night. I have to say this is a great product and looks completely stock. I used the same material as post 268 (blk perferated with red thread) in my ICAP equiped tungsten and it looks awsome. Very good mod that I would suggest to anyone. Getting the center console out for the ebrake boot was a pain in my hiney though. Everything was worth the effort. Now I just need that Hurst shifter from Santa.
I just installed armrest, ebrake, and shifter boot last night. I have to say this is a great product and looks completely stock. I used the same material as post 268 (blk perferated with red thread) in my ICAP equiped tungsten and it looks awsome. Very good mod that I would suggest to anyone. Getting the center console out for the ebrake boot was a pain in my hiney though. Everything was worth the effort. Now I just need that Hurst shifter from Santa.
12/13/05, 07:06 PM
#278
Bullitt Member
Join Date: August 31, 2005
Posts: 473
Likes: 0
Received 0 Likes
on
0 Posts
Just got my boot and console cover. I reviewed the instructions at the Redline site, but have a question. It mentions re-installing the shift ****, but doesn't say to remove it.
Does it just thread off?
Does it just thread off?
12/13/05, 07:28 PM
#279
Bullitt Member
Join Date: February 8, 2005
Posts: 230
Likes: 0
Received 0 Likes
on
0 Posts
Chief,
Just twist it off. The plastic base comes off very easily. When reinstalling just give the sides a thump and it will seat with no problems. Looks and feels 100 times better than OEM. If you are installing the ebrake boot take fastrack's advice and pull the handle as far up as you can. It will make taking out the console much easier. Make sure you put a towel or something soft in front of console when removing and installing to protect the soft plastic. I pulled it off without scratching anything which is amazing considering the effort required to take the console out. Good luck with the install... you will be pleased with your efforts.
Always glad to help another Airman!
12/13/05, 09:47 PM
#280
Banned
Join Date: October 13, 2004
Location: Honey Harbour, Ontario, Canada
Posts: 822
Likes: 0
Received 0 Likes
on
0 Posts
Originally posted by AFChief@December 13, 2005, 9:09 PM
Just got my boot and console cover. I reviewed the instructions at the Redline site, but have a question. It mentions re-installing the shift ****, but doesn't say to remove it.
Does it just thread off?
Just got my boot and console cover. I reviewed the instructions at the Redline site, but have a question. It mentions re-installing the shift ****, but doesn't say to remove it.
Does it just thread off?
To attach the new boot, use automotive goop, wait for it to dry a bit then re-press it along the edges, it makes for a very nice finish.
To attach the boot to the Shift ****:
1) Turn the boot inside out, and hold the shift **** opening towards the ceiling.
2) Now push the shift **** upwards with the screw portion of the **** pointing the ceiling.
What I used instead of the Zip-tie that they suggest (since I could feel it). Was a piece of 1/8" ribbon, I tightened that into the grove, and as you can see from my post above, my shift boot is nice and flat. I can not feel the knot in the ribbon since it's actually in the groove. Some small diameter string would probably work as well.
For the centre console:
1) Remove the armrest from the car (2 or 3 screws.. can't remember).
2) Remove metal insert from armrest
3) Stretch the cover over the armrest
4) Remount the metal insert and ensure the back of the cover (elastic part) is being held in place by the metal insert/hinge.
Without doing the above I found the cover bunched up around the hinges...
Wow that was long.. And probably makes no sense.. LOL
