Caliper Removal For Painting
 10/28/09, 11:50 PM
#1
GT Member
Thread Starter
Join Date: October 24, 2009
Location: FL
Posts: 115
Likes: 0
Received 0 Likes
on
0 Posts
Caliper Removal For Painting
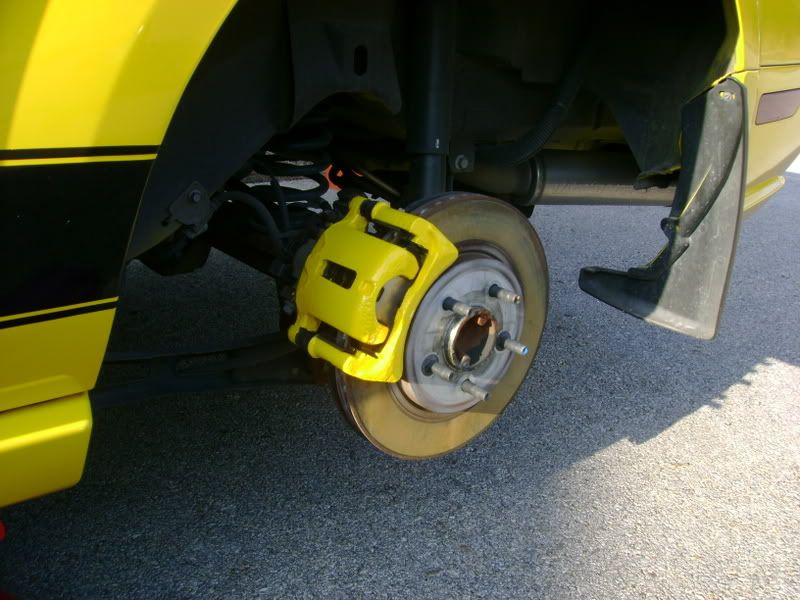
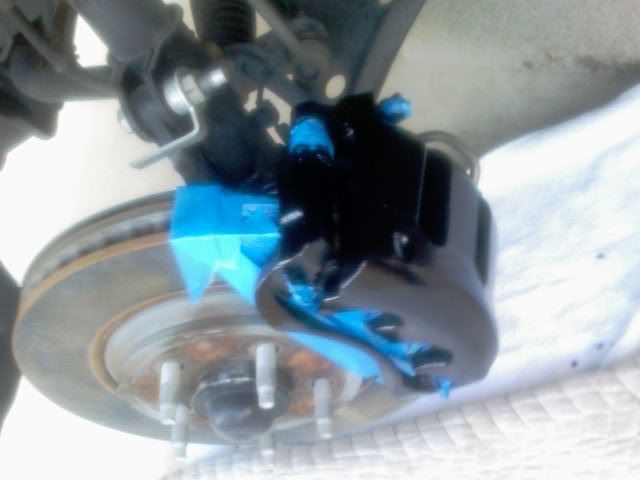
Does anyone have a link or anything to post on this? I've been searching for a while and can't find anything. My new caliper paint arrives tomorrow and I still don't know how to completely remove them so I can brush the paint on. I'm also upgrading/swapping out rotors and caliper brackets(v6 to GT). So I wanted to do everything at the same time and I figured it would just be easier to remove all 4 calipers & brackets for painting. I've looked up how to swap pads and rotors, I was just curious on what else needs to be done to completely remove the caliper so I can be completely ready and know what I need to do before I start. Can anyone help me out? Thanks!
Last edited by Topless Stang; 10/29/09 at 12:12 AM.
 10/28/09, 11:56 PM
#2
Does anyone have a link or anything to post on this? I've been searching for a while and can't find anything. My new caliper paint arrives tomorrow and I still don't know how to completely remove them so I can brush the paint on. I'm also upgrading/swapping out rotors and caliper brackets(v6 to GT). So I wanted to do everything at the same time and I figured it would just be easier to remove all 4 calipers & brackets for painting. Can anyone help me out? Thanks!
10/29/09, 12:55 AM
#3
GT Member
Thread Starter
Join Date: October 24, 2009
Location: FL
Posts: 115
Likes: 0
Received 0 Likes
on
0 Posts
I don't know about the removal but I would suggest that you do not put off using the caliper paint. I think I read in a thread here that it is better if you use it sooner than later. The longer it sits the less likely it is to stick or turn out properly. I can't back this up with the thread, but I know I read that. You've got weeks for sure, but don't put it on a shelf and think that next summer it will be just as good as it is now.
10/29/09, 06:13 AM
#5
GT Member
Thread Starter
Join Date: October 24, 2009
Location: FL
Posts: 115
Likes: 0
Received 0 Likes
on
0 Posts
10/29/09, 06:22 AM
#7
GT Member
Thread Starter
Join Date: October 24, 2009
Location: FL
Posts: 115
Likes: 0
Received 0 Likes
on
0 Posts
cool, i"m doing mine in white with the black 'running pony' decals. did you have to take the wheels off to put the decals on? I planned on painting this weekend, but putting the decals on next week when they get here without taking the tires off.
10/29/09, 08:35 AM
#10
Cobra R Member
I used G2 many times and painted em right on the car. Just clean with soap and water.
Let dry. Clean with the G2 brake cleaner (comes in the kit). let dry. Then mask.
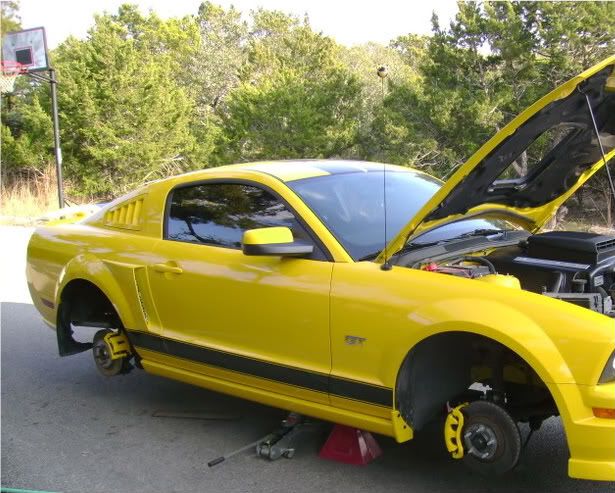
Have all four tires off and be ready to paint them all at the same time. The G2 comes with a hardener
so you have about 1 hour before its a rock! Dont worry about brush strokes. As it dries it congeals and will be smooth.
The key is masking. Just take your time.

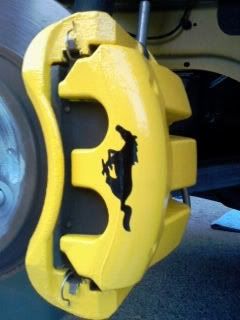
For the Mustang I just measured and had a vinyl guy make me a reverse of a decal....the outline
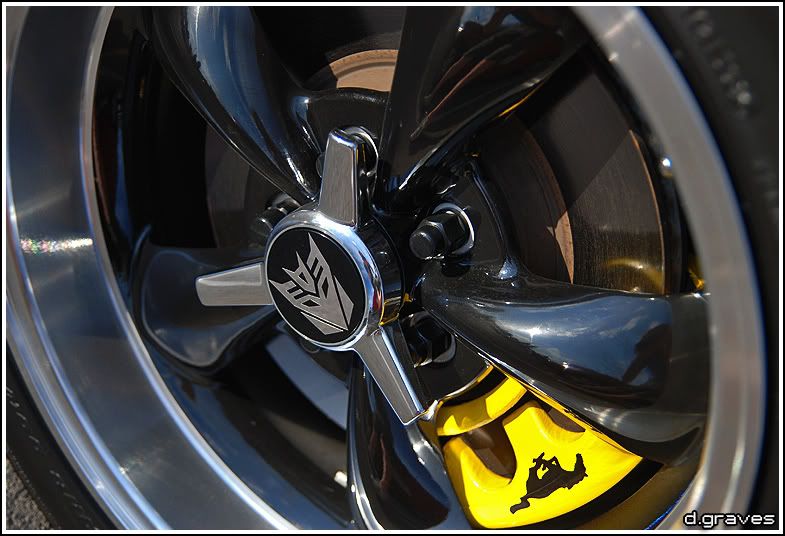
or whatever they call it. I applied it after the paint dried and sprayed some 800 degree black engine paint
on it. Waited 15 minutes then peeled it off. WHALLLLAAAAA.....painted pony:
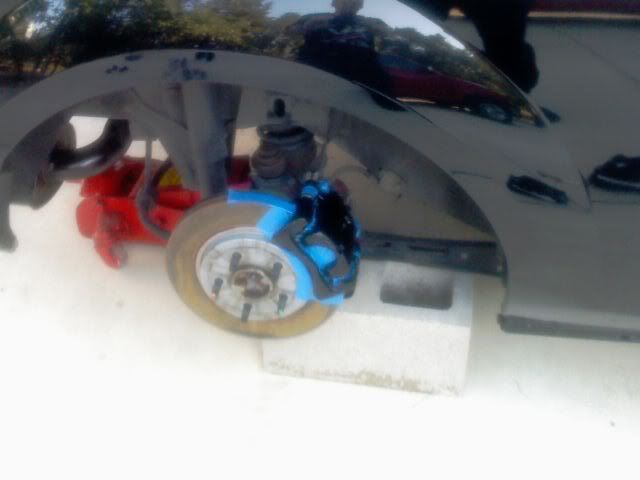
and a few when I was painting barry to give you a masking idea:
Dont take them off cause you cant go far...unless you open the system up.
Let dry. Clean with the G2 brake cleaner (comes in the kit). let dry. Then mask.
Have all four tires off and be ready to paint them all at the same time. The G2 comes with a hardener
so you have about 1 hour before its a rock! Dont worry about brush strokes. As it dries it congeals and will be smooth.
The key is masking. Just take your time.
For the Mustang I just measured and had a vinyl guy make me a reverse of a decal....the outline
or whatever they call it. I applied it after the paint dried and sprayed some 800 degree black engine paint
on it. Waited 15 minutes then peeled it off. WHALLLLAAAAA.....painted pony:
and a few when I was painting barry to give you a masking idea:
Dont take them off cause you cant go far...unless you open the system up.
Last edited by Barricade; 10/29/09 at 08:38 AM.
10/29/09, 09:41 AM
#11
GT Member
Thread Starter
Join Date: October 24, 2009
Location: FL
Posts: 115
Likes: 0
Received 0 Likes
on
0 Posts
I used G2 many times and painted em right on the car. Just clean with soap and water.
Let dry. Clean with the G2 brake cleaner (comes in the kit). let dry. Then mask.
Have all four tires off and be ready to paint them all at the same time. The G2 comes with a hardener
so you have about 1 hour before its a rock! Dont worry about brush strokes. As it dries it congeals and will be smooth.
The key is masking. Just take your time.
For the Mustang I just measured and had a vinyl guy make me a reverse of a decal....the outline
or whatever they call it. I applied it after the paint dried and sprayed some 800 degree black engine paint
on it. Waited 15 minutes then peeled it off. WHALLLLAAAAA.....painted pony:
and a few when I was painting barry to give you a masking idea:
Dont take them off cause you cant go far...unless you open the system up.
So you wash, dry, THEN use the brake cleaner spray? Cool...thanks for the tip. I'm glad I came here..the G2 site says once you apply the hardener the paint will be usable for 4-6 hours. You're saying you only have an hour to paint?? That was enough time to go over each caliper? How many coats did you do? The decals I found were on ebay and they are supposedly 'offical' ford products
http://cgi.ebay.com/ebaymotors/ws/eB...tchlink:top:en
It seems like a painted pony might be a better way to go though. Any chance you'd be willing to sell that pony stencil?? lol
Great looking car and paint job on the calipers. If hope mine turns out that good.
Last edited by Topless Stang; 10/29/09 at 10:03 AM.
10/29/09, 10:47 AM
#12
Cobra R Member
4 hours? I think not! I put two coats on em and touched it up in places.
You have plenty of time if you prep before you pour the hardner into the paint.
Stencil....thats the word! lol
I can have her make another one but she isnt as cheap as ebay. Ebay may be your best bang for your buck.
The cool thing about it was she did a mirror so the Pony faces up on both sides.
You also need tweezers to get that one small part from just behind the front leg.
You cant wait till the paint is dry. You gotta pull off the stencil about 15-20 min after painting it so it doesnt tear the paint.
I also masked around the stencil with paper and used a can of black 800 degree engine paint
spray for the pony.
Been on for over two years and still looks new.
Ask the guys on ebay if they can do a stencil pair with a mirrored one. Looks like mines a tad bigger
than the ebay sticker.
Last edited by Barricade; 10/29/09 at 10:48 AM.
10/29/09, 11:12 AM
#13
GT Member
Thread Starter
Join Date: October 24, 2009
Location: FL
Posts: 115
Likes: 0
Received 0 Likes
on
0 Posts
4 hours? I think not! I put two coats on em and touched it up in places.
You have plenty of time if you prep before you pour the hardner into the paint.
Stencil....thats the word! lol
I can have her make another one but she isnt as cheap as ebay. Ebay may be your best bang for your buck.
The cool thing about it was she did a mirror so the Pony faces up on both sides.
You also need tweezers to get that one small part from just behind the front leg.
You cant wait till the paint is dry. You gotta pull off the stencil about 15-20 min after painting it so it doesnt tear the paint.
I also masked around the stencil with paper and used a can of black 800 degree engine paint
spray for the pony.
Been on for over two years and still looks new.
Ask the guys on ebay if they can do a stencil pair with a mirrored one. Looks like mines a tad bigger
than the ebay sticker.
You have plenty of time if you prep before you pour the hardner into the paint.
Stencil....thats the word! lol
I can have her make another one but she isnt as cheap as ebay. Ebay may be your best bang for your buck.
The cool thing about it was she did a mirror so the Pony faces up on both sides.
You also need tweezers to get that one small part from just behind the front leg.
You cant wait till the paint is dry. You gotta pull off the stencil about 15-20 min after painting it so it doesnt tear the paint.
I also masked around the stencil with paper and used a can of black 800 degree engine paint
spray for the pony.
Been on for over two years and still looks new.
Ask the guys on ebay if they can do a stencil pair with a mirrored one. Looks like mines a tad bigger
than the ebay sticker.
10/29/09, 11:27 AM
#14
Cobra R Member
Yes...the stencil is made from the overlay stuff they usually put over the stickers
for ease of application.
Sooooo it can be easily removed. Plenty of stick but peels off easy cheesy.
Ill see her tomorrow so Ill ask.
for ease of application.
Sooooo it can be easily removed. Plenty of stick but peels off easy cheesy.
Ill see her tomorrow so Ill ask.
10/29/09, 12:06 PM
#16
GT Member
Thread Starter
Join Date: October 24, 2009
Location: FL
Posts: 115
Likes: 0
Received 0 Likes
on
0 Posts
4 hours? I think not! I put two coats on em and touched it up in places.
You have plenty of time if you prep before you pour the hardner into the paint.
Stencil....thats the word! lol
I can have her make another one but she isnt as cheap as ebay. Ebay may be your best bang for your buck.
The cool thing about it was she did a mirror so the Pony faces up on both sides.
You also need tweezers to get that one small part from just behind the front leg.
You cant wait till the paint is dry. You gotta pull off the stencil about 15-20 min after painting it so it doesnt tear the paint.
I also masked around the stencil with paper and used a can of black 800 degree engine paint
spray for the pony.
Been on for over two years and still looks new.
Ask the guys on ebay if they can do a stencil pair with a mirrored one. Looks like mines a tad bigger
than the ebay sticker.
You have plenty of time if you prep before you pour the hardner into the paint.
Stencil....thats the word! lol
I can have her make another one but she isnt as cheap as ebay. Ebay may be your best bang for your buck.
The cool thing about it was she did a mirror so the Pony faces up on both sides.
You also need tweezers to get that one small part from just behind the front leg.
You cant wait till the paint is dry. You gotta pull off the stencil about 15-20 min after painting it so it doesnt tear the paint.
I also masked around the stencil with paper and used a can of black 800 degree engine paint
spray for the pony.
Been on for over two years and still looks new.
Ask the guys on ebay if they can do a stencil pair with a mirrored one. Looks like mines a tad bigger
than the ebay sticker.
Where did you get those spinners?? I could go for some with a white autobot symbol!!
Last edited by Topless Stang; 10/29/09 at 12:12 PM.
 11/1/09, 03:04 PM
#18
Cobra R Member
Hey Topless....she can make me another set. She said $20. Sounds steep to me.
I can grab it and throw a stamp on it ifn u want. I still think ebay might be cheaper for ya.
The Spinners? ahhhhhhh....its beena couple years. Let me see if I can remember.
I can grab it and throw a stamp on it ifn u want. I still think ebay might be cheaper for ya.
The Spinners? ahhhhhhh....its beena couple years. Let me see if I can remember.
11/4/09, 10:12 AM
#19
GT Member
Thread Starter
Join Date: October 24, 2009
Location: FL
Posts: 115
Likes: 0
Received 0 Likes
on
0 Posts
That sucks...I pullled the trigger on those ebay ones last night


Thread
Thread Starter
Forum
Replies
Last Post