Any plumbers in here?
 5/13/13, 02:42 PM
#21
Legacy TMS Member
Thread Starter
Most single function valves work that way on my experience. It's on and them you can only adjust hot and cold mixture with the lever. A flow control would require a different type of valve with a flow valve and a hot/cold mix valve.
Most people just want full on flow and don't care about adjusting it.
Most people just want full on flow and don't care about adjusting it.
but I thought it's supposed to have a volume control.
Then again, now that I think of it, the similar valve in the shower in the other bathroom turns on then the slider lever below controls the volume.
Hmmmmm ...
 5/22/13, 05:26 PM
#22
Legacy TMS Member
Thread Starter
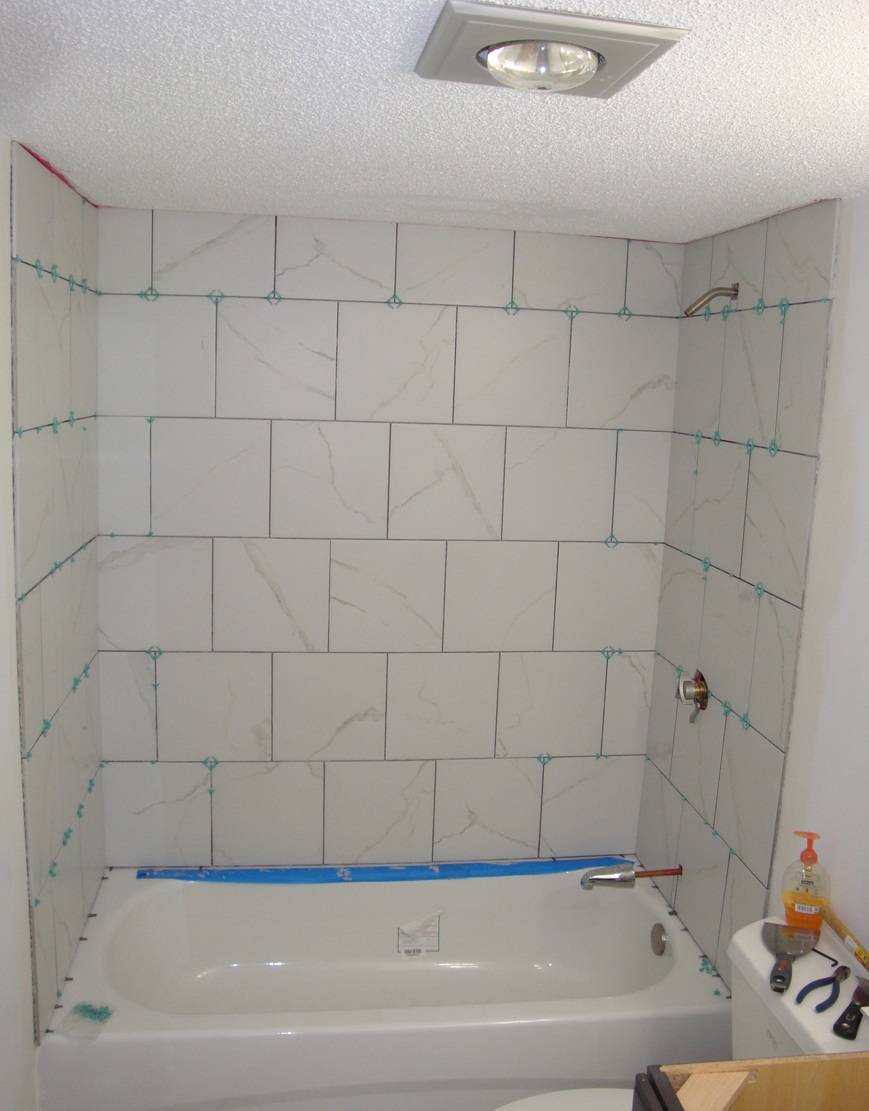
Made some nice progress on the tile. Today I finished installing the large pieces of tile, I just have some paintwork, the grouting, and the trim/edge pieces to install.
5/25/13, 08:12 PM
#23
Legacy TMS Member
Thread Starter
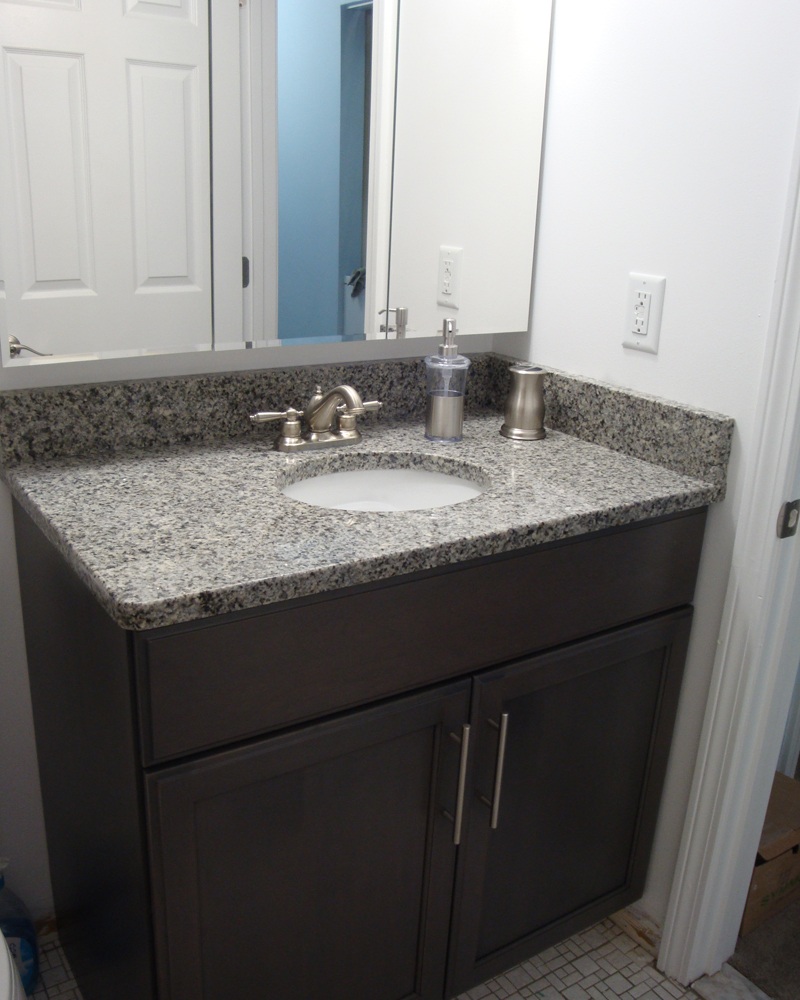
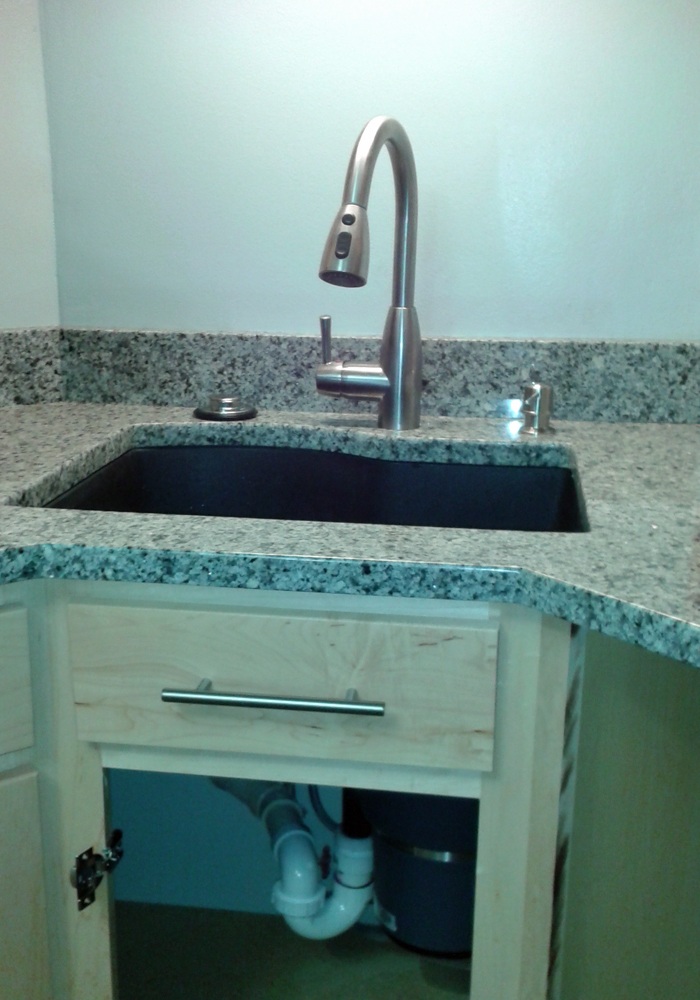
Made more headway today ... hooked up one of the bathroom faucets, installed a new p-trap and hooked it all up. Turned on the water pressure underneath and no leaks. Ran the faucet into a small plastic container to make sure it worked ok.
Can't run water down the sink yet since the sealant I used in-between the drain flange and the sink needs 24 hrs to cure. Couldn't use plumber's putty since the front of the sink hole wasn't perfectly round, it had a gap. The sealant is white so it blends very well into the white of the sink.
But I'm quite happy with how this turned out so far. Can't wait to actually use it!!
Also bought new matching toothbrush holders and liquid-soap dispensers for both bathrooms
5/25/13, 09:03 PM
#24
Mach 1 Member

Very nice, Gabe! Is that vanity top real granite or solid surface material? I've got 30-some running feet of Corian countertop in my kitchen. Still lovin' it after 20 years-- one of the better choices made in building this house.
5/25/13, 09:09 PM
#25
Legacy TMS Member
Thread Starter
5/25/13, 09:30 PM
#26
Legacy TMS Member
Thread Starter
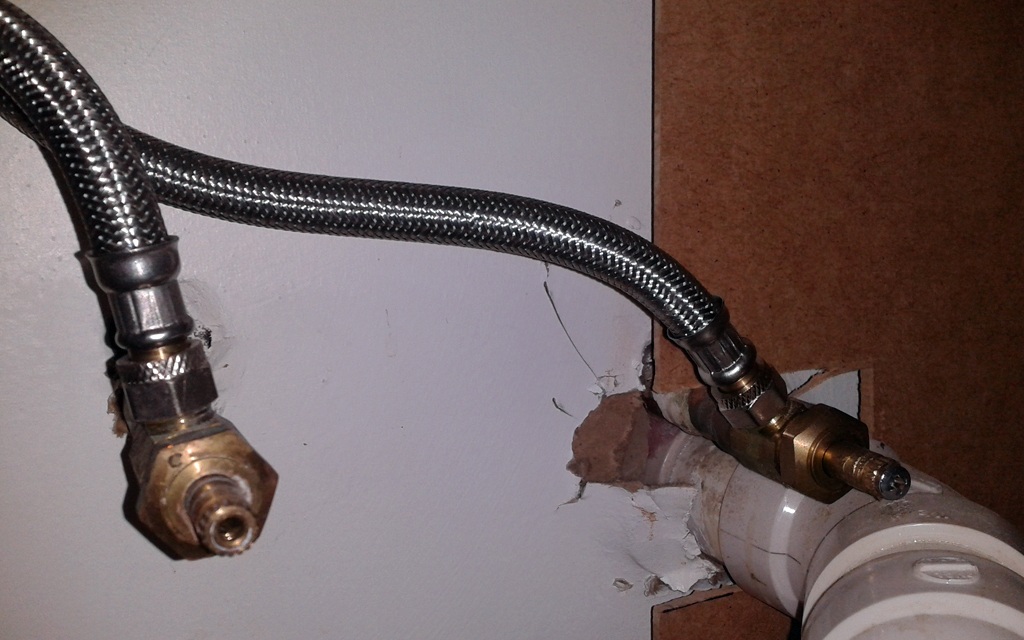
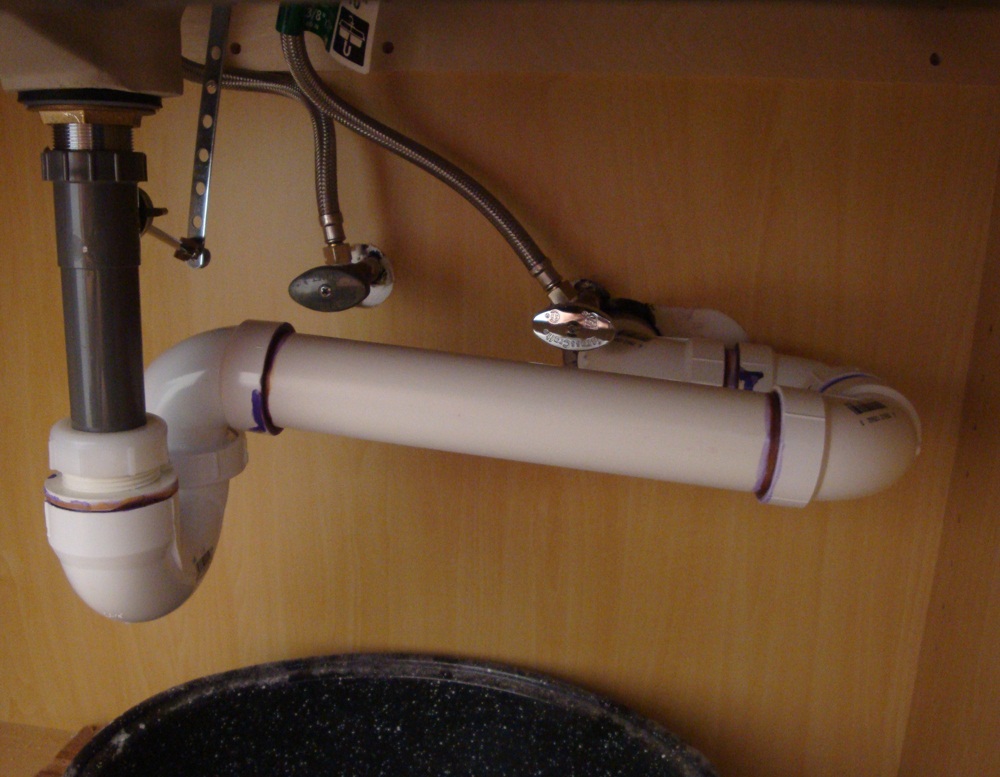
Oh, and I took care of that mess that once was the p-trap/plumbing under the old vanity in this bathroom ... I cut the old PVC pipe very close to the wall, glued on a 90-degree elbow, then some other connections/elbows, then installed a new handle for the water shut-off valve and I now have plenty of room to turn the handle.
Old mess:
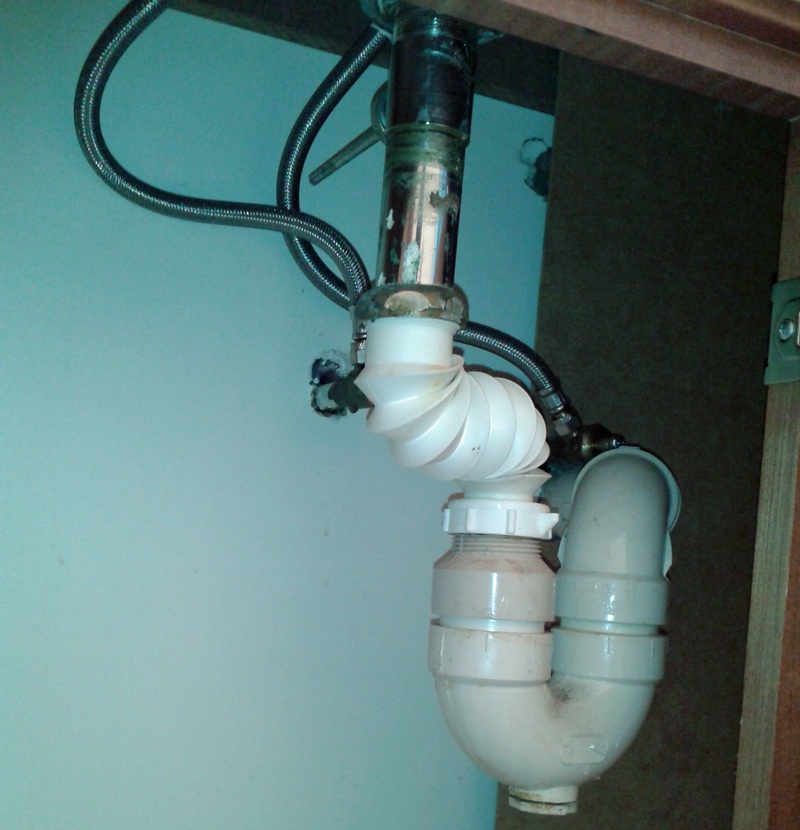
New set-up:
Old mess:
New set-up:
5/26/13, 02:12 AM
#27
Oh, and I took care of that mess that once was the p-trap/plumbing under the old vanity in this bathroom ... I cut the old PVC pipe very close to the wall, glued on a 90-degree elbow, then some other connections/elbows, then installed a new handle for the water shut-off valve and I now have plenty of room to turn the handle.
Old mess:
New set-up:
Old mess:
New set-up:
 5/26/13, 04:53 PM
#29
Legacy TMS Member
Thread Starter
6/12/13, 06:06 AM
#30
Legacy TMS Member
Thread Starter
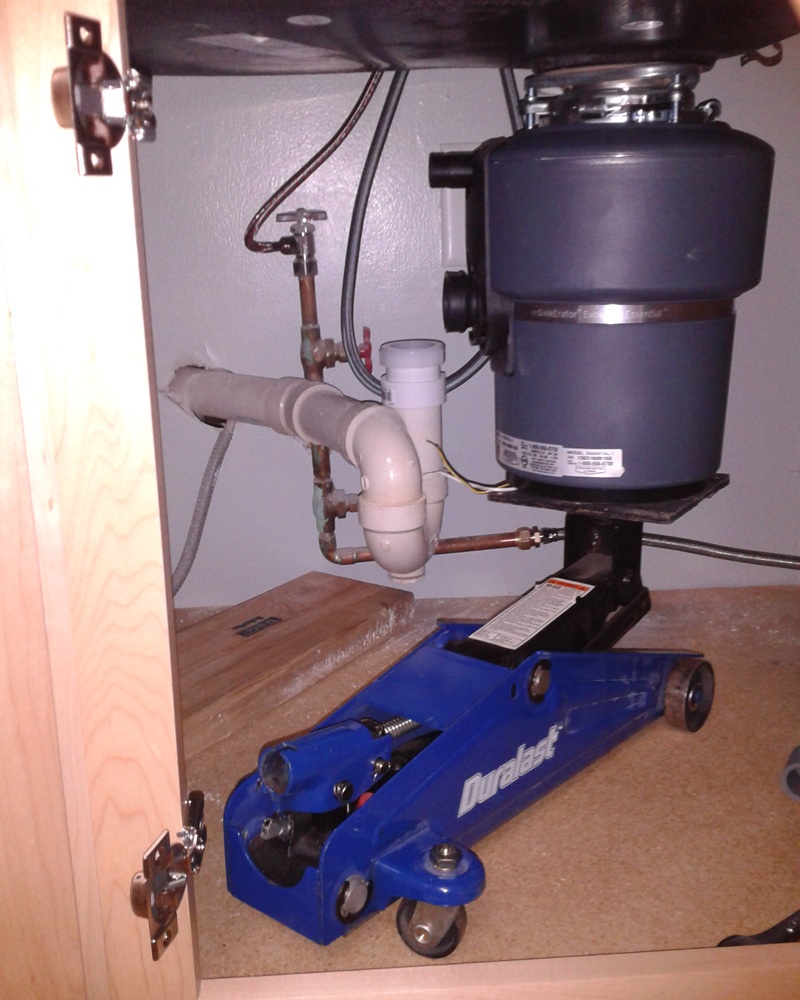
Got to work yesterday installing the new kitchen faucet, new garbage disposal (wow is the new one so much quieter than the old one, I can barely hear it run), new liquid-soap dispenser, and got a lot done toward getting the dishwasher installed.
Between the 2 trips I had to make to Home Depot, having a hard time working under the sink cuz it's in the corner cabinet and the cabinet under it has a tiny door opening, it took me most of the day to get this done, but I'm psyched to have a working kitchen sink again!!
Yes, that's a small automotive floor jack being used to lift up the heavy garbage disposal.
It worked like a charm
6/12/13, 07:37 AM
#32
Legacy TMS Member
Thread Starter
6/12/13, 10:58 AM
#33
Legacy TMS Member
Thread Starter
Just finished installing the dishwasher, and it's already working on its first load
6/12/13, 11:34 AM
#34
Legacy TMS Member
Thread Starter
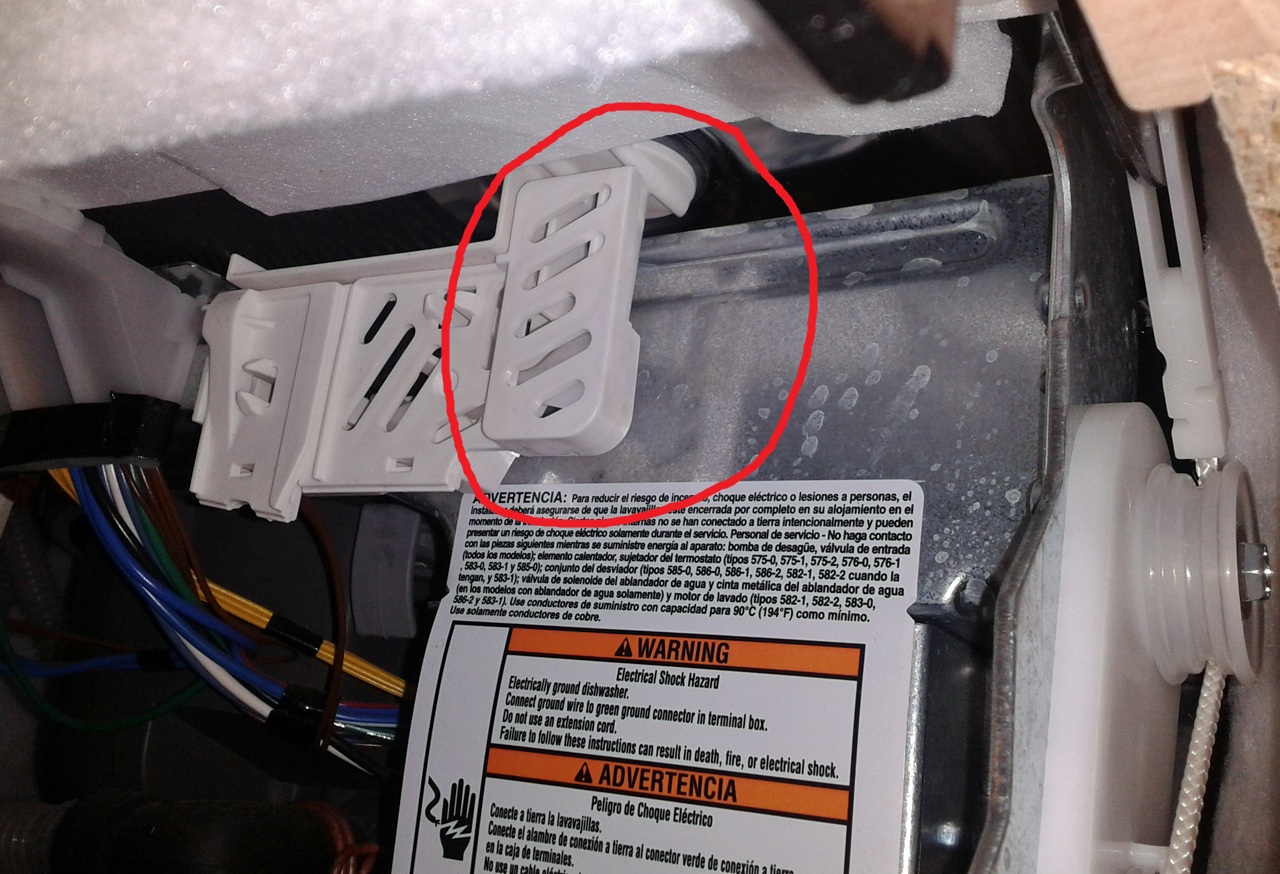
And .... I've got a small leak from the bottom/right of the dishwasher itself.
Leaking soapy water, dripping, from the white plastic piece circled in the pic below, which seems to be connected to a grommet that goes into the dishwasher itself.
Anybody have a clue about how I can stop this leak?
EDIT: Leak slowed down and stopped, all on its own.
Inside that plastic piece there's a rod that activates a cone-shaped piece inside the dishwasher ... not sure what it does, but it's no longer leaking ... I have another load being washed now and no drips .
EDIT #2: Just checked, I see a few drips again.
Uggghhhhhh .....
Last edited by Gabe; 6/12/13 at 02:25 PM.
6/13/13, 10:33 AM
#35
Mach 1 Member
Everything looks to be coming along nicely. Good work on tiling your shower area. Nice colors, and the granite looks great too. Are you for hire, I have a bathroom I need to have done 
6/13/13, 01:54 PM
#36
Legacy TMS Member
Thread Starter
As far as the dishwasher leak, turns out it wasn't level so it was letting the water go forward too much.
Turned the front legs a few turns, got the front about 1/4" higher, no more leak, going on its second leak-free load right now.
6/13/13, 04:59 PM
#39
Legacy TMS Member
Thread Starter
I still have some dripping in the right front, under the overflow.
I think I'll have to adjust the wheels in the back so they sit higher up in the chassis (they have 3 positions) which will allow more backward lean, which I HOPE will finally stop the leaks once and for all.
6/13/13, 06:10 PM
#40
http://www.diychatroom.com helped me with this dishwasher dilemma, which as it turns out is not over yet.
I still have some dripping in the right front, under the overflow.
I think I'll have to adjust the wheels in the back so they sit higher up in the chassis (they have 3 positions) which will allow more backward lean, which I HOPE will finally stop the leaks once and for all.

Thread
Thread Starter
Forum
Replies
Last Post