Retrofitting the 4.2 LCD Track Apps cluster

 5/28/14, 06:42 PM
#42
V6 Member

Join Date: April 2, 2014
Location: CA
Posts: 83
Likes: 0
Received 0 Likes
on
0 Posts
Instruction for LCD Cluster Install
The following directions are for people retro fitting an LCD gauge cluster into a 2011/2012. Attempt this at your own risk, I will not be held responsible for bricked modules or things that goes wrong. If you are unsure, ask the question. Many people have performed this installation with very little instructions. I wrote this just to help people out and make it easier. Like most I have a lot of money invested in my car and accessories, so buying a 2014 GT500 because it has a cool cluster seemed a little expensive. I cannot take responsibility for this modification coming together. I stumbled upon this a few months ago. The pioneers on this are Zeroaviation, dmhines, Jim010, LEXiiON, Ajturbo, and Deerslayer.
You will need a Black Box along with a modified steering wheel cruise control switch from Zeroaviation. Another option is to reprogram you PCM to 2013 firmware. If you do this you will not need a Black Box or modified switch to get Track Apps, all of the gauges and cruise control to function normally. In either case you will need to do some wiring in order to get the left steering wheel switch to work since you will no longer use the buttons located under your headlight switch (Info, Setup, and Reset). Before you do anything, I highly suggest you read through this write up one time before you start.
Parts you will need:
� Your new cluster (BOSS, GT Premium, or Shelby GT500)
� Black Box
� Modified switch � Part Number - SW 6911
� 2013 ABS Module - Part Number - DR3Z 2C210 A
� VCM II (If you want to do PATS and PMI yourself. The unit cost $159 shipped, PATS at a dealer cost $90 alone. I suggest you buy it, it�s a great tool to have) - www.aliexpress.com
It is IMPORTANT to know that you must have the mileage set on your new cluster before you conduct the install and PATS. The reset will erase your PATS. To reset the mileage call the following place, they charge $85 for the service:
United Radio - Automotive Division
5717 Enterprise parkway
E Syracuse
New York
13057
1-800-448-0944
Ask for Bob and tell them what you want (there are a couple of Bobs)
First, let�s make sure you have everything you need in order to be successful and avoid any trips to the hardware store. You�ll need a an 8mm socket, 10mm socket, T15 hex socket, ratchet, socket extension, flat head screwdriver, wire splitters (the kind that allows you to expose the cable by pulling the shielding apart while still plugged in), wire strippers (you can also use the wire strippers for this), 6 feet of 20 gauge wire, extra pins from an old wire harness (you may need to go to a junk yard to source these, I did), and liquid electric tape to put over the taps.
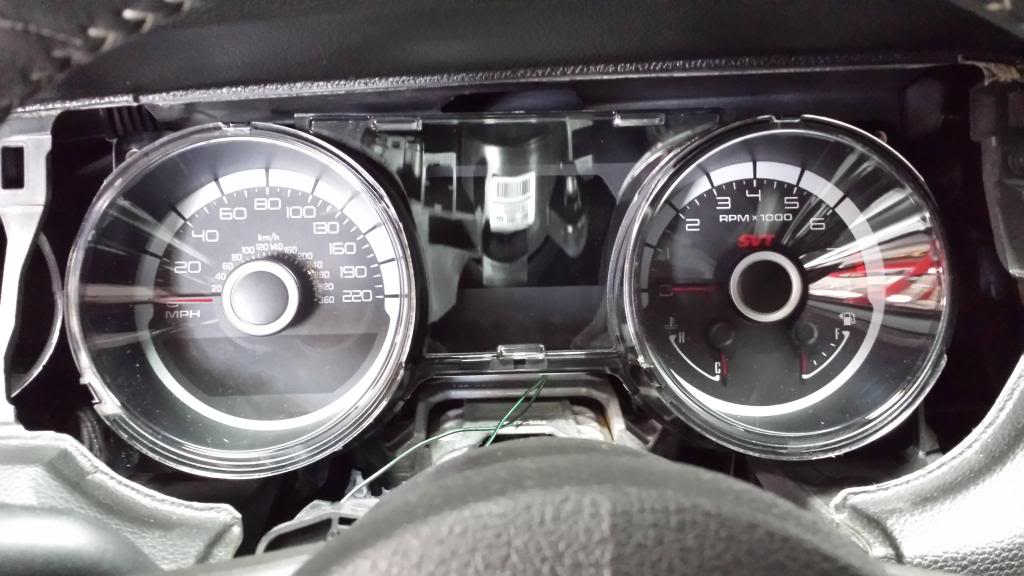
First well perform the installation of the New Cluster and then move onto the Black Box. Lower the steering wheel all the way down. Then remove the dash around the cluster by pulling up on the bottom where the rubber piece is above the steering column. Then pull out and the dash comes off exposing the cluster. The cluster is held in by 2 8mm bolts, one on each corner on top. Pull on the cluster; it will not give initially because there are two clips that hold it up against the dash. The harness is located on the right side as your looking at it in the back. The release for the connector (C220) is on the bottom. Then just tilt the cluster forward and pull it out. Next remove the black plastic cover above the steering column (just pull up and forward as it hooks in the back). The bottom piece has 2 T15 screws. This piece isn�t removed, it�s just lowered (this is where connector C2274A is located, also known as the dashboard side of the clockspring).
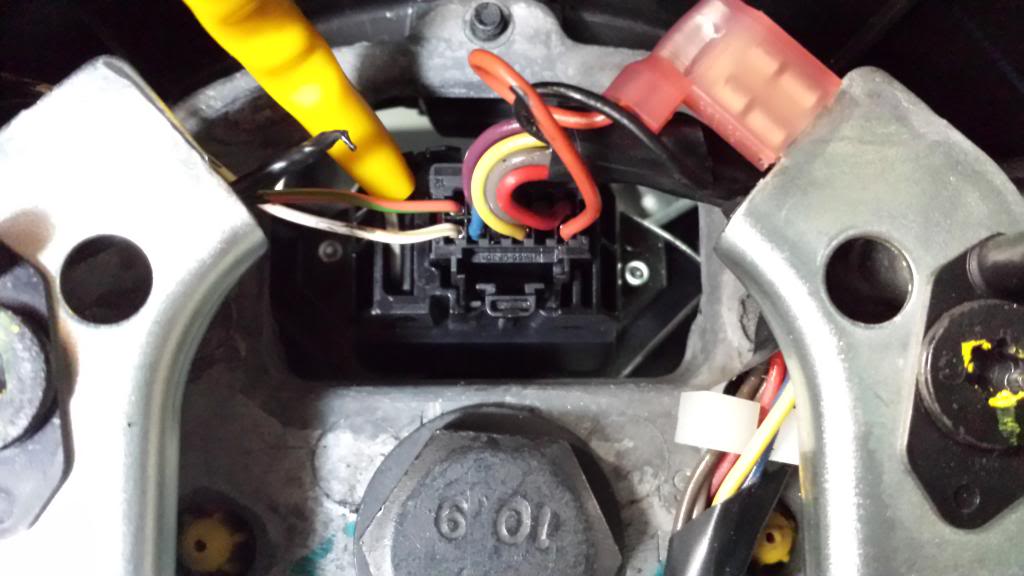
Now it�s time for some splicing. On connector C220 (gauge cluster connector) you want to find the wire coming out of Pin #6, it is a Green wire with a Purple stripe (this is the message signal wire). Tap into this wire by using the cable splitters. Attach a piece of 20 gauge wire 22 inches long. Put liquid electric tape where you made the tap to prevent grounding out the wire. Attach a pin to the other end and run that wire to the clockspring in the steering wheel, insert it into slot number 3 (slot is empty and the connectors are all numbered on the corners) on connector C2274A which is located under the steering wheel. Before you can plug your new pin in, you must unplug the connector and remove the red plastic cover on the front of it that helps secure the pins in place on the connector. Leave it off until you have plugged in both taps from the back of the cluster.
Now the message return wire needs to be done. Now go back to the connector that connects to the gauge cluster C220. Find the wire coming from Pin #4, it is a White wire with Brown stripe, tap into it. Just like you did the other one with a 22 inch long piece of wire and attach another pin to the other end. Run that wire from the tap to the connector on the clockspring C2274A on the underside of the steering column, plug it into slot #11 (this slot is empty).
You are now halfway done with the cluster install at this point and can put your new cluster in and secure it with the 2 8mm bolts. Make sure you are careful not to damage or disconnect the 2 taps (check picture). Reinstall the dash plastic on top of the cluster. Now, make sure the red plastic cap is on the clockspring connector C2274A that you installed the two taps into and reinstall it. Now reinstall the black plastic that goes under the steering column with the two T15 screws. Now reattach the black plastic that goes on top of the steering column.
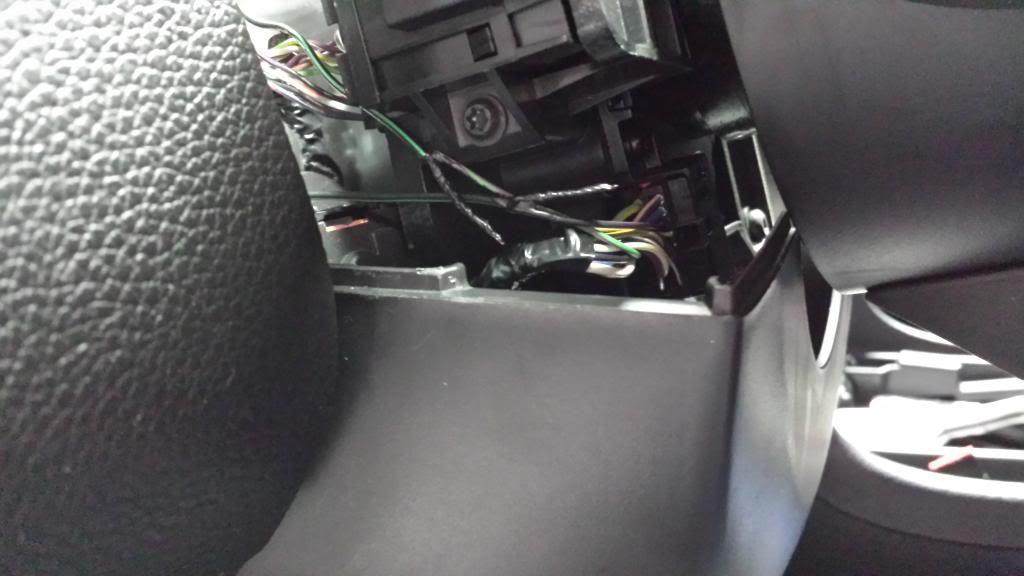
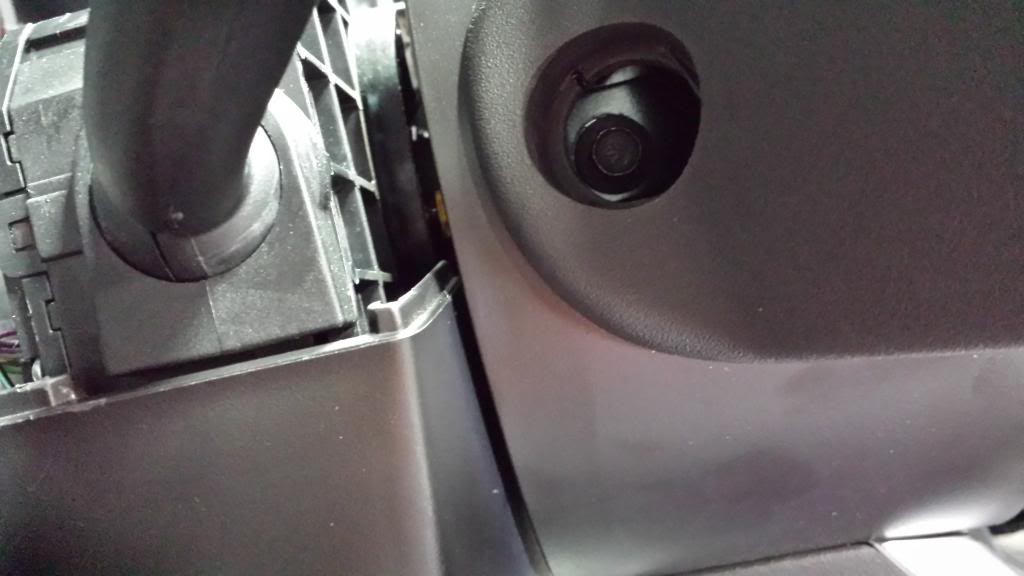
Now it is time to remove the airbag, install the modified switch, and make two new connections. Sounds harder than it is, takes no time at all. People might say disconnect the negative battery terminal before you do this, but I didn�t. Do what makes you feel more comfortable. On either side of the steering wheel there is a plug (reference picture) and behind it is a 10mm bolt. Remove both bolts and pull off the airbag. Leave it connected and place it on top of the steering wheel (everything in this write up will make more sense once you are doing it). The connector on the clockspring is C2274B and you are going to place two new pins in here that you will run to the new left side steering wheel switch with the OK button (reference picture).
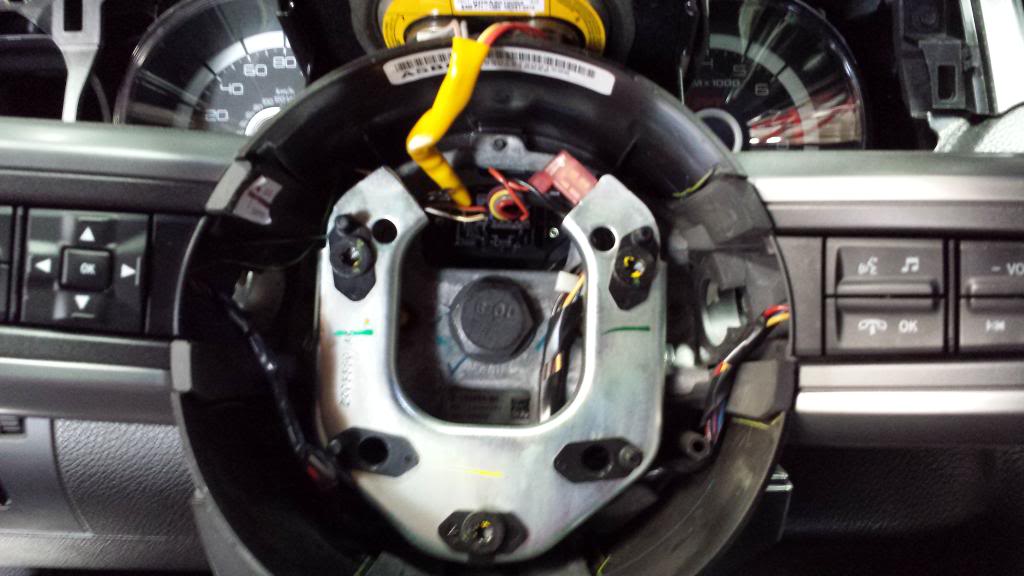
Remove the old steering wheel switch by disconnecting it and sliding it out. Insert your new modified switch, make sure it goes in properly. Now take two 9 inch pieces of 20 gauge wire, strip off both ends and attach new pins (it should be noted that the pins in clockspring connector C2274B and the pins in the steering wheel switch connector C2998 are different, so make sure you have then before you start. They are shorter). On the steering wheel switch connector C2998, move pin #2 to position #1 (this is for cruise control). On the steering wheel side of the clockspring, on connector C2274B, you will insert a pin into slot #6 (it will be empty). The other end of this wire will be inserted into the #2 slot of the steering wheel connector C2998. Now insert the other wire that you pinned into slot #12 (will be empty) on connector C2274B of the clockspring. Run that wire to the steering wheel switch connector C2998 and insert it into slot #3 (will be empty).
Message center button should now work. Disconnect the message center buttons on the headlight switch module. Just disconnect it from the back. It will no longer be used. You may want to get the 2013 headlight switch module which blanks out the message center buttons. Insert the airbag back in and make sure not to damage the two wires you ran. Insert the two 10mm bolt and covers on either said of the steering column. Your cluster will now work and there will be no DTC codes, you can manipulate the LCD screen. You will not have functional Track Apps unless you install a 2013 ABS Module and PMI it with a VCM II (If you purchased it) Without the Black Box the only value that your gauges will read in the LCD is Volts (If you are upgrading a GT500 you will have Boost and Volts only). Once you have installed the Black Box all gauge appropriate to the cluster you have installed (GT500, BOSS or GT Premium) will work.
STOP HERE IF YOU ARE GOING TO FLASH YOUR PCM TO 2013 AND SKIP DOWN TO ABS MODULE INSTALL.
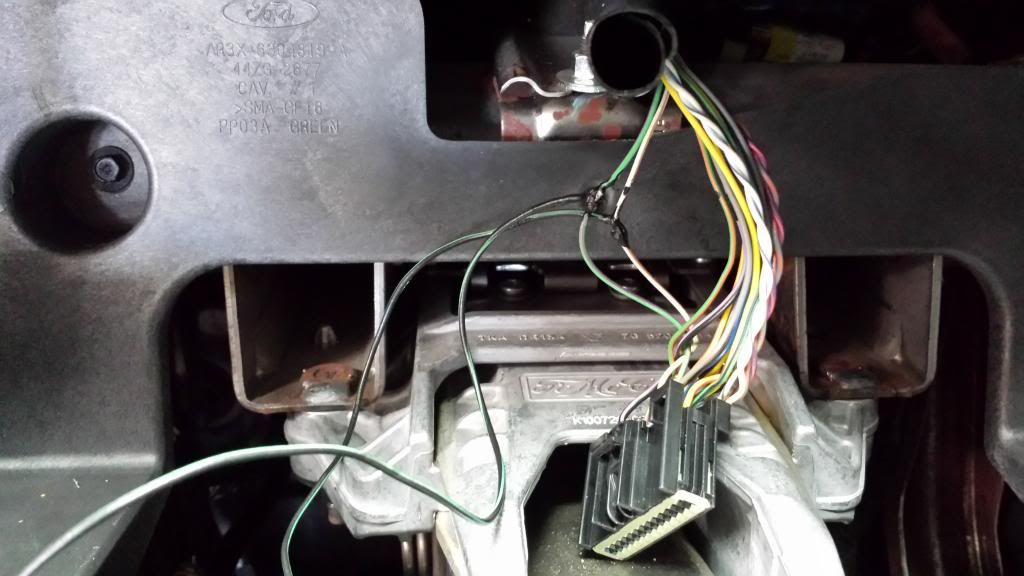
The best place to install your Black Box will be in the center counsel so you have access to the CAN signals that run into the Restraint Control Module (RCM). Remove you center counsel, by lifting from the end closest to the rear sets and lift up. If you don�t know or haven�t noticed yet, these cars are all held together by clips�. Disconnect the two connectors located under the cup holder. Then disconnect the connector that is attached to your traction control button and trunk release. You can now rotate the center counsel out of the way and work freely. The Restraint Control Module is located near the location of your USB and AUX port (it says RCM on it, see picture).

The Black Box will come fully wired with 4 wires:
� Red = Power from RCM
� Black = Ground (bolt that holds down the RCM)
� Yellow = which is CAN H
� White = which is CAN L
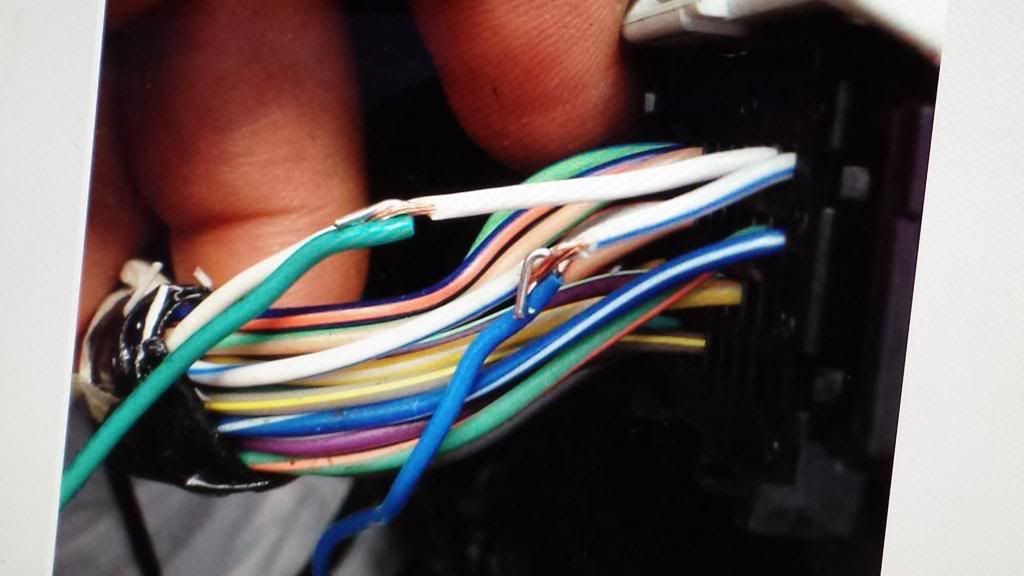
You will ground the Black wire onto the bolt that hold down the RCM. This is a 10mm bolt. Next you will tap your White wire from the Black Box into the ALL WHITE wire coming out of the RCM module (reference picture). Put liquid electrical tape on it. Now tap your Yellow wire coming from the lack box into the WHITE WIRE WITH BLUE STRIP coming out of the RCM module. Once you splice it and tap it, put some liquid electrical tape on it. Next you will tap your Red wire into the power wire coming out of the RCM which is
IN THIS PICTURE GREEN REPRESENTS YOUR WHITE WIRE AND BLUE REPRESENTS YOUR YELLOW WIRE.
Once your done taping into the power of the RCM, make sure your switch on the Black Box is on R = run (P = Program for updates). Now turn your car on and all of the gauge should display a value. You are now done, just tuck the black box deep in the back of the center counsel, reinstall the connectors you uninstalled and put the top of the center counsel back on by pushing the clips back in starting from the stereo and working your way back.
PICKUP HERE IF YOU FLASHED YOUR PCM. THIS IS PATS AND ABS MODULE INSTALL.
If you haven�t performed PATS yet, then your car isn�t going to start and this is the time to do it. Since you are at this point of the install I awesome you bought a VCM II and are going to do the PATS yourself. PATS will take you about 30 minutes to perform. You will need two keys to perform PATS successfully. Once you have successfully installed IDS and the patch that comes with your VCM II. (The VCM II that you buy will only work with the version of IDS that it came with) Connect the VCM II to your computer (via the USB) and start IDS. Connect the VCM II to the car via the OBD II port. In the IDS menu Go to Vehicles then All Other. IDS will ask you to confirm your vehicle and VIN number. Click on the check mark (Consider this the enter button on IDS). Once you confirm you will have the main menu at your disposal. Now go to Body, then Security, then PATS Function. It will ask you if you have two keys check enter. Then it will ask tell you that it will take 10 minutes to gain access to PATS, check enter and wait 10 minutes. Once you have access, you need to erase all keys associated with the cluster. During the process you will have to insert one key and turn it to the on position for 6 second and then do the same with the other key. Once done you will be kicked out of PATS and have to re access it again (this means waiting 10 minutes again gain access). Once you have gained access click on Reset Parameters. Click enter on whatever menus come up and once done it will return you to the security access page. At this point you are done and should be able to start your vehicle.
Now you are done, but if you want to have working Track Apps you will need to install the 2013 ABS Module in order to get them to work. The Module is located under the air box. Remove the air box to access the module. Disconnect the harness on the module. There are 4 screws that are T15 holding the module to the actual abs. These screws strip very easily so be careful when removing them. In fact I replaced mine with Hex Cap screws that were 7mm for ease of removal in the future, just in case. Your module will come with 4 new T15 screws if you bought it new from a dealer because they know that these screws are junk. Remove the 4 screws and pull off the old module. Install the new module and screw in the 4 screws to secure it. Reinstall the wire harness to the abs module and reinstall the air box.
THIS WRITE UP IS A WORK IN PROGRESS, IT WILL BE UPDATED AS I GET MORE DONE WITH THIS.
You will need a Black Box along with a modified steering wheel cruise control switch from Zeroaviation. Another option is to reprogram you PCM to 2013 firmware. If you do this you will not need a Black Box or modified switch to get Track Apps, all of the gauges and cruise control to function normally. In either case you will need to do some wiring in order to get the left steering wheel switch to work since you will no longer use the buttons located under your headlight switch (Info, Setup, and Reset). Before you do anything, I highly suggest you read through this write up one time before you start.
Parts you will need:
� Your new cluster (BOSS, GT Premium, or Shelby GT500)
� Black Box
� Modified switch � Part Number - SW 6911
� 2013 ABS Module - Part Number - DR3Z 2C210 A
� VCM II (If you want to do PATS and PMI yourself. The unit cost $159 shipped, PATS at a dealer cost $90 alone. I suggest you buy it, it�s a great tool to have) - www.aliexpress.com
It is IMPORTANT to know that you must have the mileage set on your new cluster before you conduct the install and PATS. The reset will erase your PATS. To reset the mileage call the following place, they charge $85 for the service:
United Radio - Automotive Division
5717 Enterprise parkway
E Syracuse
New York
13057
1-800-448-0944
Ask for Bob and tell them what you want (there are a couple of Bobs)
First, let�s make sure you have everything you need in order to be successful and avoid any trips to the hardware store. You�ll need a an 8mm socket, 10mm socket, T15 hex socket, ratchet, socket extension, flat head screwdriver, wire splitters (the kind that allows you to expose the cable by pulling the shielding apart while still plugged in), wire strippers (you can also use the wire strippers for this), 6 feet of 20 gauge wire, extra pins from an old wire harness (you may need to go to a junk yard to source these, I did), and liquid electric tape to put over the taps.
First well perform the installation of the New Cluster and then move onto the Black Box. Lower the steering wheel all the way down. Then remove the dash around the cluster by pulling up on the bottom where the rubber piece is above the steering column. Then pull out and the dash comes off exposing the cluster. The cluster is held in by 2 8mm bolts, one on each corner on top. Pull on the cluster; it will not give initially because there are two clips that hold it up against the dash. The harness is located on the right side as your looking at it in the back. The release for the connector (C220) is on the bottom. Then just tilt the cluster forward and pull it out. Next remove the black plastic cover above the steering column (just pull up and forward as it hooks in the back). The bottom piece has 2 T15 screws. This piece isn�t removed, it�s just lowered (this is where connector C2274A is located, also known as the dashboard side of the clockspring).
Now it�s time for some splicing. On connector C220 (gauge cluster connector) you want to find the wire coming out of Pin #6, it is a Green wire with a Purple stripe (this is the message signal wire). Tap into this wire by using the cable splitters. Attach a piece of 20 gauge wire 22 inches long. Put liquid electric tape where you made the tap to prevent grounding out the wire. Attach a pin to the other end and run that wire to the clockspring in the steering wheel, insert it into slot number 3 (slot is empty and the connectors are all numbered on the corners) on connector C2274A which is located under the steering wheel. Before you can plug your new pin in, you must unplug the connector and remove the red plastic cover on the front of it that helps secure the pins in place on the connector. Leave it off until you have plugged in both taps from the back of the cluster.
Now the message return wire needs to be done. Now go back to the connector that connects to the gauge cluster C220. Find the wire coming from Pin #4, it is a White wire with Brown stripe, tap into it. Just like you did the other one with a 22 inch long piece of wire and attach another pin to the other end. Run that wire from the tap to the connector on the clockspring C2274A on the underside of the steering column, plug it into slot #11 (this slot is empty).
You are now halfway done with the cluster install at this point and can put your new cluster in and secure it with the 2 8mm bolts. Make sure you are careful not to damage or disconnect the 2 taps (check picture). Reinstall the dash plastic on top of the cluster. Now, make sure the red plastic cap is on the clockspring connector C2274A that you installed the two taps into and reinstall it. Now reinstall the black plastic that goes under the steering column with the two T15 screws. Now reattach the black plastic that goes on top of the steering column.
Now it is time to remove the airbag, install the modified switch, and make two new connections. Sounds harder than it is, takes no time at all. People might say disconnect the negative battery terminal before you do this, but I didn�t. Do what makes you feel more comfortable. On either side of the steering wheel there is a plug (reference picture) and behind it is a 10mm bolt. Remove both bolts and pull off the airbag. Leave it connected and place it on top of the steering wheel (everything in this write up will make more sense once you are doing it). The connector on the clockspring is C2274B and you are going to place two new pins in here that you will run to the new left side steering wheel switch with the OK button (reference picture).
Remove the old steering wheel switch by disconnecting it and sliding it out. Insert your new modified switch, make sure it goes in properly. Now take two 9 inch pieces of 20 gauge wire, strip off both ends and attach new pins (it should be noted that the pins in clockspring connector C2274B and the pins in the steering wheel switch connector C2998 are different, so make sure you have then before you start. They are shorter). On the steering wheel switch connector C2998, move pin #2 to position #1 (this is for cruise control). On the steering wheel side of the clockspring, on connector C2274B, you will insert a pin into slot #6 (it will be empty). The other end of this wire will be inserted into the #2 slot of the steering wheel connector C2998. Now insert the other wire that you pinned into slot #12 (will be empty) on connector C2274B of the clockspring. Run that wire to the steering wheel switch connector C2998 and insert it into slot #3 (will be empty).
Message center button should now work. Disconnect the message center buttons on the headlight switch module. Just disconnect it from the back. It will no longer be used. You may want to get the 2013 headlight switch module which blanks out the message center buttons. Insert the airbag back in and make sure not to damage the two wires you ran. Insert the two 10mm bolt and covers on either said of the steering column. Your cluster will now work and there will be no DTC codes, you can manipulate the LCD screen. You will not have functional Track Apps unless you install a 2013 ABS Module and PMI it with a VCM II (If you purchased it) Without the Black Box the only value that your gauges will read in the LCD is Volts (If you are upgrading a GT500 you will have Boost and Volts only). Once you have installed the Black Box all gauge appropriate to the cluster you have installed (GT500, BOSS or GT Premium) will work.
STOP HERE IF YOU ARE GOING TO FLASH YOUR PCM TO 2013 AND SKIP DOWN TO ABS MODULE INSTALL.
The best place to install your Black Box will be in the center counsel so you have access to the CAN signals that run into the Restraint Control Module (RCM). Remove you center counsel, by lifting from the end closest to the rear sets and lift up. If you don�t know or haven�t noticed yet, these cars are all held together by clips�. Disconnect the two connectors located under the cup holder. Then disconnect the connector that is attached to your traction control button and trunk release. You can now rotate the center counsel out of the way and work freely. The Restraint Control Module is located near the location of your USB and AUX port (it says RCM on it, see picture).
The Black Box will come fully wired with 4 wires:
� Red = Power from RCM
� Black = Ground (bolt that holds down the RCM)
� Yellow = which is CAN H
� White = which is CAN L
You will ground the Black wire onto the bolt that hold down the RCM. This is a 10mm bolt. Next you will tap your White wire from the Black Box into the ALL WHITE wire coming out of the RCM module (reference picture). Put liquid electrical tape on it. Now tap your Yellow wire coming from the lack box into the WHITE WIRE WITH BLUE STRIP coming out of the RCM module. Once you splice it and tap it, put some liquid electrical tape on it. Next you will tap your Red wire into the power wire coming out of the RCM which is
IN THIS PICTURE GREEN REPRESENTS YOUR WHITE WIRE AND BLUE REPRESENTS YOUR YELLOW WIRE.
Once your done taping into the power of the RCM, make sure your switch on the Black Box is on R = run (P = Program for updates). Now turn your car on and all of the gauge should display a value. You are now done, just tuck the black box deep in the back of the center counsel, reinstall the connectors you uninstalled and put the top of the center counsel back on by pushing the clips back in starting from the stereo and working your way back.
PICKUP HERE IF YOU FLASHED YOUR PCM. THIS IS PATS AND ABS MODULE INSTALL.
If you haven�t performed PATS yet, then your car isn�t going to start and this is the time to do it. Since you are at this point of the install I awesome you bought a VCM II and are going to do the PATS yourself. PATS will take you about 30 minutes to perform. You will need two keys to perform PATS successfully. Once you have successfully installed IDS and the patch that comes with your VCM II. (The VCM II that you buy will only work with the version of IDS that it came with) Connect the VCM II to your computer (via the USB) and start IDS. Connect the VCM II to the car via the OBD II port. In the IDS menu Go to Vehicles then All Other. IDS will ask you to confirm your vehicle and VIN number. Click on the check mark (Consider this the enter button on IDS). Once you confirm you will have the main menu at your disposal. Now go to Body, then Security, then PATS Function. It will ask you if you have two keys check enter. Then it will ask tell you that it will take 10 minutes to gain access to PATS, check enter and wait 10 minutes. Once you have access, you need to erase all keys associated with the cluster. During the process you will have to insert one key and turn it to the on position for 6 second and then do the same with the other key. Once done you will be kicked out of PATS and have to re access it again (this means waiting 10 minutes again gain access). Once you have gained access click on Reset Parameters. Click enter on whatever menus come up and once done it will return you to the security access page. At this point you are done and should be able to start your vehicle.
Now you are done, but if you want to have working Track Apps you will need to install the 2013 ABS Module in order to get them to work. The Module is located under the air box. Remove the air box to access the module. Disconnect the harness on the module. There are 4 screws that are T15 holding the module to the actual abs. These screws strip very easily so be careful when removing them. In fact I replaced mine with Hex Cap screws that were 7mm for ease of removal in the future, just in case. Your module will come with 4 new T15 screws if you bought it new from a dealer because they know that these screws are junk. Remove the 4 screws and pull off the old module. Install the new module and screw in the 4 screws to secure it. Reinstall the wire harness to the abs module and reinstall the air box.
THIS WRITE UP IS A WORK IN PROGRESS, IT WILL BE UPDATED AS I GET MORE DONE WITH THIS.
6/13/14, 02:33 AM
#43
Member

Join Date: August 11, 2012
Posts: 44
Likes: 0
Received 0 Likes
on
0 Posts
Thank you everyone who contributed to this upgrade for the Base GT Owners. Last night I got the cluster installed and did the PATS. Tonight, after playing around with VCM2 I finally got the Track Apps enabled in my 2013 Base GT. But, stupid *** me enabled one of the keys to be a MyKey which disables the Track Apps with that key. Now I can't find my other key which doesn't My Key on it.
6/17/14, 12:58 PM
#47
Jim010,
Do you happen to have the part numbers for your 4 gauge cluster, as well as the new cluster?
I was talking with someone at a dealership that I trust about this swap, and shared this thread. He was interested in the part numbers, as he said that he could order the cluster, but there were several choices but no detailed descriptions (other than "gauge cluster"), except for one listed as "gauge cluster - 4 gauge", which we are assuming is the base one my car came with (2014 Base GT, Manual Trans, Track Pack w Recaros).
If you have your old and new cluster part numbers recorded anywhere, that would help me out. Great thread by the way.
--Springer
6/17/14, 01:32 PM
#48
Legacy TMS Member
Thread Starter
I'll have to get back to you. I bought mine used from a wrecker, so I don't know what part number it is, but I may be able to get that.
There are some guys on the other thread that did order their clusters, though. You could also ask them the part number they used.
I know that the differences are whether they are metric or imperial, Boss, Shelby or premium (LCD) and base. There are 8 choices based on this, I think.
There are some guys on the other thread that did order their clusters, though. You could also ask them the part number they used.
I know that the differences are whether they are metric or imperial, Boss, Shelby or premium (LCD) and base. There are 8 choices based on this, I think.
6/17/14, 03:24 PM
#49
V6 Member
Join Date: April 2, 2014
Location: CA
Posts: 83
Likes: 0
Received 0 Likes
on
0 Posts
Jim010,
Do you happen to have the part numbers for your 4 gauge cluster, as well as the new cluster?
I was talking with someone at a dealership that I trust about this swap, and shared this thread. He was interested in the part numbers, as he said that he could order the cluster, but there were several choices but no detailed descriptions (other than "gauge cluster"), except for one listed as "gauge cluster - 4 gauge", which we are assuming is the base one my car came with (2014 Base GT, Manual Trans, Track Pack w Recaros).
If you have your old and new cluster part numbers recorded anywhere, that would help me out. Great thread by the way.
--Springer
Do you happen to have the part numbers for your 4 gauge cluster, as well as the new cluster?
I was talking with someone at a dealership that I trust about this swap, and shared this thread. He was interested in the part numbers, as he said that he could order the cluster, but there were several choices but no detailed descriptions (other than "gauge cluster"), except for one listed as "gauge cluster - 4 gauge", which we are assuming is the base one my car came with (2014 Base GT, Manual Trans, Track Pack w Recaros).
If you have your old and new cluster part numbers recorded anywhere, that would help me out. Great thread by the way.
--Springer
Just go on eBay and find a 5.0 that has an LCD cluster and give the dealer that VIN. They'll be able to pull up the right one.
6/17/14, 09:38 PM
#50
Member
Join Date: August 11, 2012
Posts: 44
Likes: 0
Received 0 Likes
on
0 Posts
Ford part numbers are weird. The part numbers are the same for all the clusters of a particular year whether you have a 4 gauge cluster or LCD. Since you know someone at the dealership, just have him input a VIN of a Mustang GT premium on the lot and it narrows down the selection to the LCD cluster. If you want a cluster from a 14 GT Premium built after July 1, 2013, get the VIN and print a window sticker. The numbers on the bottom right hand corner will tell you the build date.
6/24/14, 08:45 AM
#51
Member
Join Date: April 19, 2014
Location: New Jersey
Posts: 36
Likes: 0
Received 0 Likes
on
0 Posts
Ford part numbers are weird. The part numbers are the same for all the clusters of a particular year whether you have a 4 gauge cluster or LCD. Since you know someone at the dealership, just have him input a VIN of a Mustang GT premium on the lot and it narrows down the selection to the LCD cluster. If you want a cluster from a 14 GT Premium built after July 1, 2013, get the VIN and print a window sticker. The numbers on the bottom right hand corner will tell you the build date.
Anyway, here is the part number (from a friend at a dealer I used to work at) for the cluster DR3Z-10849-EA, and the ID# is DR33-10849-EA, or DR33-10849-EB.
Quick lesson on Ford part numbers, if you care to know what they mean.
There is a base number, usually 4+ numbers occasionally with a character in the middle somewhere that specifies the type of part it is (i.e. headlight, fog light, instrument cluster, etc.)
Then, there is a 4 character prefix, usually a mixture of letters and numbers that specify the vehicle model and year.
Finally, there is the 1 to 3 character suffix, usually letters that specify the vehicle trim options.
Now, the ID#'s are setup exactly the same, but are more specific. The prefix helps determine if something for that model/part changed halfway through the year, and the suffix helps if there are a bunch of different trim level options for a specific model.
Breakdown of the part # above:
Prefix - DR3Z - 2014 Mustang (Should be the same on most 2014 Mustang parts)
Base - 10849 - Instrument Cluster (Same for all Ford Clusters)
Suffix - EA - Premium Trim Option
Breakdown of the ID#'s above:
Prefix - DR33 - 2014 Mustang built after 7/1/2013
Base - 10849 - Instrument Cluster (Same as part number, no change)
Suffix - EA/EB - Premium Trim Option V6/GT
So if you want a late model build 2014 Premium Cluster you need part # DR3Z-10849-EA and the cluster ID# DR33-10849-EA or DR33-10849-EB. EA or EB really shouldn't matter for you because I believe the V6 and GT premium clusters are exactly the same.
6/24/14, 09:31 AM
#53

Breakdown of the part # above:
Prefix - DR3Z - 2014 Mustang (Should be the same on most 2014 Mustang parts)
Base - 10849 - Instrument Cluster (Same for all Ford Clusters)
Suffix - EA - Premium Trim Option
Breakdown of the ID#'s above:
Prefix - DR33 - 2014 Mustang built after 7/1/2013
Base - 10849 - Instrument Cluster (Same as part number, no change)
Suffix - EA/EB - Premium Trim Option V6/GT
6/24/14, 11:42 AM
#54
Member
Join Date: April 19, 2014
Location: New Jersey
Posts: 36
Likes: 0
Received 0 Likes
on
0 Posts
Hey, thanks for this info. Not to hijack because I think it's relevant here too, how do you use this information to determine part interchangeability? That is, the part may be exactly the same from one year to another but the number will be different; any way to tell if it fits your particular application?

This info comes from a few years being a parts monkey at a dealer sorting all the parts on the shelves, and many more years of being friends with the guys who still work in the dealer.
It gets kind of difficult past what I've already explained because there are actually quite a few parts that don't abide by my earlier explanation, and these parts crossover years, models, and even makes (i.e. ford, lincoln, mercury, heck even mazda, land rover, and jaguar when they owned all of them).
But I digress, long story short, these forums and threads like these are how we figure out compatibility.
 7/15/14, 03:32 PM
#55
Member

Join Date: July 10, 2014
Location: Northern California
Posts: 31
Likes: 0
Received 0 Likes
on
0 Posts
New to the group and I apologize if this has already been asked and answered. I have a 2012 GT Track Pack and am converting to the 2014 instrument cluster with the track apps. I have already ordered the new cluster, the ABS module, and the new button for my steering wheel (I already upgraded the steering wheel).
My question is this, I understand that I need to purchase a VCM II and need as built data to manually enter but, based on my research, it appears that I need to have a subscription to Ford's IDS system? Is this correct? Also, I am assuming that purchasing an aftermarket VCM II will work just as well as the Bosch one? I am in Northern California, any help/advice would be greatly appreciated!!! Thanks! Mike
My question is this, I understand that I need to purchase a VCM II and need as built data to manually enter but, based on my research, it appears that I need to have a subscription to Ford's IDS system? Is this correct? Also, I am assuming that purchasing an aftermarket VCM II will work just as well as the Bosch one? I am in Northern California, any help/advice would be greatly appreciated!!! Thanks! Mike
7/15/14, 05:34 PM
#56
V6 Member
Join Date: April 2, 2014
Location: CA
Posts: 83
Likes: 0
Received 0 Likes
on
0 Posts
New to the group and I apologize if this has already been asked and answered. I have a 2012 GT Track Pack and am converting to the 2014 instrument cluster with the track apps. I have already ordered the new cluster, the ABS module, and the new button for my steering wheel (I already upgraded the steering wheel).
My question is this, I understand that I need to purchase a VCM II and need as built data to manually enter but, based on my research, it appears that I need to have a subscription to Ford's IDS system? Is this correct? Also, I am assuming that purchasing an aftermarket VCM II will work just as well as the Bosch one? I am in Northern California, any help/advice would be greatly appreciated!!! Thanks! Mike
My question is this, I understand that I need to purchase a VCM II and need as built data to manually enter but, based on my research, it appears that I need to have a subscription to Ford's IDS system? Is this correct? Also, I am assuming that purchasing an aftermarket VCM II will work just as well as the Bosch one? I am in Northern California, any help/advice would be greatly appreciated!!! Thanks! Mike
Where in NorCal are you? If your willing to make the trip to my location I could help you out and save you the purchase of the VCM II tool and install it for you. PM if your interested.
7/15/14, 11:15 PM
#57
Member
Join Date: July 10, 2014
Location: Northern California
Posts: 31
Likes: 0
Received 0 Likes
on
0 Posts
7/21/14, 05:59 PM
#58
Member

Join Date: July 8, 2014
Location: DALY CITY,CA
Posts: 8
Likes: 0
Received 0 Likes
on
0 Posts
Has anyone done this to a '13/'14 base GT yet?
I'm researching doing this to my '14 GT and I am just trying to figure out how involved it is going to be. I would like to do as much as possible to save some $$ before having to bring it to the dealer for PATS.
Also, if I do all this work at home, will I be able to drive it to the dealer to have them perform PATS on it?
7/21/14, 06:05 PM
#59
Member
Join Date: July 8, 2014
Location: DALY CITY,CA
Posts: 8
Likes: 0
Received 0 Likes
on
0 Posts
Did you get track key yet? Does paperwork ask for VIN or PCM code? They may only ask for VIN to verify build date and compatibility. I do not believe there is any difference between 2013 and 2014 part numbers or PCM codes.
You may also need more than just IDS to install track key. I thought I read you need oasis login also.
You may also need more than just IDS to install track key. I thought I read you need oasis login also.
7/21/14, 06:23 PM
#60
Member
Join Date: July 8, 2014
Location: DALY CITY,CA
Posts: 8
Likes: 0
Received 0 Likes
on
0 Posts
Well, this isn't completely true. While yes the part numbers are weird and are the same for the same MY, it's the cluster ID# that determines the right cluster for a specific MY, trim, etc.
Anyway, here is the part number (from a friend at a dealer I used to work at) for the cluster DR3Z-10849-EA, and the ID# is DR33-10849-EA, or DR33-10849-EB.
Quick lesson on Ford part numbers, if you care to know what they mean.
There is a base number, usually 4+ numbers occasionally with a character in the middle somewhere that specifies the type of part it is (i.e. headlight, fog light, instrument cluster, etc.)
Then, there is a 4 character prefix, usually a mixture of letters and numbers that specify the vehicle model and year.
Finally, there is the 1 to 3 character suffix, usually letters that specify the vehicle trim options.
Now, the ID#'s are setup exactly the same, but are more specific. The prefix helps determine if something for that model/part changed halfway through the year, and the suffix helps if there are a bunch of different trim level options for a specific model.
Breakdown of the part # above:
Prefix - DR3Z - 2014 Mustang (Should be the same on most 2014 Mustang parts)
Base - 10849 - Instrument Cluster (Same for all Ford Clusters)
Suffix - EA - Premium Trim Option
Breakdown of the ID#'s above:
Prefix - DR33 - 2014 Mustang built after 7/1/2013
Base - 10849 - Instrument Cluster (Same as part number, no change)
Suffix - EA/EB - Premium Trim Option V6/GT
So if you want a late model build 2014 Premium Cluster you need part # DR3Z-10849-EA and the cluster ID# DR33-10849-EA or DR33-10849-EB. EA or EB really shouldn't matter for you because I believe the V6 and GT premium clusters are exactly the same.
Wait Im not understanding this I got a cluster DR33-10849-EA is that trackey enabled ??? the guy said it was a 13

Last edited by WARHEADBR; 7/21/14 at 06:30 PM.