
SilverHorse Racing Louver Install (without removing interior)

Thread Starter
Mach 1 Member
Joined: April 17, 2013
Posts: 678
Likes: 5
From: Hickory Creek, TX
SilverHorse Racing Louver Install (without removing interior)
From the second I saw them, I've wanted the SHR Louvers- but the thought of pulling my factory glass (and cutting the interior) was pretty daunting. I finally took the plunge and ordered the louvers + install kit last Sunday. Everything arrived on Thursday, and after an evening and afternoon, I'm happy to say they are installed! Total time was about 4 hours (including thinking and photographing). If I had to do it a second time, it would probably take about 3 hours...
I decided I did not want to remove my interior- opting to trim them "in place." There are plusses and minuses to this approach, as I'll cover below. I have to say, the owner of SHR (Marcello Canitano) was super responsive to my email inquiries, and provided helpful tips for the install.
My usual caveat is to mention that I am by no means a professional installer or mechanic (which means if I could install this piece, so can you ). By all means if you see something I've done that is wrong (or did something that's just plain stupid), please post a comment to help anyone else deciding to do this project! No offense taken!
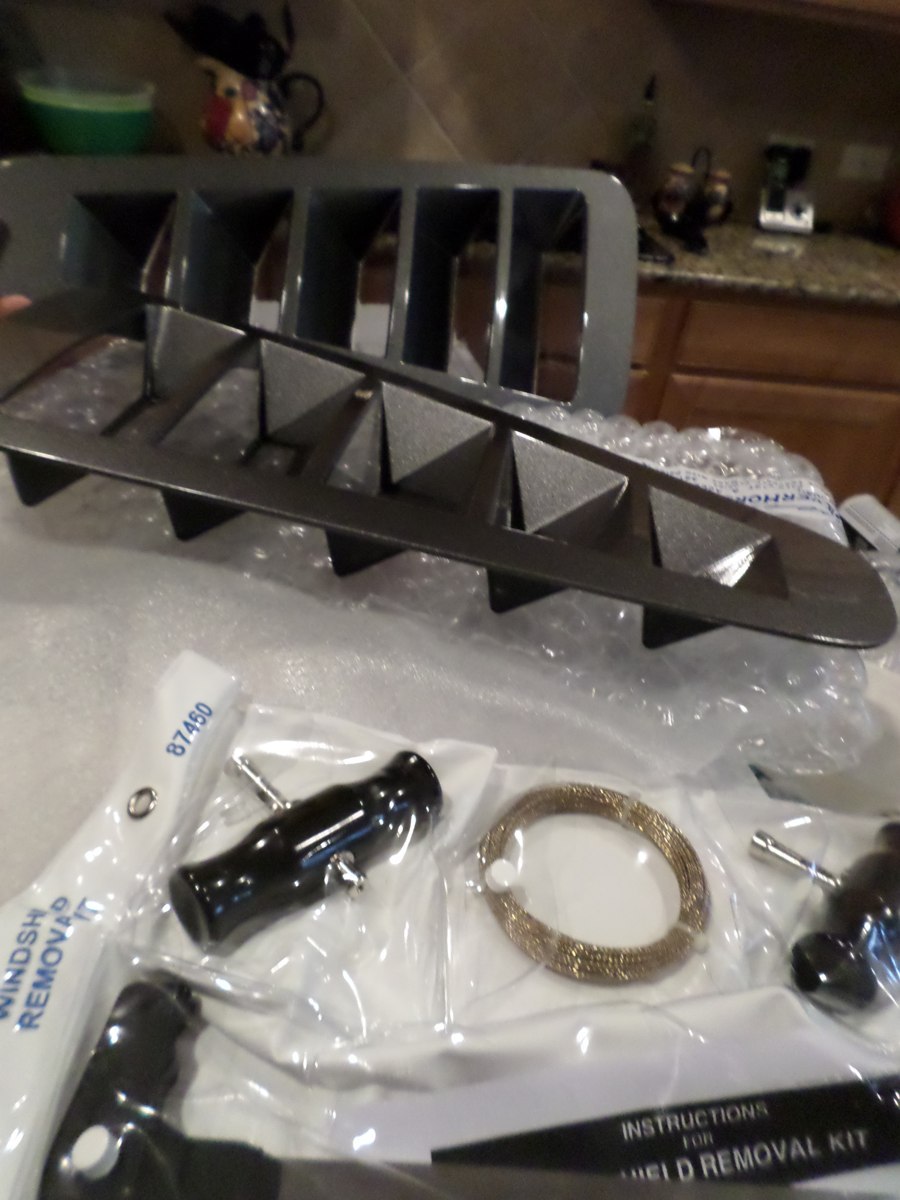
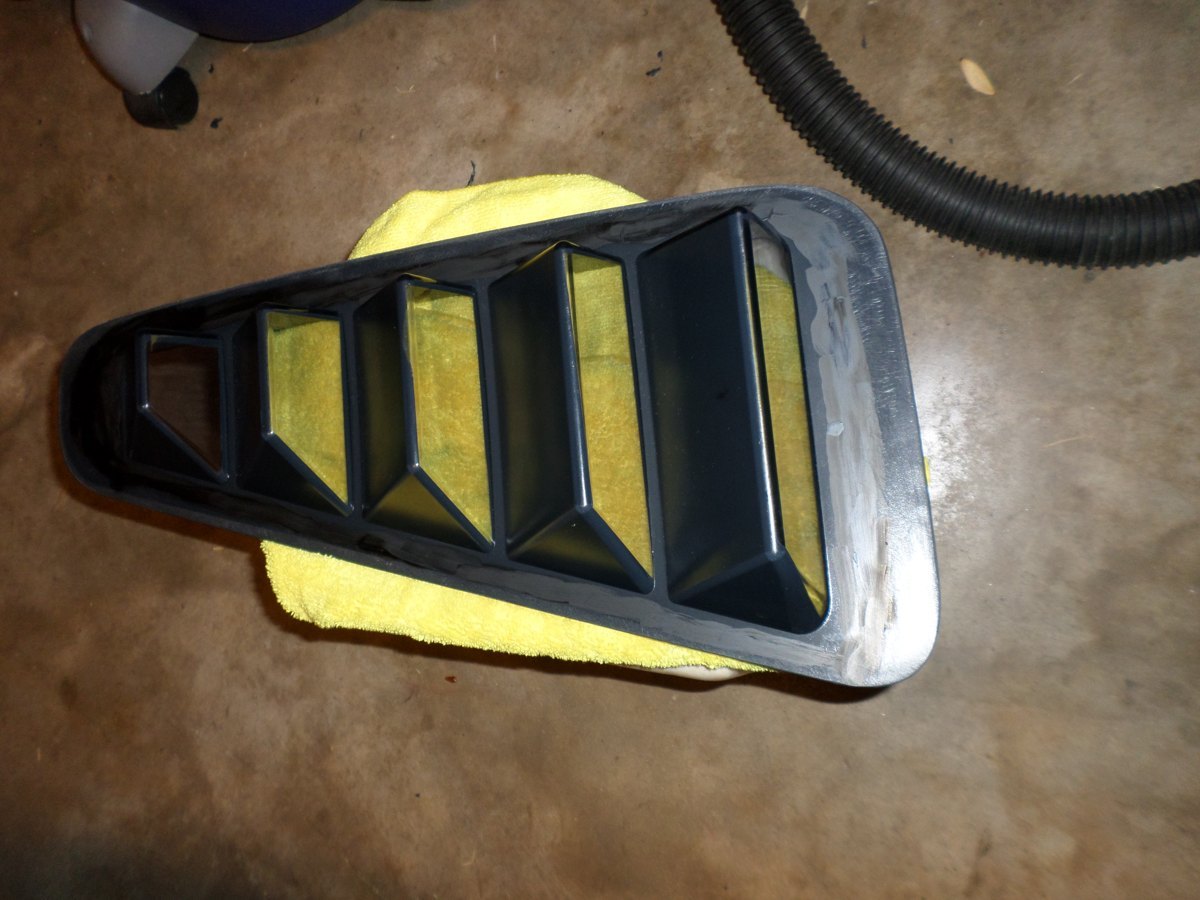
I ordered the louvers pre-painted, and the color match was spot on for my Sterling Grey. The louvers were well-packed, and I highly recommend purchasing the install kit, which includes a window removal tool, 3M fast cure sealant, and 3M primer. As a technical kinda guy (I work in ophthalmic manufacturing), I really appreciate the "form follows function" approach to the design of these louvers. Besides looking amazing, they actually provide decent visibility out the rear quarter windows (even better than stock).
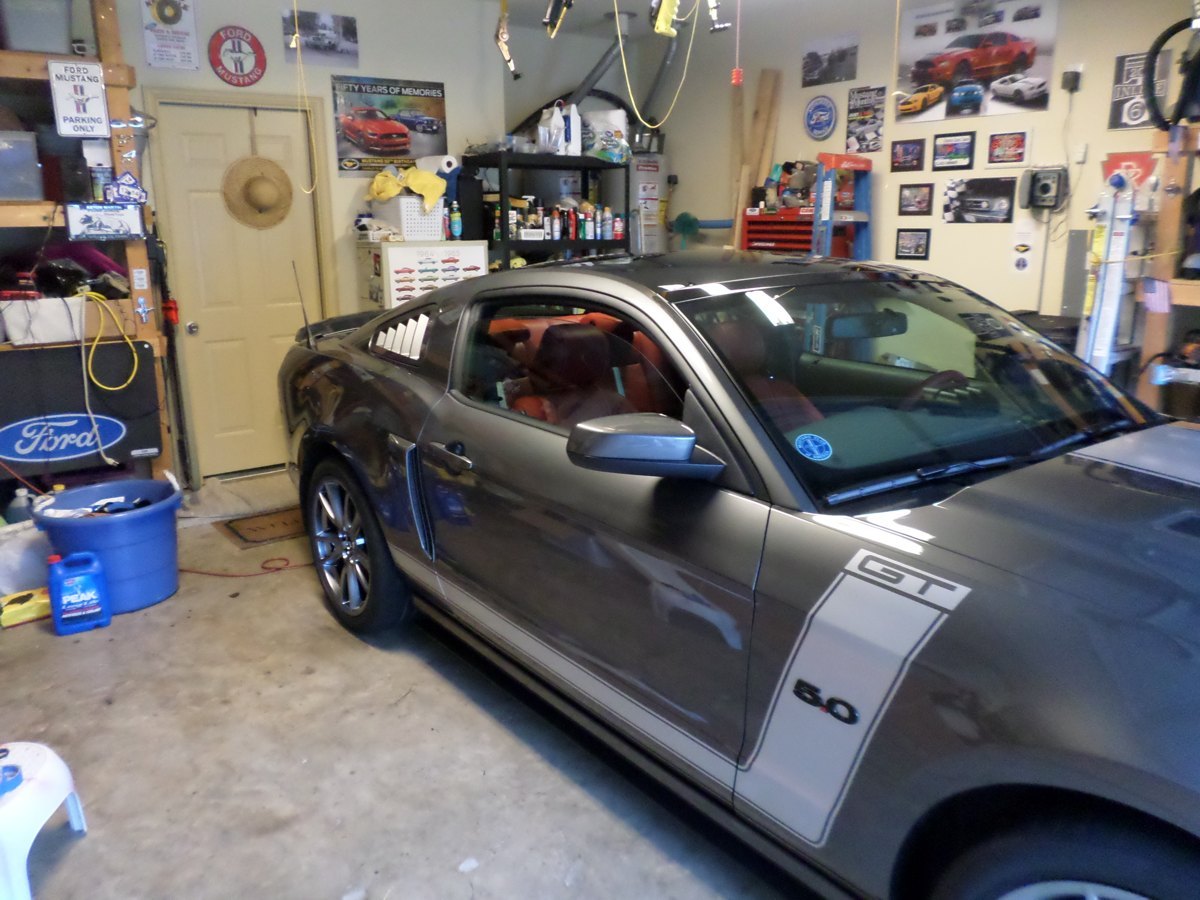
Of course, before any surgery you need a sterile environment- so my '14 GT got its last bath with the factory glass in place. I ordered her with the factory "fish gill" louvers, but removed them a while back.

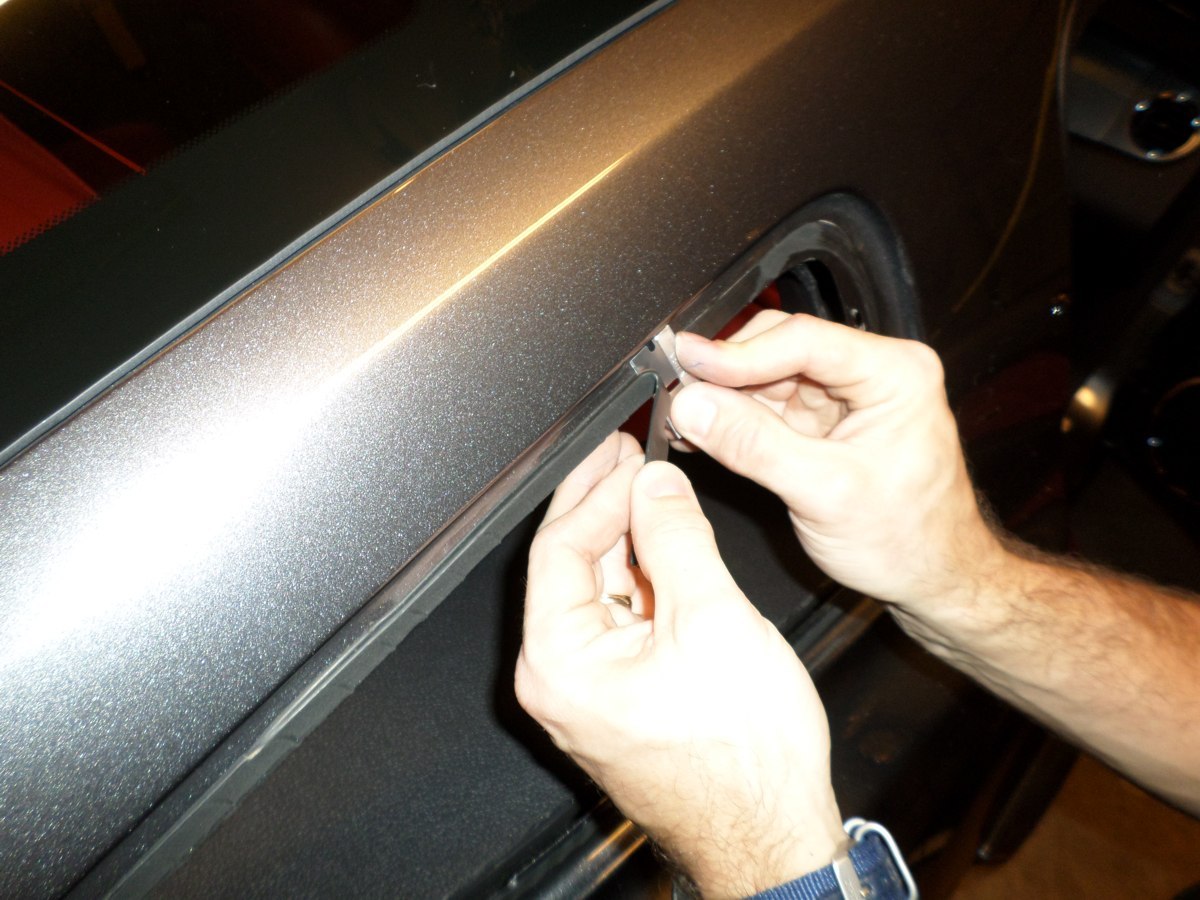
The first step is to place TWO layers of tape all around each window. You will be sawing through the sealant, and don't want to mar your paint. Even with the tape, I got careless and put one tiny mar on the back of the driver's side (barely noticeable). As you saw through the seal, you will find a bunch of resistance at two points- one is on the front edge and the other is towards the back on the top edge. These are "location posts" used by the factory (you can see the spots where they are in the pic). You really have to vigorously saw, and you will notice some "smoke" from the friction. The tiny mar I made on the driver's side came when I was sawing through the rear location post and got a bit too "gungho" . Not to worry, you will eventually "pop" through each post and then the seal will quickly separate. Be sure to have someone holding the window to the car or it WILL jump out when you finish cutting the seal. Also, do NOT pull away from the car, or you could break the glass.
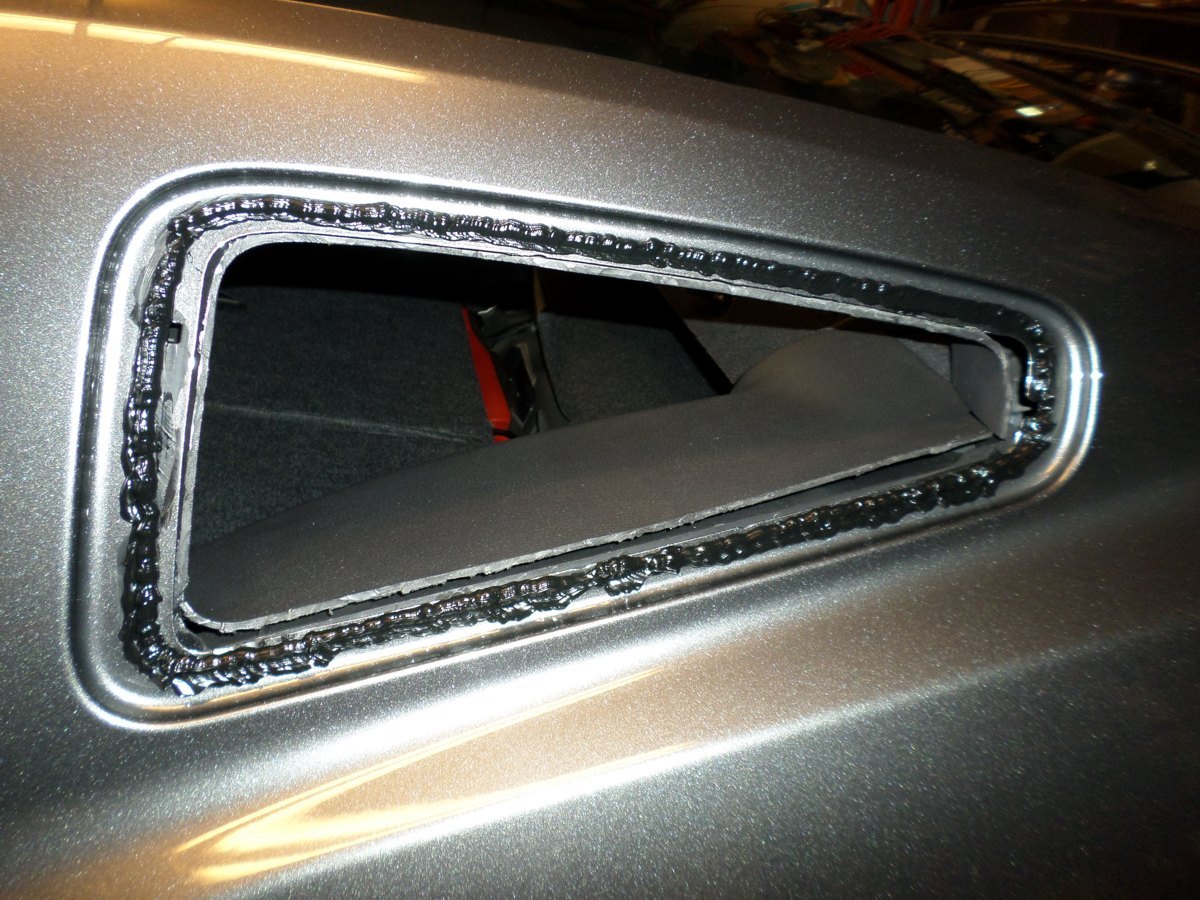
Once you get the glass removed, take a razor and trim away the remaining factory sealant. Its okay (and actually a good thing) if you have a thin layer remaining on the body.
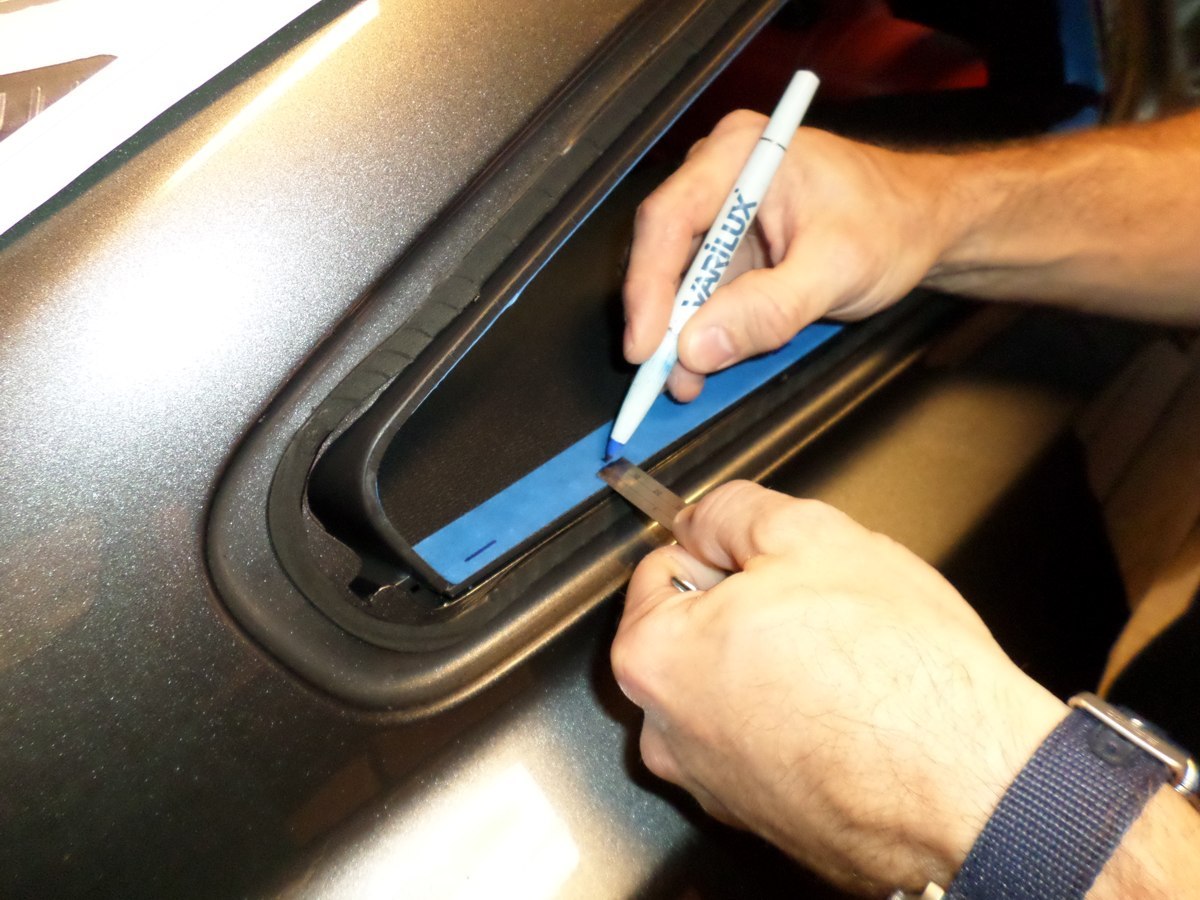
This is where we deviate from the official SHR instructions (which involve removing the rear seat and interior trim and removing the windows at the end). To be fair, I think the install could be done in about the same time following SHR's instructions- but leaving everything in place worked for me. Once you have the window out, you'll understand why the interior needs trimmed (I'm told it doesn't need trimming for the '05-'09). The interior trim extends INTO the window opening, and for the SHR louver to fit, it needs to be trimmed behind the lip of the window opening. Place tape all around the opening, and make a line (following the SHR instructions) all around the opening.
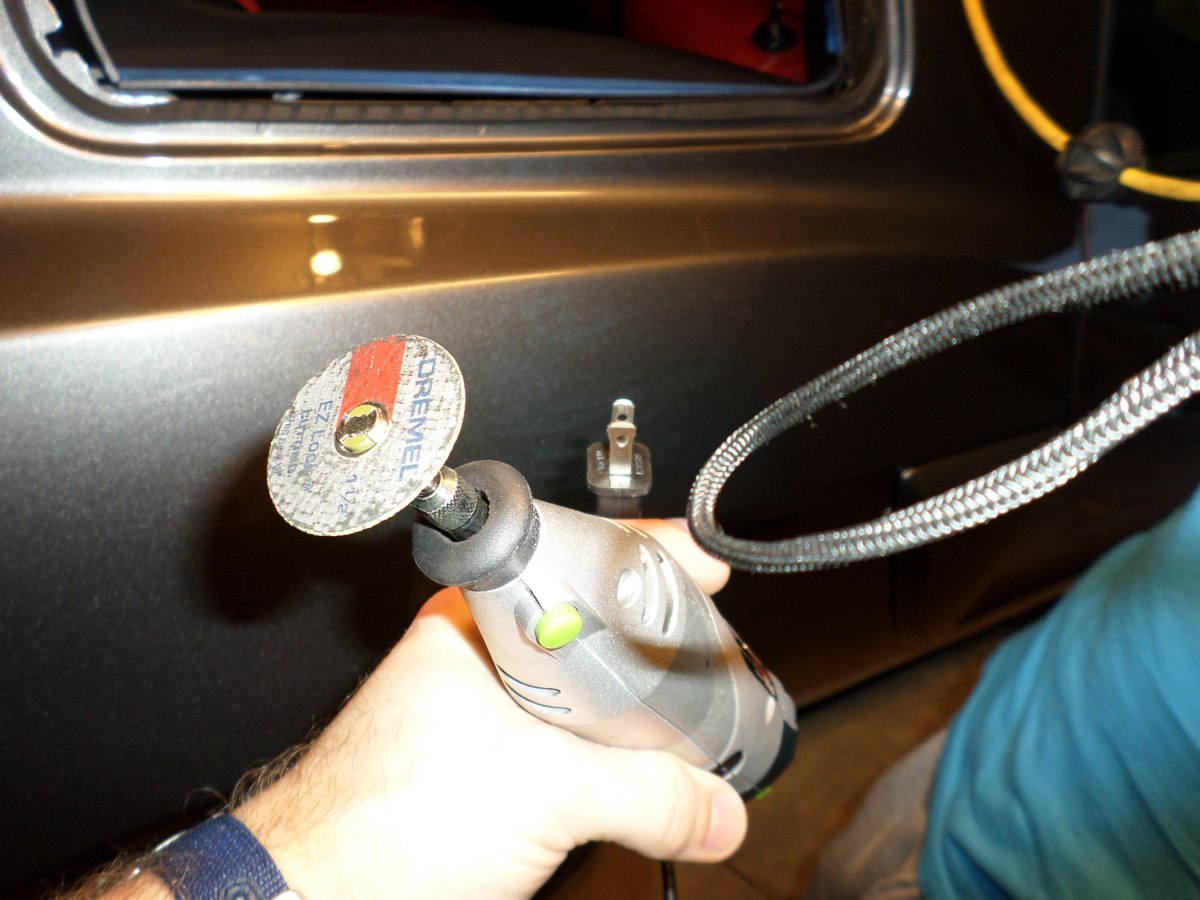
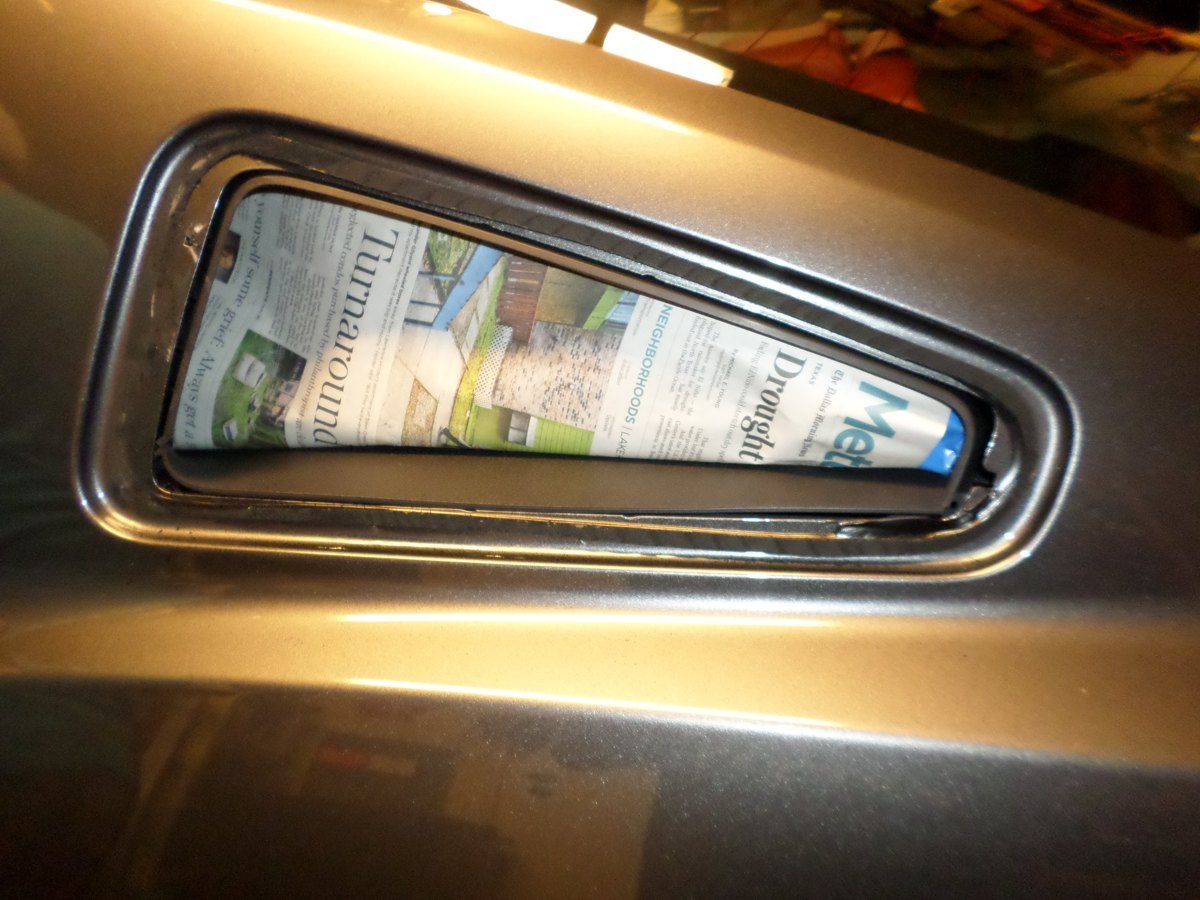
I used a Dremel with a plastic cutting disc. The key is to BE PATIENT! Score along the line, then go back and gradually cut through. You do not want to build up heat- as this causes the plastic to "melt-" so go slow. As Marcello predicted, you will spray some shavings as you cut. On the first window, I tried having my son hold a Shop-Vac right next to the cutter... not particularly effective (but not too bad either- most of the dust went outside the car). On the second window, we taped some paper in the opening as below- MUCH better! Finally, any time you are using a power tool WEAR SAFETY GLASSES (I am a licensed optician, so I just have to add this- when I see all the crap that ends up on the safety glasses, its clear why they should be worn).
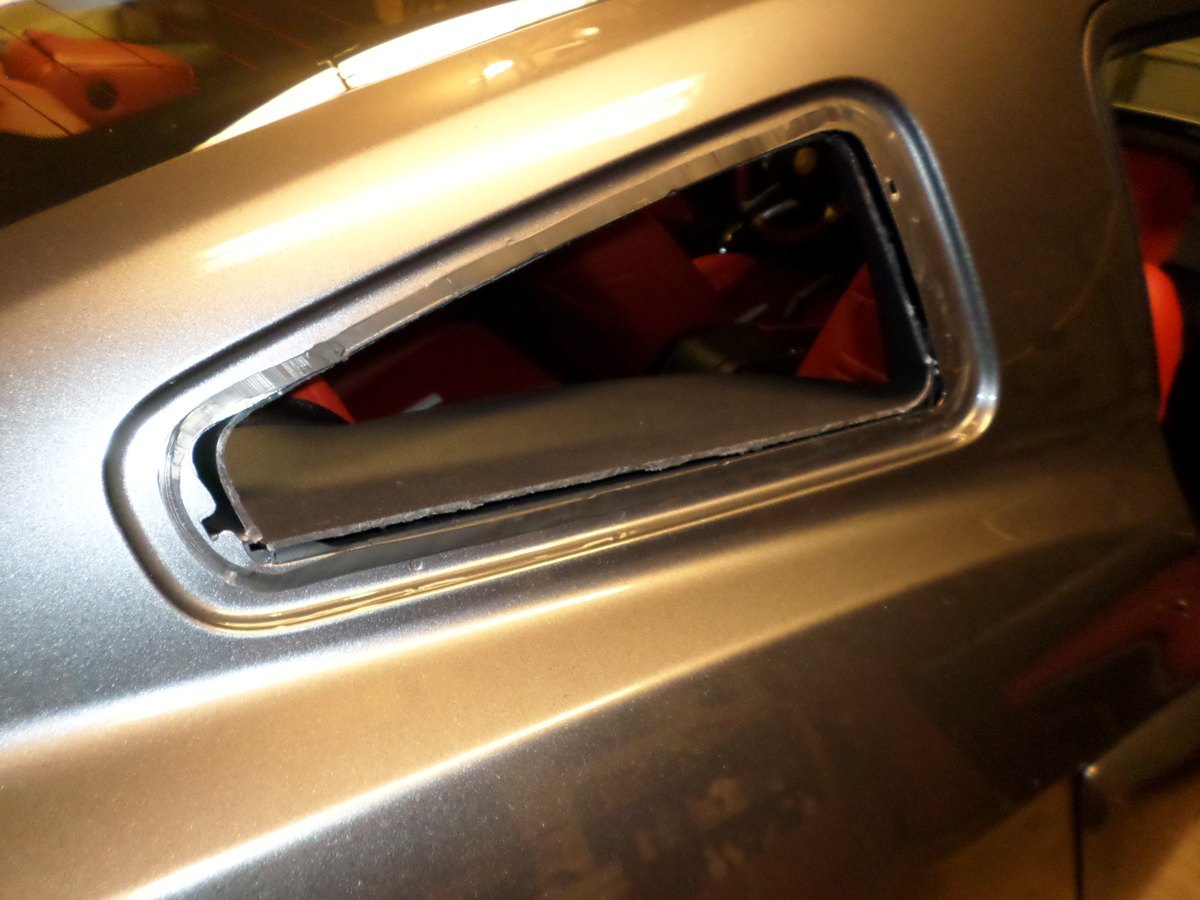
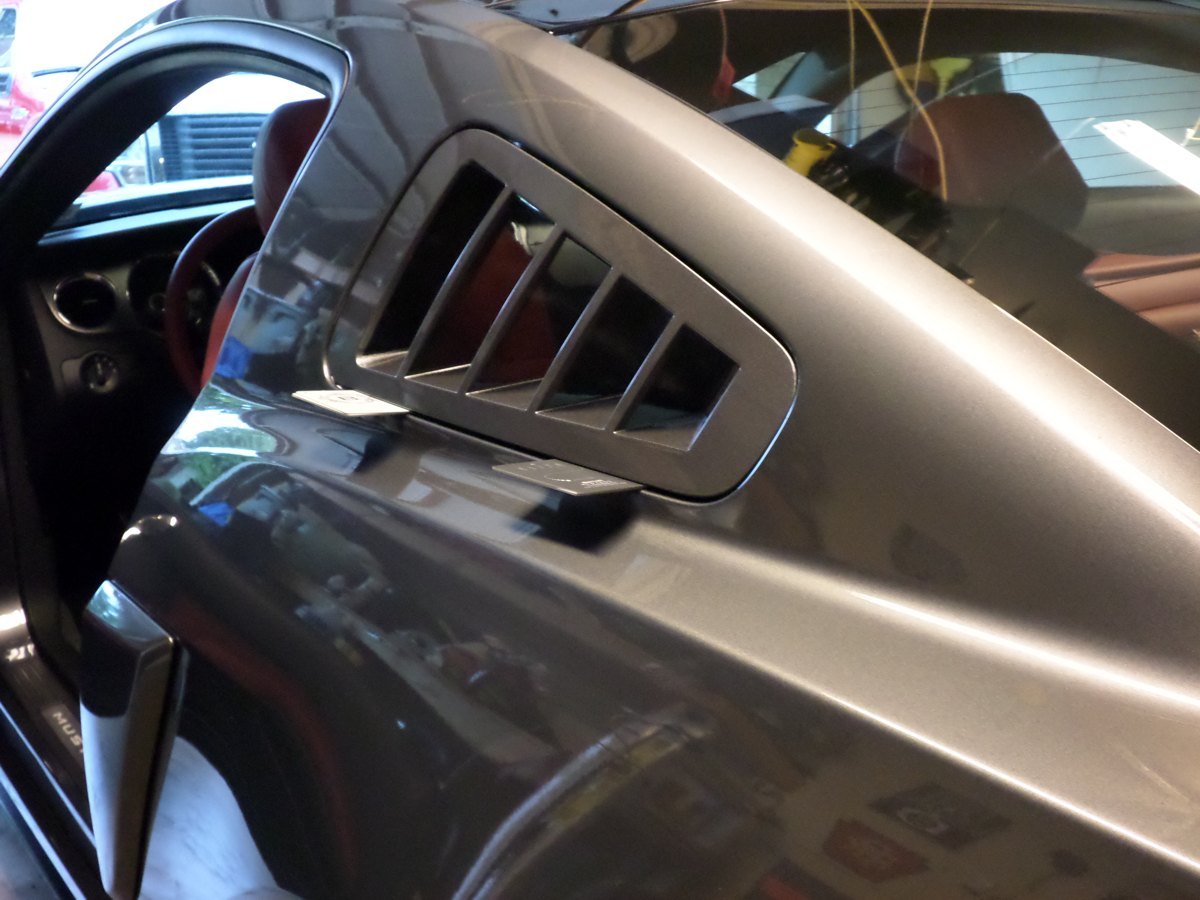
Here's the result once you get everything cut. This is a good time to "test fit" the louver. You may notice that the bottom front corner seems to want to push out. I fiddled with this for some time before coming to the conclusion that- once the sealer is in place- the piece as a whole will fit properly. Keep in mind the entire piece should be just slightly recessed down into the body- when you hold it like this, you should notice the louver fits quite nicely. A tip for anytime you cut trim. After cleaning the edge with a razor, take a heat gun and play it along the edge- it melts the edge and you end up with a cleaner cut. Also, take care to go inside the car and look at things with the louver in place. If you are touching somewhere, it will be obvious. Also, if you have burrs that will be visible it will also be obvious at this point.
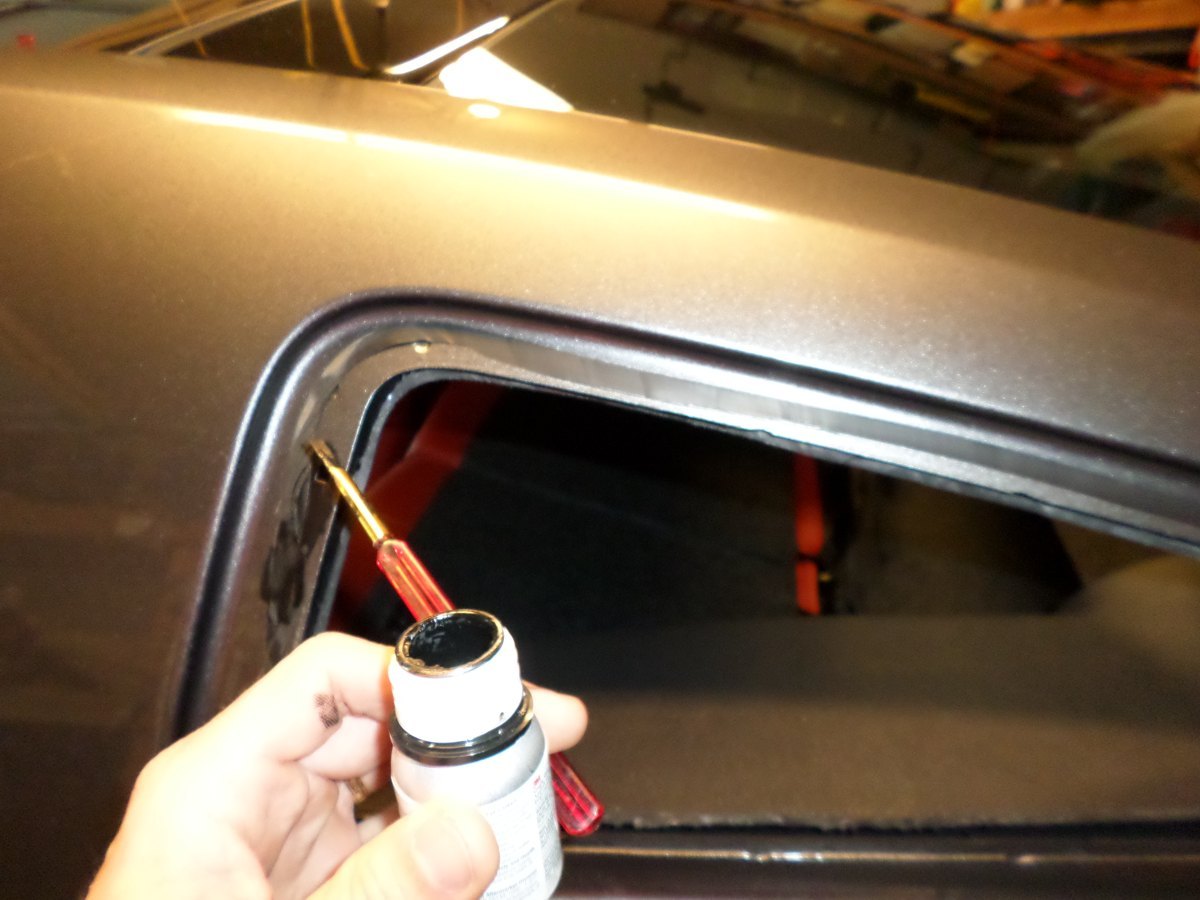
Time to use the primer in the install kit. Just follow along the residual factory sealant. Also be sure to cover any bare metal (the removal tool probably removed a little paint). Use a brush or a foam applicator (the primer is VERY thin and will run if you don't).
You should also prep the louver. Use some sandpaper to lightly scuff the lip where the sealant will contact the louver. I also applied primer to the louver (not sure if you are supposed to do this, but the primer really does help- its used to make a soft top canvas attach to the sealant, so it should also help the louver adhere).
You should have test fit the louver (a dozen times- if you're OCD like me) prior to applying the primer, so now its time to lay down a bead of the 3M sealant. Cut an inverted "V" into the tip about 1.5" back. I've read reports that the sealant is hard to press out of the tube (you'll need a caulking gun), so I heated my tube in the oven a bit (ran the oven up to 170 degrees, turned the oven OFF, then placed the tube on a cookie sheet for 10 minutes). Be sure to keep the "V" perpendicular to the direction you are traveling- it flowed pretty well for me (but it will give your hand a workout by the end). I probably applied more than necessary, but I did NOT want leaks. In truth, I probably used a bit much, because you can just see it beading in the gap (not too obvious, but I know its there).
Once I had the bead laid, I took the louver and set it like you would a tile (get it centered, and then wiggle slightly back and forth to establish contact). The louver should sit just slightly recessed down into the body. You really want to be careful with the 3M sealant- it can get messy if things get out of control (didn't for me, but I got just a bit on my finger). If you do get some where you don't want it, lighter fluid (or gasoline, or any petrol product) will clean it up.
You may want to "shim" things just a bit to keep the gap even top and bottom. I travel a lot and find used hotel keys to be VERY useful in the garage- I have used these things for too many things to list! The 3M sets up really quick (10-15 minutes)- but it doesn't really cure for 6-8 hours. During the first 15 minutes, visit each window and apply some gentle pressure just to make sure it hasn't moved out at all.

At this point, put your windows down a couple of inches! To understand why, try closing a door while you have the first window out... you'll be surprised at the force of the air coming out the quarter window! For the first 24 hours or so, you want to avoid slamming your door with the windows open (you could push the louver out slightly- probably won't pop the louver out, but you could create a leak).
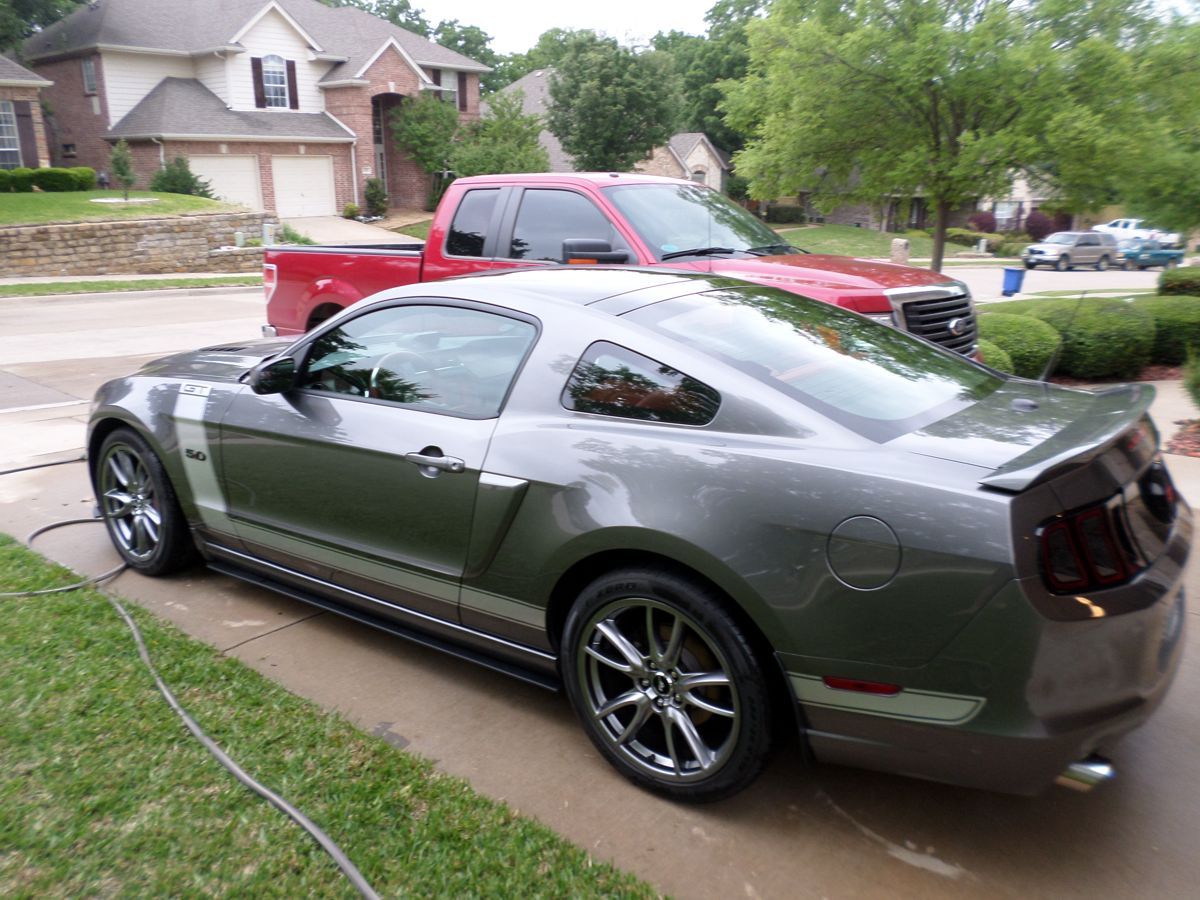
That's pretty much it! I split my install over a night and afternoon, but the clock said it was about 4 hours total. Also a shameless opportunity to show off my "Old Silver Horse" (a Silver Smoke '65 that we drove 2,500 miles from Texas to Charlotte for the 50th).
As Stevie Ray Vaughn once said "Its Floodin' Down in Texas." For now, my new modification will sit in the garage. Once the sun comes out tomorrow, I'll get her out and take some pics (added a Steeda CAI and BAMA tune two days ago, so she's due for a full picture spread ).
).
I decided I did not want to remove my interior- opting to trim them "in place." There are plusses and minuses to this approach, as I'll cover below. I have to say, the owner of SHR (Marcello Canitano) was super responsive to my email inquiries, and provided helpful tips for the install.
My usual caveat is to mention that I am by no means a professional installer or mechanic (which means if I could install this piece, so can you
). By all means if you see something I've done that is wrong (or did something that's just plain stupid), please post a comment to help anyone else deciding to do this project! No offense taken!I ordered the louvers pre-painted, and the color match was spot on for my Sterling Grey. The louvers were well-packed, and I highly recommend purchasing the install kit, which includes a window removal tool, 3M fast cure sealant, and 3M primer. As a technical kinda guy (I work in ophthalmic manufacturing), I really appreciate the "form follows function" approach to the design of these louvers. Besides looking amazing, they actually provide decent visibility out the rear quarter windows (even better than stock).
Of course, before any surgery you need a sterile environment- so my '14 GT got its last bath with the factory glass in place. I ordered her with the factory "fish gill" louvers, but removed them a while back.
The first step is to place TWO layers of tape all around each window. You will be sawing through the sealant, and don't want to mar your paint. Even with the tape, I got careless and put one tiny mar on the back of the driver's side (barely noticeable). As you saw through the seal, you will find a bunch of resistance at two points- one is on the front edge and the other is towards the back on the top edge. These are "location posts" used by the factory (you can see the spots where they are in the pic). You really have to vigorously saw, and you will notice some "smoke" from the friction. The tiny mar I made on the driver's side came when I was sawing through the rear location post and got a bit too "gungho"
. Not to worry, you will eventually "pop" through each post and then the seal will quickly separate. Be sure to have someone holding the window to the car or it WILL jump out when you finish cutting the seal. Also, do NOT pull away from the car, or you could break the glass. Once you get the glass removed, take a razor and trim away the remaining factory sealant. Its okay (and actually a good thing) if you have a thin layer remaining on the body.
This is where we deviate from the official SHR instructions (which involve removing the rear seat and interior trim and removing the windows at the end). To be fair, I think the install could be done in about the same time following SHR's instructions- but leaving everything in place worked for me. Once you have the window out, you'll understand why the interior needs trimmed (I'm told it doesn't need trimming for the '05-'09). The interior trim extends INTO the window opening, and for the SHR louver to fit, it needs to be trimmed behind the lip of the window opening. Place tape all around the opening, and make a line (following the SHR instructions) all around the opening.
I used a Dremel with a plastic cutting disc. The key is to BE PATIENT! Score along the line, then go back and gradually cut through. You do not want to build up heat- as this causes the plastic to "melt-" so go slow. As Marcello predicted, you will spray some shavings as you cut. On the first window, I tried having my son hold a Shop-Vac right next to the cutter... not particularly effective (but not too bad either- most of the dust went outside the car). On the second window, we taped some paper in the opening as below- MUCH better! Finally, any time you are using a power tool WEAR SAFETY GLASSES (I am a licensed optician, so I just have to add this
- when I see all the crap that ends up on the safety glasses, its clear why they should be worn).Here's the result once you get everything cut. This is a good time to "test fit" the louver. You may notice that the bottom front corner seems to want to push out. I fiddled with this for some time before coming to the conclusion that- once the sealer is in place- the piece as a whole will fit properly. Keep in mind the entire piece should be just slightly recessed down into the body- when you hold it like this, you should notice the louver fits quite nicely. A tip for anytime you cut trim. After cleaning the edge with a razor, take a heat gun and play it along the edge- it melts the edge and you end up with a cleaner cut. Also, take care to go inside the car and look at things with the louver in place. If you are touching somewhere, it will be obvious. Also, if you have burrs that will be visible it will also be obvious at this point.
Time to use the primer in the install kit. Just follow along the residual factory sealant. Also be sure to cover any bare metal (the removal tool probably removed a little paint). Use a brush or a foam applicator (the primer is VERY thin and will run if you don't).
You should also prep the louver. Use some sandpaper to lightly scuff the lip where the sealant will contact the louver. I also applied primer to the louver (not sure if you are supposed to do this, but the primer really does help- its used to make a soft top canvas attach to the sealant, so it should also help the louver adhere).
You should have test fit the louver (a dozen times- if you're OCD like me
) prior to applying the primer, so now its time to lay down a bead of the 3M sealant. Cut an inverted "V" into the tip about 1.5" back. I've read reports that the sealant is hard to press out of the tube (you'll need a caulking gun), so I heated my tube in the oven a bit (ran the oven up to 170 degrees, turned the oven OFF, then placed the tube on a cookie sheet for 10 minutes). Be sure to keep the "V" perpendicular to the direction you are traveling- it flowed pretty well for me (but it will give your hand a workout by the end). I probably applied more than necessary, but I did NOT want leaks. In truth, I probably used a bit much, because you can just see it beading in the gap (not too obvious, but I know its there). Once I had the bead laid, I took the louver and set it like you would a tile (get it centered, and then wiggle slightly back and forth to establish contact). The louver should sit just slightly recessed down into the body. You really want to be careful with the 3M sealant- it can get messy if things get out of control (didn't for me, but I got just a bit on my finger). If you do get some where you don't want it, lighter fluid (or gasoline, or any petrol product) will clean it up.
You may want to "shim" things just a bit to keep the gap even top and bottom. I travel a lot and find used hotel keys to be VERY useful in the garage- I have used these things for too many things to list! The 3M sets up really quick (10-15 minutes)- but it doesn't really cure for 6-8 hours. During the first 15 minutes, visit each window and apply some gentle pressure just to make sure it hasn't moved out at all.
At this point, put your windows down a couple of inches! To understand why, try closing a door while you have the first window out... you'll be surprised at the force of the air coming out the quarter window! For the first 24 hours or so, you want to avoid slamming your door with the windows open (you could push the louver out slightly- probably won't pop the louver out, but you could create a leak).
That's pretty much it! I split my install over a night and afternoon, but the clock said it was about 4 hours total. Also a shameless opportunity to show off my "Old Silver Horse" (a Silver Smoke '65 that we drove 2,500 miles from Texas to Charlotte for the 50th).
As Stevie Ray Vaughn once said "Its Floodin' Down in Texas." For now, my new modification will sit in the garage. Once the sun comes out tomorrow, I'll get her out and take some pics (added a Steeda CAI and BAMA tune two days ago, so she's due for a full picture spread
Last edited by Varilux; Apr 25, 2015 at 09:02 PM.
 And they look great too!

Bullitt Member
Joined: June 9, 2011
Posts: 222
Likes: 0
Varilux...you are an A+ guy and this is an A+ write up!!! Thanks for taking the time to document these steps...I want these louvers on my Stang so bad!!!
Please do share more pics...especially an interior shot to see the fitment of the louvers against the interior trim
Please do share more pics...especially an interior shot to see the fitment of the louvers against the interior trim
Last edited by magnido45; Apr 25, 2015 at 04:24 PM.
Cobra Member
Joined: April 14, 2011
Posts: 1,072
Likes: 25
From: NJ. Waiting for our Gov. to be held accountable for his actions>>>Jersey Broke
Beautiful job installing the Louvers and the write up is top notch.
Job Well Done Sir!!!
And the car looks GREAT.
Please post some pictures when you get it outside.
Job Well Done Sir!!!
And the car looks GREAT.
Please post some pictures when you get it outside.
Thread Starter
Mach 1 Member
Joined: April 17, 2013
Posts: 678
Likes: 5
From: Hickory Creek, TX
Thanks everyone! As they say on Wheeler Dealers (a British car show), I am "pretty chuffed" with how they came out. We drove down to the local drive-in (Kellers), and someone commented "Oh, I've seen those on-line, but you have to remove the glass right? Where did you have yours done?" I was quite happy to say "My garage."
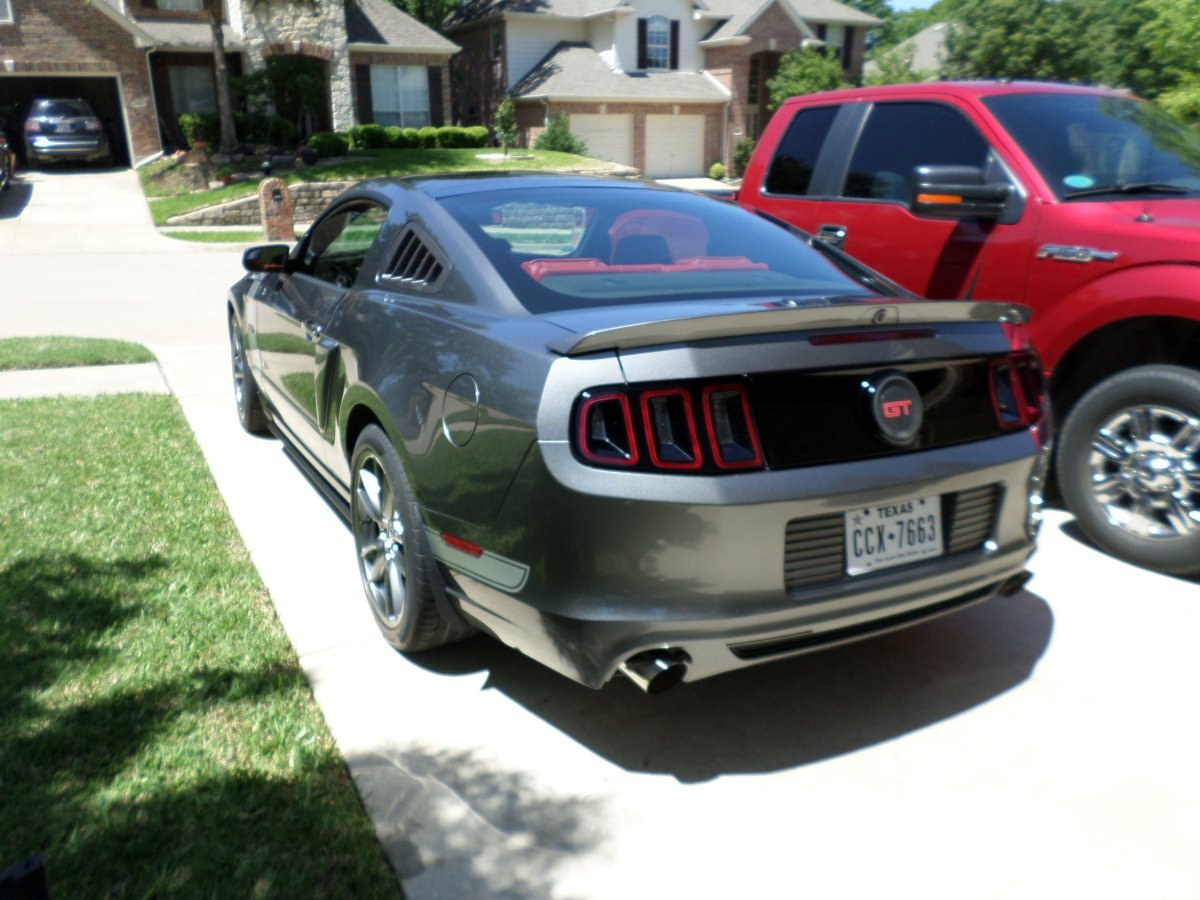
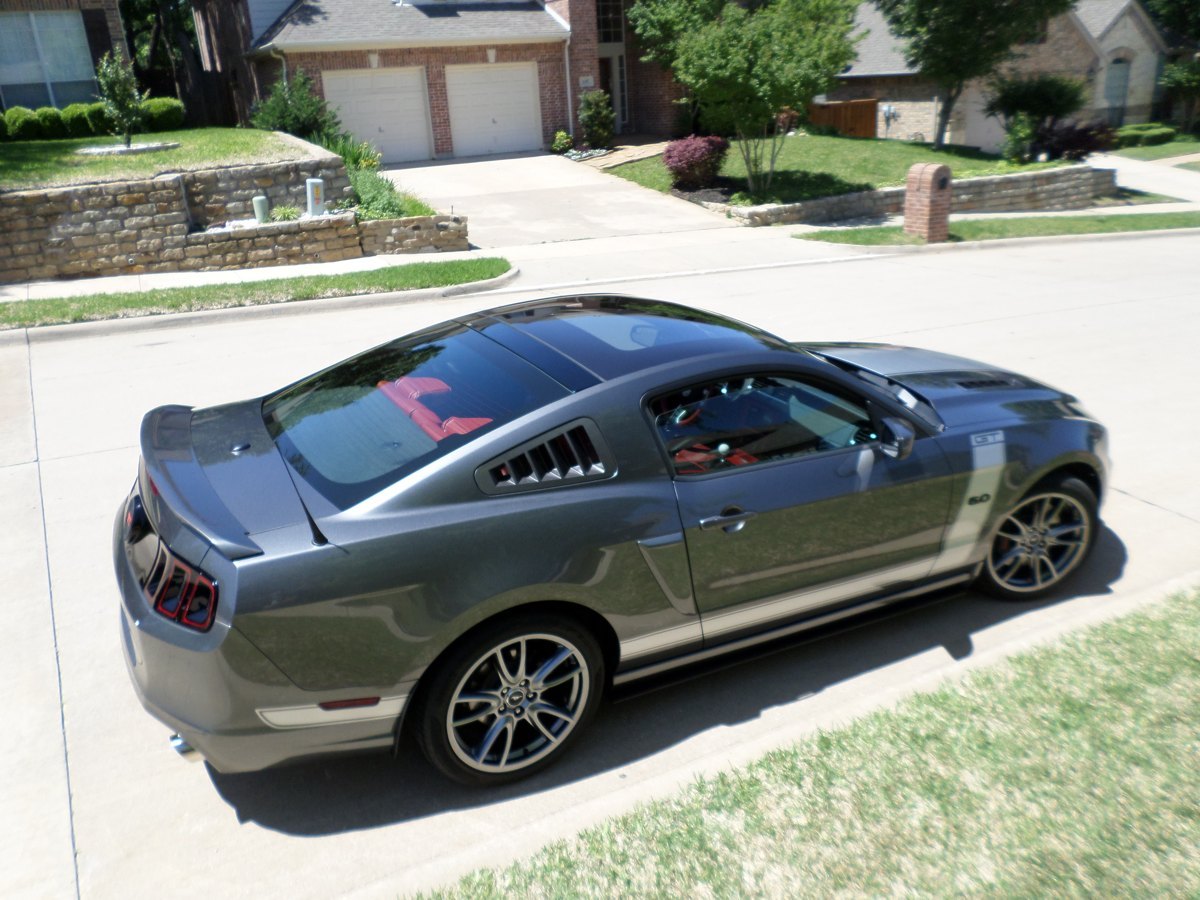
It was a beautiful sunny Spring day here in Dallas, so I took pics from every conceivable angle (and I might have slipped a pic of the new CAI in there as well).

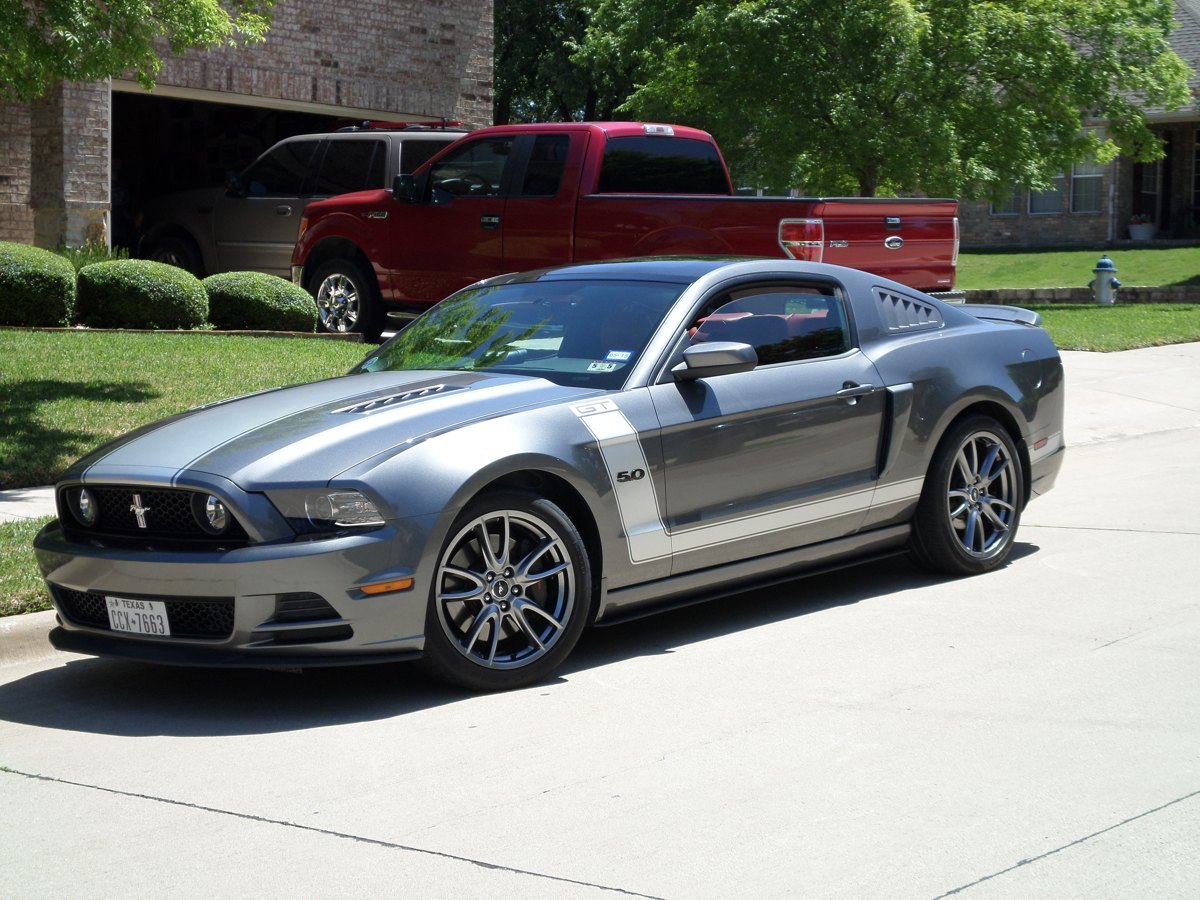
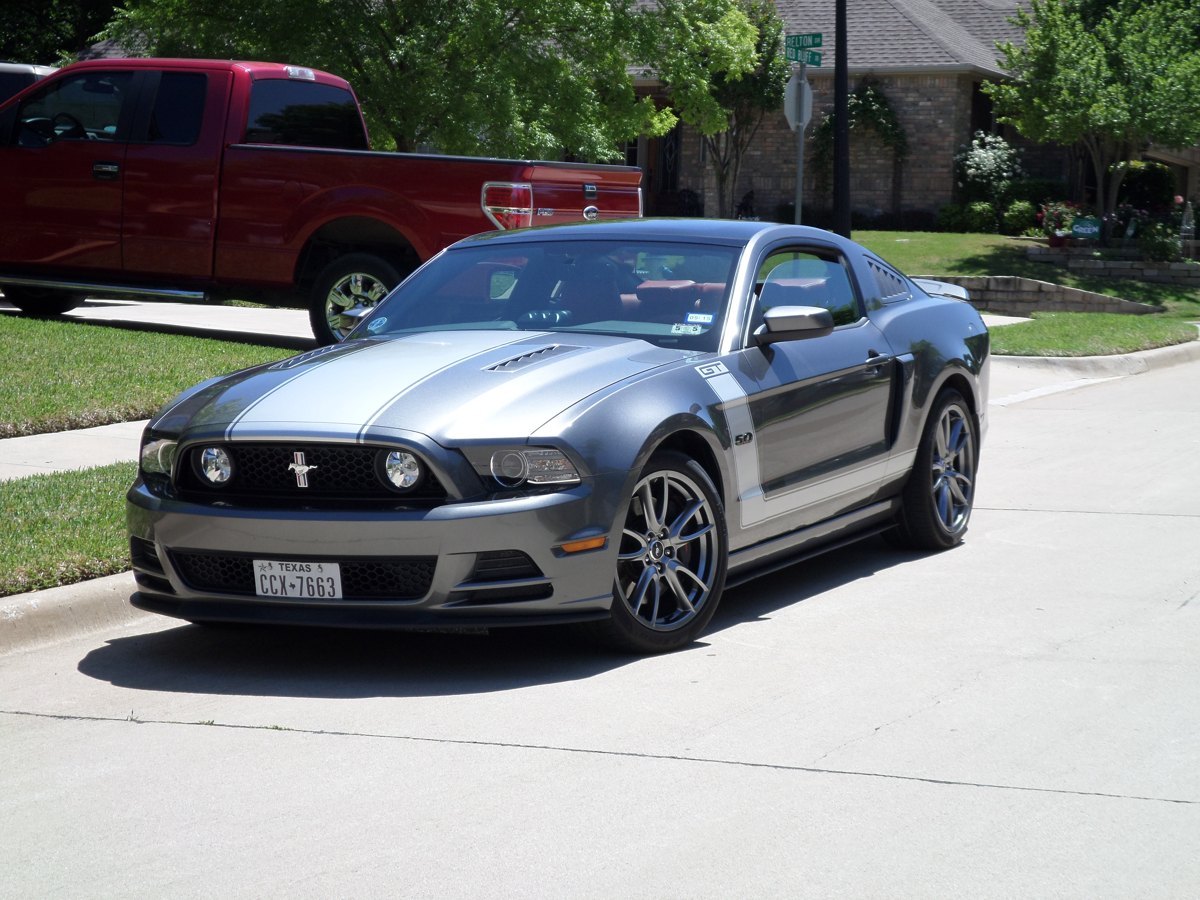
(I call this "the money shot," and that's my wife's F150 in the background- she wants me to note the only time it gets washed is from the overspray when I wash the Mustang- which is 1-2x per week... I sense she is trying to tell me something...)
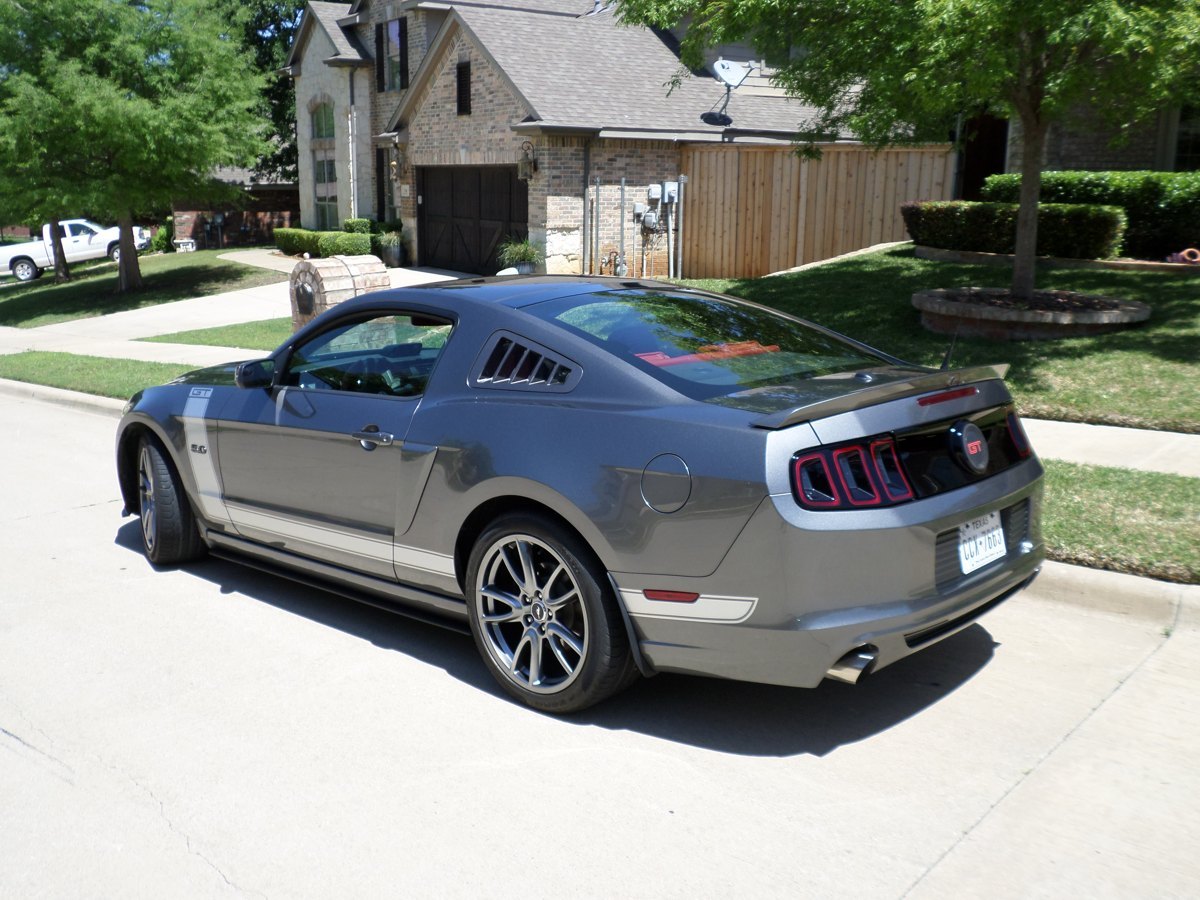
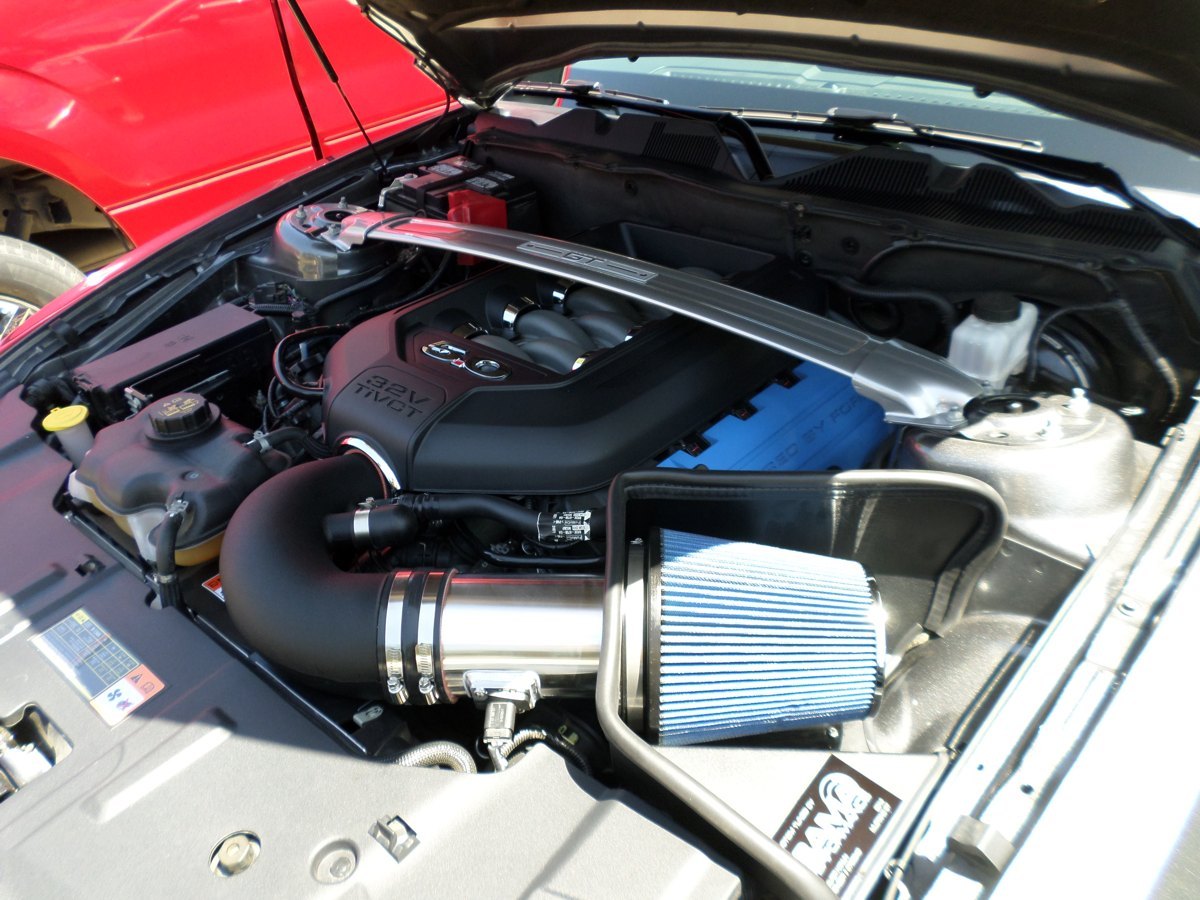
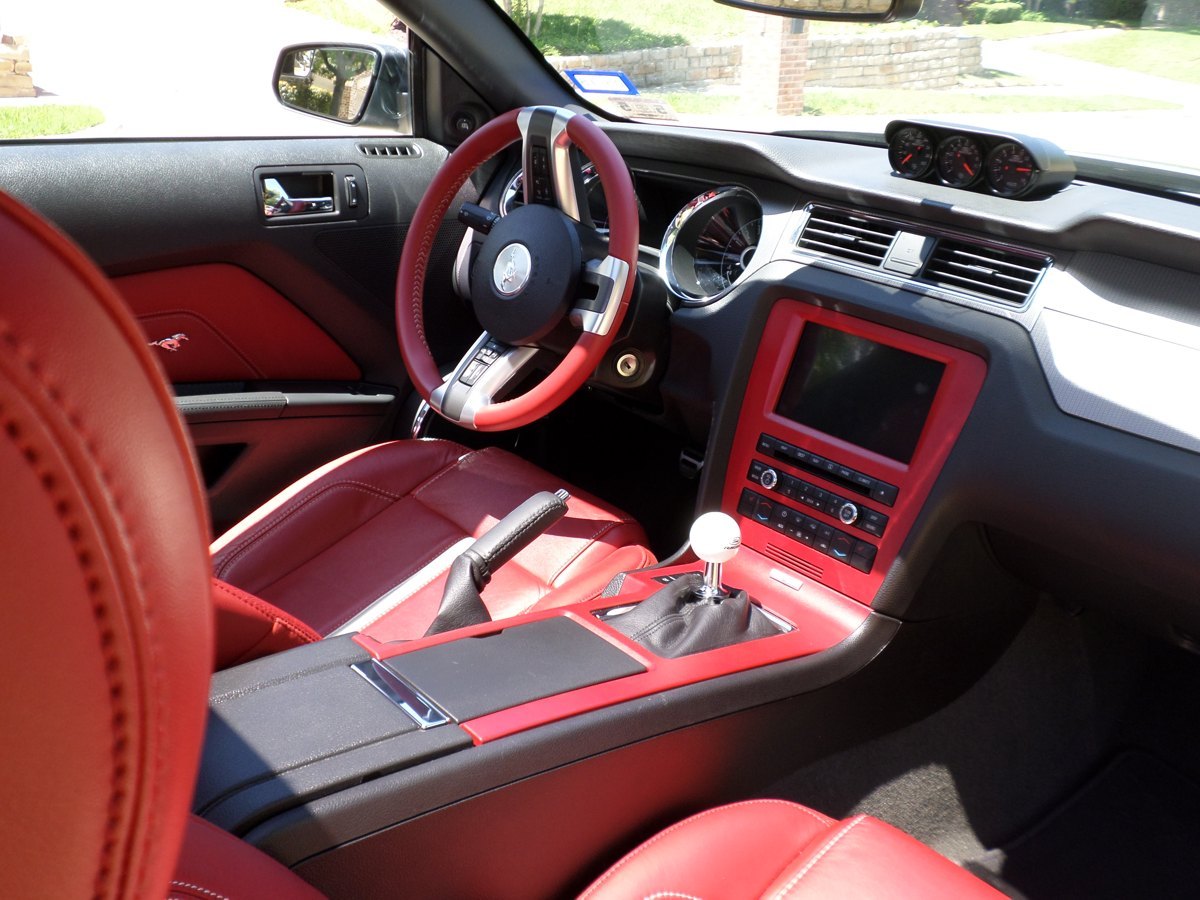
Had to sneak in a pic of the Steeda CAI, which adds a little bling under the hood. At this point, I've done every single thing I wanted to do to this car with the possible exception of a Roush super-charger, but that would necessitate keeping it through another trade cycle (I usually go 2.5-3 years between trades... I am hopelessly infected with the "new car bug"). When I was shopping in April 2013, I wanted a Boss 302 in the worst way- but I also wanted a red interior and a glass roof, and you just couldn't get that with the Boss. So, I've set out to make my car as "Boss-like" as I could.
One of the "Boss-like" features is the Laguna Seca gauge pod (which is another pretty straight-forward install, and can be done pretty inexpensively if you go with the American Racing pod ($99) and SpeedHut gauges. They'll even put Ford Racing graphics on the gauges upon request. For those with Brick Red interior, I would note that Plasti-Dip red creates an almost perfect match (I dipped the center console and Nav bezel to extend the red up into the dash).
It was a beautiful sunny Spring day here in Dallas, so I took pics from every conceivable angle (and I might have slipped a pic of the new CAI in there as well
(I call this "the money shot," and that's my wife's F150 in the background- she wants me to note the only time it gets washed is from the overspray when I wash the Mustang- which is 1-2x per week... I sense she is trying to tell me something...
)Had to sneak in a pic of the Steeda CAI, which adds a little bling under the hood. At this point, I've done every single thing I wanted to do to this car with the possible exception of a Roush super-charger, but that would necessitate keeping it through another trade cycle (I usually go 2.5-3 years between trades... I am hopelessly infected with the "new car bug"
). When I was shopping in April 2013, I wanted a Boss 302 in the worst way- but I also wanted a red interior and a glass roof, and you just couldn't get that with the Boss. So, I've set out to make my car as "Boss-like" as I could. One of the "Boss-like" features is the Laguna Seca gauge pod (which is another pretty straight-forward install, and can be done pretty inexpensively if you go with the American Racing pod ($99) and SpeedHut gauges. They'll even put Ford Racing graphics on the gauges upon request. For those with Brick Red interior, I would note that Plasti-Dip red creates an almost perfect match (I dipped the center console and Nav bezel to extend the red up into the dash).
Last edited by Varilux; Apr 25, 2015 at 09:19 PM.

Legacy Tms Member
Joined: January 9, 2005
Posts: 2,037
Likes: 2
I like the red on the center console, and have been on the fence on the steering wheel since I have the Alcantara black one in ours, but looking good! Personally I like the driver's side shot the best, but the car definitely looks nice and the install work looks great!
Thread Starter
Mach 1 Member
Joined: April 17, 2013
Posts: 678
Likes: 5
From: Hickory Creek, TX
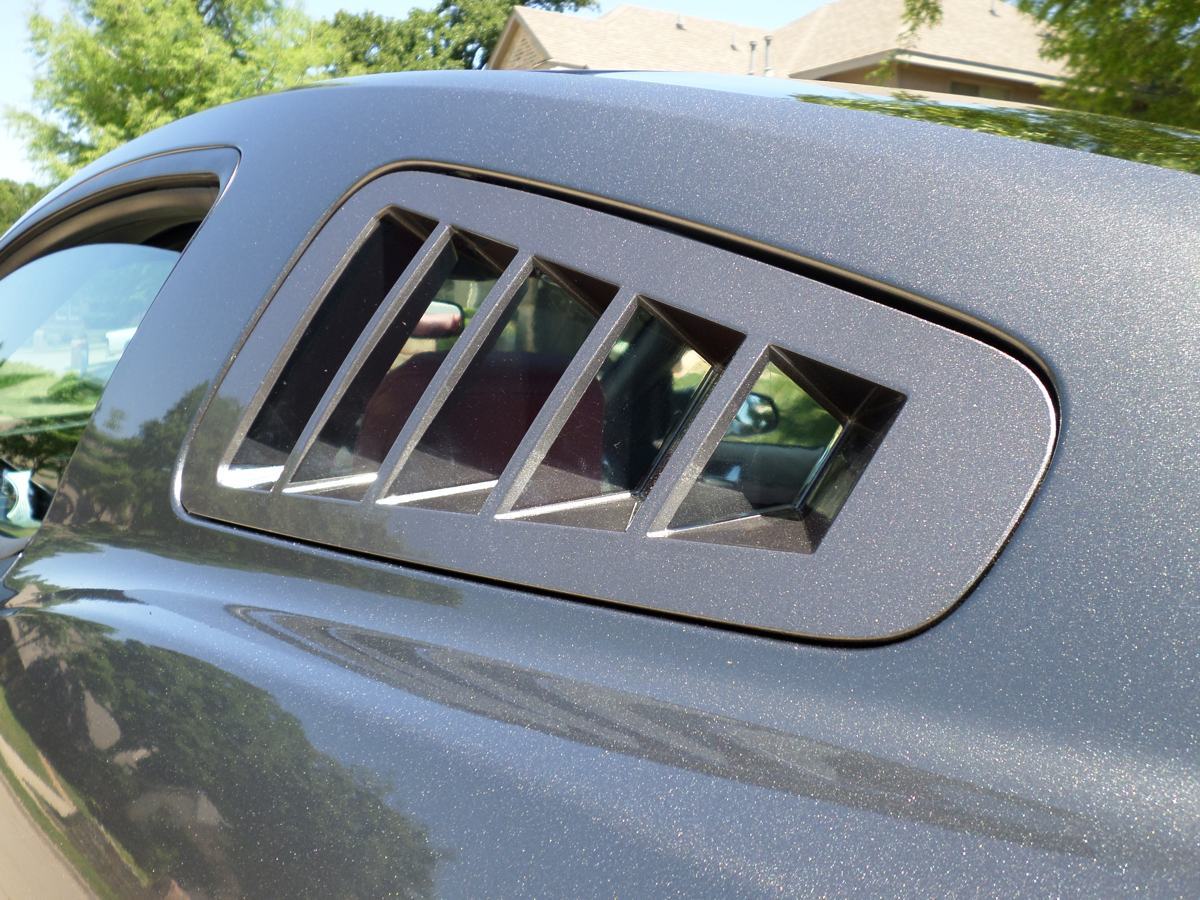
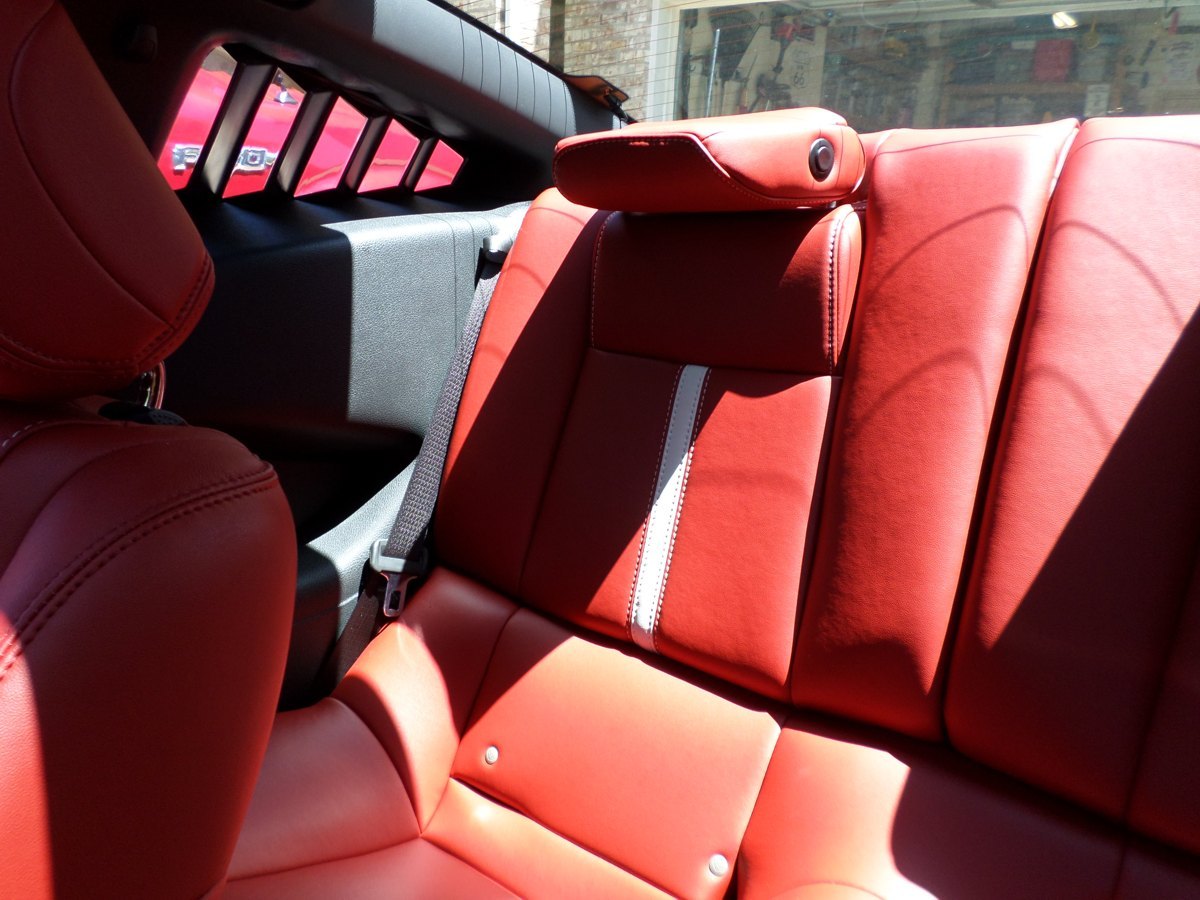
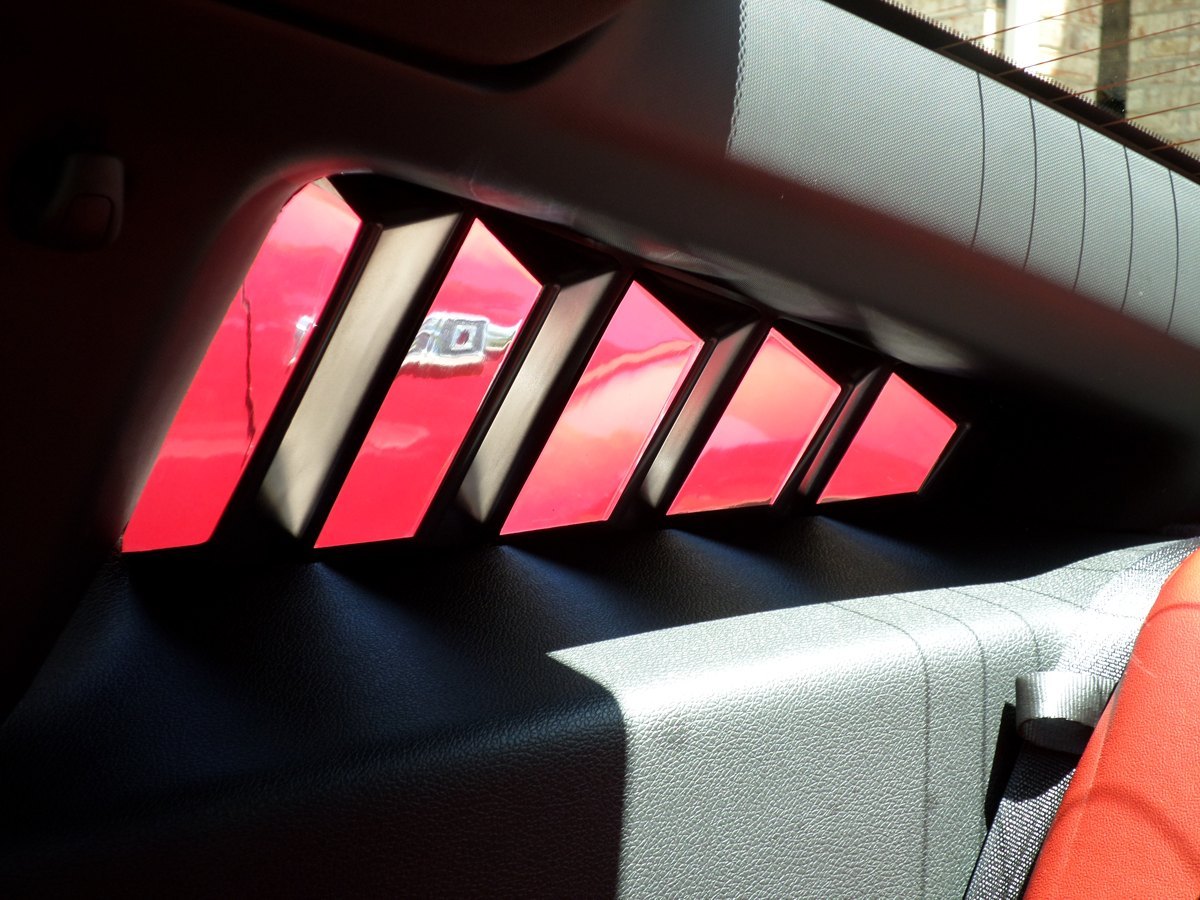
Are there any gaps between the inside of the louvers and the edge of the interior trim or is it a tight fit?
Pretty tight fit... and since the piece itself extends over the edge of the trim, it would be hard to see any defect. I sat in the back seats, and was very happy with the appearance from inside the car. I'll try taking a picture from the back seat passenger perspective this afternoon.
Pretty tight fit... and since the piece itself extends over the edge of the trim, it would be hard to see any defect. I sat in the back seats, and was very happy with the appearance from inside the car. I'll try taking a picture from the back seat passenger perspective this afternoon.

Thread Starter
Mach 1 Member
Joined: April 17, 2013
Posts: 678
Likes: 5
From: Hickory Creek, TX
Thanks again, and here's some closeups of the interior clearance (the shiny strip on the upper edge is the back side of the louver- which is reflecting light due to the flash ). Under normal illumination its a pretty snug fit and looks good to passengers in the seat.
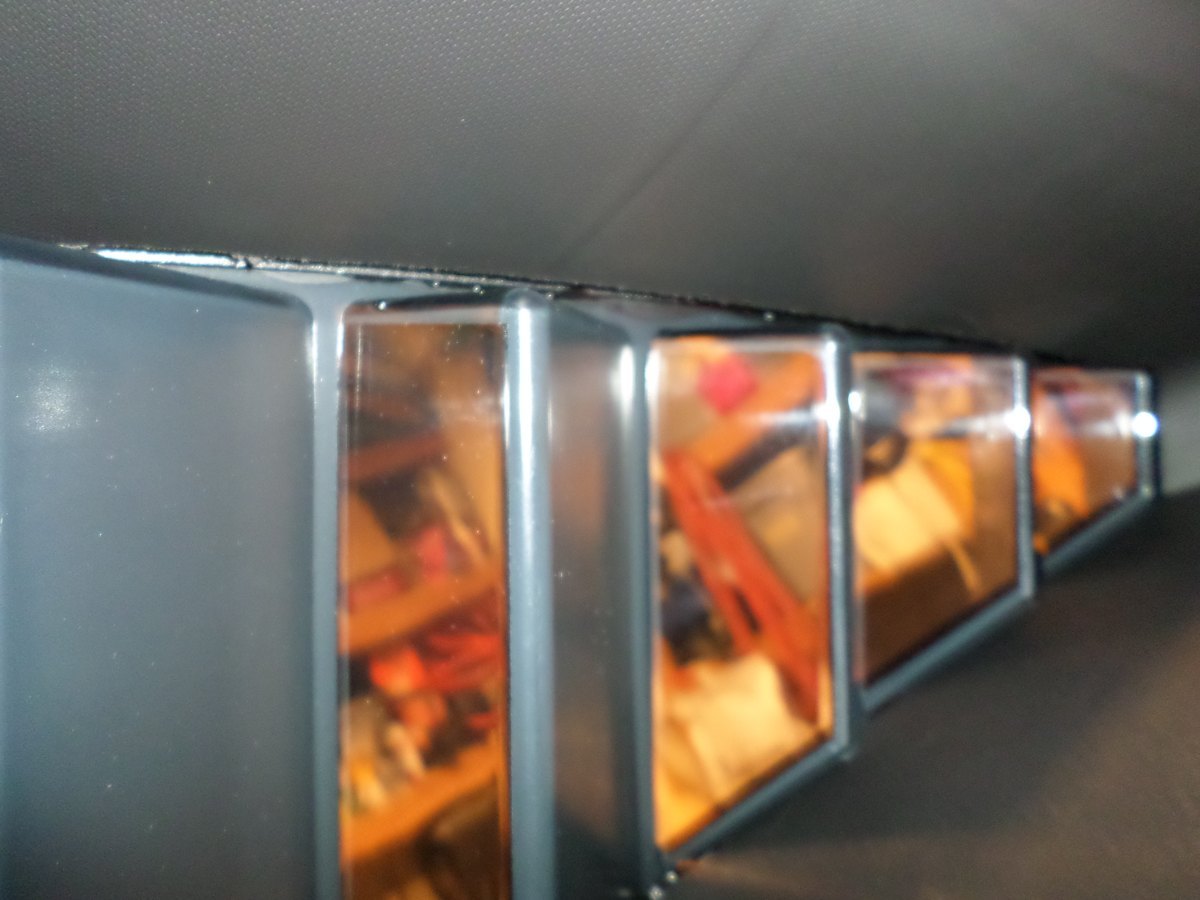
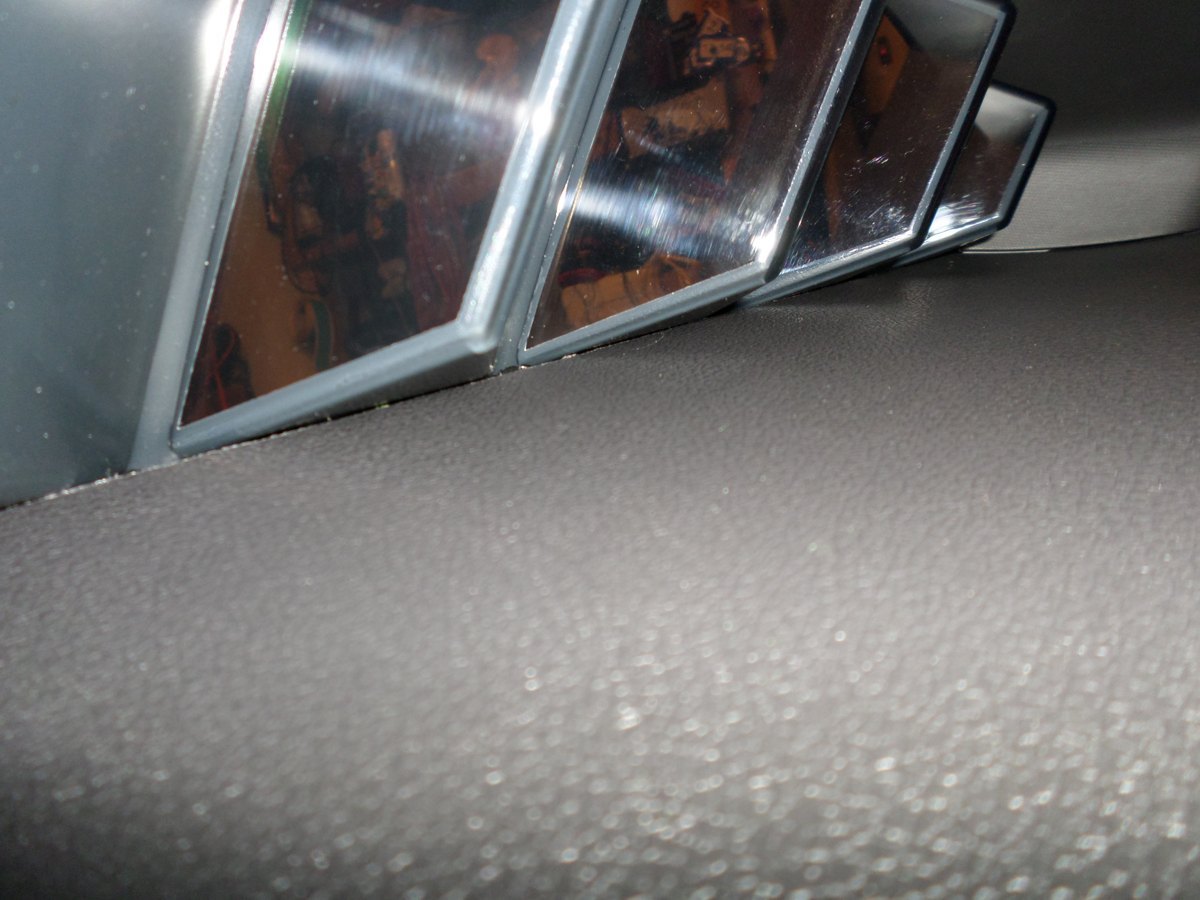
). Under normal illumination its a pretty snug fit and looks good to passengers in the seat.
Bullitt Member
Joined: June 9, 2011
Posts: 222
Likes: 0
Thanks for these close ups!!! Very, very helpful!!!


Thread
Thread Starter
Forum
Replies
Last Post
SplitSecond
'10-14 Roush Mustangs
1
Oct 17, 2015 07:41 PM