

GT500 Axle Back Exhaust Installation

Thread Starter
Member
Joined: April 29, 2012
Posts: 17
Likes: 0
GT500 Axle Back Exhaust Installation
So, I finished installing the GT500 axle back exhaust on my 2013 GT/CS and thought I'd share some photos. It was my first time installing exhaust. I ordered the GT500s from latemodelrestoration and did the installation by myself. To elevate the rear end I used the 12,000 capacity RhinoGear ramps, with tire chocks in front for safety. I didn't trust the ramps all that much, so I also stuck some jack stands under the rear axle, just in case. Incidentally, the ramps just slip out from under the wheels when you "pull off" of them. Doesn't seem safe.
Removing the stock mufflers was a fairly easy process. Really, the only difficult part was getting the front hangers out of the brackets. It's mostly difficult just because the over-the-axle pipe is in the way. Nevertheless, after too much time spent trying to finesse them out, I found they come out pretty quickly if you just pull back fairly hard while shimmying the mufflers sideways. Also, I used a silicone lubricant spray before I got started, which really seemed to help.
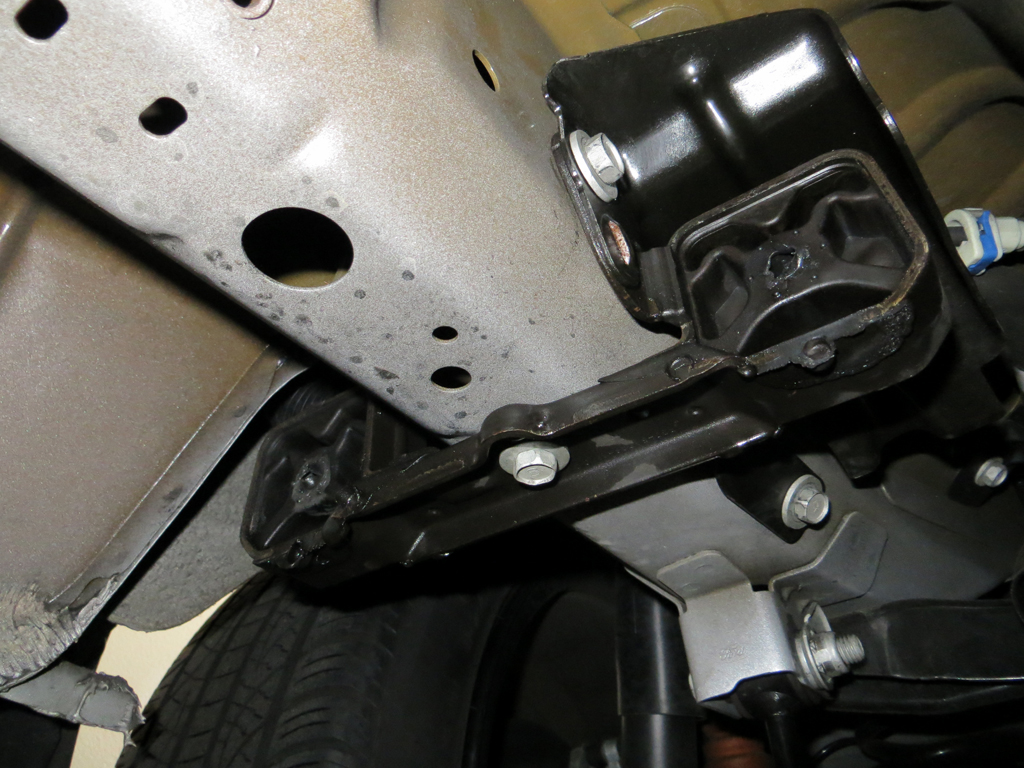
Installing the new mufflers was nearly impossible, by myself, without taking off the hanger brackets. I figured this out after about 30 minutes of unsuccessfully trying to guide the passenger side muffler into the brackets. In fact, it's only the one hanger without the stopper on it that I couldn't get into the bracket. Anyway, the driver side bracket is held on with three 13mm hex bolts and is super easy to take off after the stock mufflers are out.
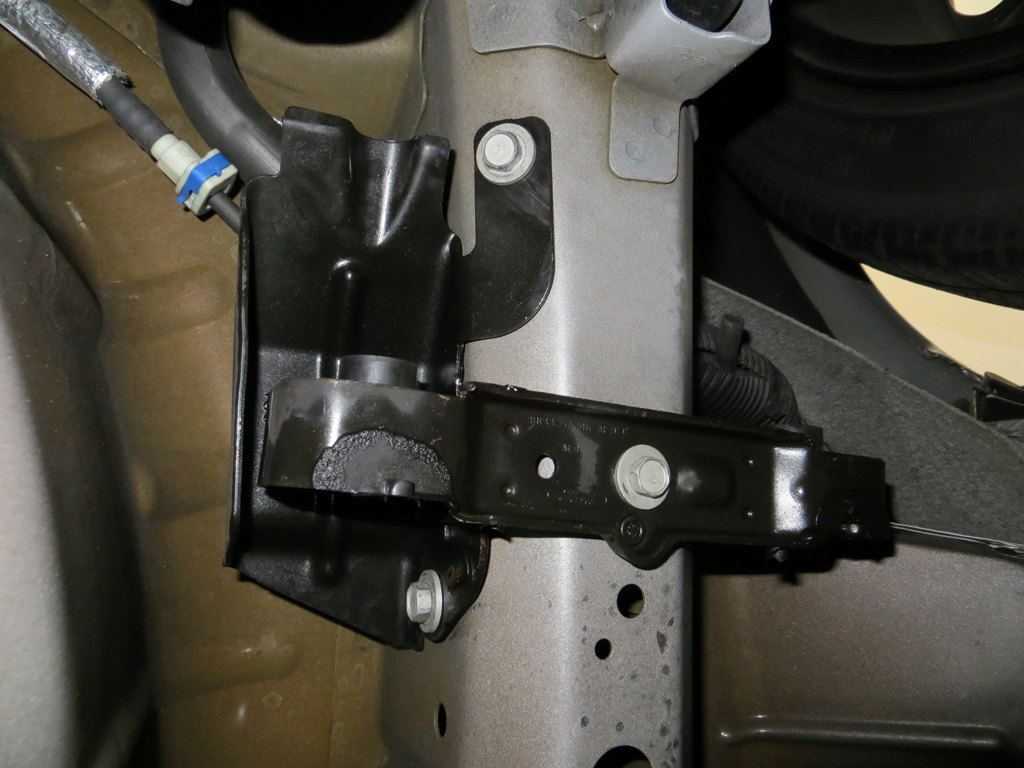
The passenger side hanger bracket is held on by two of the same screws. In my photo, it looks like there's a third screw in the back, but that's not connected to the bracket.
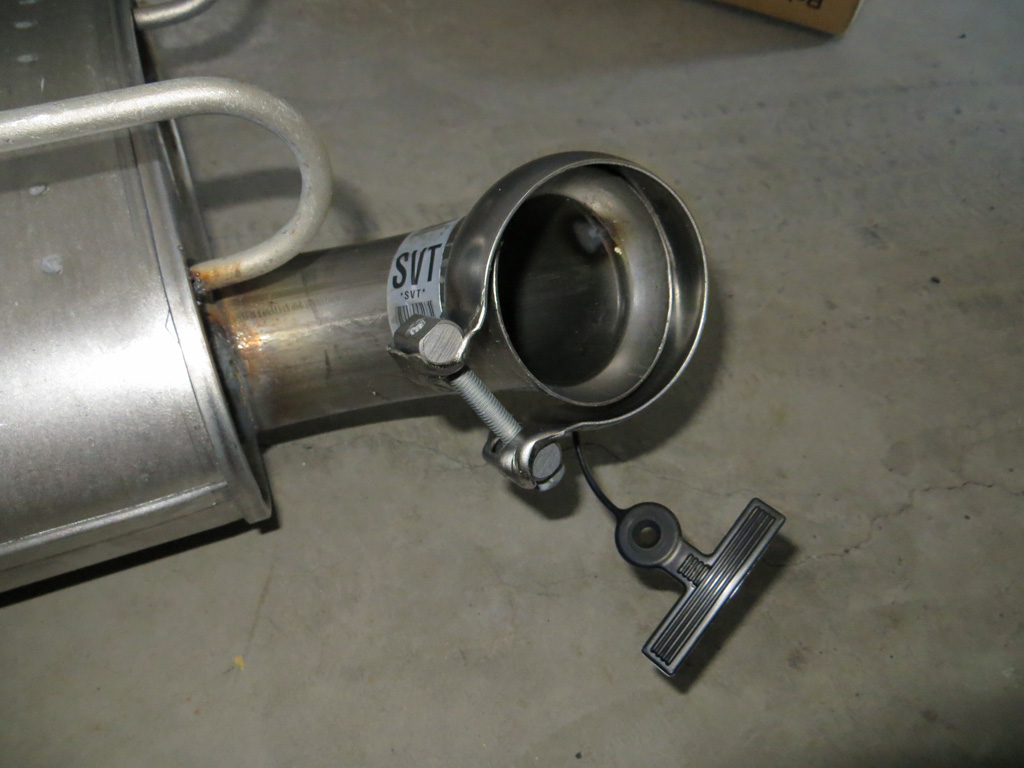
Unlike I had read in other forum posts and seen on YouTube, the mufflers I ordered came supplied with a tack-welded pipe clamp and 13mm hex bolt. So, I did not have to reuse the stock clamp (which I discovered only after I had wiggled it off!) and bolt. That was a nice surprise. In case you do have to re-use your hardware, I recommend twisting the clamp, as this seems to break the weld very quickly and cleanly.
To re-mount the hanger bracket, I just held up the muffler with one hand while I threaded the upper bolt(s) with the other. After that, I used both hands to thread the lower bolt, which has maybe only 1" of clearance above the muffler. I had to use a 13mm wrench to tighten the bolt, since it is in such a tight spot, but it eventually got the job done.
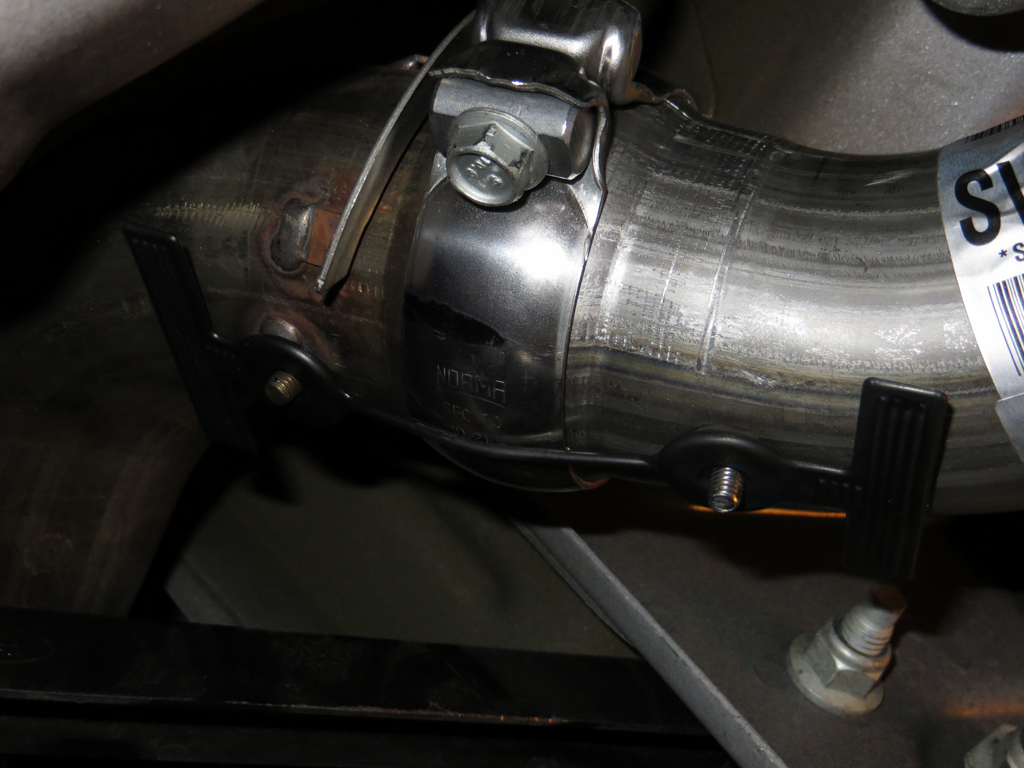
I'm not sure what this rubber connector is for, other than to ensure the exhaust is adequately connected. I took it off after the installation, since I think it will melt if I leave it there (?).
And, finally, pictures of the GT500 axle backs installed:
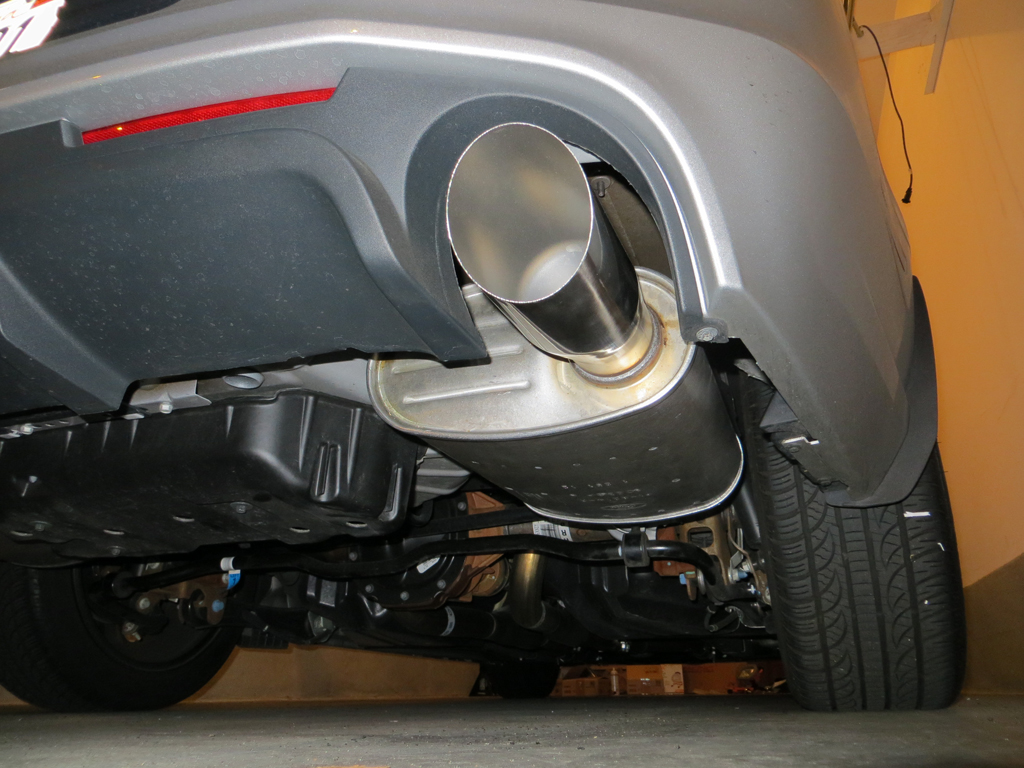
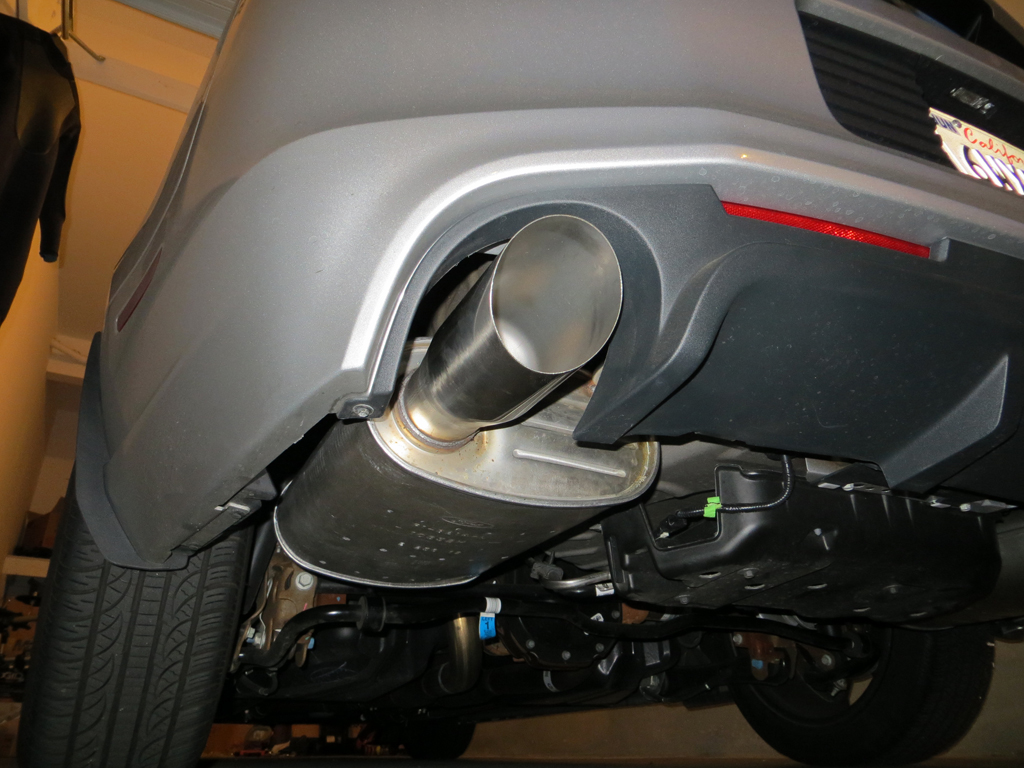
In the end, it took me a little over three hours to do the installation by myself. A lot of that time consisted of me lying there with the exhaust on my chest while I strategized my next move (or running to home depot for random things). I did not disconnect the negative battery terminal, even though I read that it's recommended for safety. The exhaust sounds great and I can't wait to drive it around more. Except, I'm a little concerned about the protruding fuel hose I discovered (see my other thread)! One last thing, I read that you need an extension for your ratchet but I found this not to be the case. Cheers!
Removing the stock mufflers was a fairly easy process. Really, the only difficult part was getting the front hangers out of the brackets. It's mostly difficult just because the over-the-axle pipe is in the way. Nevertheless, after too much time spent trying to finesse them out, I found they come out pretty quickly if you just pull back fairly hard while shimmying the mufflers sideways. Also, I used a silicone lubricant spray before I got started, which really seemed to help.
Installing the new mufflers was nearly impossible, by myself, without taking off the hanger brackets. I figured this out after about 30 minutes of unsuccessfully trying to guide the passenger side muffler into the brackets. In fact, it's only the one hanger without the stopper on it that I couldn't get into the bracket. Anyway, the driver side bracket is held on with three 13mm hex bolts and is super easy to take off after the stock mufflers are out.
The passenger side hanger bracket is held on by two of the same screws. In my photo, it looks like there's a third screw in the back, but that's not connected to the bracket.
Unlike I had read in other forum posts and seen on YouTube, the mufflers I ordered came supplied with a tack-welded pipe clamp and 13mm hex bolt. So, I did not have to reuse the stock clamp (which I discovered only after I had wiggled it off!) and bolt. That was a nice surprise. In case you do have to re-use your hardware, I recommend twisting the clamp, as this seems to break the weld very quickly and cleanly.
To re-mount the hanger bracket, I just held up the muffler with one hand while I threaded the upper bolt(s) with the other. After that, I used both hands to thread the lower bolt, which has maybe only 1" of clearance above the muffler. I had to use a 13mm wrench to tighten the bolt, since it is in such a tight spot, but it eventually got the job done.
I'm not sure what this rubber connector is for, other than to ensure the exhaust is adequately connected. I took it off after the installation, since I think it will melt if I leave it there (?).
And, finally, pictures of the GT500 axle backs installed:
In the end, it took me a little over three hours to do the installation by myself. A lot of that time consisted of me lying there with the exhaust on my chest while I strategized my next move (or running to home depot for random things). I did not disconnect the negative battery terminal, even though I read that it's recommended for safety. The exhaust sounds great and I can't wait to drive it around more. Except, I'm a little concerned about the protruding fuel hose I discovered (see my other thread)! One last thing, I read that you need an extension for your ratchet but I found this not to be the case. Cheers!
Legacy TMS Member
Joined: August 7, 2011
Posts: 5,246
Likes: 567
From: NC
Good job!
I installed mine with the car just backed up onto ramps and the e-brake set.
And I didn't take 3 hours, but I also left one of the driver-side bolts loose that I still plan on tightening up some time soon ... lol
I actually have to get back under there since the pass-side tip isn't centered anymore after the tech that did my DSS driveshaft removed/re-installed the pass-side muffler and pipe so he could get the driveshaft in.
Guess I'll take another look at that loose bolt.
Bullitt Member
Joined: October 22, 2012
Posts: 343
Likes: 4
From: West Bend, Wisconsin

Thanks for the step by step. Great photos and well documented.
Cobra Member
Joined: April 4, 2012
Posts: 1,200
Likes: 0
From: Central, Louisiana
Did this same swap over the weekend, took about the same amount of time. I know i looked dumb to my neighbors rolling around under that **** car fighting with a muffler sitting on my chest hahaa...my legs are sunburned and im sore as crap! But it looks great 
Shelby GT350 Member
Joined: May 18, 2010
Posts: 2,318
Likes: 15
From: CT
My experience was very similar to gwestonm's...
I think that for adult men with large hands, this job is a super annoying one. There's nothing compicated about it but the clearance is very tight. It took me several hours total and I believe the driver's side gave me the most crap.
I believe I did drop the brackets with the mufflers (though I did this two years ago... ).
Nobody considering this mod should be deterred though. It merely requires a bit of patience and a pair of safety glasses.
Shelby GT350 Member
Joined: May 18, 2010
Posts: 2,318
Likes: 15
From: CT
FWIW, I installed the SLP Loudmouth axle backs on my 2009 GT in like 30 minutes. Clearance to see what you're doing and be able to move your hands makes all the difference in the world.
Member
Joined: November 2, 2012
Posts: 37
Likes: 0
From: Ohio
Cobra Member
Joined: September 6, 2005
Posts: 1,296
Likes: 2
From: Colorado
I had major problems doing mine as well... Took FOREVER to get one off! And I was about to give up when I read something on here about loosening the mid-pipe and that made a HUGE difference! I didn't have to uninstall the brackets at all and the rest of the uninstallation and installation of the new ones were cake!
GT Member
Joined: October 15, 2012
Posts: 190
Likes: 2
From: Seattle
Team Mustang Source
Joined: December 23, 2004
Posts: 641
Likes: 0
From: Pacific Northwest
 oh well.. I'd still rather do it myself.

Thread
Thread Starter
Forum
Replies
Last Post
Mackitude
2010-2014 Mustang
6
Aug 13, 2015 01:05 PM
glo106
2010-2014 Mustang
16
Aug 11, 2015 08:29 AM

