05-09 Exterior Modifications Making Your '05 Stand Out from the Crowd

Show me your shakers

Old Jan 11, 2008 | 06:46 AM
  #81  
91svtcoupe's Avatar
Bullitt Member
 
Joined: November 20, 2006
Posts: 389
Likes: 3
With Supercharger

Originally Posted by Lampoon
Am I the only one that likes the shroud & aluminum Mustang highlights?

I will be installing my supercharger very soon.....I like the shroud now but I was thinking that if I will be cutting it up anyway why not go ahead and trim it out....?
Reply
Old Jan 11, 2008 | 02:47 PM
  #82  
n8rfastback's Avatar
Shelby GT350 Member
 
Joined: June 25, 2007
Posts: 2,416
Likes: 1
i have the full shroud on mine still. plan on keeping it so far.
Reply
Old Jan 29, 2008 | 04:54 PM
  #83  
odiaz's Avatar
Bullitt Member
 
Joined: May 30, 2005
Posts: 419
Likes: 0
I give you guys a lot of credit for cutting up the shaker. It looks great. What did you use to trim it? Did you use a poer saw or a pair of snips?
Reply
Old Jan 30, 2008 | 05:47 AM
  #84  
Barricade's Avatar
Cobra R Member
 
Joined: December 21, 2004
Posts: 1,617
Likes: 3
From: The Alamo
You couldnt cut that hood with tin snips if you were Arnold Schwarzenegger.
I used a jig saw and it wasnt easy (doing a good job).
There are a few areas in the cut out zone where you will be going through
several layers of metal.

I cant tell you how glad I am that I did it though.
The Shaker is the cherry on top.
Reply
Old Jan 30, 2008 | 08:14 PM
  #85  
CaliforniaShaker's Avatar
Member
 
Joined: December 30, 2007
Posts: 47
Likes: 1
Jig saw with fine tooth metal cutting blade. Actually I went through three blades, just to be on the safe side, and just because I had them. I highly recommend a variable speed saw. Slow and steady is the key.
Reply
Old Jan 31, 2008 | 05:11 AM
  #86  
Barricade's Avatar
Cobra R Member
 
Joined: December 21, 2004
Posts: 1,617
Likes: 3
From: The Alamo
Good call & 100% correct.

Slow on those corners or it will get away from you.
Reply
Old Jan 31, 2008 | 12:45 PM
  #87  
n8rfastback's Avatar
Shelby GT350 Member
 
Joined: June 25, 2007
Posts: 2,416
Likes: 1
hey guys i used a 4" angle grinder and it worked great!!!

i just went through the first layer real slow, peeled it off and then cut out the under bracing....

went like a hot knife through butter, and was clean and simple too.... no jig sawing action to get jerky or throw you off
Reply
Old Jan 31, 2008 | 12:58 PM
  #88  
TacoBill's Avatar
 
Joined: September 23, 2004
Posts: 10,037
Likes: 5
From: SoCal
Originally Posted by 91svtcoupe
I like the shroud now but I was thinking that if I will be cutting it up anyway why not go ahead and trim it out....?
2 problems with keeping the full shroud..

1. Restricts view of the camcovers if you decide to paint or powdercoat them.

2. The shroud/scoop will need to be removed everytime you go to the dyno (PITA). They have to clip onto the #1 coil pack.

The way I (and a few others) trimmed the shroud, the noted 2 problems no longer exist.
Reply
Old Jan 31, 2008 | 02:20 PM
  #89  
n8rfastback's Avatar
Shelby GT350 Member
 
Joined: June 25, 2007
Posts: 2,416
Likes: 1
i will definately be trimming mine this spring when i do my throttle body cleaning....

it just looks cleaner, i like the shroud a lot but its time to get trimmed up
Reply
Old Jan 31, 2008 | 02:21 PM
  #90  
n8rfastback's Avatar
Shelby GT350 Member
 
Joined: June 25, 2007
Posts: 2,416
Likes: 1
plus i wanna make it easier to see the headers once i get them on
Reply
Old Jan 31, 2008 | 02:52 PM
  #91  
GRAYPNY's Avatar
Thread Starter
Team Mustang Source
 
Joined: December 12, 2004
Posts: 5,801
Likes: 5
From: NorCal
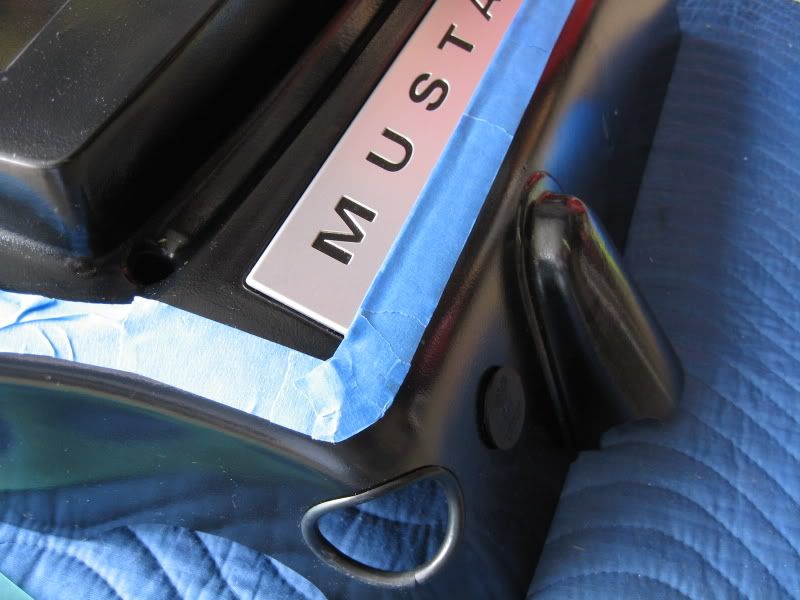
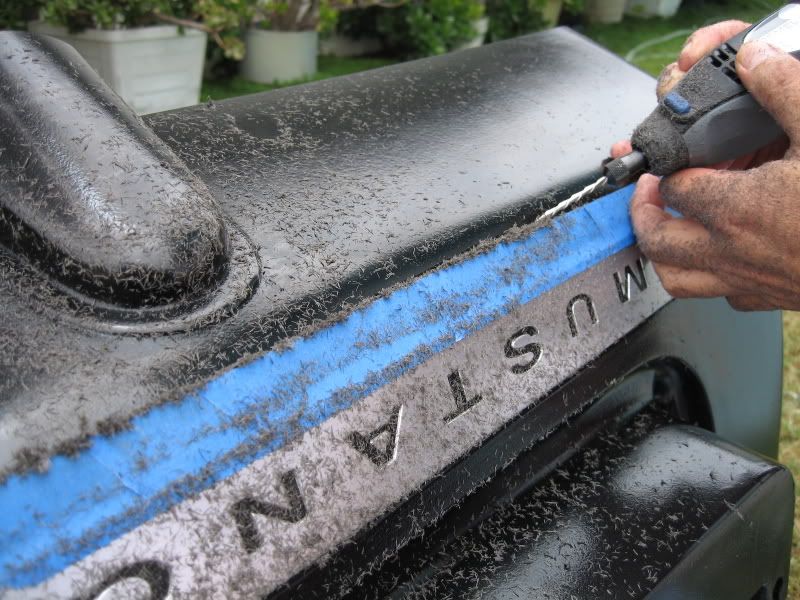
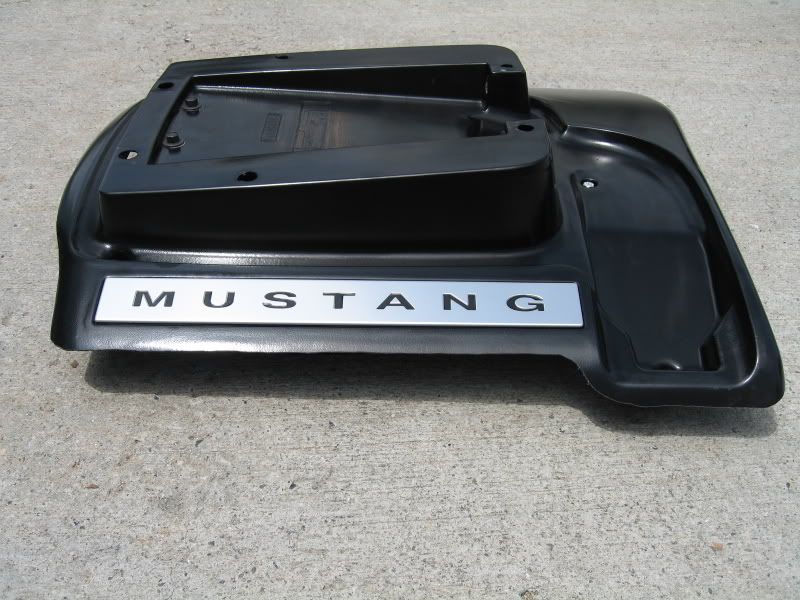
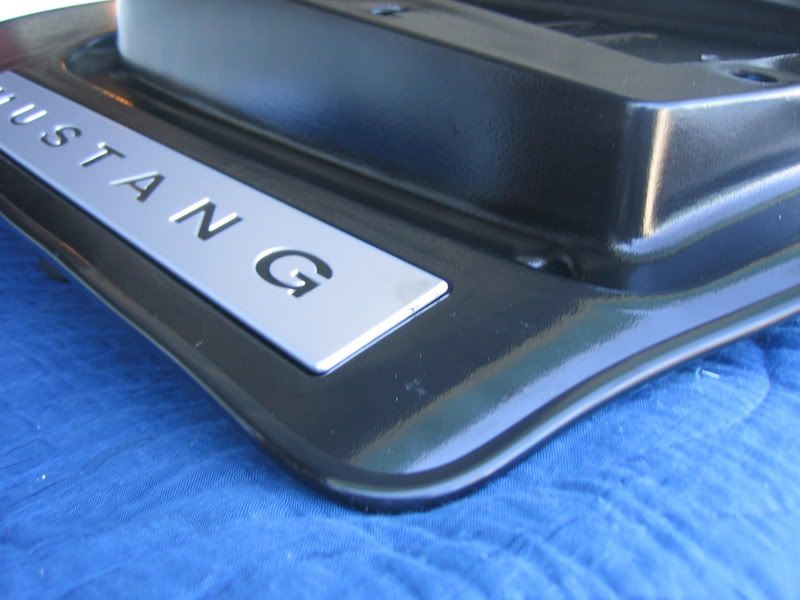
I guess I didn't post pictures of the end result so here they are. I used a cutting wheel to trim the shaker after I masked it off and used a sharpie to mark where I wanted to cut. I then took a propane torch and melted away the plastic fuzzies from the cutting wheel. Lastly I buffed the edges with a polishing wheel and it came out so nice I didn't even bother to add the trim around the edges.
Attached Thumbnails Show me your shakers-picture-180-small-.jpg   Show me your shakers-picture-181-small-.jpg   Show me your shakers-picture-188-small-.jpg   Show me your shakers-picture-190-small-.jpg   Show me your shakers-picture-73-small-.jpg  

Reply
Old Jan 31, 2008 | 02:56 PM
  #92  
n8rfastback's Avatar
Shelby GT350 Member
 
Joined: June 25, 2007
Posts: 2,416
Likes: 1
hey can you get a close up of the edges, i may do that to mine too, i dont really want to put some big nasty trim on the edge of my shaker if i dont have to... i prefer the clean edge if i can
Reply
Old Jan 31, 2008 | 03:35 PM
  #93  
GRAYPNY's Avatar
Thread Starter
Team Mustang Source
 
Joined: December 12, 2004
Posts: 5,801
Likes: 5
From: NorCal
Check out post #78 Nate. It's about as good as the picture gets. Very smooth and no rough edges.
Reply
Old Jan 31, 2008 | 04:15 PM
  #94  
officespace56's Avatar
Cobra Member
 
Joined: March 3, 2007
Posts: 1,186
Likes: 0
From: Eden Prairie, MN
Originally Posted by LEO_06GT
Hmmm... That engine bay looks familiar.

Here's an updated pic.

WOW Leo! That thing is really shinin!

When did you get a painted chin spoiler? Or paint the textured one?
Reply
Old Feb 3, 2008 | 08:51 PM
  #95  
odiaz's Avatar
Bullitt Member
 
Joined: May 30, 2005
Posts: 419
Likes: 0
Originally Posted by Lampoon
You couldnt cut that hood with tin snips if you were Arnold Schwarzenegger.
I used a jig saw and it wasnt easy (doing a good job).
There are a few areas in the cut out zone where you will be going through
several layers of metal.

I cant tell you how glad I am that I did it though.
The Shaker is the cherry on top.
i meant how did you trim the plastic shaker. I realize the hood couln't be cut with tins snips.

I imagine you have to have really steady hands if you plan on using a dremmel with a rotozip blade. A rotary blade might be a bit easier for straight lines but the curved ends might be a bit hard to do.
Reply
Old Feb 3, 2008 | 09:18 PM
  #96  
LEO_06GT's Avatar
Legacy TMS Member
 
Joined: May 24, 2006
Posts: 7,409
Likes: 0
From: San Diego
Originally Posted by officespace56
WOW Leo! That thing is really shinin!

When did you get a painted chin spoiler? Or paint the textured one?
Thanks. I got the chin painted back in November. Best decision I ever made. Looks so much more OEM than before.
Reply
Old Feb 4, 2008 | 06:14 AM
  #97  
Barricade's Avatar
Cobra R Member
 
Joined: December 21, 2004
Posts: 1,617
Likes: 3
From: The Alamo
Originally Posted by odiaz
i meant how did you trim the plastic shaker. I realize the hood couln't be cut with tins snips.
My bad...
Reply
Old Feb 4, 2008 | 07:25 AM
  #98  
TacoBill's Avatar
 
Joined: September 23, 2004
Posts: 10,037
Likes: 5
From: SoCal
Originally Posted by odiaz
i meant how did you trim the plastic shaker. I realize the hood couln't be cut with tins snips.

I imagine you have to have really steady hands if you plan on using a dremmel with a rotozip blade. A rotary blade might be a bit easier for straight lines but the curved ends might be a bit hard to do.
Dremel with router bit.


Reply
Old Feb 4, 2008 | 07:36 AM
  #99  
adrenalin's Avatar
I Have No Life
 
Joined: May 26, 2004
Posts: 10,605
Likes: 2
Dang, after seeing the shroud mod I think I am going to have to trim mine as well
Reply
Old Feb 4, 2008 | 07:49 AM
  #100  
Barricade's Avatar
Cobra R Member
 
Joined: December 21, 2004
Posts: 1,617
Likes: 3
From: The Alamo
Doesnt that trim cover only come in like 24"...?
hey Bill....did you use a drill bit?
Reply

Thread Tools
Search this Thread

All times are GMT -6. The time now is 01:47 AM.