
New 2011 Safety Mirrors

Thread Starter
Member
Joined: January 21, 2011
Posts: 8
Likes: 0
From: Pacific NW
New 2011 Safety Mirrors
Hey Stanger's,
Does anyone know if the new 2011 Side Mirrors (with the parabolic insert safety feature) will fit on an 05-09 Mustang???
or does anyone know if there is an aftermarket company that has something comparable?
thanks again,
james/shelbygt07
Does anyone know if the new 2011 Side Mirrors (with the parabolic insert safety feature) will fit on an 05-09 Mustang???
or does anyone know if there is an aftermarket company that has something comparable?
thanks again,
james/shelbygt07
Mach 1 Member
Joined: June 24, 2010
Posts: 501
Likes: 0
From: Sacramento/Orange County
Credit goes to B. Menes for this write-up
Originally Posted by Menes's GT
This write made the install painless so i thought id share it with you guys if anyone wants to put these mirrors on
Since this is a very uncommon mod, and there is very little info on the web - I am submitting a writeup for the install of 2010-2011 mirrors on a 2005-2009 mustang.
Parts:
-2011 Mirror Assembly (both sides) - BR3Z-17682-AA /// BR3Z-17683-AA - $140.00 and &137.85
-2011 Covers (both sides) - AR3Z-17D742-AA /// AR3Z17D743-AA - $17.88 a pop
-2010 Mirror Assembly (both sides) - AR3Z-17682-AA /// AR3Z-17683-AA - $81.95 and $77.95
-2010 Covers (both sides) - AR3Z-17D743-BAPTM /// AR3Z-17D742-BAPTM - $8.68 a pop
Notes:
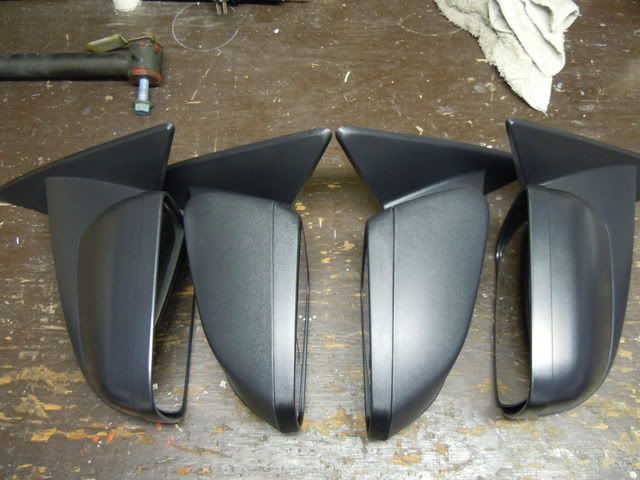
The difference between the mirrors is simple. The 2010's have a sold piece of glass. And the 2011 have a integrated blind spot area in the outside upper corner. Is the price difference worth it?? That is your opinion. I opted for the 2011 mirrors since i was already doing the upgrade. All together you are spending $119 dollars more for the blind spot areas.
Cost:
$370.56. That is for the mirror cover x2, assembly x2, auto primer, auto clear, and ford "HP" White. By painting these mirrors myself i saved around $75 - $150 (price to paint varies from shop to shop).
Disclaimer:
This is a very simple install. You have to take your time lining up the mirrors and drilling the holes. If you destroy your car, i am not at fault!! All in all, this was a fun install - i give it a 3 out of 10 on the difficultly scale.
Tools Needed:
-11mm box wrench
-Drill
-Drill index
-Dremel (works best. if you do not have one you can use a small blade, hack saw blade, and metal file)
INSTALL:
1 - Remove the plastic parts that cover the mirror bolts. They simply just pull out.
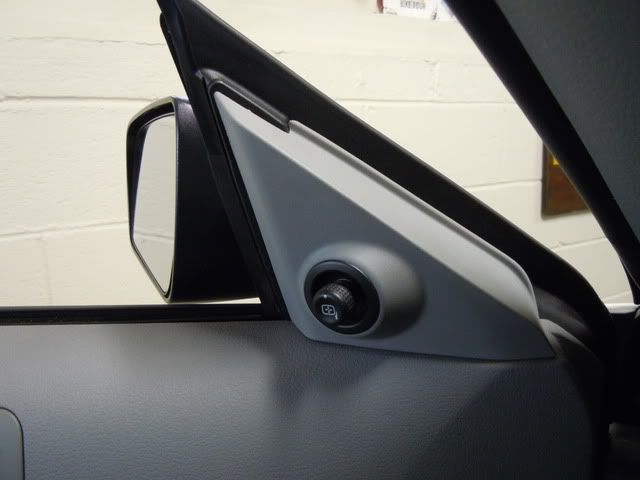
2 - Unplug the 3 electrical connections. 1 on the passengers side, and 2 on the drivers side. Let the wires just hang there.
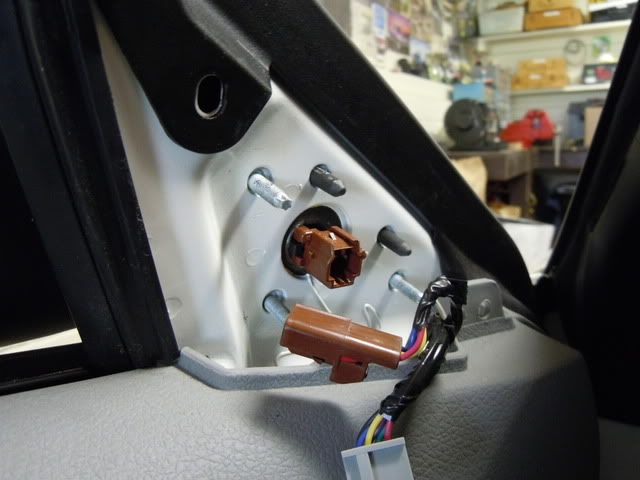
3 - Using the 11mm box wrench, unbolt the bolts. Do not let the bolts drop into the door. That will easily set you back an hour or so. Set bolts aside, you will use these to mount up the 2010/2011 mirrors.

4 - Give the mirrors a tug and pull them out, you will have some road dirt behind them.
5 - Now is the tricky part, the mirrors do not match up to the holes. On each mirror there are 2 plastic locating pins. Both these have to be cut off. Take off the foam backing on the mirror so you can cut at the base of the pins. THESE PINS NEED TO BE CUT FLUSH TO THE BACK OF THE MIRROR OR THE MIRROR WILL NOT BOLT UP FLAT. << very important. I used my Dremel for this, but you can use a hack saw blade or knife. Put the foam backing on the mirror again.
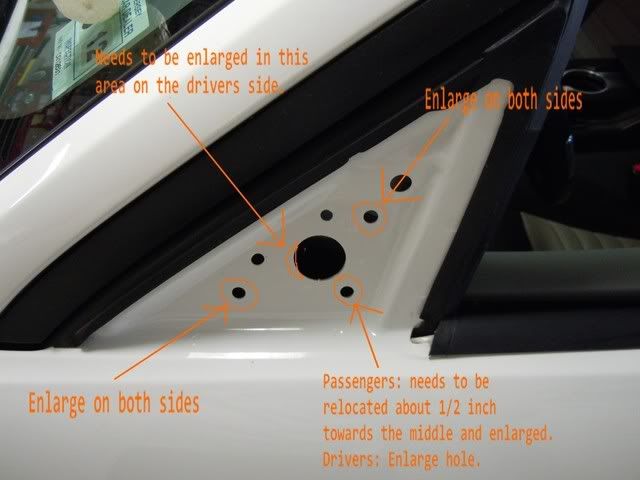
6 - Now the 3 holes on your 2005-2009 GT need to be moved and enlarged. On the drivers side i only had to enlarge the 3 holes. I made them a little over 1/2 inch. On the passengers side the top and front hole i had to enlarge. But the bottom/rear hole i had to move about a 1/2 inch up and in to the center. TEST FIT THE MIRRORS SEVERAL TIMES. You can line the mirrors up to the car and use a marker or pencil to make marks to show you where to drill. See the above picture for a reference. You do have some room for error because the flange on the bolts are so big. Just don't make the holes to big.
The wire clips are located in the center of the mirrors. There is a large hole that the wire clip fits into. The passenger side hole was fine. But i had to grind out the left hand side of the hole so the clip would fit in on the drivers side. I used my Dremel for this. See the above picture for a reference.
7 - Once the holes are moved/enlarged, the mirrors will pop right into place like they were made for the car.
8 - Because the holes are now enlarged you have to move the mirror around and line it up along the A pillar. Put the 3 bolts back on, and tighten them down with the 11mm wrench. Hand tight with the wrench is fine, just snug them up.
9 - Plug in the 3 wire plugs.
10 - Pop the 2 plastic covers back on....DONE!!!
All in all, this was money well spent, i feel the new mirrors look awesome from the outside of the car. I can not wait to get them painted. The area of the mirrors are a bit smaller, but you can still see great. And the integrated blind spots are nice.
Reference Photos:
Here you can see the difference between the mirrors.
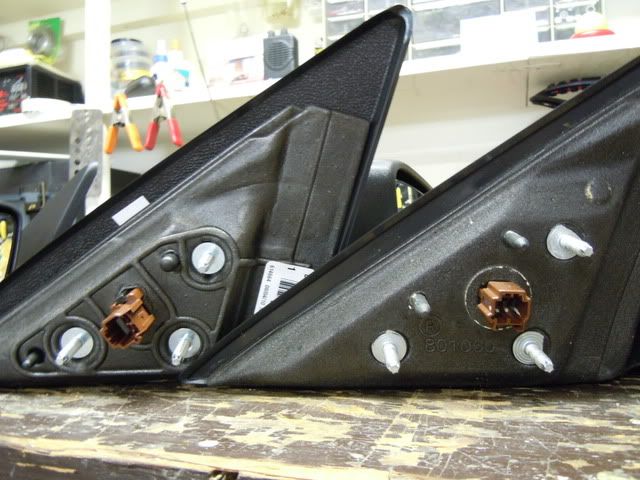
This photo shows the difference in the location of the screw studs.
Since this is a very uncommon mod, and there is very little info on the web - I am submitting a writeup for the install of 2010-2011 mirrors on a 2005-2009 mustang.
Parts:
-2011 Mirror Assembly (both sides) - BR3Z-17682-AA /// BR3Z-17683-AA - $140.00 and &137.85
-2011 Covers (both sides) - AR3Z-17D742-AA /// AR3Z17D743-AA - $17.88 a pop
-2010 Mirror Assembly (both sides) - AR3Z-17682-AA /// AR3Z-17683-AA - $81.95 and $77.95
-2010 Covers (both sides) - AR3Z-17D743-BAPTM /// AR3Z-17D742-BAPTM - $8.68 a pop
Notes:
The difference between the mirrors is simple. The 2010's have a sold piece of glass. And the 2011 have a integrated blind spot area in the outside upper corner. Is the price difference worth it?? That is your opinion. I opted for the 2011 mirrors since i was already doing the upgrade. All together you are spending $119 dollars more for the blind spot areas.
Cost:
$370.56. That is for the mirror cover x2, assembly x2, auto primer, auto clear, and ford "HP" White. By painting these mirrors myself i saved around $75 - $150 (price to paint varies from shop to shop).
Disclaimer:
This is a very simple install. You have to take your time lining up the mirrors and drilling the holes. If you destroy your car, i am not at fault!! All in all, this was a fun install - i give it a 3 out of 10 on the difficultly scale.
Tools Needed:
-11mm box wrench
-Drill
-Drill index
-Dremel (works best. if you do not have one you can use a small blade, hack saw blade, and metal file)
INSTALL:
1 - Remove the plastic parts that cover the mirror bolts. They simply just pull out.
2 - Unplug the 3 electrical connections. 1 on the passengers side, and 2 on the drivers side. Let the wires just hang there.
3 - Using the 11mm box wrench, unbolt the bolts. Do not let the bolts drop into the door. That will easily set you back an hour or so. Set bolts aside, you will use these to mount up the 2010/2011 mirrors.
4 - Give the mirrors a tug and pull them out, you will have some road dirt behind them.
5 - Now is the tricky part, the mirrors do not match up to the holes. On each mirror there are 2 plastic locating pins. Both these have to be cut off. Take off the foam backing on the mirror so you can cut at the base of the pins. THESE PINS NEED TO BE CUT FLUSH TO THE BACK OF THE MIRROR OR THE MIRROR WILL NOT BOLT UP FLAT. << very important. I used my Dremel for this, but you can use a hack saw blade or knife. Put the foam backing on the mirror again.
6 - Now the 3 holes on your 2005-2009 GT need to be moved and enlarged. On the drivers side i only had to enlarge the 3 holes. I made them a little over 1/2 inch. On the passengers side the top and front hole i had to enlarge. But the bottom/rear hole i had to move about a 1/2 inch up and in to the center. TEST FIT THE MIRRORS SEVERAL TIMES. You can line the mirrors up to the car and use a marker or pencil to make marks to show you where to drill. See the above picture for a reference. You do have some room for error because the flange on the bolts are so big. Just don't make the holes to big.
The wire clips are located in the center of the mirrors. There is a large hole that the wire clip fits into. The passenger side hole was fine. But i had to grind out the left hand side of the hole so the clip would fit in on the drivers side. I used my Dremel for this. See the above picture for a reference.
7 - Once the holes are moved/enlarged, the mirrors will pop right into place like they were made for the car.
8 - Because the holes are now enlarged you have to move the mirror around and line it up along the A pillar. Put the 3 bolts back on, and tighten them down with the 11mm wrench. Hand tight with the wrench is fine, just snug them up.
9 - Plug in the 3 wire plugs.
10 - Pop the 2 plastic covers back on....DONE!!!
All in all, this was money well spent, i feel the new mirrors look awesome from the outside of the car. I can not wait to get them painted. The area of the mirrors are a bit smaller, but you can still see great. And the integrated blind spots are nice.
Reference Photos:
Here you can see the difference between the mirrors.
This photo shows the difference in the location of the screw studs.
Last edited by chutoyy; Apr 11, 2011 at 02:26 PM.
Like Father...
I ♥ Sausage
I ♥ Sausage
Joined: April 4, 2007
Posts: 20,164
Likes: 643
From: Just outside the middle of nowhere
Honestly, I haven't been able to get used to them on my '11. Granted, I've only put about 400 miles on the car, but so far I find them very distracting. At this point I wish it was a regular mirror like my 08's had on them. That may change with time, but as of now I'm just not liking it.
Last edited by Rather B.Blown; Apr 11, 2011 at 03:09 PM.

Thread
Thread Starter
Forum
Replies
Last Post
MRGTX
2015 - 2023 MUSTANG
4
Sep 16, 2015 08:08 AM