
CDC Shaker with C&L Intake

Thread Starter
Mach 1 Member
Joined: January 29, 2004
Posts: 837
Likes: 3
From: Milwaukee, WI
CDC Shaker with C&L Intake
Anyone here have this combo? What modifications did you need to make to the shaker to make it fit? How did you get the cold air feed to go into the C&L heat shield?
If no one has this combo, I suppose I'll do a thorough how-to when I get one.
If no one has this combo, I suppose I'll do a thorough how-to when I get one.
Bullitt Member
Joined: May 30, 2005
Posts: 419
Likes: 0
First, drill a 3" hole in the side of the heat shield. Then I cut the lower duct to make it much shorter. I used a hack saw to cut it at about 5" from the bottom.
I bought a piece of 3�x3� Spectre Flex hose at Auozone for $19.99. This is a 3� hose with couplings ends and clamps.
I heated one of the couplings with a heat gun since it was quite cold in the garage and the rubber was a bit stiff. I then slid it over the modified lower duct and held it in place with one of the 3� clamps. I then attached the flex hose to the lower duct and measured enough of the hose to connect to the Cold air outlet on the shaker.
Finally, I trimmed the straight hose that came with the shaker and installed it inside the air shield to extend the air flow and focus it directly onto the filter. I held this piece of hose with the other 3� clamp that came with the Spectre hose.
Last edited by odiaz; May 10, 2008 at 09:37 PM.
Legacy TMS Member
Joined: January 9, 2005
Posts: 6,982
Likes: 6
From: New Carlisle, Ohio (20 miles north of Dayton)
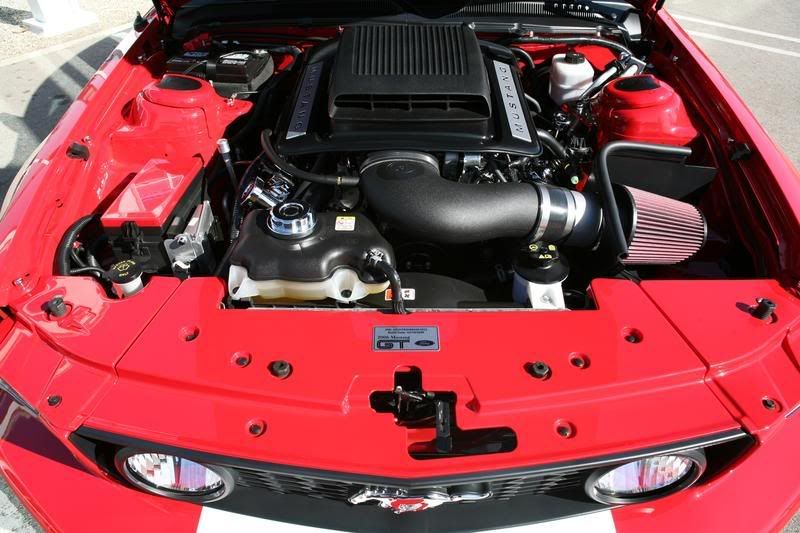
As promised here are a few pics of my setup. You will need to trim the shaker where is goes around the intake at the throttle body. If I remember correctly it is about 1/2 to 3/4 inch on both sides and the top. You need to remove enough material to be able to get to the upper TB screws. Since this is where the CDC shaker attaches.
As far as the airbox goes I used the CDC intake but the vertical section needs to be shortened. If you look real hard you can see some black electrical tape wrapped around the vertical area. I cut about 1 1/2 inches out of this area and glued it back together with ABS cement. I wrapped electrical tape around it to hide the uneven seam it creates. Finally you will need to make about a 2 inch long extension to reach to the airbox. Since I work at a tool shop I just turned up some aluminum tubing and painted it black. Hopes this helps you out.
Scott
Last edited by 70MACH1OWNER; May 12, 2008 at 06:30 AM.
Legacy TMS Member
Joined: October 8, 2005
Posts: 12,395
Likes: 29
From: Medina county, OH
Great info guys! I used to have the JLT intake with a CDC shaker and I ran it in a similar fashion to what's been suggested here.
And I can vouch for Scott's setup- looks great in person!
And I can vouch for Scott's setup- looks great in person!
Legacy TMS Member
Joined: January 9, 2005
Posts: 6,982
Likes: 6
From: New Carlisle, Ohio (20 miles north of Dayton)

Thread Starter
Mach 1 Member
Joined: January 29, 2004
Posts: 837
Likes: 3
From: Milwaukee, WI
Legacy TMS Member
Joined: January 9, 2005
Posts: 6,982
Likes: 6
From: New Carlisle, Ohio (20 miles north of Dayton)
Legacy TMS Member
Joined: January 9, 2005
Posts: 6,982
Likes: 6
From: New Carlisle, Ohio (20 miles north of Dayton)

I Have No Life
Joined: May 26, 2004
Posts: 10,605
Likes: 2
I just don't understand the point of routing the shaker to the heat shield on the CAI. It really isn't going to do much since it is not an enclosed system. I wish someone would make a universal enclosure that would work with the majority of CAI's on the market. I started fabricating one last year but there wasn't enough space on the inside at high speeds. However, during idle it was cool to hear all of the air being sucked in through the shaker.
Legacy TMS Member
Joined: January 9, 2005
Posts: 6,982
Likes: 6
From: New Carlisle, Ohio (20 miles north of Dayton)
I just don't understand the point of routing the shaker to the heat shield on the CAI. It really isn't going to do much since it is not an enclosed system. I wish someone would make a universal enclosure that would work with the majority of CAI's on the market. I started fabricating one last year but there wasn't enough space on the inside at high speeds. However, during idle it was cool to hear all of the air being sucked in through the shaker.
Scott
Cobra Member
Joined: October 1, 2006
Posts: 1,153
Likes: 5
From: Central OH
It may not be a fully enclosed system, but my first cleaning of my CAI filter convinced me that there is actually quite a bit of airflow going through the Shaker.
The top of the 1/3rd of the filter was dirty + a circular dirty spot where my inlet fed into the CAI shield.
I'll have to take some pics next time I clean the filter.
The top of the 1/3rd of the filter was dirty + a circular dirty spot where my inlet fed into the CAI shield.
I'll have to take some pics next time I clean the filter.
Legacy TMS Member
Joined: January 9, 2005
Posts: 6,982
Likes: 6
From: New Carlisle, Ohio (20 miles north of Dayton)
It may not be a fully enclosed system, but my first cleaning of my CAI filter convinced me that there is actually quite a bit of airflow going through the Shaker.
The top of the 1/3rd of the filter was dirty + a circular dirty spot where my inlet fed into the CAI shield.
I'll have to take some pics next time I clean the filter.
The top of the 1/3rd of the filter was dirty + a circular dirty spot where my inlet fed into the CAI shield.
I'll have to take some pics next time I clean the filter.
Larry...you are 100% correct. I have seen the same kind of dirty spot on my filter. I know it makes an airflow improvement but don't know how to explain it to the general public. Seeing is believing guys!! And I see in about 4 weeks your going to join "us over the hill gang" !!
Scott

Last edited by 70MACH1OWNER; May 13, 2008 at 07:15 PM.
Bullitt Member
Joined: May 29, 2006
Posts: 450
Likes: 0
From: Victoria, BC
I did a very similar setup to Odiaz above. I ran out to a local speed shop and was surprised to find a Spectre 3' x 3" intake tube set like above. I don't have any pics but my install was quite similar.
I cut back the tube on the shaker itself about 3.5". then I trimmed off all but about 14 or so inches from the spectre tube. I then took a 3" metal adapter and dremel'd out a hole in the C&L airshield. to ensure the metal part didn't rub against the filter I positioned it where I needed it and then used a worm drive clamp on the engine side of the C&L airbox and all said and done worked out much easier than expected. There is still a pretty round about bend for the air to go through but it's finished and came out pretty good.
I may replace the metal bit with a chunk of PVC but it looks fine and I'm in no mad rush. So thanks to the others in this thread for ideas it helped out a lot!

When I had my K&N CAI, I had the cold air ducting routed to the heatshield, but decided to ditch it when I switched to the K&N Racer (which I no longer have). A much cleaner look imo. Without the ducting, cool air is provided into the engine bay which is always welcome.

Thread
Thread Starter
Forum
Replies
Last Post