Valve Cover Hell
 2/1/08, 04:40 AM
#1
Valve Cover Hell
I bought a set of Steeda powder coated valve covers and am not too happy. I initially thought that the job would be easy but I was wrong. All of the wiring harnesses make it a pain in the but to get the old covers out and put the new ones in. I keep my engine clean but still had to worry about getting dirt into my vavle train when removing the covers. Using masking tape will keep your covers scratch free while putting the new covers in. No instructions were provided so I could see where an excited modder would not think of it. I got the tip by reading forums on valve covers. The biggest thing I didn't like was the fact that the Steeda covers that I got used two less bolts than the factory ones (beware when it says product may vary from one shown in picture)  Getting a torque wrench onto all of them is impossible even when using a universal adapter. I couldn't start the car up last night to check for oil leaks because my car is loud and even sounds louder coming out of the garage
  If they leak I will throw up the
  flag and just get my factory ones powder coated and put them back in. I sure hope the Steeda covers with two less bolts dont leak though because I don't want to go through with that again
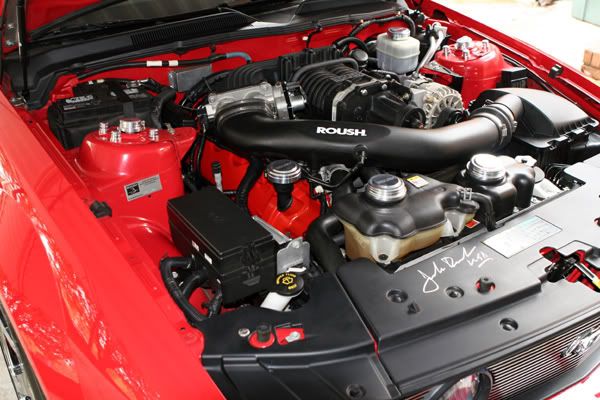
  . Pics are posted below. I am expanding the IUP color combo into my hood and trunk compartments. Now I need some brushed aluminm under there somewhere.
Getting a torque wrench onto all of them is impossible even when using a universal adapter. I couldn't start the car up last night to check for oil leaks because my car is loud and even sounds louder coming out of the garage flag and just get my factory ones powder coated and put them back in. I sure hope the Steeda covers with two less bolts dont leak though because I don't want to go through with that again . Pics are posted below. I am expanding the IUP color combo into my hood and trunk compartments. Now I need some brushed aluminm under there somewhere.
Last edited by mustang_lurkers; 3/7/08 at 04:26 AM.
 2/1/08, 08:00 AM
#2
Team Mustang Source
Join Date: June 19, 2004
Location: Phoenixville, PA
Posts: 6,839
Likes: 0
Received 2 Likes
on
2 Posts
Hey Derek, they look SWEET! Nice color contrast in the engine bay! I did a set about 6 months back. Not the easiest thing in the world to do, but having a second set of hands is a MUST!! My dad helped me on these. Since he's a mechanic with over 55+ years of experience, that made the install a breeze. Took 1.5 hours. But your right, the wiring looms were a PITA! The passenger side was worse than the driver's side.
A tip for anyone who is going to switch their valve covers. Unhook the fuel line. It makes for ALOT more clearance when its not connected. Just use a rag to catch the few drops of fuel. And make sure you unbolt the dipstick. And lastly, a torque wrench isn't necessary. The Ford torque specs are basically what hand tightening equals. My dad told me to "put that d*** torque wrench away", after we got the second covers on, lol. Hand tighening is plenty fine. When you see the gasket flatten out to its max, between the head and the cover, your good!
A tip for anyone who is going to switch their valve covers. Unhook the fuel line. It makes for ALOT more clearance when its not connected. Just use a rag to catch the few drops of fuel. And make sure you unbolt the dipstick. And lastly, a torque wrench isn't necessary. The Ford torque specs are basically what hand tightening equals. My dad told me to "put that d*** torque wrench away", after we got the second covers on, lol. Hand tighening is plenty fine. When you see the gasket flatten out to its max, between the head and the cover, your good!
2/1/08, 08:36 AM
#4
Success! I just ran my engine for 30 minutes and had no oil leaks. I checked for visual leaks and any smoking from the headers and there were none. I was very skeptical since Steeda sent me valve covers with two less bolts than the factory covers. Let me know what you think of my color selection.
 2/1/08, 08:44 AM
#6
Thanks for the compliments Jeff. A second set of hands really would have helped. I guess I am a torque nut to because it really frustrated me when I couldn't get the torque wrench on all of the nuts. I even used a universal joint to get on some of them. I guess it doesn't matter now since I didn't get any leaks. Now I need to get me one of those canton aluminum radiator over flow tanks and some other brused aluminum parts to replicate the IUP and IA (Red) interior under my hood. I did the same thing in the trunk and it looks great as if the whole car came from the factory with coordinated colors everywhere!
2/1/08, 08:58 AM
#7
Looks Great! I guess nothing worse while comes very easy....
2/1/08, 10:57 AM
#8

 2/1/08, 11:01 AM
#9
Team Mustang Source
I was going to tell you that ALWAYS check TacoBill's hot links before starting any project. When I installed mine his write was very useful and torquing the bolts is a waste of time and energy.
2/1/08, 11:03 AM
#10
Team Mustang Source Legacy Member
I did mine myself, but I also had the entire intake out first to replace the CMCV plates at the same time. I didn't disconnect the fuel line, but once the injectors were pulled out of the head, the whole fuel assembly flips over to the drivers side to get out of the way. And I was able to pull the wiring harness out of the way on each side enough to get the covers in and out fairly easily.
That red does look really good in there, nice job! Wish I had the blower you do to dress mine up even more.
That red does look really good in there, nice job! Wish I had the blower you do to dress mine up even more.


Thread
Thread Starter
Forum
Replies
Last Post
BavarianStang
Ford Discussions
0
9/5/15 05:55 AM