
Hood Pin location for aftermarket hoods
 11/7/10, 06:15 AM
#1
Member
Thread Starter
Join Date: October 17, 2009
Posts: 18
Likes: 0
Received 0 Likes
on
0 Posts
Hood Pin location for aftermarket hoods
With the Trufiber GTS-3 hood, and many other hoods, a wider setting of the hood pins is needed due to design constraints surrounding location of ram air channels and hood height/thickness.
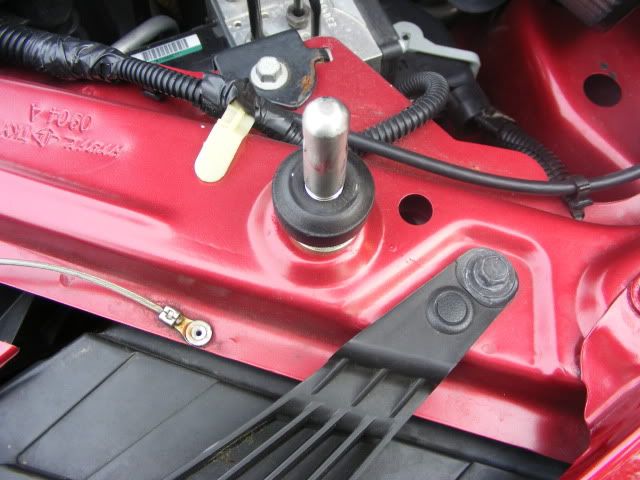
The original location of the factory rubber hood stop provides a nice location for the pins. And the rubber stop can be relocated to an existing hole right near it's original location. This pin location lines up nicely with the circle on the under side of the new hood for the hole that the pin travels through.
Also you will have to twist the pin and the top latch to a 4 and 10 o'clock position on the passenger side of the hood and the drivers side to an 8 and 2 position. The exact clock position of the pin is determined by the angle of the hood at this location. A hood with a more level plain will need less, if any postioning away from the traditional 6-12 o'clock.
The bodyshop that installed my hood chose this location after we both considered our options. The hole we used to set the pin in where the factory rubber stop was located is slightly smaller then the pins I used, (UPR Hood Kit). And access to under side of the hole is not easy without major dissasembly so the shop used a, I think they called it, a bolt anchor? They did have wo widen the existing hole some, but not much. The pins almost fit thru the existing hole but not quite so it only needs a hair more room. How much they opened it up to set the anchor I'm not sure but it is all hidden by the pins bolts and washer anyway.
As you see I have black radiator extension covers. The hole already exists for the pins as the rubber stops went there anyway. You'll have to carefully locate and drill a hole for the new location of the rubber stops. Start with small pilot holes and do several test fits before drilling the final hole to the size needed, that will depend on what size stop you used. The shop went with a smaller stop then the original because the secondary hole used for the new location is slightly smaller.
First photo shows the original rubber stop before relocating. Next photo shows the hole location on the underside of the hood. Which I think turns out nicely, set within the existing circle, and looks clean without the supplied underside steel plate the kit provides. Third photo is after relocating rubber stop to nearby existing secondary hole and installing pin in the original rubber stop location. Last two photos show respective clock position of pin and latch.
Last edited by gtcsmustang; 11/7/10 at 06:20 AM.
 11/7/10, 08:16 AM
#2
Mach 1 Member

Your car looks great  . What year is it?
I installed my hood pins in the same location but I ended up using some sway bar bushings from Auto Zone as my hood bump stops. I'm also using the pin lanyards but they're going to be removed soon because the nylon is starting to split and they're starting to rust.

Do you have any issues with the Redline hood struts and your hood? I choose not to re install mine when I got my hood.
. What year is it? I installed my hood pins in the same location but I ended up using some sway bar bushings from Auto Zone as my hood bump stops. I'm also using the pin lanyards but they're going to be removed soon because the nylon is starting to split and they're starting to rust.
Do you have any issues with the Redline hood struts and your hood? I choose not to re install mine when I got my hood.
11/7/10, 09:22 AM
#3
Member
Thread Starter
Join Date: October 17, 2009
Posts: 18
Likes: 0
Received 0 Likes
on
0 Posts
Your car looks great . What year is it?
I installed my hood pins in the same location but I ended up using some sway bar bushings from Auto Zone as my hood bump stops. I'm also using the pin lanyards but they're going to be removed soon because the nylon is starting to split and they're starting to rust.
Do you have any issues with the Redline hood struts and your hood? I choose not to re install mine when I got my hood.
. What year is it? I installed my hood pins in the same location but I ended up using some sway bar bushings from Auto Zone as my hood bump stops. I'm also using the pin lanyards but they're going to be removed soon because the nylon is starting to split and they're starting to rust.
Do you have any issues with the Redline hood struts and your hood? I choose not to re install mine when I got my hood.
11/7/10, 10:36 PM
#5
Member
Thread Starter
Join Date: October 17, 2009
Posts: 18
Likes: 0
Received 0 Likes
on
0 Posts
http://www.uprproducts.com/mustang-b...kit-black.html

Last edited by gtcsmustang; 11/8/10 at 08:37 AM.
12/8/10, 04:25 PM
#7
Member
Thread Starter
Join Date: October 17, 2009
Posts: 18
Likes: 0
Received 0 Likes
on
0 Posts
I liked your idea so I used a Needa Part Ford Shock Asorber Bushing Part # 310184 and after trimming the lip from the underside of the bushing it was just the right height. Here's how it looks now.

Thread
Thread Starter
Forum
Replies
Last Post
tj@steeda
2015 - 2023 MUSTANG
0
9/24/15 08:15 PM