
2005-2009 Mustang How To Saleen 200mph Gauge Cluster & Red LCD FTW!!

Thread Starter
GT Member
Joined: January 9, 2009
Posts: 128
Likes: 1
From: Memphis, TN
2005-2009 Mustang How To Saleen 200mph Gauge Cluster & Red LCD FTW!!
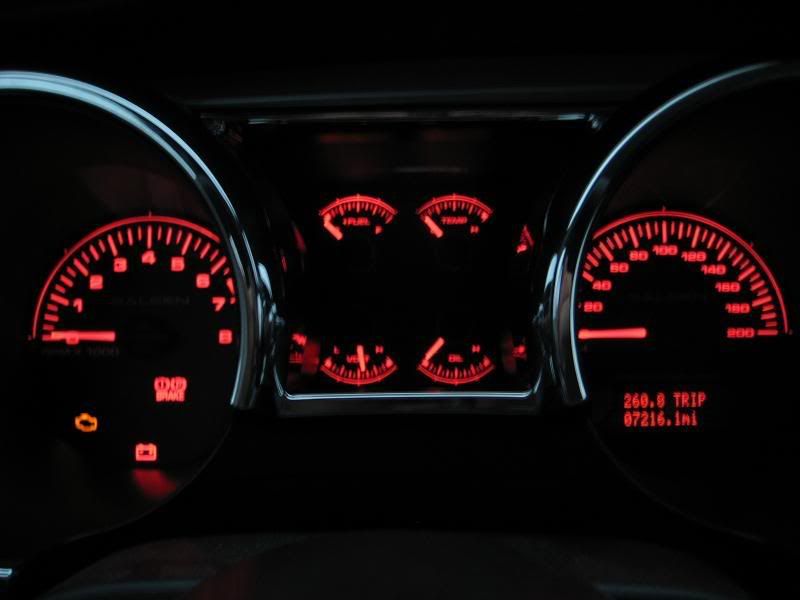
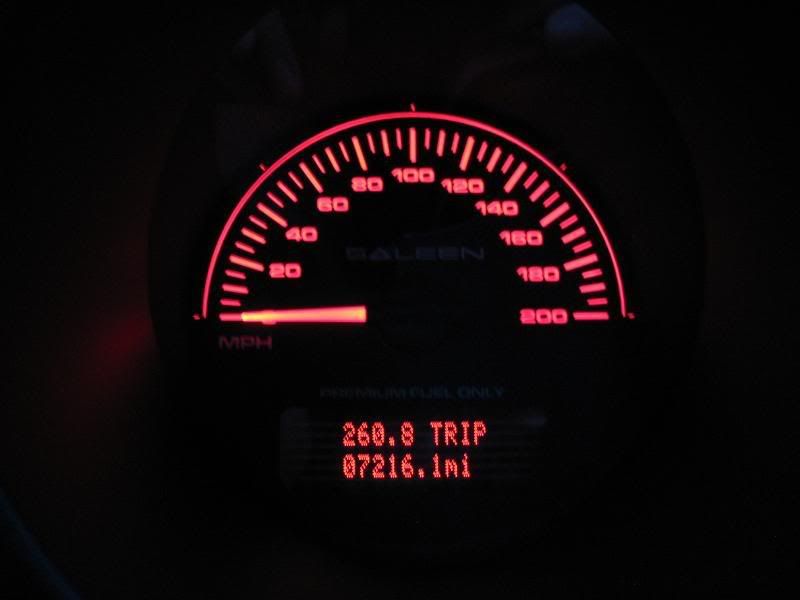
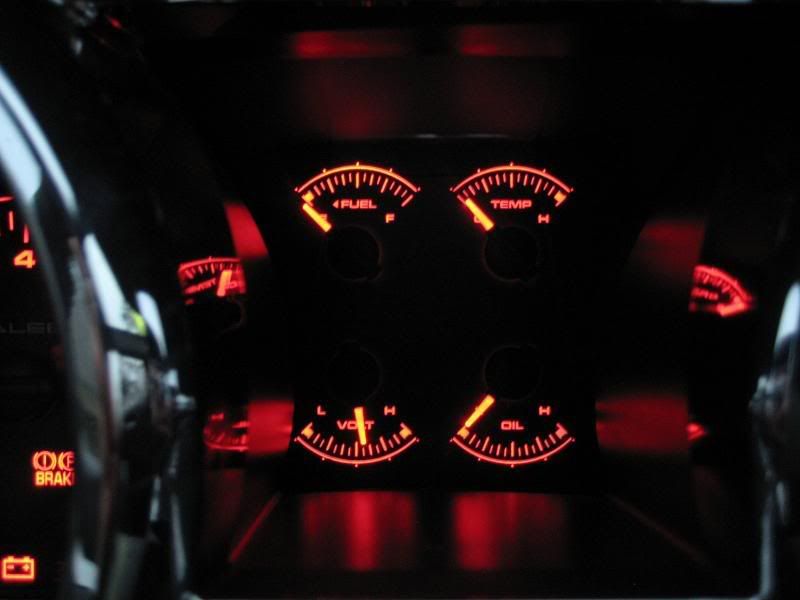
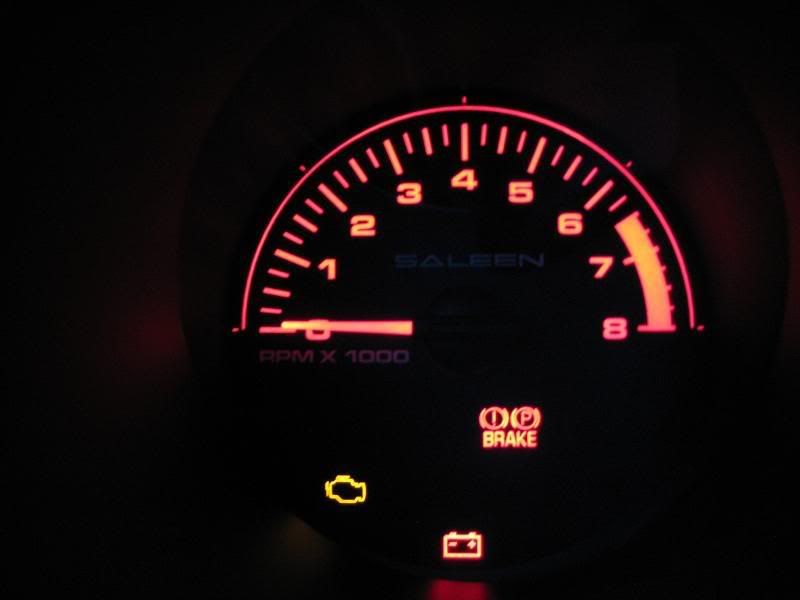
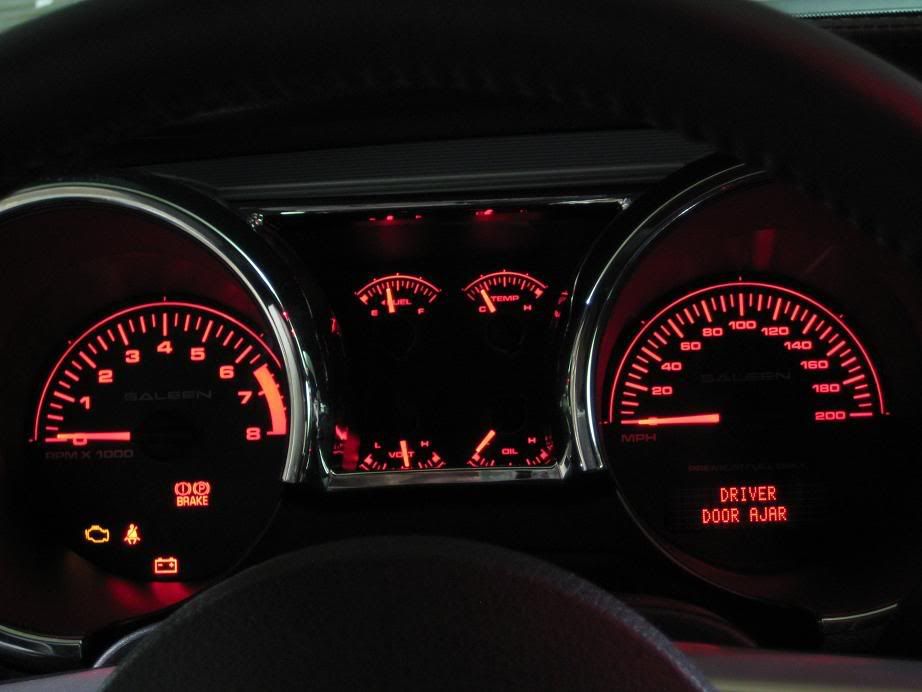
This is honestly one of my favorite mods ive done to my car so far even though not a whole has been done... yet! Anyways, I came across a Saleen 200mph gauge cluster faceplate on eBay(from seller horsepower1 ) last week and won it for $28.49 shipped. Needless to say I was stoked to get it but just wasn't happy enough with it as is. So before I shipped everything to Saleen to be recalibrated, I modified the display window for the LCD so it would be red and not the stock puke green. I did my stock gauge cluster before this one too so if anyone wants me to write a DIY for the LCD mod then just let me know. Let me know what you guys think 
Sorry for the semi fuzzy pics my camera sucks for night shots.. any tips?
Sorry for the semi fuzzy pics my camera sucks for night shots.. any tips?

Cobra Member
Joined: June 22, 2006
Posts: 1,031
Likes: 0
From: CT
Looks great! How difficult is it to read the speedo, seems like it's pretty tightly packed.
I will probably be too chicken, just like the full led replacement, but we ALWAYS like good DIY guides!
I will probably be too chicken, just like the full led replacement, but we ALWAYS like good DIY guides!
Thread Starter
GT Member
Joined: January 9, 2009
Posts: 128
Likes: 1
From: Memphis, TN
After I got it in yesterday I drove around just to see how hard it was to read and I actually find it easier to read than the stock one. Youre actually modifying the window on the overlay and not the LCD itself so if you have even basic skills then you can do it. Ill write up a DIY a little later today but right now I wont be able to have many pics since I didnt even think about it while I was doing it but ill do what I can. So if theres anyone near me in Jonesboro, Ar or Memphis, Tn then ill help you do yours so I can get some pics.


Cobra Member
Joined: September 11, 2006
Posts: 1,210
Likes: 1

Thread Starter
GT Member
Joined: January 9, 2009
Posts: 128
Likes: 1
From: Memphis, TN
Saleen only charges $100 for the labor and I provided the overlay and a return shipping label in the box for them. and I didnt forget about the DIY guys so dont worry.. just between work full time and college full time I dont have a whole lot of free time haha. As for what color is better, to each their own as its your car but for me I love having every little detail match and that green was just gonna bug me with everything else being red 
Thread Starter
GT Member
Joined: January 9, 2009
Posts: 128
Likes: 1
From: Memphis, TN
DIY: Modify Instrument Cluster LCD Display Window Color
Here is the DIY several members requested over in this thread so here it is. As of right now, I don’t have access to an unmodified cluster so I had to borrow some pictures from AmericanMuscles DIY on a SIMCO gauge overlay install in order to write this DIY. But if someone is close to me or is willing to send me your cluster so that I can write a DIY with step by step pics then I will mod yours for free as long as you pay shipping. I live in the Northeastern Arkansas/Memphis, TN area by the way. That being said onto the DIY!
To start off let me say this is a very easy mod that anyone with basic skills and minimum tools can complete but I TAKE NO RESPONSIBILITY if you mess up your cluster so DO AT YOUR OWN RISK. Just to clarify things, you are modding the green window on the overlay and not the LCD itself. I will explain how to mod the stock gauge cluster overlay first and then how to do any SIMCO brand overlays.
Items Needed:
3M 1000grit Wet/dry sandpaper
Water and bowl - for wetsanding
Random Orbital Buffer – preferably a small one like the 6” pictured
Meguiars ScratchX 2.0 – any polishing compound will work but this is what I had laying around
7mm Socket driver
Gauge Needle pliers – Not necessary as I used 2 flat blade screwdrivers instead and it worked just fine
Lighting Gels – These can be bought at nearly any costume shop or music store that carries lighting equipment. Buy a sheet of whatever color you want your display to be. I.E. Blue, Red, Yellow, Pink, etc.
Razor Blade – Not needed for stock overlays but needed for SIMCO brand overlays.
Once you’ve gathered all of the stuff needed you can begin
Lower the steering wheel all the way down and then grab the dash trim at the 9 o’clock position of the rpm side and 3 o’clock position on the mph gauge and pull. The clips will disengage and then once it’s loose just pull it out and up.

Using the 7mm socket driver remove the 4 screws shown below

Lean the cluster forward and disconnect it by depressing the tab and rotating the gray arm clockwise and everything will eject.

Take the cluster out of the car and take it your workbench or where ever you'll be working on it.
To remove the Bezel lens just release the 3 holding tabs at the bottom of the cluster and the 2 holding tabs at the top of the cluster (see figure 4 & 5). Then pull the Bezel Lens from the cluster by lifting straight up off of the unit.


At this point it is up to whether or not you want to completely remove the overlay or do what I did. I only removed the MPH needle and gently folded the overlay back just enough to where I could work on it. Now even though it would’ve made this mod easier to do with the overlay completely off, I didn’t have the proper needle removal tools and I didn’t want to risk damaging the smaller needles in the middle. But for those that would like to take it completely off you can follow the steps shown here:

STOCK GAUGE OVERLAY:
Before I started removing the needle I placed sticky notes under the needle so that I wouldn’t scratch the overlay. Then using the flat bladed screwdrivers I placed them under the needle with one on each side. I took my time working the needle up and it came off with little to no problem even though it was on there pretty tight. After the needle has been removed, gently lift the overlay up starting from the lower right hand corner.
After it has been folded back, I placed a piece of paper over the white plastic of the cluster and the LCD so that nothing would get on it in the next couple steps. The first time around doing this I used Acetone to take the green off and it ended up fogging the window a little bit so I wet sanded it down a good bit to make it even and then polished it with the ScratchX and the buffer. Needless to say, I realized just wet sanding it from the beginning is the way to go here. So take your 1000 grit sandpaper (I cut mine into small squares) and dip it in the water and begin to wet sand the backside of the LCD window. You’ll start to notice the water is turning green – this is what you want to happen. Every now and then wipe away all the water and green. Once all of the green is gone, the window will appear ‘frosted’.
Next, take your ScratchX and put some on the side you wet sanded clean and get to buffing! It took me about 2 min of buffing to get it all clear but when I was done it was as clear as glass. Use a clean rag with some water on it to remove any of the polishing compound that remains.
SIMCO GAUGE OVERLAYS:
My Saleen gauge overlay was made by SIMCO so I can only assume all SIMCO brand overlays will be the same as far as this mod goes. I tried wetsanding the green off of the window to only find that the entire window is solid green and not coated green like the stock overlays. So I took my razor, from the front of the overlay, and placed it along the edge of the window and used a screwdriver handle to hammer the razor blade through the overlay. For the corners I had to free hand it to get the curve and then used a rounded jeweler’s file to the make the corners perfectly round. To finish it off I used a black sharpie on the edge that was cut so you wouldn’t see the white plastic.
FOR BOTH STOCK AND SIMCO OVERLAYS:
Take the lighting gel you chose and cut a 4” x 2” section. Then simply put it on the backside of the overlay and the existing glue should hold it in place fine. Lay the overlay back down and make sure there isn’t anything like water, ScratchX, etc behind the window and you’re good to go!
At first, I had a bit of difficulty getting the mph needle to line up right up but came up with an easy solution. I took the cluster, before reinstalling the needle or Bezel, and put it in the car and hooked it up on the back then turned my key to the on position so the cluster would power up. At this point the mph needle post will be at 0 mph. Take your needle and push it on its post to where it’s at 0 mph. Cycle the cluster by removing your key and wait 5 seconds for the gauges to go to their rest position and then put the key to the on position again to make sure it’s still at 0. Remove the needle and repeat if necessary but you get it on your first try if you’re patient and careful.
After everything is copasetic it’s time to reinstall everything. After you have snapped the bezel back into place it’s time to put the cluster back in your car. Plug everything up, reinstall the four 7mm screws, and replace the dash trim. Now sit back and enjoy your work!
Hers a pic of mine done in red!
If anyone has a better way of doing something then let me know and ill add or edit it into the post. And like I said at the beginning, if I can get a hold of an unmodified cluster I will edit everything with step by step pictures.
To start off let me say this is a very easy mod that anyone with basic skills and minimum tools can complete but I TAKE NO RESPONSIBILITY if you mess up your cluster so DO AT YOUR OWN RISK. Just to clarify things, you are modding the green window on the overlay and not the LCD itself. I will explain how to mod the stock gauge cluster overlay first and then how to do any SIMCO brand overlays.
Items Needed:
3M 1000grit Wet/dry sandpaper
Water and bowl - for wetsanding
Random Orbital Buffer – preferably a small one like the 6” pictured
Meguiars ScratchX 2.0 – any polishing compound will work but this is what I had laying around
7mm Socket driver
Gauge Needle pliers – Not necessary as I used 2 flat blade screwdrivers instead and it worked just fine
Lighting Gels – These can be bought at nearly any costume shop or music store that carries lighting equipment. Buy a sheet of whatever color you want your display to be. I.E. Blue, Red, Yellow, Pink, etc.
Razor Blade – Not needed for stock overlays but needed for SIMCO brand overlays.
Once you’ve gathered all of the stuff needed you can begin
Lower the steering wheel all the way down and then grab the dash trim at the 9 o’clock position of the rpm side and 3 o’clock position on the mph gauge and pull. The clips will disengage and then once it’s loose just pull it out and up.
Using the 7mm socket driver remove the 4 screws shown below
Lean the cluster forward and disconnect it by depressing the tab and rotating the gray arm clockwise and everything will eject.
Take the cluster out of the car and take it your workbench or where ever you'll be working on it.
To remove the Bezel lens just release the 3 holding tabs at the bottom of the cluster and the 2 holding tabs at the top of the cluster (see figure 4 & 5). Then pull the Bezel Lens from the cluster by lifting straight up off of the unit.
At this point it is up to whether or not you want to completely remove the overlay or do what I did. I only removed the MPH needle and gently folded the overlay back just enough to where I could work on it. Now even though it would’ve made this mod easier to do with the overlay completely off, I didn’t have the proper needle removal tools and I didn’t want to risk damaging the smaller needles in the middle. But for those that would like to take it completely off you can follow the steps shown here:
STOCK GAUGE OVERLAY:
Before I started removing the needle I placed sticky notes under the needle so that I wouldn’t scratch the overlay. Then using the flat bladed screwdrivers I placed them under the needle with one on each side. I took my time working the needle up and it came off with little to no problem even though it was on there pretty tight. After the needle has been removed, gently lift the overlay up starting from the lower right hand corner.
After it has been folded back, I placed a piece of paper over the white plastic of the cluster and the LCD so that nothing would get on it in the next couple steps. The first time around doing this I used Acetone to take the green off and it ended up fogging the window a little bit so I wet sanded it down a good bit to make it even and then polished it with the ScratchX and the buffer. Needless to say, I realized just wet sanding it from the beginning is the way to go here. So take your 1000 grit sandpaper (I cut mine into small squares) and dip it in the water and begin to wet sand the backside of the LCD window. You’ll start to notice the water is turning green – this is what you want to happen. Every now and then wipe away all the water and green. Once all of the green is gone, the window will appear ‘frosted’.
Next, take your ScratchX and put some on the side you wet sanded clean and get to buffing! It took me about 2 min of buffing to get it all clear but when I was done it was as clear as glass. Use a clean rag with some water on it to remove any of the polishing compound that remains.
SIMCO GAUGE OVERLAYS:
My Saleen gauge overlay was made by SIMCO so I can only assume all SIMCO brand overlays will be the same as far as this mod goes. I tried wetsanding the green off of the window to only find that the entire window is solid green and not coated green like the stock overlays. So I took my razor, from the front of the overlay, and placed it along the edge of the window and used a screwdriver handle to hammer the razor blade through the overlay. For the corners I had to free hand it to get the curve and then used a rounded jeweler’s file to the make the corners perfectly round. To finish it off I used a black sharpie on the edge that was cut so you wouldn’t see the white plastic.
FOR BOTH STOCK AND SIMCO OVERLAYS:
Take the lighting gel you chose and cut a 4” x 2” section. Then simply put it on the backside of the overlay and the existing glue should hold it in place fine. Lay the overlay back down and make sure there isn’t anything like water, ScratchX, etc behind the window and you’re good to go!
At first, I had a bit of difficulty getting the mph needle to line up right up but came up with an easy solution. I took the cluster, before reinstalling the needle or Bezel, and put it in the car and hooked it up on the back then turned my key to the on position so the cluster would power up. At this point the mph needle post will be at 0 mph. Take your needle and push it on its post to where it’s at 0 mph. Cycle the cluster by removing your key and wait 5 seconds for the gauges to go to their rest position and then put the key to the on position again to make sure it’s still at 0. Remove the needle and repeat if necessary but you get it on your first try if you’re patient and careful.
After everything is copasetic it’s time to reinstall everything. After you have snapped the bezel back into place it’s time to put the cluster back in your car. Plug everything up, reinstall the four 7mm screws, and replace the dash trim. Now sit back and enjoy your work!
Hers a pic of mine done in red!
If anyone has a better way of doing something then let me know and ill add or edit it into the post. And like I said at the beginning, if I can get a hold of an unmodified cluster I will edit everything with step by step pictures.
Thread Starter
GT Member
Joined: January 9, 2009
Posts: 128
Likes: 1
From: Memphis, TN
haha Tom your half right as I doubt ill ever take it above 150  Anyways guys, I got around to writing up the DIY for this and you can check it out here: https://themustangsource.com/showthread.php?t=477717
Anyways guys, I got around to writing up the DIY for this and you can check it out here: https://themustangsource.com/showthread.php?t=477717

Thread Starter
GT Member
Joined: January 9, 2009
Posts: 128
Likes: 1
From: Memphis, TN
LTX I dont have aim and couldnt send you a pm so shoot me an email at scottyz@comcast.net If anyone else has questions you can either post here or pm me and we can talk there or over the phone.
Last edited by memphisstylee; Oct 12, 2009 at 01:47 AM.