Open Exhaust Electric Activators.
 1/27/12, 04:27 PM
#1
Member
Thread Starter
Join Date: January 22, 2012
Posts: 46
Likes: 0
Received 0 Likes
on
0 Posts
Open Exhaust Electric Activators.
I was talking with the service manager and the tech after getting my Trackey today and they mentioned that Ford Racing makes a kit to electrically open and close the side exhausts on our cars. They (Fritts Ford in Riverside) said many have already been installed by them.
This is the first I have heard of this mod. Have any of you got this done and/or are aware that this is available. What a slick way to go, and it seems that your warranty would not be voided as I heard it would be?, if your remove the disks since this is a Ford part and install. I did not get a quote but approx 4 hours labor is required to do the install.
What,s the good word on this one.
 1/27/12, 06:37 PM
#2
Bullitt Member
Join Date: July 12, 2005
Posts: 331
Likes: 0
Received 0 Likes
on
0 Posts
I believe these are what they are offering.
http://shop.quicktimeperformance.com...ct_detail&p=77
http://shop.quicktimeperformance.com...ct_detail&p=77
2/7/12, 04:34 PM
#3
V6 Member
Join Date: December 12, 2011
Location: Hialeah, Fl.
Posts: 79
Likes: 0
Received 0 Likes
on
0 Posts
I was talking with the service manager and the tech after getting my Trackey today and they mentioned that Ford Racing makes a kit to electrically open and close the side exhausts on our cars. They (Fritts Ford in Riverside) said many have already been installed by them.
This is the first I have heard of this mod. Have any of you got this done and/or are aware that this is available. What a slick way to go, and it seems that your warranty would not be voided as I heard it would be?, if your remove the disks since this is a Ford part and install. I did not get a quote but approx 4 hours labor is required to do the install.
What,s the good word on this one.
This is the first I have heard of this mod. Have any of you got this done and/or are aware that this is available. What a slick way to go, and it seems that your warranty would not be voided as I heard it would be?, if your remove the disks since this is a Ford part and install. I did not get a quote but approx 4 hours labor is required to do the install.
What,s the good word on this one.
What you are refering to is the QTP Boss302 electric cut-off. They are NOT Ford parts but installing them should not in any way voild your waranty. If you get the optional remote control the installation will be easier and in no way should they charge you 4 hours to install. The actual cut-off requires only the removal of two bolts per side, slide the original spacer out and slide in the cut-off. Thats about ten minutes worth of work. The other part is wiring in the cut-off but no way 4 hours, especially if you go with the QTP remote transmitter. They are pretty cool cause you can vary the sound by opening or closing the valves with the remote that looks like a garage door opener. This is a real nice mod for your Boss302.
Good luck with them,
Rob
2/7/12, 09:29 PM
#5
GT Member

Join Date: August 4, 2011
Posts: 175
Likes: 0
Received 0 Likes
on
0 Posts
Hi Stef,
What you are refering to is the QTP Boss302 electric cut-off. They are NOT Ford parts but installing them should not in any way voild your waranty. If you get the optional remote control the installation will be easier and in no way should they charge you 4 hours to install. The actual cut-off requires only the removal of two bolts per side, slide the original spacer out and slide in the cut-off. Thats about ten minutes worth of work. The other part is wiring in the cut-off but no way 4 hours, especially if you go with the QTP remote transmitter. They are pretty cool cause you can vary the sound by opening or closing the valves with the remote that looks like a garage door opener. This is a real nice mod for your Boss302.
Good luck with them,
Rob
However it will be a while before I can bolt them on.
Cheers,
2/8/12, 09:17 AM
#7
Member

Join Date: October 26, 2011
Location: Orange County, Ca.
Posts: 14
Likes: 0
Received 0 Likes
on
0 Posts
Questions: 1. Where did you route the wiring from the bottom of the car into the passenger compartment.
2. Where did you tie in the hot lead and ground inside the car.
Thank you for any help with these two questions
2. Where did you tie in the hot lead and ground inside the car.
Thank you for any help with these two questions
2/8/12, 09:57 PM
#8
V6 Member
Join Date: December 12, 2011
Location: Hialeah, Fl.
Posts: 79
Likes: 0
Received 0 Likes
on
0 Posts
Go here to this link to get an idea of the install process.
http://www.youtube.com/watch?feature...0NpvBZwHc&NR=1
Hope this helps.
Rob
2/19/12, 07:36 AM
#9
Bullitt Member
Join Date: December 2, 2010
Location: Ontario
Posts: 326
Likes: 0
Received 0 Likes
on
0 Posts
Bump for more details.
Wondering if more members have completed the install on these cut outs? Just curious if there are more details (with pics and/or videos) on the install and whether the job can be tackled by the average Joe.
Thanks
Wondering if more members have completed the install on these cut outs? Just curious if there are more details (with pics and/or videos) on the install and whether the job can be tackled by the average Joe.
Thanks
2/19/12, 08:37 AM
#10
V6 Member
Join Date: March 7, 2011
Location: Moscow Russia and NC USA
Posts: 82
Likes: 0
Received 1 Like
on
1 Post
Hi 302 Gordon,
Go here to this link to get an idea of the install process.
http://www.youtube.com/watch?feature...0NpvBZwHc&NR=1
Hope this helps.
Rob
Go here to this link to get an idea of the install process.
http://www.youtube.com/watch?feature...0NpvBZwHc&NR=1
Hope this helps.
Rob
Any idea what that electrical connector in the console is for? I tried using the pin suggested in the link but the valves would not work. Turned out that pin only had a couple of volts in my car. Something wrong maybe? I then connected the valves to the 12v console power plug, not recommended because it is always hot. The valves worked but then I blew several fuses. Wires are fine. They worked and then after a short drive the fuse was blown. This happened several times. Up'd it to 3 amp fuse and they seem to work and not blew a fuse but then I had to go out of country. May need to check the motors. Will need to revise it all when I get back. Any thoughts or suggestions from anyone?
2/19/12, 10:27 AM
#11
GT Member
Join Date: August 4, 2011
Posts: 175
Likes: 0
Received 0 Likes
on
0 Posts
I think the issue will be how to get 12v's down there, and where to put the switch? I've solved the latter problem by also purchasing the remote fob/transmitter which will allow you to regulate the cut-out valve positioning with the remote fob you can attach to your key chain..
However, I'm not quite sure of the best way to send the power down there. The guy at the factory said he put the remote under his Camero seat and used the electric seat as his source of power as the draw on the cut-out motors is quite low (2 Amps). But what the best way is to do this on a Boss I have yet to determine. My car is in storage for winter in Canada, and I'm down here in Phoenix, so I won't be on this job for another 3 months. Yikes!
2/19/12, 03:03 PM
#12
V6 Member
Join Date: September 11, 2011
Location: South Central Pa.
Posts: 74
Likes: 0
Received 0 Likes
on
0 Posts
I installed the qtp's on my boss and it was easy. You just need the be careful where you route the wires. I ran mine behind the heat shield and up and under the rubber shift boot. Hooked the wires up to the unused connector as per the instruction. Takes about an hour if your cars on a lift. One negitive I ran in to that tick me off was the cutout's butterfly valve was rubbing inside the mount, it wasn't ground down the way it should have been and it would get stuck in either open/close. I was wondering why one was always lagging behind the other while opening and closing. You can hear it when the cars not running. I filed down the butterfly and now its fine but it's a pain in the butt removing and reinstalling without a lift. Make sure you bench test it before installing. it should not sound like it is laboring in anyway, check it by running one at a time. or remove the motor and moving it by hand. the butterfly valve shouldn't rub on ether side of the housing. Mine works fine now, if you have a problem QTP won't send you one. you have to remove the defective one and send it back. No if, and, or, butts, about it. Sucks if you want to drive your car because like I said, it's a pain working on it while it on the ground. I can only get an arm under there far enough to reach the bolts. Hope this helps.
PS. It is nice to be able to set the volume level at will.
PS. It is nice to be able to set the volume level at will.
2/19/12, 07:07 PM
#13
GT Member
Join Date: August 4, 2011
Posts: 175
Likes: 0
Received 0 Likes
on
0 Posts
I installed the qtp's on my boss and it was easy. You just need the be careful where you route the wires. I ran mine behind the heat shield and up and under the rubber shift boot. Hooked the wires up to the unused connector as per the instruction. Takes about an hour if your cars on a lift. One negitive I ran in to that tick me off was the cutout's butterfly valve was rubbing inside the mount, it wasn't ground down the way it should have been and it would get stuck in either open/close. I was wondering why one was always lagging behind the other while opening and closing. You can hear it when the cars not running. I filed down the butterfly and now its fine but it's a pain in the butt removing and reinstalling without a lift. Make sure you bench test it before installing. it should not sound like it is laboring in anyway, check it by running one at a time. or remove the motor and moving it by hand. the butterfly valve shouldn't rub on ether side of the housing. Mine works fine now, if you have a problem QTP won't send you one. you have to remove the defective one and send it back. No if, and, or, butts, about it. Sucks if you want to drive your car because like I said, it's a pain working on it while it on the ground. I can only get an arm under there far enough to reach the bolts. Hope this helps.
PS. It is nice to be able to set the volume level at will.
PS. It is nice to be able to set the volume level at will.
That should be tested at factory actually, but forewarned is forearmed so I'll I'll do it before install, thanks to your post.
Cheers,
2/20/12, 06:20 PM
#14
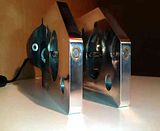
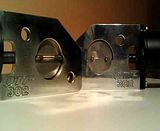
One negitive I ran in to that tick me off was the cutout's butterfly valve was rubbing inside the mount, it wasn't ground down the way it should have been and it would get stuck in either open/close.
Either way, it is good practice to always do a thorough visual inspection or a dry run prior to installing any parts on your car. Most of the time you can correct minor issues yourself without having to involve the manufacturer.
I ran my cut-outs as soon as I took them out of the box. Click on either of the following shots for a short video of each...
 2/20/12, 07:17 PM
#15
V6 Member
Join Date: December 12, 2011
Location: Hialeah, Fl.
Posts: 79
Likes: 0
Received 0 Likes
on
0 Posts
Hi Tob,
I love your video, shows how smooth they operate.
Let us know how you ran the wires and where are you going to tap off for the 12V source. Did you get the remote control ?
Rob
I love your video, shows how smooth they operate.
Let us know how you ran the wires and where are you going to tap off for the 12V source. Did you get the remote control ?
Rob
2/21/12, 03:03 AM
#16
V6 Member
Join Date: September 11, 2011
Location: South Central Pa.
Posts: 74
Likes: 0
Received 0 Likes
on
0 Posts
[QUOTE=Tob*;6258545]That's odd. I believe both the circular butterfly and the billet aluminum body are CNC cut/machined. Was there a burr or a nick that was causing the two to bind?
There was a burr but I did notice it when I check it on the bench. They opened and closed, but once installed that when one failed. When I pulled it I noticed it would bind when you put a little pressure on one side. Removed the burrs and it worked fine. No doubt that it should have been caught at the factory and they were not willing to budge a little bit to help. They didn't care about my situation, just send the part back credit card or not. That's how I found the problem. Won't deal with them again. Good build on the part though with the exception of bad QA/QC, machines can't do everything.
There was a burr but I did notice it when I check it on the bench. They opened and closed, but once installed that when one failed. When I pulled it I noticed it would bind when you put a little pressure on one side. Removed the burrs and it worked fine. No doubt that it should have been caught at the factory and they were not willing to budge a little bit to help. They didn't care about my situation, just send the part back credit card or not. That's how I found the problem. Won't deal with them again. Good build on the part though with the exception of bad QA/QC, machines can't do everything.

Thread
Thread Starter
Forum
Replies
Last Post
tj@steeda
2015 - 2023 MUSTANG
0
9/10/15 12:44 PM