Removing Rear Headrest on 2011 Mustang


Thread Starter
Mach 1 Member
Joined: January 18, 2010
Posts: 562
Likes: 0
From: KC, MO
Removing Rear Headrest on 2011 Mustang
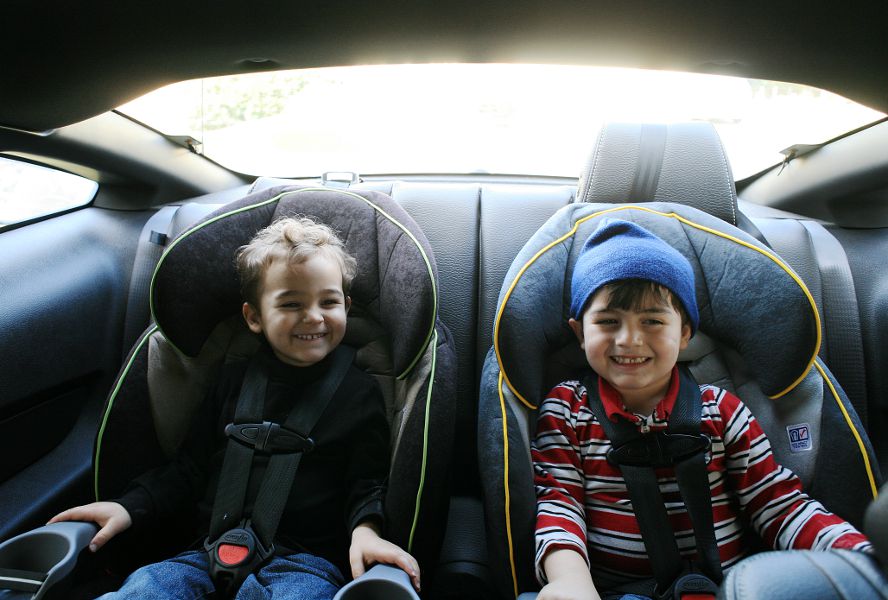
For anyone interested in removing one or both of the rear headrests from a 2011 Mustang, I have the procedure for you. Our toddler car seat did not fit that well in our back seat because the top of the toddler car seat angles towards the back, putting it in conflict with the head rest, and causing the car seat to lean forward a little more than it should. So I took the time to figure out how to remove it. So here it is:
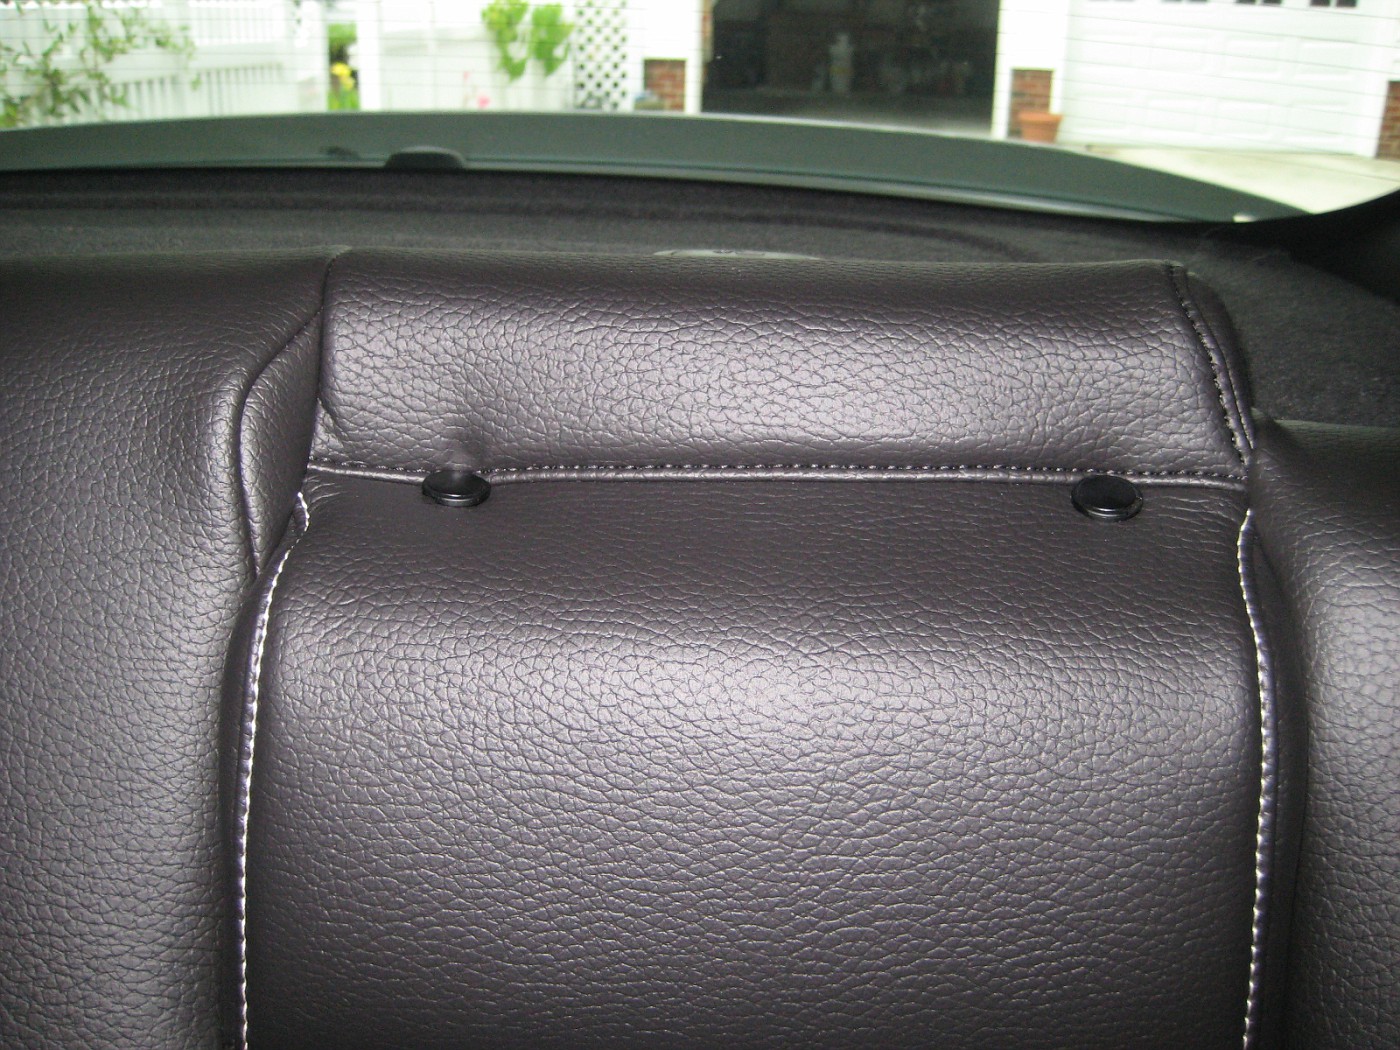
Put the seat back down. Towards the bottom in the back, where the leather meets the fuzzy fabric, carefully pull the fabric away from the leather.

It connects using a rubber interlocking trim. I don't have a picture of it up close, but I do have a picture of how the leather wrapped around the headrest interlocks, and the seat back fabric interlocks in pretty much the same way. Here is the example picture:

There is also a couple of velcro strips to pull apart. With the fabric fully separated at the bottom, sit the seat back up and lay yourself down so you can look up inside the front of the seat back. You may need a flash light. If you look up between the seat back and the foam cushion, you will see where the headrest posts go through a metal bracket (sorry, I didn't take a picture of this either). In the holes in the bracket where the posts go through is a plastic piece (one for each post). At the top of the plastic piece are little buttons. Push in on those buttons and it should release the headrest posts where you can pull out the headrest (much like a front headrest, but the buttons are beneath the seat back fabric and foam). Reattach the bottom of the seat fabric, and you are done!
I actually fully disassembled the rear headrest during my exploratory headrest removal operation. Here are the pics:
The headrest bar:

Note the notch in the posts, as seen in the following picture. These are what hold the rear headrest in place. Pushing the buttons releases the catch on the notches.

Here is the front of the headrest with the fabric removed:

And a look inside the headrest:


And finally, a couple of pictures with the headrest removed. Note how the toddler carseat now fits quite nicely, including the 3rd top point which otherwise deforms the headrest a disturbing amount when the headrest is in place:


Put the seat back down. Towards the bottom in the back, where the leather meets the fuzzy fabric, carefully pull the fabric away from the leather.
It connects using a rubber interlocking trim. I don't have a picture of it up close, but I do have a picture of how the leather wrapped around the headrest interlocks, and the seat back fabric interlocks in pretty much the same way. Here is the example picture:
There is also a couple of velcro strips to pull apart. With the fabric fully separated at the bottom, sit the seat back up and lay yourself down so you can look up inside the front of the seat back. You may need a flash light. If you look up between the seat back and the foam cushion, you will see where the headrest posts go through a metal bracket (sorry, I didn't take a picture of this either). In the holes in the bracket where the posts go through is a plastic piece (one for each post). At the top of the plastic piece are little buttons. Push in on those buttons and it should release the headrest posts where you can pull out the headrest (much like a front headrest, but the buttons are beneath the seat back fabric and foam). Reattach the bottom of the seat fabric, and you are done!
I actually fully disassembled the rear headrest during my exploratory headrest removal operation. Here are the pics:
The headrest bar:
Note the notch in the posts, as seen in the following picture. These are what hold the rear headrest in place. Pushing the buttons releases the catch on the notches.
Here is the front of the headrest with the fabric removed:
And a look inside the headrest:
And finally, a couple of pictures with the headrest removed. Note how the toddler carseat now fits quite nicely, including the 3rd top point which otherwise deforms the headrest a disturbing amount when the headrest is in place:


Bullitt Member
Joined: April 3, 2010
Posts: 309
Likes: 0
From: Geismar, LA
I may remove mine for visual purposes. Can you see any better without them? I'm between 6'2" and 6'5" (depending on my BAC) so the one '10 Mustang I sat in seemed like an awkward fit (I'm coming from a big station wagon and big trucks.) To see better through the back window I may remove the headrests. My 5yo son is the only one who will ever be shoehorned into the back and it'll be a long while before that headrest would do him any good anyway.
Thread Starter
Mach 1 Member
Joined: January 18, 2010
Posts: 562
Likes: 0
From: KC, MO
Don't forget the headrests can flip forward. It looks a bit silly flipped forward, but it does get it out of your view, if that's your only concern.
One leather wrapped rear headrest weighs 2 lb 5 oz, according to our coffee scale.
One leather wrapped rear headrest weighs 2 lb 5 oz, according to our coffee scale.
Thread Starter
Mach 1 Member
Joined: January 18, 2010
Posts: 562
Likes: 0
From: KC, MO
Thought I would add a couple of illustrations for things I didn't take pictures of. See attachment. First is an illustration of the issues with our car seat that prompted me to remove the head rest. Second is an illustration of the bracket that the headrest posts slide into. Please note that there are 2 plastic pieces, one on each side, each with a button, but I only drew in one of them. The bracket has a plastic piece on each side. Each plastic piece has a button to press to release the posts. The button isn't really red, I just filled it in red for clarity.
A couple of additional notes. It might be possible to thread the 3rd LATCH point between the headrest and seatback for a better fit, but it would be difficult to do at best, and still wouldn't be a nice fit. Also, with a little prodding around, there is a slight chance you might figure out how to push the headrest buttons without having to reach up inside the seat behind the fabric and foam, but I doubt it.
A couple of additional notes. It might be possible to thread the 3rd LATCH point between the headrest and seatback for a better fit, but it would be difficult to do at best, and still wouldn't be a nice fit. Also, with a little prodding around, there is a slight chance you might figure out how to push the headrest buttons without having to reach up inside the seat behind the fabric and foam, but I doubt it.
Last edited by Skotty; Jul 15, 2010 at 02:53 PM.
Member
Joined: October 12, 2004
Posts: 32
Likes: 0
On my 04 Mach 1 I changed my stock headrests (non upgrade package) to the cobra headrests and all I did was thread a hacksaw blade down the post and it releases the locks? Don't know if the newer ones work the same way but the post ends look identical. Might be less destructive for some to try? Hit the teeth with a hammer first 
Thread Starter
Mach 1 Member
Joined: January 18, 2010
Posts: 562
Likes: 0
From: KC, MO
On my 04 Mach 1 I changed my stock headrests (non upgrade package) to the cobra headrests and all I did was thread a hacksaw blade down the post and it releases the locks? Don't know if the newer ones work the same way but the post ends look identical. Might be less destructive for some to try? Hit the teeth with a hammer first
Team Mustang Source
Joined: January 30, 2004
Posts: 3,738
Likes: 0
From: Montreal
My tint window guy that did the back window asked me to remove them. Told him they weren't removable ( yeah right). I didn't want him to break anything since i didn't know myself how to remove them. So there you go. Thx for the info.

Member
Joined: January 24, 2011
Posts: 6
Likes: 0
I know this is an old thread but I tried this on my Job 2 Mustang, built in August. It looks like the posts of my rear head restraints are held in place with a clamp. I couldn't find/feel anything resembling a release button.
I spent some time on fordparts.com but couldn't find anything that would suggest the parts have changed. Their diagrams also didn't show anything resembling a button.
Is there any possibility that your car was assembed with a part from MY 2010?
The button is on the outboard side, right? The side nearest the window? I think I tried both sides, but I spent most of my time feeling around on the side you illustrate.
Thanks.
Bullitt Member
Joined: October 3, 2004
Posts: 271
Likes: 0
From: Montreal, Quebec
I know this is an old thread but I tried this on my Job 2 Mustang, built in August. It looks like the posts of my rear head restraints are held in place with a clamp. I couldn't find/feel anything resembling a release button.
I spent some time on fordparts.com but couldn't find anything that would suggest the parts have changed. Their diagrams also didn't show anything resembling a button.
Is there any possibility that your car was assembed with a part from MY 2010?
The button is on the outboard side, right? The side nearest the window? I think I tried both sides, but I spent most of my time feeling around on the side you illustrate.
Thanks.
I spent some time on fordparts.com but couldn't find anything that would suggest the parts have changed. Their diagrams also didn't show anything resembling a button.
Is there any possibility that your car was assembed with a part from MY 2010?
The button is on the outboard side, right? The side nearest the window? I think I tried both sides, but I spent most of my time feeling around on the side you illustrate.
Thanks.

Member
Joined: January 24, 2011
Posts: 6
Likes: 0
Mach 1 Member
Joined: July 15, 2010
Posts: 532
Likes: 0
From: Greenville NC
Last edited by Modshack; Jan 24, 2011 at 09:17 AM.
Member
Joined: January 24, 2011
Posts: 6
Likes: 0
But thanks for the tip. The drawing specifies the passenger-side post.