
Coyote 5.0 Badge


 2/19/13, 08:52 AM
#48
Needs to be more Astony
Thread Starter
BOOM!!!
This is good thru end of winter. Many of you still have your cars in storage so its your chance to get it and do something with your car in the mean time!
Offer expires March 19th which is the last day of winter! $25 off use promo code 1TMS2013
Thank you!
This is good thru end of winter. Many of you still have your cars in storage so its your chance to get it and do something with your car in the mean time!
Offer expires March 19th which is the last day of winter! $25 off use promo code 1TMS2013
Thank you!
3/14/13, 03:31 PM
#49
Needs to be more Astony
Thread Starter
You guys still have a couple more days to get the discount! Get your orders in now!
Also wanted to share two recent owners kind words about it. I also found it funny that two people with similar professions and names both chose to let me know what they thought!
This really means a lot to me to hear back from customers. Thank you Roy and Troy for letting me share your comments!
Also wanted to share two recent owners kind words about it. I also found it funny that two people with similar professions and names both chose to let me know what they thought!
Hello Chris, received this part today and I must give you my compliments. As a mechanical engineer and a supervisor of a cnc machining department I appreciate the quality of work you guys have here.
-Roy E.
-Roy E.
I just wanted to let you know I received the badge the other day and
that the quality of your work is top notch. I am a quality tech at a precision machine shop so I am pretty picky when it comes to machining, thanks and keep up the good work.
-Troy P.
that the quality of your work is top notch. I am a quality tech at a precision machine shop so I am pretty picky when it comes to machining, thanks and keep up the good work.
-Troy P.
3/16/13, 04:36 PM
#50
Needs to be more Astony
Thread Starter
NOW FOR AN EXCLUSIVE LOOK!!!!
Behind the scenes on the care and work that is....The Mustang Coyote 5.0 Badge.
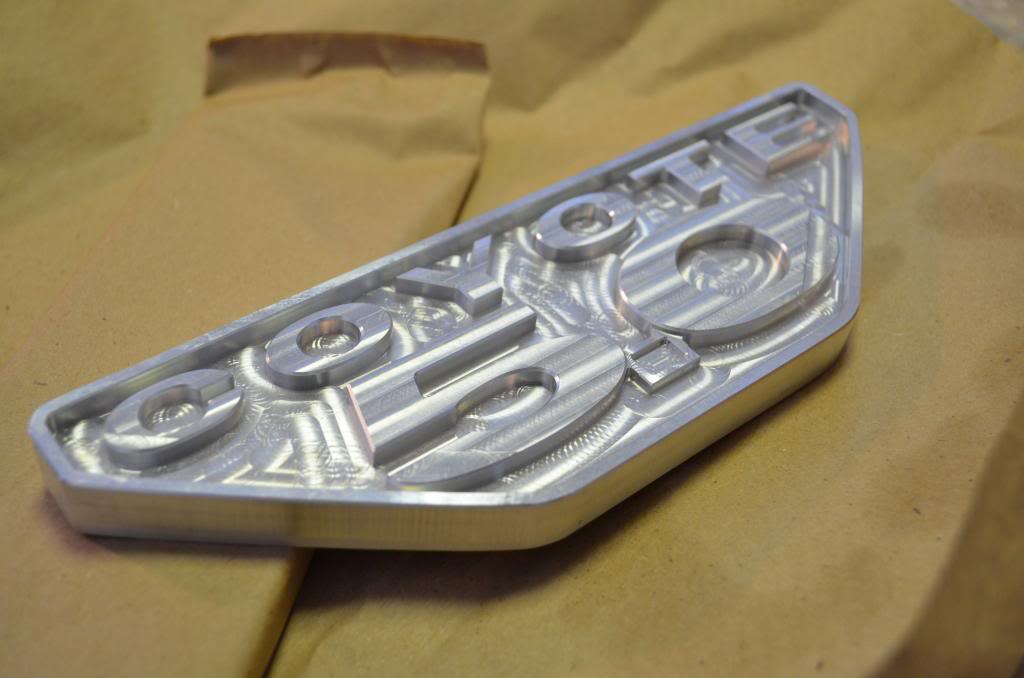
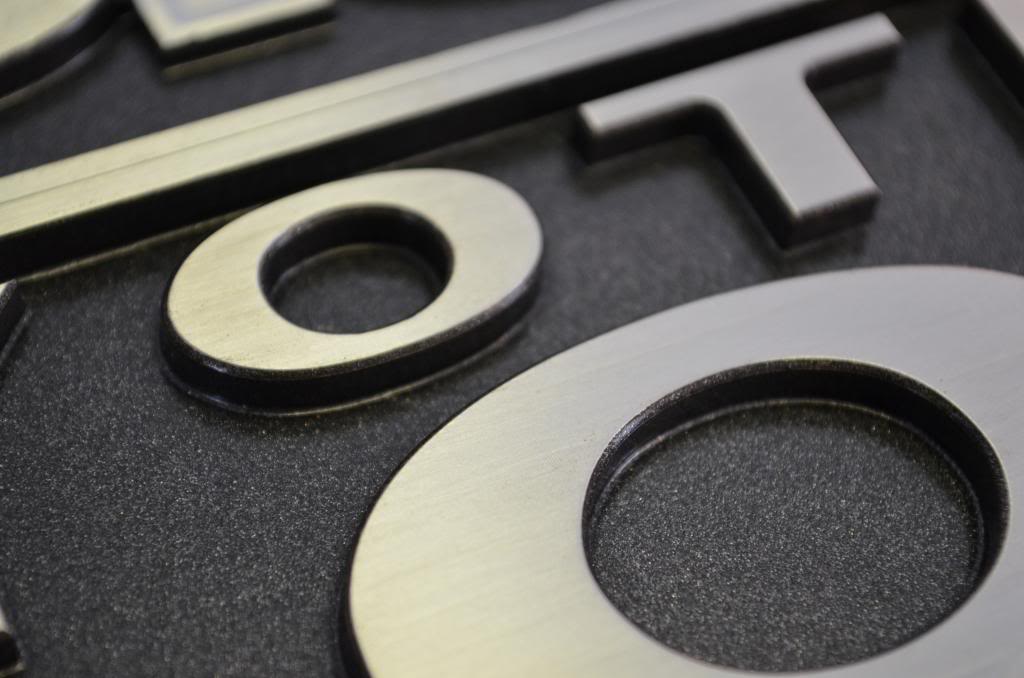
First part is taking a normal block of T6061 Aluminum and turning it into this beauty.
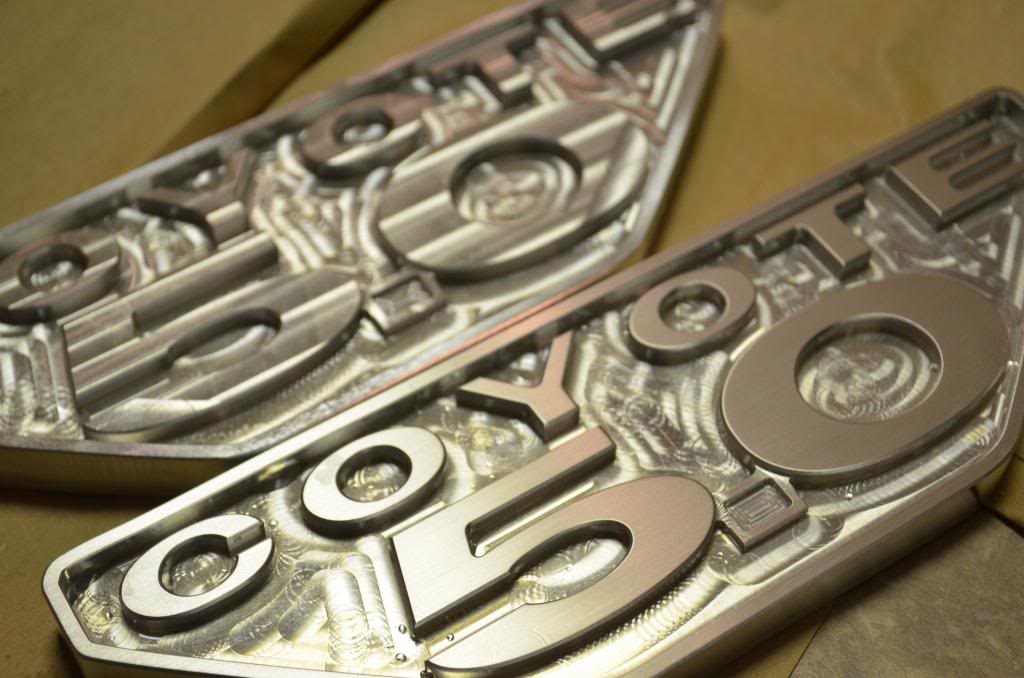
I then take a scotchbrite pad and hand brush the lettering numbers and trim leaving a wonderful satin look.
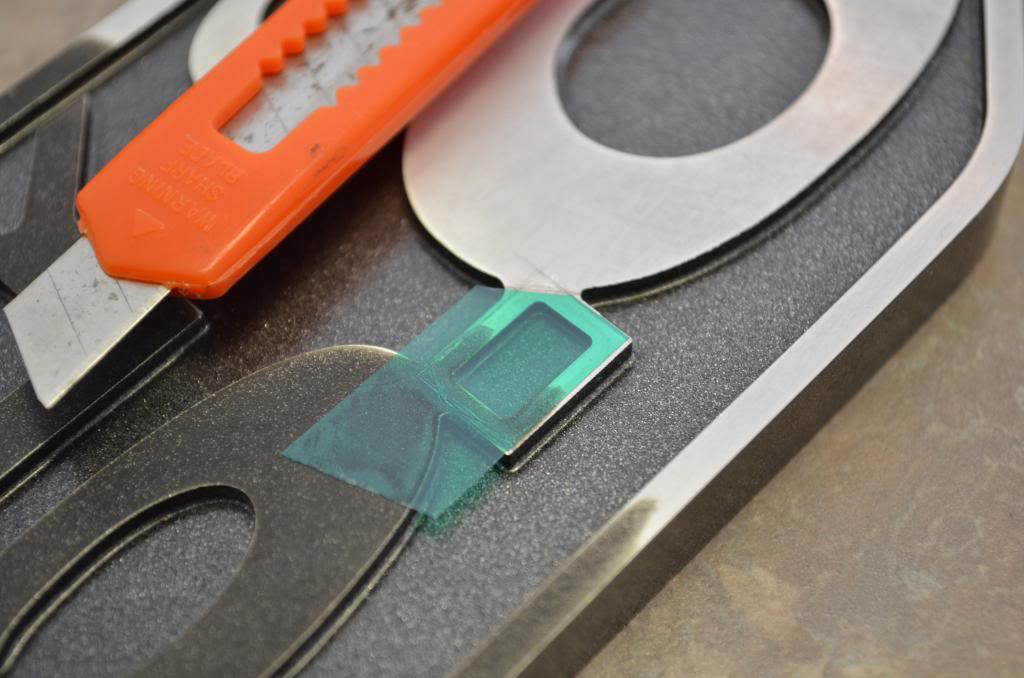
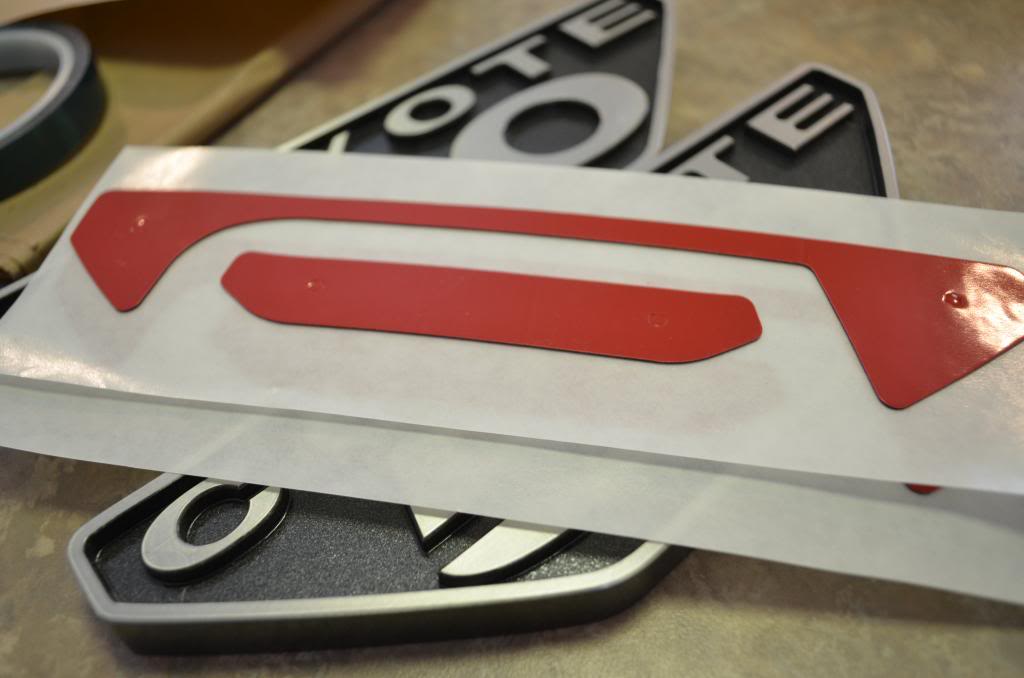
The part is washed carefully and I take some green tape and cut out a masking for the 5.0 dot. Shown here on one of my test unit that has seen many experiments to get the look and finish exactly right.
Now for Powder Coating! A nice metallic gray base! (Contact me for special orders of different colors.)
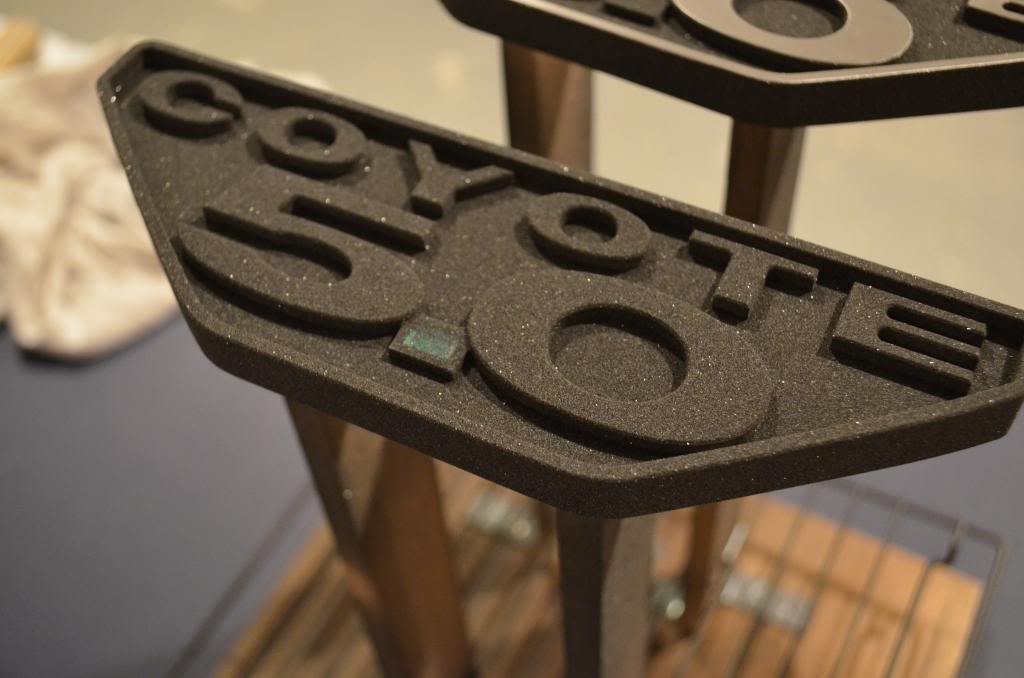
The Dry Powder looks nothing like the baked finish.
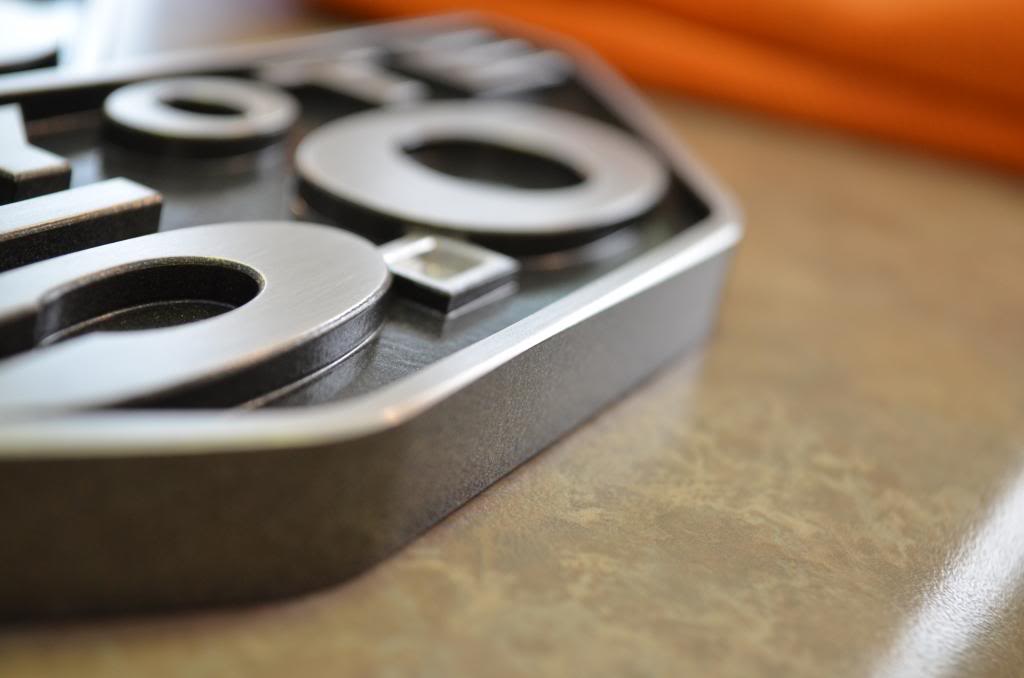
Now for the most difficult part of the process. After spraying the powder I have to wipe off anything that I don't want to be gray. All the powder is carefully blotted up from the letters, numbers and outer edge.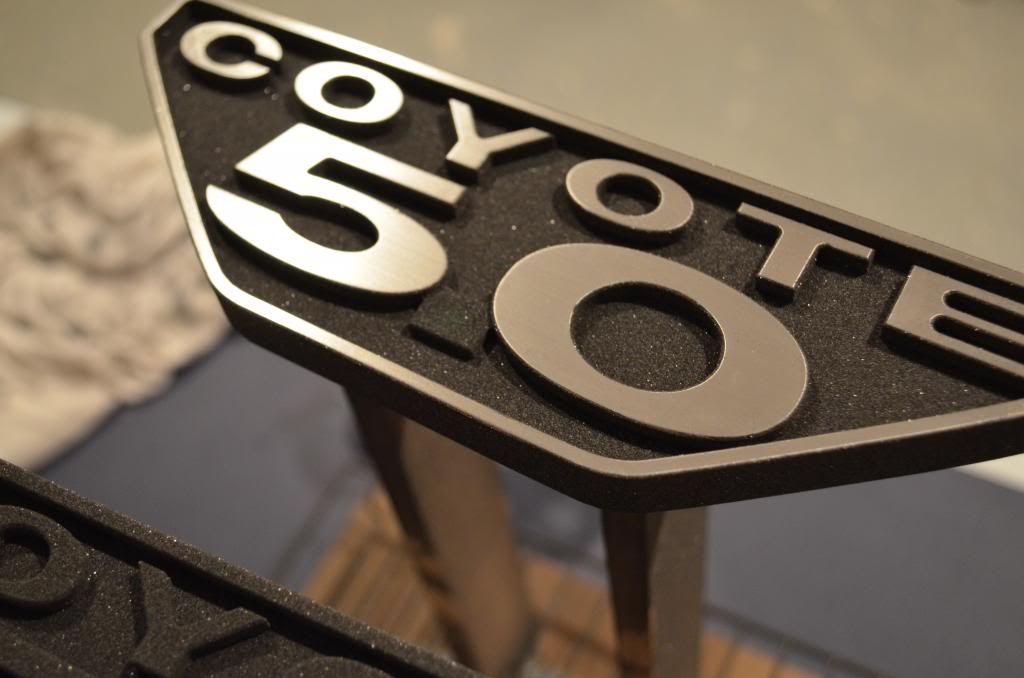
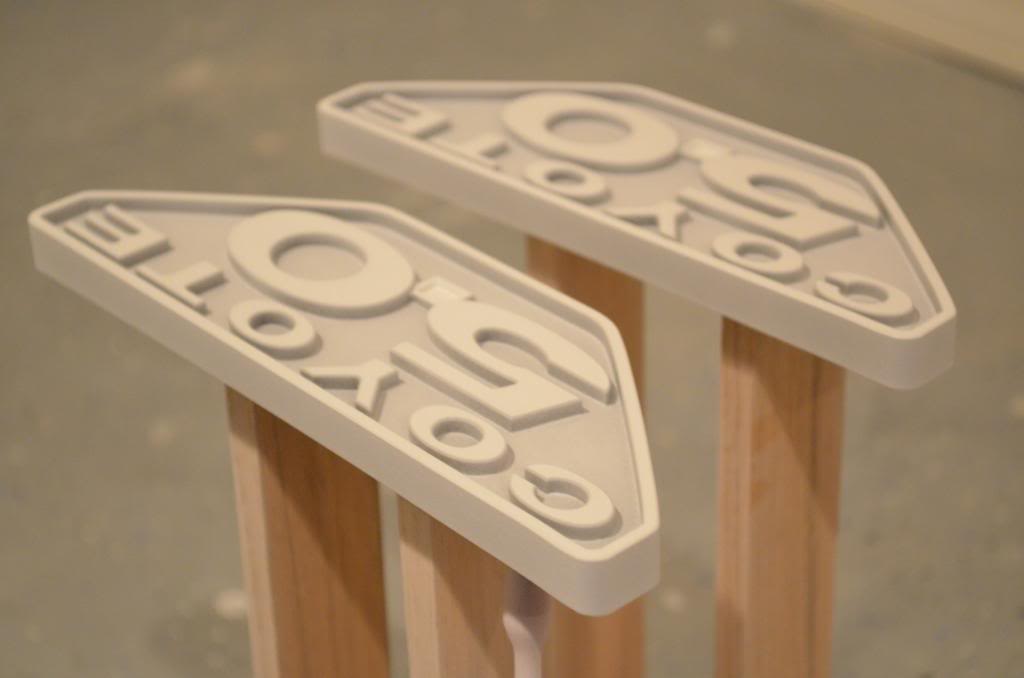
Alright! We have two units all cleaned up and ready to start cooking!
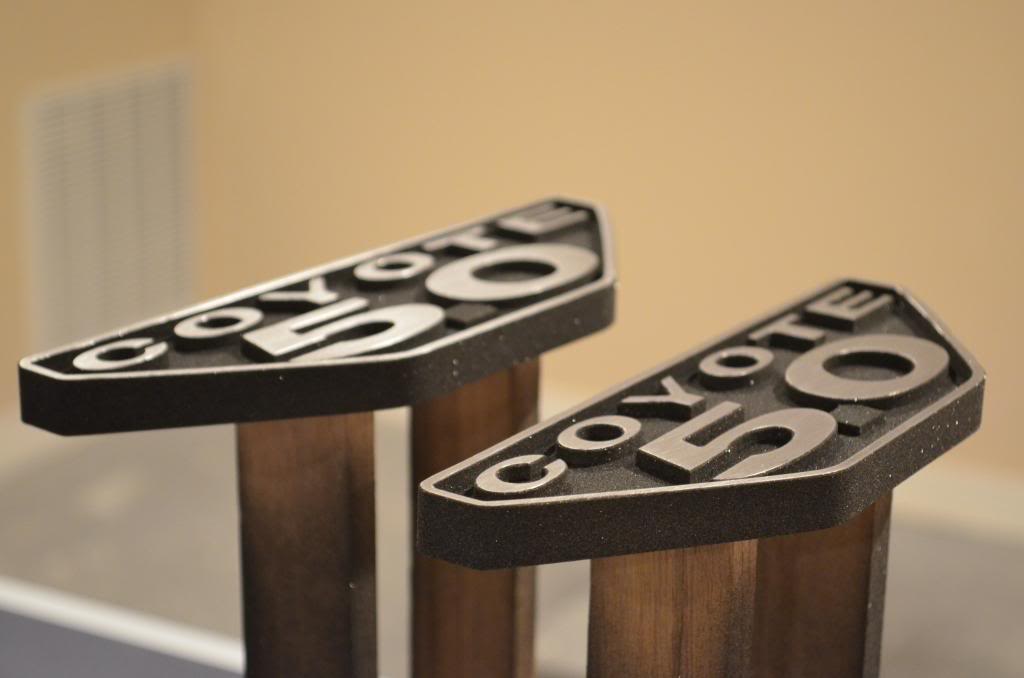
And into the oven they go!

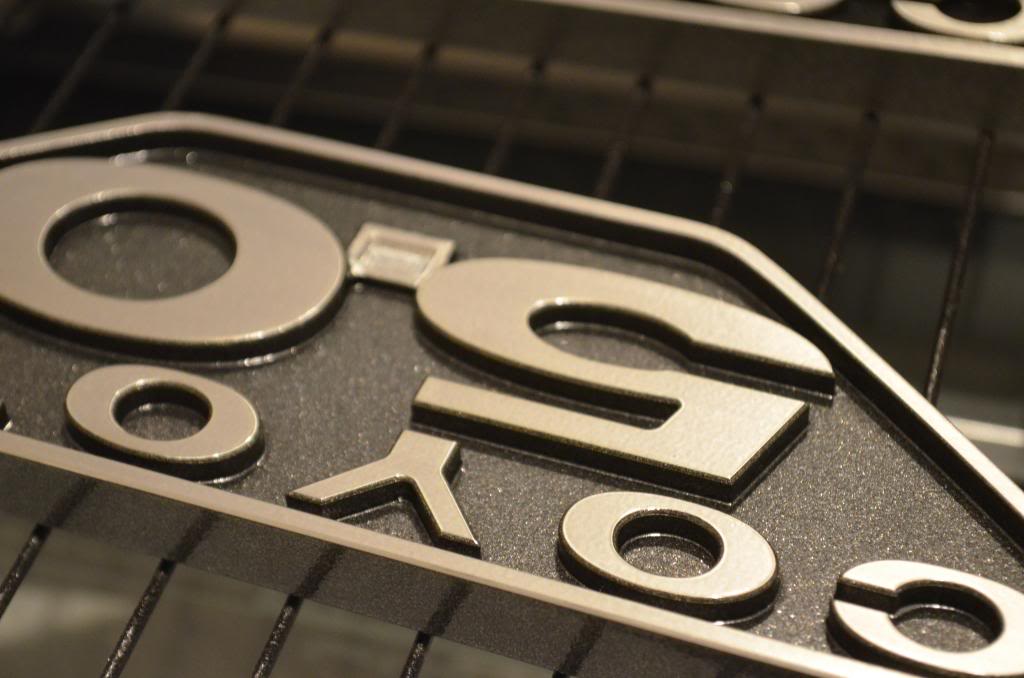
30 min later they come out with a beautiful even shine.
Looks good enough to show already but we are only half way done!!!
Behind the scenes on the care and work that is....The Mustang Coyote 5.0 Badge.
First part is taking a normal block of T6061 Aluminum and turning it into this beauty.
I then take a scotchbrite pad and hand brush the lettering numbers and trim leaving a wonderful satin look.
The part is washed carefully and I take some green tape and cut out a masking for the 5.0 dot. Shown here on one of my test unit that has seen many experiments to get the look and finish exactly right.
Now for Powder Coating! A nice metallic gray base! (Contact me for special orders of different colors.)
The Dry Powder looks nothing like the baked finish.
Now for the most difficult part of the process. After spraying the powder I have to wipe off anything that I don't want to be gray. All the powder is carefully blotted up from the letters, numbers and outer edge.
Alright! We have two units all cleaned up and ready to start cooking!
And into the oven they go!
30 min later they come out with a beautiful even shine.
Looks good enough to show already but we are only half way done!!!
3/16/13, 04:53 PM
#51
Needs to be more Astony
Thread Starter
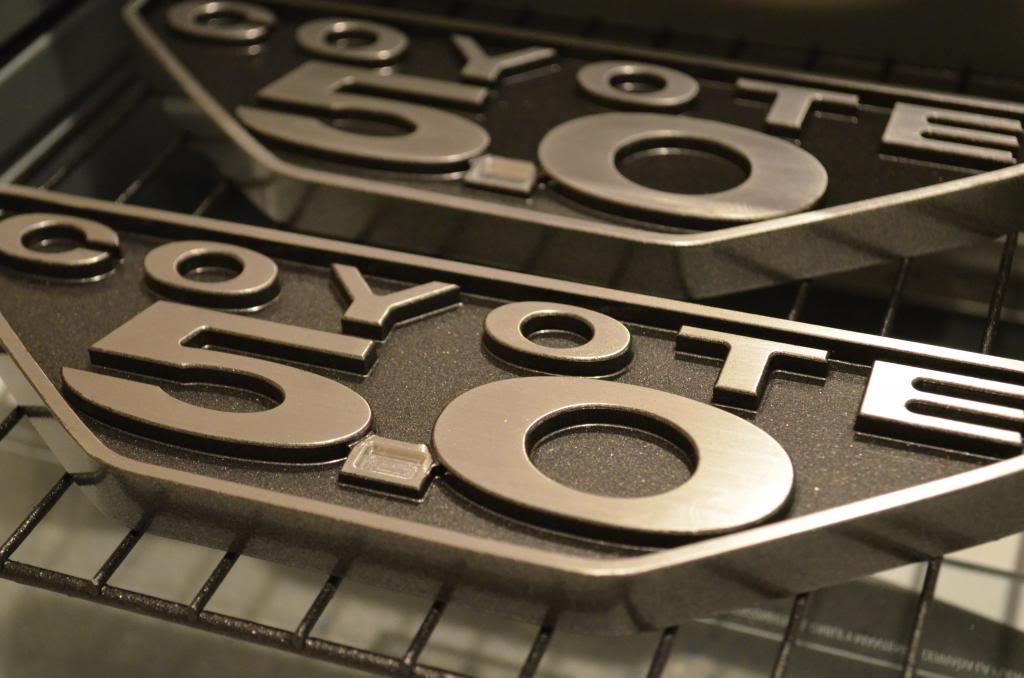
Once they are out of the oven we can see all the leftover powder that wasn't picked up in the initial blotting.
With some elbow grease and some paint thinner we wipe all the excess spots from any aluminum areas. And BOOM we have some pretty slick looking highlights text!
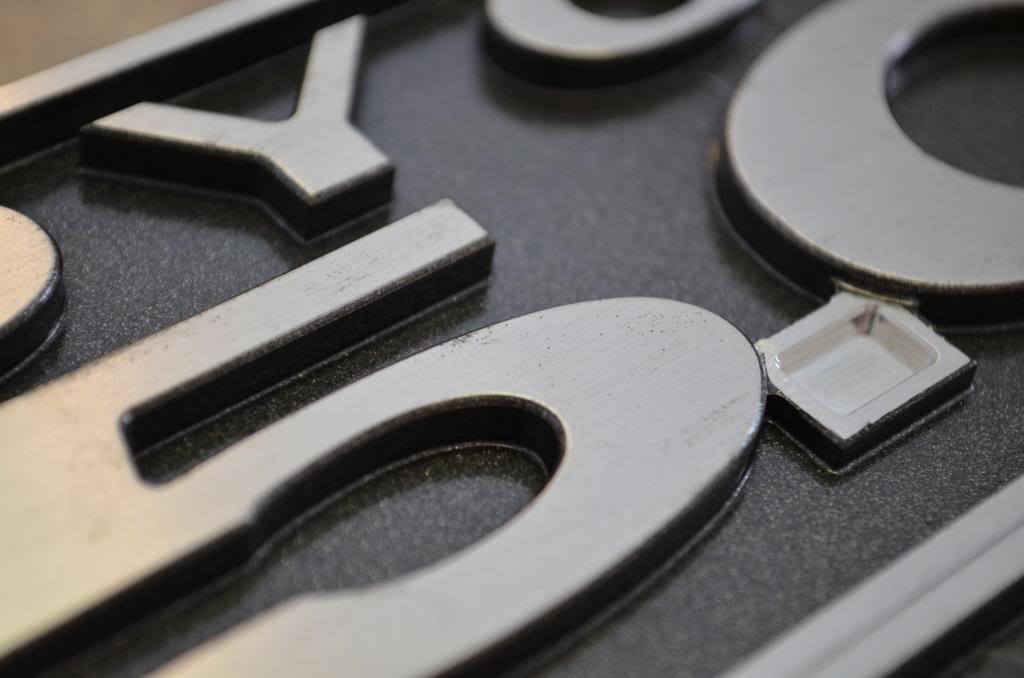
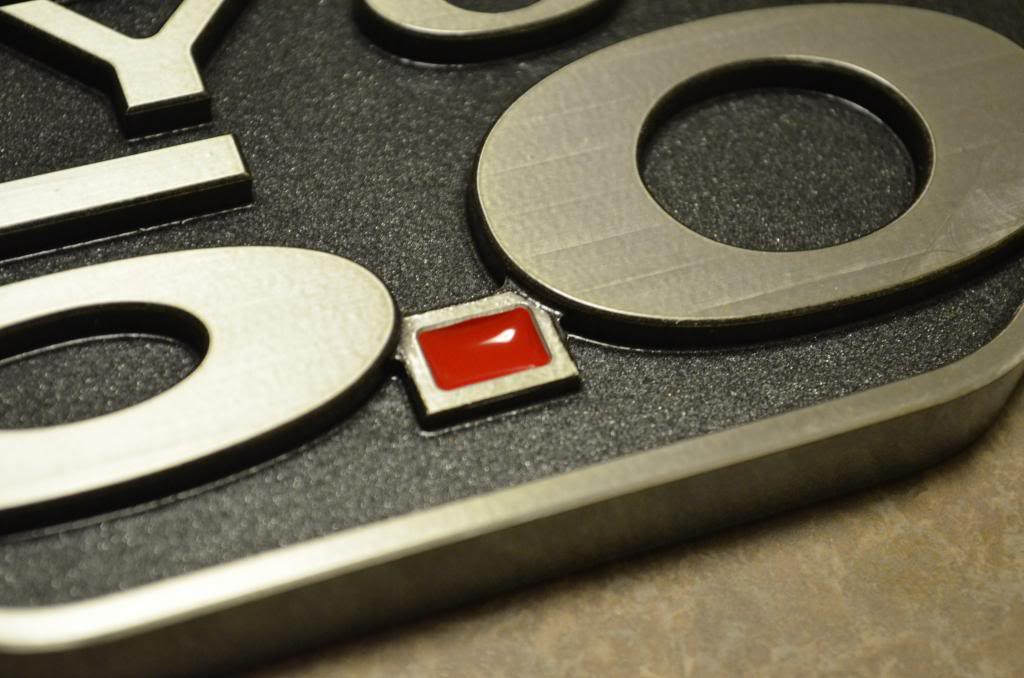
Now most companies would say, "That looks perfect now lets get'em on a car." Not here. A sanding block is then taken to the outside bevel to leave a perfect edge to really show off our part. Subtle yet important part of creating a really visual stunning peice.
The next step takes our already awesome finish and brings it to a whole other level. Also that outstanding protection that powder coating is known for. The clear coat!
Sprays on white and looks quite interesting in its powdered form.
And into the oven!!!

30 min later...
Now lets take this beauty and set it off properly with "The Dot"
Now its a showpiece! Would look great anywhere! I have one on my desk! But to go where it was really made for it needs some help.
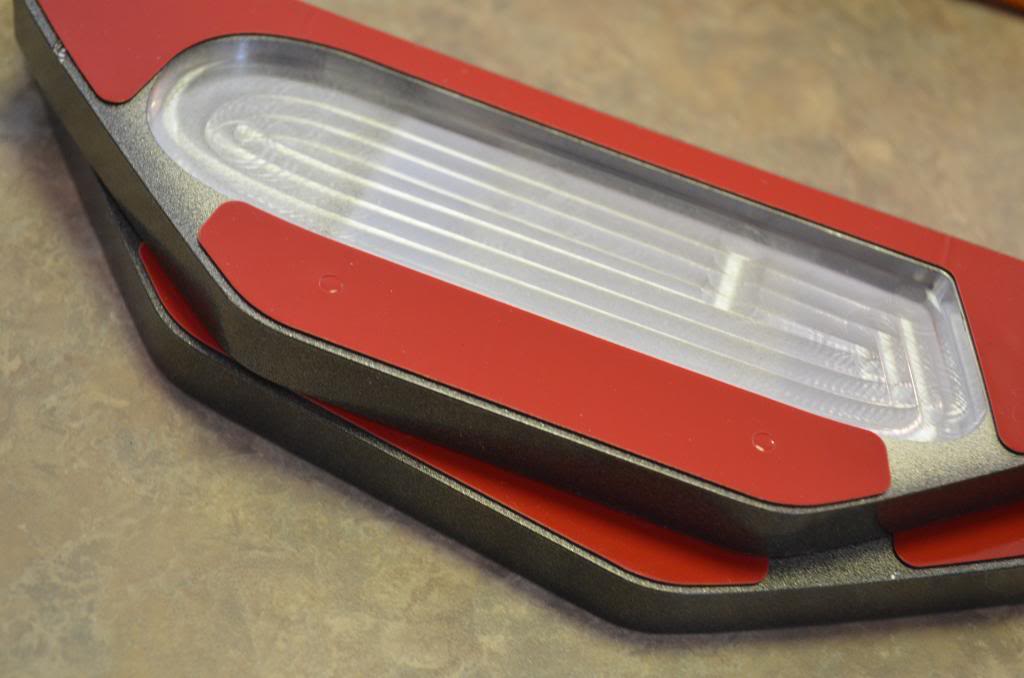
Thank you 3m for your adhesive wonders. Too bad you can't see the underside while its on the car because as you can see no detail is overlooked in its look and execution.
At this step I say my farewells as it goes off to its new home.

Thanks for reading! I hope you enjoyed a look behind the scenes!
With some elbow grease and some paint thinner we wipe all the excess spots from any aluminum areas. And BOOM we have some pretty slick looking highlights text!
Now most companies would say, "That looks perfect now lets get'em on a car." Not here. A sanding block is then taken to the outside bevel to leave a perfect edge to really show off our part. Subtle yet important part of creating a really visual stunning peice.
The next step takes our already awesome finish and brings it to a whole other level. Also that outstanding protection that powder coating is known for. The clear coat!
Sprays on white and looks quite interesting in its powdered form.
And into the oven!!!
30 min later...
Now lets take this beauty and set it off properly with "The Dot"
Now its a showpiece! Would look great anywhere! I have one on my desk! But to go where it was really made for it needs some help.
Thank you 3m for your adhesive wonders. Too bad you can't see the underside while its on the car because as you can see no detail is overlooked in its look and execution.
At this step I say my farewells as it goes off to its new home.
Thanks for reading! I hope you enjoyed a look behind the scenes!
3/16/13, 05:35 PM
#52
Post *****
Join Date: May 13, 2004
Location: Berkeley/Redwood City, CA
Posts: 18,613
Likes: 0
Received 3 Likes
on
2 Posts
Sweet! That is just excellent. great job showing off that subtle chamfer  I didn't notice it until you pointed it out but it really does make a nice difference.
Thanks for showin us how you make em
I didn't notice it until you pointed it out but it really does make a nice difference.Thanks for showin us how you make em
3/18/13, 09:32 AM
#53
Needs to be more Astony
Thread Starter
 5/23/13, 06:02 AM
#56
Needs to be more Astony
Thread Starter
Offering a Mustang Source group buy. If 10 people are interested I can do them for $95 each with free shipping included. Reply in this thread or pm me.
5/23/13, 06:17 AM
#57
Bullitt Member
I'm waiting for delivery of my new 2014 5.0 in Black, and this will be a nice finishing touch! I'll do it the same time I delete the sound tube
5/24/13, 08:20 AM
#60
Mach 1 Member
Join Date: August 14, 2010
Location: Texas
Posts: 720
Likes: 0
Received 0 Likes
on
0 Posts