
FromZto5's SC Installation Chronicle: Magnuson MP2300 TVS Supercharger on 2012 5oh
 9/22/13 | 12:06 PM
#1
Thread Starter
I Have No Life
Joined: September 24, 2011
Posts: 10,141
Likes: 172
FromZto5's SC Installation Chronicle: Magnuson MP2300 TVS Supercharger on 2012 5oh
Well folks, as most of you know, I crossed over to the dark side the other day. I finally was able to purchase my very first supercharger kit. I've been toying with the idea for years... and almost did it last fall, but due to unforeseen circumstances, put it on hold. However, the stars aligned this time around, and I was able to purchase it. I feel so blessed and lucky and thankful.
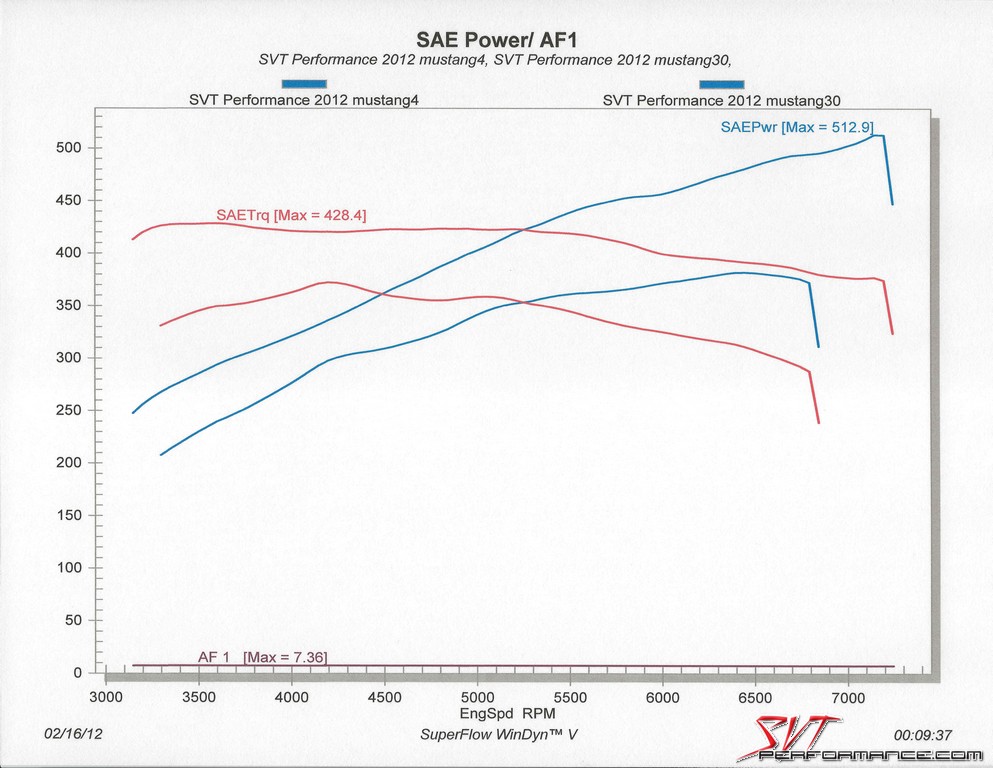
I can barely contain my excitement. From what I have seen, folks are putting down 520 whp (using Magnuson box tune) with everything else being stock. So... equating a 15% to 20% drivetrain loss, basic math for crank hp comes to be between 604 and 641 hp.


 I hope to match these numbers, at least initially. A pulley change and custom tune is definitely in forecast for the future. For now, I plan on running Magnuson's box tune to start.
Anyways, the purpose of this thread is to chronicle my installation process. Yes, I plan to do the installation myself for 4 main reasons:
1) Cost - self explanatory.
2) Get even more intimate with my car, as far as every nook and cranny in it
3) Knowledge/experience
4) it's just plain FUN!
I'm still a little freaked out but I think it will be fun. I have several buddies who will be helping me out anyways, all of whom have built their own engines, and installed their own SC's on terminators, dragsters, fox bodies, and other 5ohs. So I hope I'm in good hands.
The kit doesn't come in till mid to end of next week, but I plan on starting disassembly today... starting with the front bumper and AirRaid removal. (SIDENOTE: I can no longer use the AirRaid intake I have, and will be selling it soon... who's interested??? PM ME!!!)
I plan on updating this thread over the course of the installation. I will be taking my time, so it might be 2 weeks or more due to schedules, etc.... I will be putting several place holders for posts following this initial post, in case the writeup becomes too large.
Here's the kit that will be arriving:

And here's the END GOAL... it WILL look like this same color and all.

Here's Magnuson's detailed installation instructions... I am already worried about Step 13, as they don't elude to WHAT or HOW I need to plug the fuel lines with... Anyone have any ideas???
https://www.magnacharger.com/images/...structions.pdf
Anyways, thanks so much to everyone on this forum, and particularly the folks on this forum who I have got to know well over the last 2 years. I love this forum and hope this thread gives back to all of you as well.
Later for now...... Till the first installation step this pm
I can barely contain my excitement. From what I have seen, folks are putting down 520 whp (using Magnuson box tune) with everything else being stock. So... equating a 15% to 20% drivetrain loss, basic math for crank hp comes to be between 604 and 641 hp.
I hope to match these numbers, at least initially. A pulley change and custom tune is definitely in forecast for the future. For now, I plan on running Magnuson's box tune to start.Anyways, the purpose of this thread is to chronicle my installation process. Yes, I plan to do the installation myself for 4 main reasons:
1) Cost - self explanatory.
2) Get even more intimate with my car, as far as every nook and cranny in it
3) Knowledge/experience
4) it's just plain FUN!
I'm still a little freaked out
but I think it will be fun. I have several buddies who will be helping me out anyways, all of whom have built their own engines, and installed their own SC's on terminators, dragsters, fox bodies, and other 5ohs. So I hope I'm in good hands.The kit doesn't come in till mid to end of next week, but I plan on starting disassembly today... starting with the front bumper and AirRaid removal. (SIDENOTE: I can no longer use the AirRaid intake I have, and will be selling it soon... who's interested??? PM ME!!!
)I plan on updating this thread over the course of the installation. I will be taking my time, so it might be 2 weeks or more due to schedules, etc.... I will be putting several place holders for posts following this initial post, in case the writeup becomes too large.
Here's the kit that will be arriving:
And here's the END GOAL... it WILL look like this
same color and all.Here's Magnuson's detailed installation instructions... I am already worried about Step 13, as they don't elude to WHAT or HOW I need to plug the fuel lines with...
Anyone have any ideas???https://www.magnacharger.com/images/...structions.pdf
Anyways, thanks so much to everyone on this forum, and particularly the folks on this forum who I have got to know well over the last 2 years. I love this forum and hope this thread gives back to all of you as well.
Later for now...... Till the first installation step this pm
Last edited by FromZto5; 9/22/13 at 06:20 PM.
9/22/13 | 12:08 PM
#2
Thread Starter
I Have No Life
Joined: September 24, 2011
Posts: 10,141
Likes: 172
9/22/2013 3:00pm
Alright guys... the surgery has begun. I only got to spend 2 hours on her today, but I seriously wanted to keep going. I wish I already had the kit here so I could finish it by tomorrow morning by not sleeping
I only had 1 casualty today. The outside air temp sensor, instead of just pulling it off the fascia, I tried to remove the darn tab, and broke one side. Luckily it's still fine and locked in, and should never move... at least I hope not
The rest of it cake!!! Seriously... that bumper removal was easy. I got it off in like 15 minutes. Then off came the airraid intake, then off came the manifold and strut bar.
Not sure what else I can do for the rest of the week since the rest of it requires the contents of the SC kit, which has yet to arrive (fuel line removal tool, intercooler pump, etc). I might just have to wait till the kit arrives. Anything else I can do in the meantime?
So here come the pics of what I did today!!! Thanks again for those who helped with comments:
backed in, getting ready

all jacked up and ready for surgery!!!

One last look at what Marilyn's semi-stock cavity looks like... take a good look, she'll never look like this again

Lower panel dropped...

Radiator shrouds removed...

Passenger side bumper tabs/clips removed. I admit, I was a "little" scared but quickly got over it... lol

Driver side clips removed...

Disconnected the fog lights...

I can see the turn signal lights still connected. Gotta remove those...

Voila... Marilyn's "bra" just got removed... she's naked!

I think she seems kindda mad that I removed her support... lol

Sidenote... for those of you guys who know me, know that I NEVER drive Marilyn in rain. Thus, I have never used the wipers or wiper fluid. Take a look at this fluid reservoir. Almost like it was off the assembly line

Time to remove the strut bar... easy

Now the manifold cover...

Once again, she's kindda naked!!!

AirRaid intake REMOVED! Anyone interested in buying this??? it's only got barely 1000 miles of use. LOL.

Tadaa!!! All done for the day. Throttle body exposed.


And finally, for safety and just because I'm OCD, I taped up the throttle body opening in case some Gremlins decide to creep in.

All in all, a successful day. I will update as necessary. Thanks for following! Please let me know if you have questions or recommendations.
Update today as of 3pm 9/24...Last night, after deep research and inner reflection (lol), I purchased an autometer cobalt gauge... Only to cancel that order this morning when I woke up, since I wasn't feeling it. Instead, I purchased a Defi Boost Gauge instead, part # DF06501. I did more research today and found that the accuracy of Defi gauges are among the top tier. Thus I decided to go that route instead. Here's a pic of it installed in someone else's vehicle. Mine will obviously be installed in a roush vent gauge pod. Second update, the magnuson kit was shipped yesterday!!! I am obtaining a tracking # today. It should arrive Friday for an install Friday and Saturday.
Short Update as of 9/25 4 pm
I received the tracking #'s for all my stuff, sans the Roush gauge vent pod I ordered from GT50GO here on forum...
Maggie Kit - arriving Friday
Defi Gauge - arriving Friday
Maggie SCT Tuner with Maggie tune - arriving Monday (shipped separate)
Roush gauge vent pod - TBD, when GT50GO ships it today will get tracking #
Getting even harder to sleep at night...... Marilyn looks abused sitting in garage all torn apart ;'(
******Reserved for updates
Alright guys... the surgery has begun. I only got to spend 2 hours on her today, but I seriously wanted to keep going. I wish I already had the kit here so I could finish it by tomorrow morning by not sleeping
I only had 1 casualty today. The outside air temp sensor, instead of just pulling it off the fascia, I tried to remove the darn tab, and broke one side. Luckily it's still fine and locked in, and should never move... at least I hope not
The rest of it cake!!! Seriously... that bumper removal was easy. I got it off in like 15 minutes. Then off came the airraid intake, then off came the manifold and strut bar.
Not sure what else I can do for the rest of the week
since the rest of it requires the contents of the SC kit, which has yet to arrive (fuel line removal tool, intercooler pump, etc). I might just have to wait till the kit arrives. Anything else I can do in the meantime?So here come the pics of what I did today!!! Thanks again for those who helped with comments:
backed in, getting ready
all jacked up and ready for surgery!!!
One last look at what Marilyn's semi-stock cavity looks like... take a good look, she'll never look like this again
Lower panel dropped...
Radiator shrouds removed...
Passenger side bumper tabs/clips removed. I admit, I was a "little" scared
but quickly got over it... lolDriver side clips removed...
Disconnected the fog lights...
I can see the turn signal lights still connected. Gotta remove those...
Voila... Marilyn's "bra" just got removed... she's naked!
I think she seems kindda mad that I removed her support... lol
Sidenote... for those of you guys who know me, know that I NEVER drive Marilyn in rain. Thus, I have never used the wipers or wiper fluid. Take a look at this fluid reservoir. Almost like it was off the assembly line
Time to remove the strut bar... easy
Now the manifold cover...
Once again, she's kindda naked!!!
AirRaid intake REMOVED! Anyone interested in buying this??? it's only got barely 1000 miles of use. LOL.
Tadaa!!! All done for the day. Throttle body exposed.
And finally, for safety and just because I'm OCD, I taped up the throttle body opening in case some Gremlins decide to creep in.
All in all, a successful day. I will update as necessary. Thanks for following! Please let me know if you have questions or recommendations.
Update today as of 3pm 9/24...Last night, after deep research and inner reflection (lol), I purchased an autometer cobalt gauge... Only to cancel that order this morning when I woke up, since I wasn't feeling it. Instead, I purchased a Defi Boost Gauge instead, part # DF06501. I did more research today and found that the accuracy of Defi gauges are among the top tier. Thus I decided to go that route instead. Here's a pic of it installed in someone else's vehicle. Mine will obviously be installed in a roush vent gauge pod.
Second update, the magnuson kit was shipped yesterday!!! I am obtaining a tracking # today. It should arrive Friday for an install Friday and Saturday. Short Update as of 9/25 4 pm
I received the tracking #'s for all my stuff, sans the Roush gauge vent pod I ordered from GT50GO here on forum...
Maggie Kit - arriving Friday
Defi Gauge - arriving Friday
Maggie SCT Tuner with Maggie tune - arriving Monday (shipped separate)
Roush gauge vent pod - TBD, when GT50GO ships it today will get tracking #
Getting even harder to sleep at night...... Marilyn looks abused sitting in garage all torn apart
;'(******Reserved for updates
Last edited by FromZto5; 9/25/13 at 04:09 PM.
9/22/13 | 12:08 PM
#3
Thread Starter
I Have No Life
Joined: September 24, 2011
Posts: 10,141
Likes: 172
Update as of 9/26/2013 - 8:00 pm I had a few of my buddies come over tonight to help with further teardown. Still no Magnuson kit yet (tomorrow), but I figured there was still further stuff we could do. We removed: EVAP hose EVAP solenoid Brake booster line Fuel line Heating channel foam Fuel Rail/injectors The only "oh crap" moment was we busted the brake booster clamp... not knowing that the clamp was 1 piece, with 2 clips  So we destroyed 1 clamp. I'll have to buy better clamps. Oh well. Overall, tonight only took slightly over an hour. 10 minutes of that was that stupid clamp... Everything really was not that bad. I was seriously surprised. It was borderline easy. My buddy with the fuel line removal tool made the process super easy. I was making a big deal out of nothing. We're gonna wait to pull the intake manifold off, until I have the supercharger manifold ready to go. I also still need to get my 50/50 coolant mix, silicone lubricant, and brake cleaner. We anticipate hitting it hard Saturday morning, early... and being DONE BY LUNCH TIME! Sad part is, I CAN'T START THE CAR until my loaded SCT tuner arrives on Monday They shipped it separate for me so I could get the kit sooner, to install this weekend. So Sunday will be a very LONG day
  Anyways, here's some pics of Marilyn going down further under the knife (notice that I labeled everything):
Pictured below, the heating channels, fuel line, evap and brake booster line, and evap solenoid. The fuel line barb plugged up...
  The stock manifold with the injector holes plugged to avoid anything falling in there...

 Fuel Rail with stock injectors
So we destroyed 1 clamp. I'll have to buy better clamps. Oh well. Overall, tonight only took slightly over an hour. 10 minutes of that was that stupid clamp... Everything really was not that bad. I was seriously surprised. It was borderline easy. My buddy with the fuel line removal tool made the process super easy. I was making a big deal out of nothing. We're gonna wait to pull the intake manifold off, until I have the supercharger manifold ready to go. I also still need to get my 50/50 coolant mix, silicone lubricant, and brake cleaner. We anticipate hitting it hard Saturday morning, early... and being DONE BY LUNCH TIME! Sad part is, I CAN'T START THE CAR until my loaded SCT tuner arrives on Monday They shipped it separate for me so I could get the kit sooner, to install this weekend. So Sunday will be a very LONG day Anyways, here's some pics of Marilyn going down further under the knife (notice that I labeled everything): Pictured below, the heating channels, fuel line, evap and brake booster line, and evap solenoid.
The fuel line barb plugged up... The stock manifold with the injector holes plugged to avoid anything falling in there... Fuel Rail with stock injectors
Last edited by FromZto5; 9/26/13 at 09:23 PM.
9/22/13 | 12:09 PM
#4
Thread Starter
I Have No Life
Joined: September 24, 2011
Posts: 10,141
Likes: 172
Update as of 9/27, 10 pm...
Not much actual car work today... just received the package and started unboxing and getting it all ready for tomorrow's shindig!!!
I made sure someone was home for this:

Clearing out a space in the garage... the wife's Prius sits outside tonight

My Defi Gauge

My Roush vent gauge pod (thanks Mark!!!)

I'm supposed to adhere this sticker on my gas cover

Full print:

Box 1 completely sorted:

Box 2... something is peeking in there

The 2.3L blower has finally arrived...

Till tomorrow folks... need some sleep to get an early start.
Not much actual car work today... just received the package and started unboxing and getting it all ready for tomorrow's shindig!!!
I made sure someone was home for this:
Clearing out a space in the garage... the wife's Prius sits outside tonight
My Defi Gauge
My Roush vent gauge pod (thanks Mark!!!)
I'm supposed to adhere this sticker on my gas cover
Full print:
Box 1 completely sorted:
Box 2... something is peeking in there
The 2.3L blower has finally arrived...
Till tomorrow folks... need some sleep to get an early start.
Last edited by FromZto5; 9/27/13 at 10:18 PM.
9/22/13 | 12:09 PM
#5
Thread Starter
I Have No Life
Joined: September 24, 2011
Posts: 10,141
Likes: 172
Update as of Sunday 9/29/2013
Sorry I wasn't able to post much yesterday. I was in the belly of the beast so to say. All in all, I'd say I'm about 80 - 85% done overall. I worked alone for about 2 hours starting at 5 am yesterday, then buddies came over and we worked till 2 pm. I then worked alone again for about 2 more hours.
The install was a major success for the most part. The minor snags we ran into were:
1) Determining a good enough "cut"/modification to the PCM run-start fuse to allow for a good fit of the tapped fuse. After about 15 minutes of haggling with it, we got it in.
2) EVAP solenoid extension harness provided was the right kind (male/female), but one end of it was the wrong orientation/shape. You'll see what I mean in the pics below. I believe it's an error in the Magnuson kit, so I will be contacting them tomorrow to make sure they correct it for future kits, or perhaps I will have to change it again. We made it work by pushing it (without clicking) as much as possible, then wrapping tape around it good to ensure it doesn't come off.
3) Coolant hose routing was in error on the manual. Pics didn't match verbiage. I will be contacting Magnuson about this too. Only by looking at close-up pics of other installed Maggie Stangs on the web, were we able to determine the proper routing. Essentially it was deciding whether the driver or passenger side intercooler on the SC manifold went to the new coolant reservoir. We figured out that it was the driver side.
4) Driver side PCV hose was a major PITA!!! I spent almost 2 hours removing the fitting and reinstalling it. Task was to shorten the hose. Problem was, I had to CAREFULLY cut the molded tubing off WITHOUT damaging the fitting. Then I was supposed to heat up the tubing enough after cutting it to length, to push the fitting back on all the way in. As you can imagine, I couldn't get it hot enough to allow to push, or too soft that it started flexing. Anyways, went to ACE hardware, had another guy help me (I was alone at home doing this), then bought additional shrink tubing to make sure it was sealed.
Other than that, install was literally easy. I'd rank the overall install about a 7/10 in terms of difficulty. Just mechanical (and some electrical) inclination is all you need.
I still need to do FIVE more things... today/tomorrow (when I'm off work).
1) Fill new intercooler reservoir with coolant.
2) Reinstall the front bumper and other connections.
3) Install boost gauge, complete with power/ground connections. I will need HELP with this, for those of you out there. Where do I tap power??? esp for dimming?
4) Zip tie and clean up wire looms, tubing, etc all over engine bay.
5) Load new Magnuson tune (tomorrow arrival).
Then I'm done.... now on to the pics...
Finished tapping the fuse and connecting all the grounds. I'm amazed at my ability to do wiring at 5 am... lol

Installed panel mounting nut for intercooler pump.

Intercooler pump mounted on bracket.

Intercooler pump mounter on cross member.

Intercooler with foam backing installed.

Intercooler mounted in place! Looks amazing...

Intercooler coolant reservoir mounted in driver side strut mount.

The BELLY of the BEAST!!! Stock intake manifold removed...before cleaning. I'm amazed at how much crap is able to get in there.

New Maggie SC manifold flipped over for gasket and solenoid install.

Maggie SC ready for mounting...

This was a GRAND moment... first looking at this setup, standing back and admiring it... that was priceless.

Fuel rails with new fuel injectors ready for mounting. Getting it all lined up before pushing it down was kindda freaky... had to make sure it was all straight.

Here's this EVAP harness... stock is on right, new one is on left. You see how the straight vs curved sides is mirrored on each one???

Here's the PCV hose... see how I still had to shove it in another good .25"??? What a royal PITA.

Here's that same hose all fixed up and sealed.

New Maggie KnN filter in red, as opposed to stock orange. I noticed how much thicker the OEM one was. Back goes the stock box though! I will miss the Cone shaped AirRaid I had...

.
.
.
.
.
.
And here's the final pics... everything installed, sans bumper and cleanup of course. Serpentine belt all installed on new pulleys/idlers, etc. Airbox installed too. This is what 13 hours of work (with more to do yet!) looks like. I just LOVE how the set up looks tho. I'm SO glad I got the powder coated blue. It matches the coil covers so well.
Many thanks to Mike and Ed and Derek. My buddies who helped me this weekend. FYI, I might still need more of your help
More updates today/tomorrow as I do the 5 things I mentioned above.


Sorry I wasn't able to post much yesterday. I was in the belly of the beast so to say. All in all, I'd say I'm about 80 - 85% done overall. I worked alone for about 2 hours starting at 5 am yesterday, then buddies came over and we worked till 2 pm. I then worked alone again for about 2 more hours.
The install was a major success for the most part. The minor snags we ran into were:
1) Determining a good enough "cut"/modification to the PCM run-start fuse to allow for a good fit of the tapped fuse. After about 15 minutes of haggling with it, we got it in.
2) EVAP solenoid extension harness provided was the right kind (male/female), but one end of it was the wrong orientation/shape. You'll see what I mean in the pics below. I believe it's an error in the Magnuson kit, so I will be contacting them tomorrow to make sure they correct it for future kits, or perhaps I will have to change it again. We made it work by pushing it (without clicking) as much as possible, then wrapping tape around it good to ensure it doesn't come off.
3) Coolant hose routing was in error on the manual. Pics didn't match verbiage. I will be contacting Magnuson about this too. Only by looking at close-up pics of other installed Maggie Stangs on the web, were we able to determine the proper routing. Essentially it was deciding whether the driver or passenger side intercooler on the SC manifold went to the new coolant reservoir. We figured out that it was the driver side.
4) Driver side PCV hose was a major PITA!!! I spent almost 2 hours removing the fitting and reinstalling it. Task was to shorten the hose. Problem was, I had to CAREFULLY cut the molded tubing off WITHOUT damaging the fitting. Then I was supposed to heat up the tubing enough after cutting it to length, to push the fitting back on all the way in. As you can imagine, I couldn't get it hot enough to allow to push, or too soft that it started flexing. Anyways, went to ACE hardware, had another guy help me (I was alone at home doing this), then bought additional shrink tubing to make sure it was sealed.
Other than that, install was literally easy. I'd rank the overall install about a 7/10 in terms of difficulty. Just mechanical (and some electrical) inclination is all you need.
I still need to do FIVE more things... today/tomorrow (when I'm off work).
1) Fill new intercooler reservoir with coolant.
2) Reinstall the front bumper and other connections.
3) Install boost gauge, complete with power/ground connections. I will need HELP with this, for those of you out there. Where do I tap power??? esp for dimming?
4) Zip tie and clean up wire looms, tubing, etc all over engine bay.
5) Load new Magnuson tune (tomorrow arrival).
Then I'm done.... now on to the pics...
Finished tapping the fuse and connecting all the grounds. I'm amazed at my ability to do wiring at 5 am... lol
Installed panel mounting nut for intercooler pump.
Intercooler pump mounted on bracket.
Intercooler pump mounter on cross member.
Intercooler with foam backing installed.
Intercooler mounted in place! Looks amazing...
Intercooler coolant reservoir mounted in driver side strut mount.
The BELLY of the BEAST!!! Stock intake manifold removed...before cleaning. I'm amazed at how much crap is able to get in there.
New Maggie SC manifold flipped over for gasket and solenoid install.
Maggie SC ready for mounting...
This was a GRAND moment... first looking at this setup, standing back and admiring it... that was priceless.
Fuel rails with new fuel injectors ready for mounting. Getting it all lined up before pushing it down was kindda freaky... had to make sure it was all straight.
Here's this EVAP harness... stock is on right, new one is on left. You see how the straight vs curved sides is mirrored on each one???
Here's the PCV hose... see how I still had to shove it in another good .25"??? What a royal PITA.
Here's that same hose all fixed up and sealed.
New Maggie KnN filter in red, as opposed to stock orange. I noticed how much thicker the OEM one was. Back goes the stock box though! I will miss the Cone shaped AirRaid I had...
.
.
.
.
.
.
And here's the final pics... everything installed, sans bumper and cleanup of course. Serpentine belt all installed on new pulleys/idlers, etc. Airbox installed too. This is what 13 hours of work (with more to do yet!) looks like. I just LOVE how the set up looks tho. I'm SO glad I got the powder coated blue. It matches the coil covers so well.
Many thanks to Mike and Ed and Derek. My buddies who helped me this weekend. FYI, I might still need more of your help
More updates today/tomorrow as I do the 5 things I mentioned above.
Last edited by FromZto5; 9/29/13 at 08:28 AM.
9/22/13 | 12:09 PM
#6
Thread Starter
I Have No Life
Joined: September 24, 2011
Posts: 10,141
Likes: 172
Update as of 3 pm 9/29...
Finished tidying up all the hoses and wires in the engine bay. Adhered some of my Magnuson labels
Also, installed the Defi Boost gauge, including the vacuum line and electronic sender. I have not done the electrical wiring yet. I am contemplating taking it to an automotive electronic shop due to potential complexity. I'm not into electrical wiring
Labels adhered


Gauge cluster trim removed and wiring pulled through...

Trim put back on, but I taped the wires so they don't fall back through...lol

All done. Can't wait to see it all lit up tomorrow. Red triangle is adjustable marker for boost warning...


Going to attempt to reinstall the front bumper now... wish me luck.
============================
Update Sunday 9/29 8 pm...
Ok, I verified the intercooler pump is fully operational. I can't believe I had electrical skillzzz lol. Anyways, I took a pic and made a video of it on, when the key is in ignition and turned to on (no crank). I then finished putting the bumper back on with no issues, as well as the underbody plastic covers.
All in all a good day. Am ready for the SCT tuner arriving tomorrow, then I still don't know what to do about the gauge wiring....
Intercooler pump working... you can see the coolant pumping through. Thus verified a closed loop system... whew....

Here's a short video of it running.
Another pic of my gauge set up. I love that thing. If only I could get it working lol...

And finally, everything put back together. Does it look stock??????

Tomorrow is D-day. I hopefully get to start her up.
Finished tidying up all the hoses and wires in the engine bay. Adhered some of my Magnuson labels
Also, installed the Defi Boost gauge, including the vacuum line and electronic sender. I have not done the electrical wiring yet. I am contemplating taking it to an automotive electronic shop due to potential complexity. I'm not into electrical wiring
Labels adhered
Gauge cluster trim removed and wiring pulled through...
Trim put back on, but I taped the wires so they don't fall back through...lol
All done. Can't wait to see it all lit up tomorrow. Red triangle is adjustable marker for boost warning...
Going to attempt to reinstall the front bumper now... wish me luck.
============================
Update Sunday 9/29 8 pm...
Ok, I verified the intercooler pump is fully operational. I can't believe I had electrical skillzzz lol. Anyways, I took a pic and made a video of it on, when the key is in ignition and turned to on (no crank). I then finished putting the bumper back on with no issues, as well as the underbody plastic covers.
All in all a good day. Am ready for the SCT tuner arriving tomorrow, then I still don't know what to do about the gauge wiring....
Intercooler pump working... you can see the coolant pumping through. Thus verified a closed loop system... whew....
Here's a short video of it running.
Another pic of my gauge set up. I love that thing. If only I could get it working lol...
And finally, everything put back together. Does it look stock??????
Tomorrow is D-day. I hopefully get to start her up.
Last edited by FromZto5; 9/29/13 at 08:01 PM.
9/22/13 | 12:10 PM
#7
Thread Starter
I Have No Life
Joined: September 24, 2011
Posts: 10,141
Likes: 172
Final (sorta) update, as of 8:20 pm 9/30...
As I mentioned above, sorry I was away from PC awhile. I was busy getting the tune done, gauge installed, oh... that's right, and a LOT of driving.
The day started out with me waiting for the dang tuner to arrive. The UPS man probably got all freaked out because as soon as I saw him drive up, I went up to meet him We then talked about the contents of the box and more about the car. What a cool dude.

^ This is what the tuner looked like out of the box... nifty piece. After wiping my drool, I proceeded to load the tune. It was easy and simple to follow and use.

^ Process took about 6 minutes or so. It was a combination of rewriting and downloading the stock tune.
Then came the "moment". My wife and kids helped film the short recording belong... they were all eager as I was, so see if my car would "blow up". lol. I must admit, I was a little worried that maybe I f'd something up. Luckily, it was smooooooooooooth... See vid below.
I initially heard the faint whine of the Maggie blower... but it settled. I smelled some spilled coolant (my goof up from before), but other than that, smooth... no leaks.... no squeaks... belt was lined up. I'm good to go.
I then took her for a short drive to Auto Electronics shop to get my gauge wired up. I didn't really get on her at all... instructions said to go easy for the first few miles. She drove like STOCK! Albeit, the throttle response was more instantaneous. I attribute that to the new tune, if anything.
I made it to the shop in one piece... no issues. Whew... now the long wait to get the gauge working. After 30 minutes or so, I hear the undeniable sound (from the shop garage) of a Mustang V8 with Borla exhaust start up. I knew it was mine.... It's GO time... Here's some pics of the gauge at daytime and night, with my lights on. I also made a short vid of the start up sequence. Defi gauges FTW.


Now that all that set up was out of the way, it was time to get on her, for real. All I can say, Marilyn was awesome before, she's UNreal now... This is my first supercharged car. I've never felt a car like this before. The pull is just insane. Now I know what a 530rwhp (600+ crank hp). It's pretty much instantaneous. I remember my twin turbo rx7.... and it did NOT feel like this. Virtually no lag. Just instant slam-you-in-your-back feeling. It's just marvelous. I was pretty much barking my tires through 3rd. I had to be in sport mode the whole time, because the TCS would bog down the engine with the first hint of slip.
I gave my buddies (who helped me install) and neighbors a ride. My one neighbor, I never knew swore, did... lol Their reactions were priceless.
My mouth and face hurt from smiling so much. I am REALLY happy with this kit. I called Magnuson and gave them props for a kit that's streetable, drivable, with enough power for most folks... an install that's fairly easy, and EXCELLENT customer service. I highly recommend them to any of you. Affordable and easy to install kit.
Thanks to everyone for following this thread. Thanks for the advice, and the props. I will leave you with some vids... just some mild pulls... you can see the boost gauge working on one (don't mind the horn honk, I accidentally pushed it)... and my buddy held the iphone on the other. I was able to go almost WOT in the 2nd vid from 2nd gear I think.
Any questions please let me know... wife's prius is in the shop, so I get to drive Marilyn (tempted to change her name to Maggie...lol) all week. How lucky am I??? I hope to wash her Wednesday...ugh...dirty car.
Edit: Surprisingly, the Maggie "whine" was not as prominent as my Borla S-Type Catbacks... you can tell from the video.
===============================================
DAY 2 UPDATE!!!
Well folks... I had to pinch myself this morning to make sure I really still have the Maggie on there. LOL.
I drove to the gym at 530 am this morning, and that 50 degree air is just wonderful. Throttle modulation is the key, as someone mentioned above. The throttle response is just INSANE compared to stock. I've driven turbo cars before and you can sense the lag... this one is instant. You jab that throttle and the thing goes.
I just love the insane (and LINEAR) burst/surge of power. I now have to start in 2nd from stop signs to avoid that sudden jerk of power... also, I always drive in sport mode now. TCS fully on just isn't cutting it... lol... pun intended.
I love this thing... it has me smiling like a big baby. I'm proud of it too I highly recommend this kit to anyone looking to go Forced Induction... See my post above for reasons as to why.
fyi, mpg right now is 13.7. Ask me if I care??????????
=======================
Update 10/2 8:00 pm
On my 3rd day of supercharger ownership... I am really loving this thing. It's delivery is very smooth and linear. Driven conservatively, except for a more responsive throttle (due to new tune), one would not notice there was a blower. It's very calm on the street in that regard. Mash the throttle though, and it's a whole 'nother story. The instant torque is quite gratifying. I can't get it enough.
Also, maybe I'm just hearing things, but I could have sworn, my Borlas seem to have gotten louder. Why is that??? more air? hmmmm
The attention that this car now gets is borderline ridiculous. After friends/co-workers got wind of the mod, during lunch 4 of us went outside to check it out. 10 minutes later, there were 10 people there... each wanted a ride. lol. I obliged to a few, but had to take a rain check on the rest. For those that I gave a ride to, it was hilarious hearing them start to swear like a drunken sailor. "OH $H@@@@@@" "HOLY $H@@@@@" It's so funny. Another thing I found quite interesting: They all seemed to be totally shocked that I/we did the install all on our own. If they only knew it really was not that hard. If you can turn a wrench and read basic English, you can install this. Trust me....
Anyways, I love it... best mod I've done on any car, so far. It used to be my Borlas and MGW, but Maggie takes the cake The fact that I did the install myself makes it all the more gratifying.
Some pics tonight, I finally got a chance to wash her, though I ran out of daylight. I hate the end of summer. I'll try to take more pics this weekend.


As I mentioned above, sorry I was away from PC awhile. I was busy getting the tune done, gauge installed, oh... that's right, and a LOT of driving.
The day started out with me waiting for the dang tuner to arrive. The UPS man probably got all freaked out because as soon as I saw him drive up, I went up to meet him
We then talked about the contents of the box and more about the car. What a cool dude.^ This is what the tuner looked like out of the box... nifty piece. After wiping my drool, I proceeded to load the tune. It was easy and simple to follow and use.
^ Process took about 6 minutes or so. It was a combination of rewriting and downloading the stock tune.
Then came the "moment". My wife and kids helped film the short recording belong... they were all eager as I was, so see if my car would "blow up". lol. I must admit, I was a little worried that maybe I f'd something up. Luckily, it was smooooooooooooth... See vid below.
I initially heard the faint whine of the Maggie blower... but it settled. I smelled some spilled coolant (my goof up from before), but other than that, smooth... no leaks.... no squeaks... belt was lined up. I'm good to go.
I then took her for a short drive to Auto Electronics shop to get my gauge wired up. I didn't really get on her at all... instructions said to go easy for the first few miles. She drove like STOCK! Albeit, the throttle response was more instantaneous. I attribute that to the new tune, if anything.
I made it to the shop in one piece... no issues. Whew... now the long wait to get the gauge working. After 30 minutes or so, I hear the undeniable sound (from the shop garage) of a Mustang V8 with Borla exhaust start up. I knew it was mine....
It's GO time... Here's some pics of the gauge at daytime and night, with my lights on. I also made a short vid of the start up sequence. Defi gauges FTW.Now that all that set up was out of the way, it was time to get on her, for real. All I can say, Marilyn was awesome before, she's UNreal now... This is my first supercharged car. I've never felt a car like this before. The pull is just insane. Now I know what a 530rwhp (600+ crank hp). It's pretty much instantaneous. I remember my twin turbo rx7.... and it did NOT feel like this. Virtually no lag. Just instant slam-you-in-your-back feeling. It's just marvelous. I was pretty much barking my tires through 3rd. I had to be in sport mode the whole time, because the TCS would bog down the engine with the first hint of slip.
I gave my buddies (who helped me install) and neighbors a ride. My one neighbor, I never knew swore, did... lol
Their reactions were priceless.My mouth and face hurt from smiling so much. I am REALLY happy with this kit.
I called Magnuson and gave them props for a kit that's streetable, drivable, with enough power for most folks... an install that's fairly easy, and EXCELLENT customer service. I highly recommend them to any of you. Affordable and easy to install kit.Thanks to everyone for following this thread. Thanks for the advice, and the props. I will leave you with some vids... just some mild pulls... you can see the boost gauge working on one (don't mind the horn honk, I accidentally pushed it)... and my buddy held the iphone on the other. I was able to go almost WOT in the 2nd vid from 2nd gear I think.
Any questions please let me know... wife's prius is in the shop, so I get to drive Marilyn (tempted to change her name to Maggie...lol) all week. How lucky am I??? I hope to wash her Wednesday...ugh...dirty car.
Edit: Surprisingly, the Maggie "whine" was not as prominent as my Borla S-Type Catbacks...
you can tell from the video.===============================================
DAY 2 UPDATE!!!
Well folks... I had to pinch myself this morning to make sure I really still have the Maggie on there. LOL.
I drove to the gym at 530 am this morning, and that 50 degree air is just wonderful. Throttle modulation is the key, as someone mentioned above. The throttle response is just INSANE compared to stock. I've driven turbo cars before and you can sense the lag... this one is instant. You jab that throttle and the thing goes.
I just love the insane (and LINEAR) burst/surge of power. I now have to start in 2nd from stop signs to avoid that sudden jerk of power... also, I always drive in sport mode now. TCS fully on just isn't cutting it... lol... pun intended.
I love this thing... it has me smiling like a big baby. I'm proud of it too
I highly recommend this kit to anyone looking to go Forced Induction... See my post above for reasons as to why.fyi, mpg right now is 13.7. Ask me if I care??????????
=======================
Update 10/2 8:00 pm
On my 3rd day of supercharger ownership... I am really loving this thing. It's delivery is very smooth and linear. Driven conservatively, except for a more responsive throttle (due to new tune), one would not notice there was a blower. It's very calm on the street in that regard. Mash the throttle though, and it's a whole 'nother story. The instant torque is quite gratifying. I can't get it enough.
Also, maybe I'm just hearing things, but I could have sworn, my Borlas seem to have gotten louder. Why is that??? more air? hmmmm
The attention that this car now gets is borderline ridiculous. After friends/co-workers got wind of the mod, during lunch 4 of us went outside to check it out. 10 minutes later, there were 10 people there... each wanted a ride. lol. I obliged to a few, but had to take a rain check on the rest.
For those that I gave a ride to, it was hilarious hearing them start to swear like a drunken sailor. "OH $H@@@@@@" "HOLY $H@@@@@" It's so funny. Another thing I found quite interesting: They all seemed to be totally shocked that I/we did the install all on our own. If they only knew it really was not that hard. If you can turn a wrench and read basic English, you can install this. Trust me....Anyways, I love it... best mod I've done on any car, so far. It used to be my Borlas and MGW, but Maggie takes the cake
The fact that I did the install myself makes it all the more gratifying.Some pics tonight, I finally got a chance to wash her, though I ran out of daylight. I hate the end of summer. I'll try to take more pics this weekend.
Last edited by FromZto5; 10/2/13 at 07:56 PM.
9/22/13 | 12:16 PM
#8
Post *****
Joined: October 9, 2007
Posts: 32,752
Likes: 159
Those instructions seek a little light
When I installed mine it called for me to remove the fuse for the fuel pump in the fuse box under the hood and then try to fire the car depressurizing the fuel lines. Then once you loosen the fuel line fittings you will only have a free drips of fuel come out. Them you can simply wrap the ends in a rag or something. Something to keep debris out of the line and to gather any more drips.
On a side note with the fuel pump dead it will not fire because there won't be fuel so no worries there. It will just crank.
Last edited by 2k7gtcs; 9/22/13 at 12:17 PM.
9/22/13 | 12:18 PM
#9
Thread Starter
I Have No Life
Joined: September 24, 2011
Posts: 10,141
Likes: 172
Those instructions seek a little light
When I installed mine it called for me to remove the fuse for the fuel pump in the fuse box under the hood and then try to fire the car depressurizing the fuel lines. Then once you loosen the fuel line fittings you will only have a free drips of fuel come out. Them you can simply wrap the ends in a rag or something. Something to keep debris out of the line and to gather any more drips.
When I installed mine it called for me to remove the fuse for the fuel pump in the fuse box under the hood and then try to fire the car depressurizing the fuel lines. Then once you loosen the fuel line fittings you will only have a free drips of fuel come out. Them you can simply wrap the ends in a rag or something. Something to keep debris out of the line and to gather any more drips.
9/22/13 | 12:21 PM
#10
Post *****
Joined: October 9, 2007
Posts: 32,752
Likes: 159
Remove fuse. Try to start. Fuel system depressurizes.
I guarantee if you don't you're gonna get more fuel than you want. Eventually it will stop but irate difference between filling a thimble with fuel or a cup with fuel.
9/22/13 | 12:47 PM
#11
Thread Starter
I Have No Life
Joined: September 24, 2011
Posts: 10,141
Likes: 172
Also I know I also have to get to the coolant lines right? And tips there? Or any other disassembly tips or installation tips in general???
I am also really freaked out about the bumper removal. (Instructions call for its removal midway through, but I'm doing it ASAP first step. I don't want any chance of getting it scratched or chipped etc... You know me and paint
) but anyways, and tips for removal? Esp on the sides when removing the clips from the fender?
9/22/13 | 01:01 PM
#12
Post *****
Joined: October 9, 2007
Posts: 32,752
Likes: 159
Thanks Gary ... I will definitely do this. Is one crank attempt sufficient?
Also I know I also have to get to the coolant lines right? And tips there? Or any other disassembly tips or installation tips in general???
I am also really freaked out about the bumper removal. (Instructions call for its removal midway through, but I'm doing it ASAP first step. I don't want any chance of getting it scratched or chipped etc... You know me and paint
) but anyways, and tips for removal? Esp on the sides when removing the clips from the fender?My biggest advice is be very careful of putting any bolts in aluminum. Make sure your putting it in right and don't rush. You don't want to strip the threads inside the heads and have to helicoil anything. And of course torque to spec. Use distilled water only with whatever coolant required in any coolant whether for radiator or intercooler.
2-3 quick cranks should do it.
9/22/13 | 01:26 PM
#13
Member
Joined: March 18, 2012
Posts: 23
Likes: 0
Thanks Gary ... I will definitely do this. Is one crank attempt sufficient?
Also I know I also have to get to the coolant lines right? And tips there? Or any other disassembly tips or installation tips in general???
I am also really freaked out about the bumper removal. (Instructions call for its removal midway through, but I'm doing it ASAP first step. I don't want any chance of getting it scratched or chipped etc... You know me and paint) but anyways, and tips for removal? Esp on the sides when removing the clips from the fender?
Also I know I also have to get to the coolant lines right? And tips there? Or any other disassembly tips or installation tips in general???
I am also really freaked out about the bumper removal. (Instructions call for its removal midway through, but I'm doing it ASAP first step. I don't want any chance of getting it scratched or chipped etc... You know me and paint
) but anyways, and tips for removal? Esp on the sides when removing the clips from the fender?Don't sweat the bumper removal. I've pulled the front bumper off of 3 different '11/'12 cars and once you get all of the fasteners removed, you simply grab it like they show in the picture and tug. It'll pull right out. Easy cheesy.
9/22/13 | 01:47 PM
#14
GTR Member
Joined: October 18, 2006
Posts: 5,553
Likes: 11
From: England

Good luck with this, matey.........I'll be keeping tabs on the thread
9/22/13 | 02:13 PM
#15
Cobra R Member
Joined: July 17, 2012
Posts: 1,904
Likes: 4
From: Virginia
Congrats on the buy brother! That finished pic you put up of what it should look like is awesome! Anyways regarding the front bumper removal after all the self explanatory screws and push pins and all the bumper literally pulls out at the edges of the wheel well. You will hear 3 snaps as you pull it, you will think you broke it most likely but all is good I taped up all the edges I would be working with prior to taking it off just to protect it. (Green tape on green car) but it's there.
I taped up all the edges I would be working with prior to taking it off just to protect it. (Green tape on green car) but it's there.
9/22/13 | 03:58 PM
#16
Roush Forum Stalker
Joined: March 9, 2013
Posts: 11,165
Likes: 1,749
From: Massachusetts
Awesome Burton.
I will be watching your thread. I think that the blue looks killer on the supercharger. Those are some great numbers for power and torque as well. With those torque numbers, you're car is going to pull like crazy! Magnuson make great blowers. Enjoy bro!
I will be watching your thread. I think that the blue looks killer on the supercharger. Those are some great numbers for power and torque as well. With those torque numbers, you're car is going to pull like crazy! Magnuson make great blowers. Enjoy bro!
9/22/13 | 05:14 PM
#17
Shelby GT350 Member
Joined: April 29, 2005
Posts: 2,133
Likes: 5
Congrats on the purchase! Nice choice, it's going to look killer since you have a GB Mustang. I will be watching this thread closely. Oh and I wouldn't sweat the bumper removal at all, that will probably be the easiest part of the install.
9/22/13 | 05:15 PM
#18
Cobra Member
Joined: January 10, 2012
Posts: 1,036
Likes: 0
From: Granbury, TX
[QUOTE="Thomas S;6691408"]Congrats on the purchase! Nice choice, it's going to look killer since you have a *KONA BLUE* Mustang. I will be watching this thread closely. Oh and I wouldn't sweat the bumper removal at all, that will probably be the easiest part of the install. [/QUOTE
[/QUOTE
9/22/13 | 05:30 PM
#19
Thread Starter
I Have No Life
Joined: September 24, 2011
Posts: 10,141
Likes: 172
Congrats on the buy brother! That finished pic you put up of what it should look like is awesome! Anyways regarding the front bumper removal after all the self explanatory screws and push pins and all the bumper literally pulls out at the edges of the wheel well. You will hear 3 snaps as you pull it, you will think you broke it most likely but all is good I taped up all the edges I would be working with prior to taking it off just to protect it. (Green tape on green car) but it's there.
I taped up all the edges I would be working with prior to taking it off just to protect it. (Green tape on green car) but it's there. The grabber blue coil covers should match the powder blue supercharger tho
Last edited by FromZto5; 9/22/13 at 08:10 PM.
9/22/13 | 05:50 PM
#20
Thread Starter
I Have No Life
Joined: September 24, 2011
Posts: 10,141
Likes: 172
Day 1 begins...
9/22/2013 3:00pm
Alright guys... the surgery has begun. I only got to spend 2 hours on her today, but I seriously wanted to keep going. I wish I already had the kit here so I could finish it by tomorrow morning by not sleeping
I only had 1 casualty today. The outside air temp sensor, instead of just pulling it off the fascia, I tried to remove the darn tab, and broke one side. Luckily it's still fine and locked in, and should never move... at least I hope not
The rest of it cake!!! Seriously... that bumper removal was easy. I got it off in like 15 minutes. Then off came the airraid intake, then off came the manifold and strut bar.
Not sure what else I can do for the rest of the week since the rest of it requires the contents of the SC kit, which has yet to arrive (fuel line removal tool, intercooler pump, etc). I might just have to wait till the kit arrives. Anything else I can do in the meantime?
So here come the pics of what I did today!!! Thanks again for those who helped with comments:
backed in, getting ready
all jacked up and ready for surgery!!!
One last look at what Marilyn's semi-stock cavity looks like... take a good look, she'll never look like this again
Lower panel dropped...
Radiator shrouds removed...
Passenger side bumper tabs/clips removed. I admit, I was a "little" scared but quickly got over it... lol
Driver side clips removed...
Disconnected the fog lights...
I can see the turn signal lights still connected. Gotta remove those...
Voila... Marilyn's "bra" just got removed... she's naked!
I think she seems kindda mad that I removed her support... lol
Sidenote... for those of you guys who know me, know that I NEVER drive Marilyn in rain. Thus, I have never used the wipers or wiper fluid. Take a look at this fluid reservoir. Almost like it was off the assembly line
Time to remove the strut bar... easy
Now the manifold cover...
Once again, she's kindda naked!!!
AirRaid intake REMOVED! Anyone interested in buying this??? it's only got barely 1000 miles of use. LOL.
Tadaa!!! All done for the day. Throttle body exposed.
And finally, for safety and just because I'm OCD, I taped up the throttle body opening in case some Gremlins decide to creep in.
All in all, a successful day. I will update as necessary. Thanks for following! Please let me know if you have questions or recommendations.
Alright guys... the surgery has begun. I only got to spend 2 hours on her today, but I seriously wanted to keep going. I wish I already had the kit here so I could finish it by tomorrow morning by not sleeping
I only had 1 casualty today. The outside air temp sensor, instead of just pulling it off the fascia, I tried to remove the darn tab, and broke one side. Luckily it's still fine and locked in, and should never move... at least I hope not
The rest of it cake!!! Seriously... that bumper removal was easy. I got it off in like 15 minutes. Then off came the airraid intake, then off came the manifold and strut bar.
Not sure what else I can do for the rest of the week
since the rest of it requires the contents of the SC kit, which has yet to arrive (fuel line removal tool, intercooler pump, etc). I might just have to wait till the kit arrives. Anything else I can do in the meantime?So here come the pics of what I did today!!! Thanks again for those who helped with comments:
backed in, getting ready
all jacked up and ready for surgery!!!
One last look at what Marilyn's semi-stock cavity looks like... take a good look, she'll never look like this again
Lower panel dropped...
Radiator shrouds removed...
Passenger side bumper tabs/clips removed. I admit, I was a "little" scared
but quickly got over it... lolDriver side clips removed...
Disconnected the fog lights...
I can see the turn signal lights still connected. Gotta remove those...
Voila... Marilyn's "bra" just got removed... she's naked!
I think she seems kindda mad that I removed her support... lol
Sidenote... for those of you guys who know me, know that I NEVER drive Marilyn in rain. Thus, I have never used the wipers or wiper fluid. Take a look at this fluid reservoir. Almost like it was off the assembly line
Time to remove the strut bar... easy
Now the manifold cover...
Once again, she's kindda naked!!!
AirRaid intake REMOVED! Anyone interested in buying this??? it's only got barely 1000 miles of use. LOL.
Tadaa!!! All done for the day. Throttle body exposed.
And finally, for safety and just because I'm OCD, I taped up the throttle body opening in case some Gremlins decide to creep in.
All in all, a successful day. I will update as necessary. Thanks for following! Please let me know if you have questions or recommendations.
Last edited by FromZto5; 9/22/13 at 05:55 PM.