

2011 TSS billet oil pump gear and VMP supercharger install

Thread Starter
GT Member
Joined: March 18, 2014
Posts: 126
Likes: 0
From: Jacksonville, NC
2011 TSS billet oil pump gear and VMP supercharger install
Hey guys, this is a thread to show my progress of my TSS oil pump gear and VMP supercharger installation. I only have a few hours to work on it a day and I'm taking my time. The tear down of the engine wasnt too bad, but the electrical clips on the back side of the valve covers were a pain in the ***. The hardest part was the oil pick up tube bolts, especially the inboard one. It took me 40 mins to get that bastard out using my finger. Putting it back in, dropped in into the oil pan and had to go to the parts store and get a couple of magnets to fish it out. Yesterday, I ground down the bosses on the timing cover and then painted it black. I'm currently waiting on a new front seal, crank shaft bolt and a pair of boss tensioners, then the cover will go back on as well as the valve covers. Now on to the pics!
Removed the cold air intake
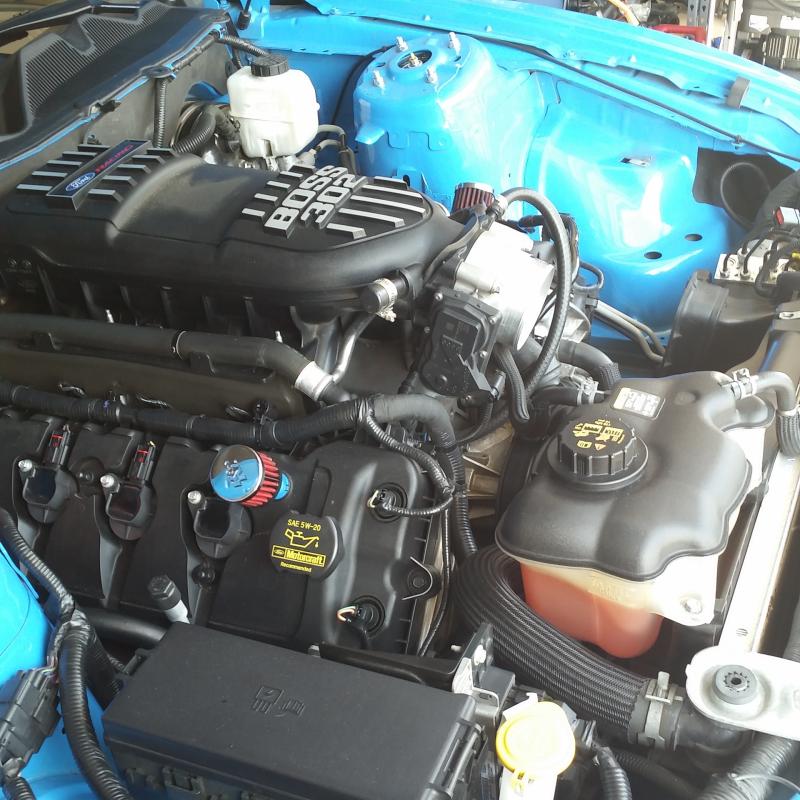
Removed the passenger side valve cover
Removed the driver’s side valve cover and boss intake manifold
Removed all the accessories, pulleys and water pump
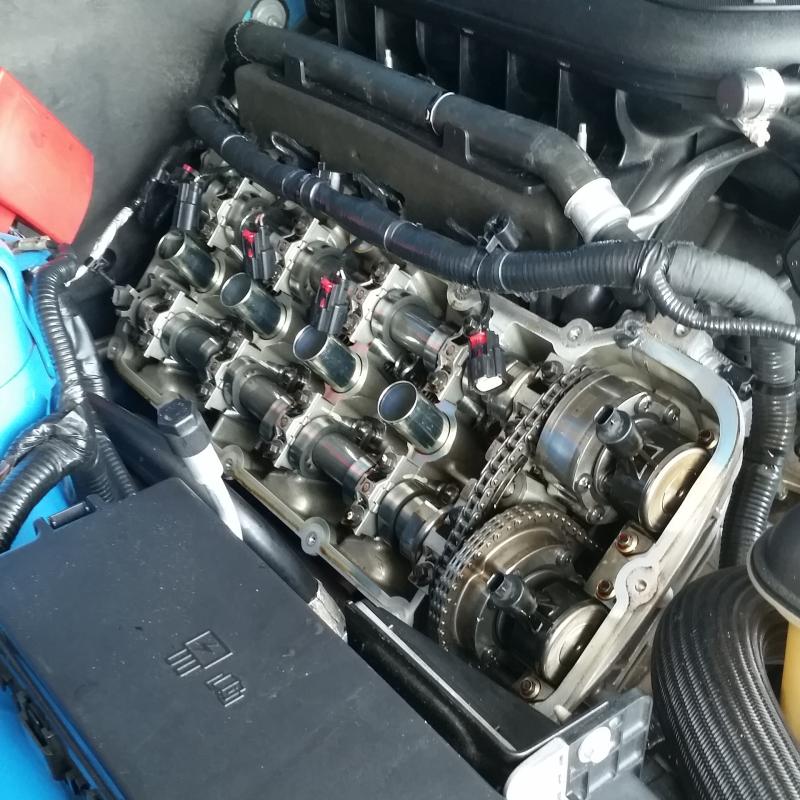
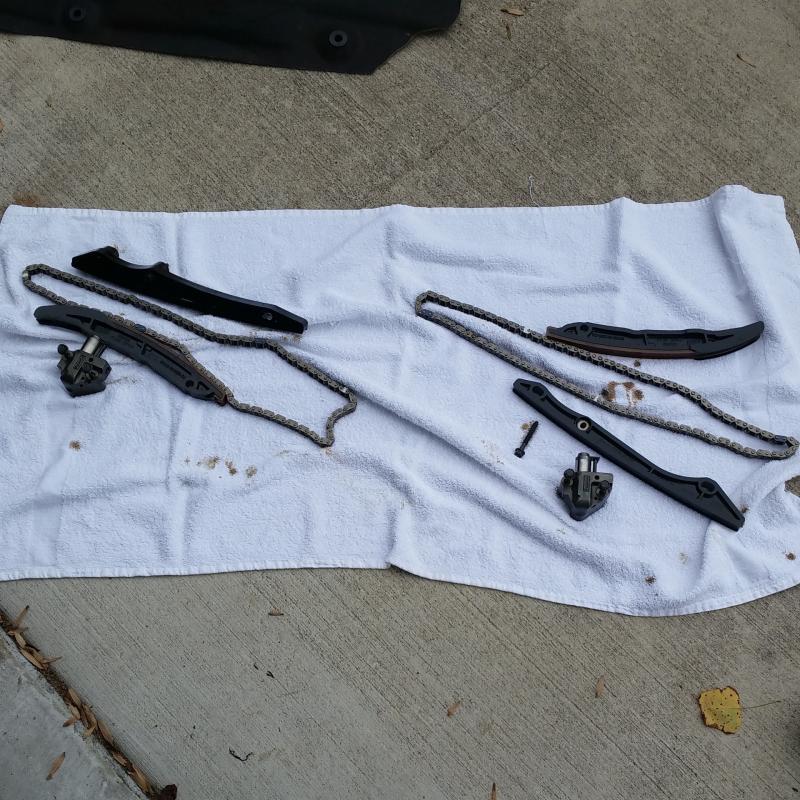
Removed the timing chains and guides
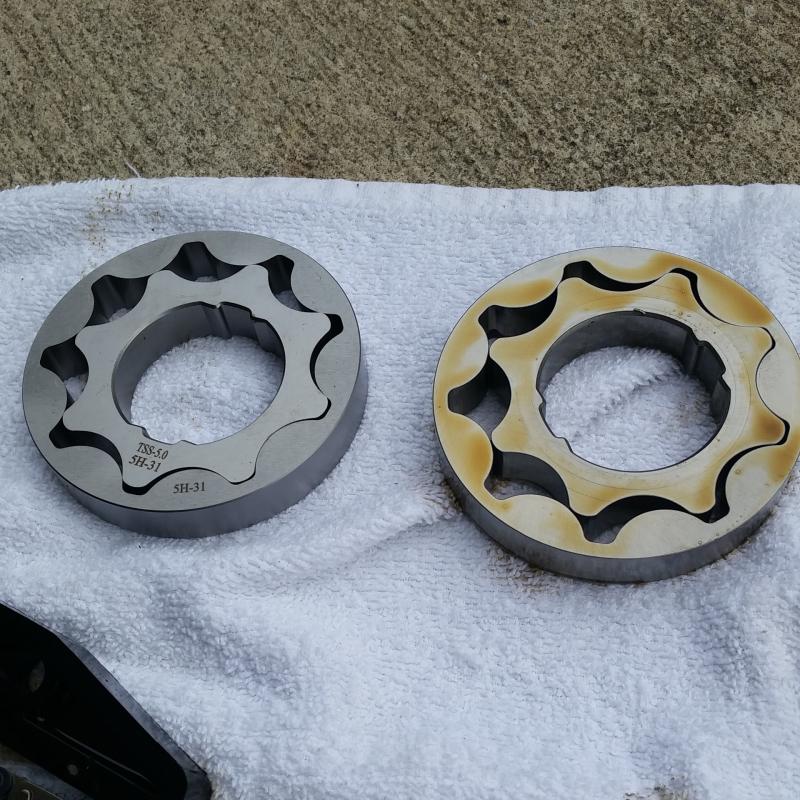
TSS billet oil pump gear on the left and stock on the right
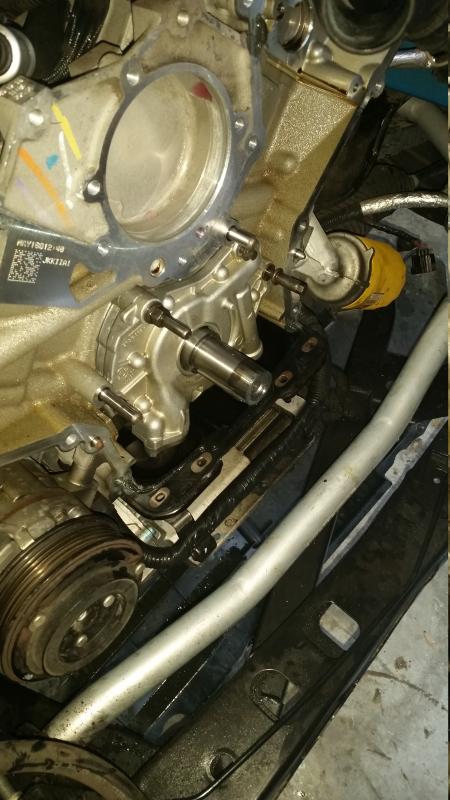
Oil pump getting installed and I dropped the **** bolt down the oil pan… grrrr.
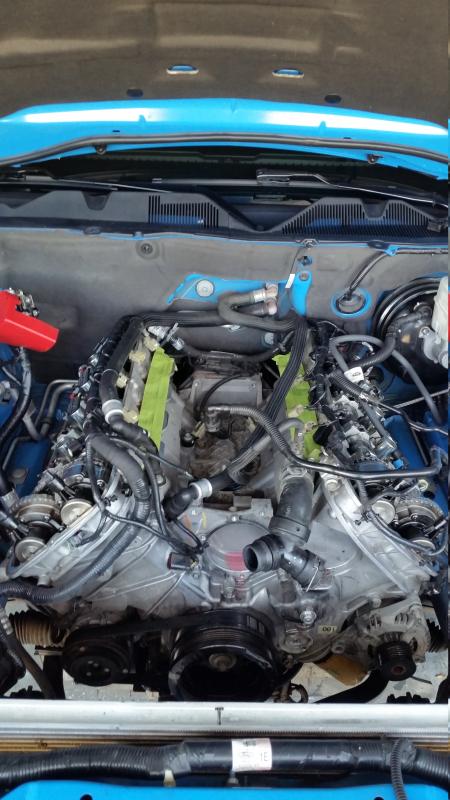
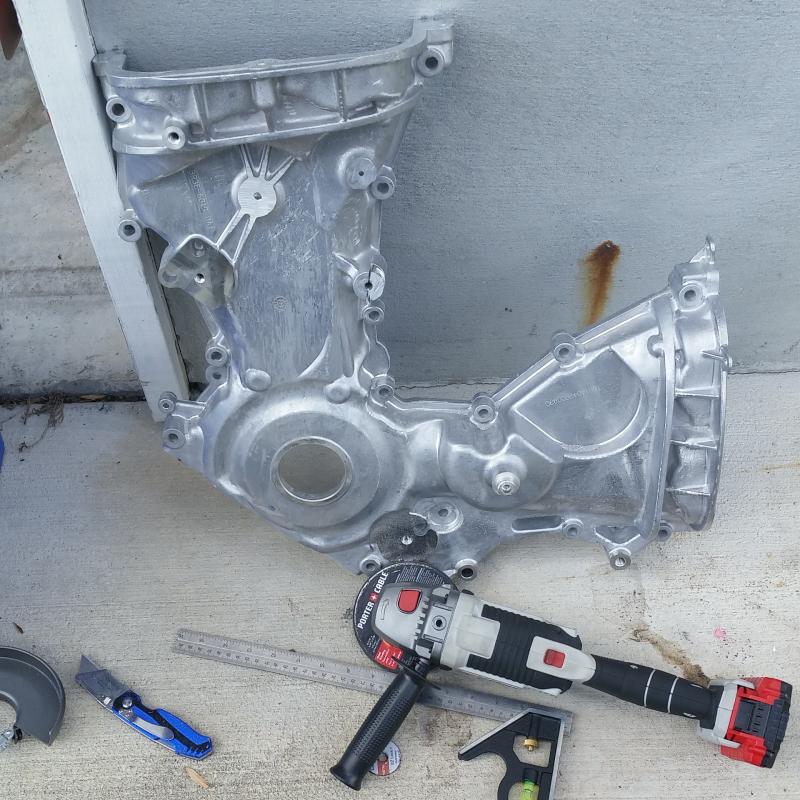
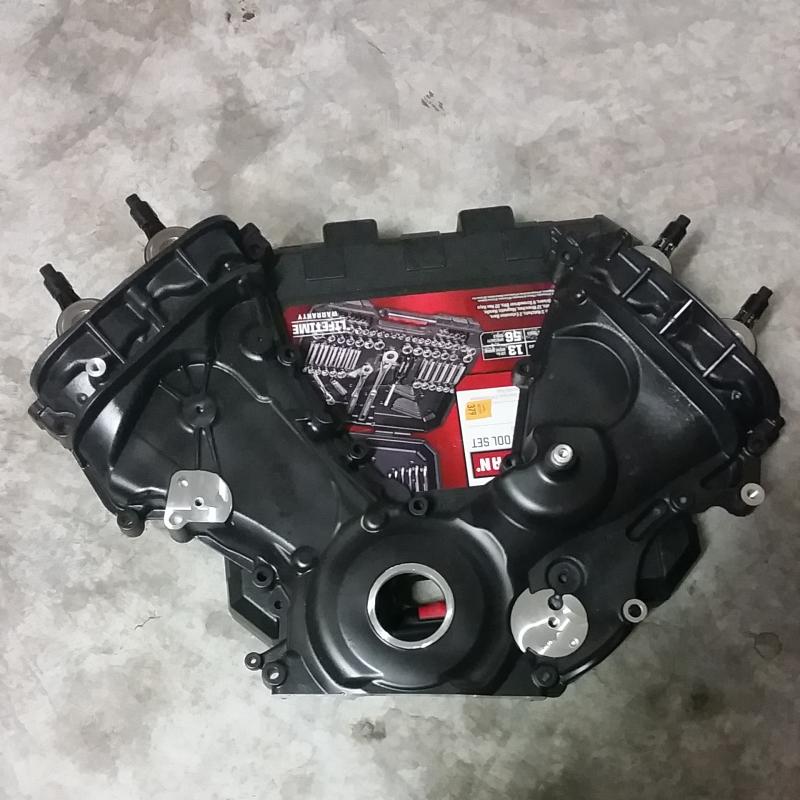
Grinding the front cover. My dumb cordless grinder kept losing power after 5 mins, so I used my dremel and 5 cutting disks to grind/cut the bosses off.
Painted the front cover black
Removed the cold air intake

Removed the passenger side valve cover

Removed the driver’s side valve cover and boss intake manifold

Removed all the accessories, pulleys and water pump

Removed the timing chains and guides

TSS billet oil pump gear on the left and stock on the right

Oil pump getting installed and I dropped the **** bolt down the oil pan… grrrr.

Grinding the front cover. My dumb cordless grinder kept losing power after 5 mins, so I used my dremel and 5 cutting disks to grind/cut the bosses off.

Painted the front cover black

Last edited by swervo; Oct 14, 2014 at 05:28 AM.
Team Mustang Source
Joined: June 17, 2012
Posts: 116
Likes: 0
From: West Central MN
Looking very nice! Tons of work there....but a lot of comfort knowing you've got the new oil pump in there. Let us know your impressions once you get it dialed in....bet it is going to be a beast.
Wayne
Wayne
Thread Starter
GT Member
Joined: March 18, 2014
Posts: 126
Likes: 0
From: Jacksonville, NC
Thanks. It's going to be a while, since I only have a few hours a day to work on it. I can't wait until it's done. Plus I'm cleaning all the parts before they go back in. All the stuff that you can't see when it's togeter were so dirty.
Team Mustang Source
Joined: June 17, 2012
Posts: 116
Likes: 0
From: West Central MN
Yeah...I can tell you are paying close attention to the "Details." This takes more time...but will pay off in the long run by not having a bunch of small "Issues" to fix after you get it all buttoned up.
Keep us posted....even though it's going to take you a while. I really like the Looks of the VMP kits and Justin really has his tuning down to a fine art. I'm hung up between the stage 2 and 3 kits.....like the expandability potential of the 3.
Wayne
Keep us posted....even though it's going to take you a while. I really like the Looks of the VMP kits and Justin really has his tuning down to a fine art. I'm hung up between the stage 2 and 3 kits.....like the expandability potential of the 3.
Wayne
Thread Starter
GT Member
Joined: March 18, 2014
Posts: 126
Likes: 0
From: Jacksonville, NC
Yes they are. That's probably the hardest part about it.
They sometime break at higher horsepower levels or higher rpms. It's just added insurance.
Thanks Jay. Some friends said they would help, but I ended up doing it myself. 
I Have No Life
Joined: September 24, 2011
Posts: 10,141
Likes: 172
Dewayne... was looking for this thread a while. Looks awesome. If you were in Iowa living literally next door, I'd help. Otherwise, see ya!
haha kidding man.
Seriously though, I can't wait to see your beast done.
But yes, I was too chicken to grind and remove stuff like you did. I wanted the ease of install so went the maggie route. But you will undoubtedly make more power....
haha kidding man.
Seriously though, I can't wait to see your beast done.
But yes, I was too chicken to grind and remove stuff like you did. I wanted the ease of install so went the maggie route. But you will undoubtedly make more power....
Thread Starter
GT Member
Joined: March 18, 2014
Posts: 126
Likes: 0
From: Jacksonville, NC
Sorry for the lack of an update as I haven't really had time to really do anything. I finally got it up and running and took her for a spin around the block to get it up to temp and make sure everything was working properly. Haven't really got on it since I was in a small subdivision. Plus I wanted to get all the air out of the system. Anyway, here are the pics.
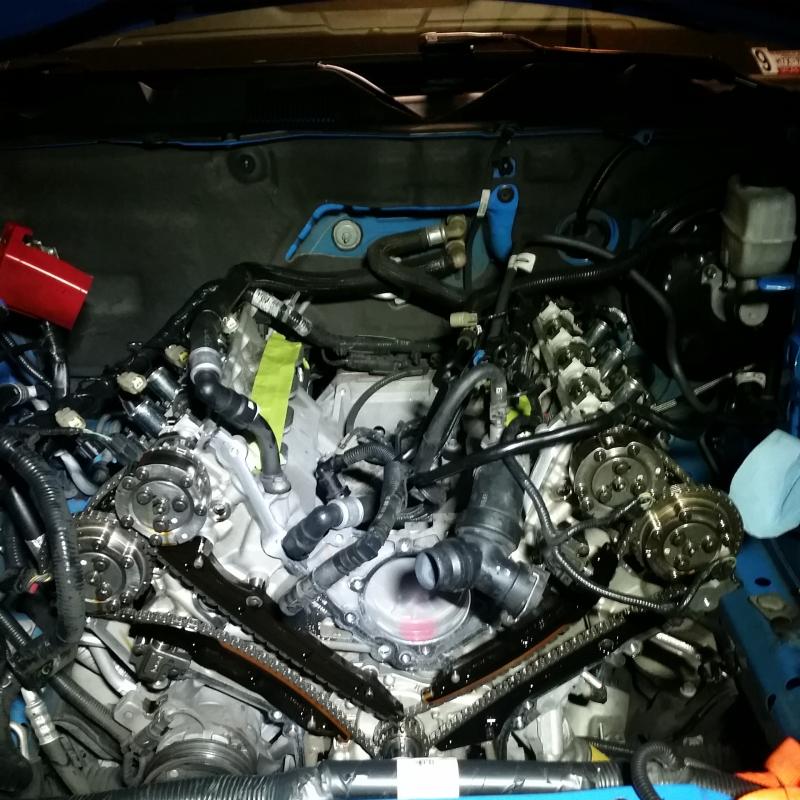
Got the front cover on
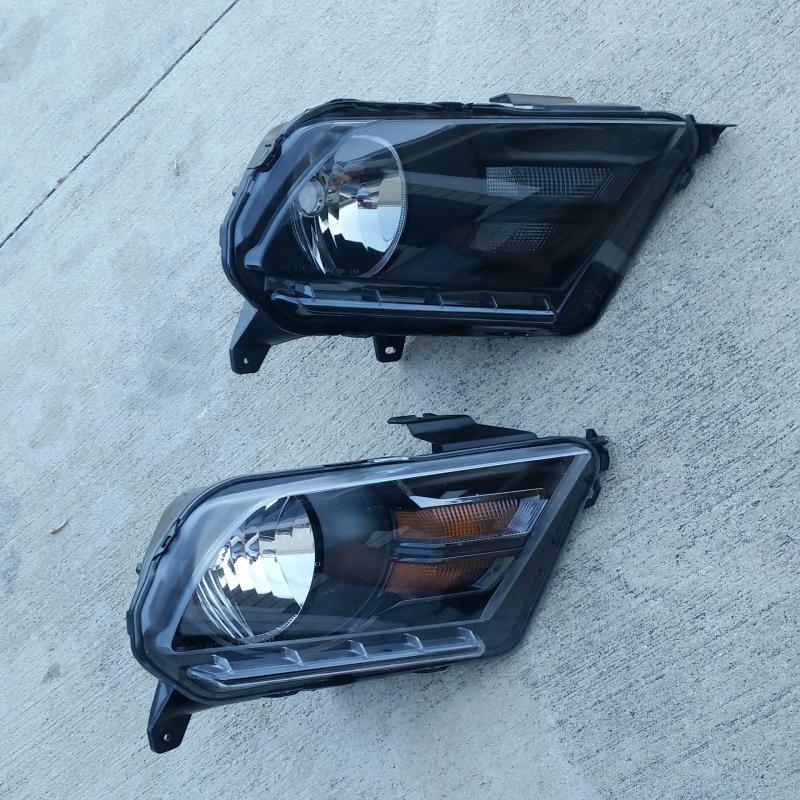
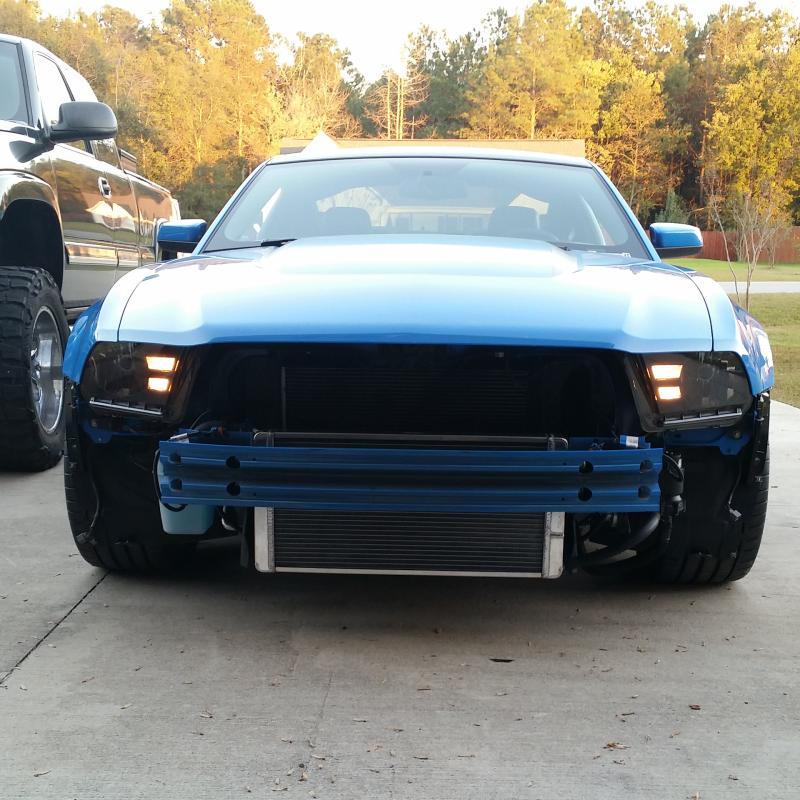
I figured since I had the bumper off, I would change out the headlights that I bought from LRS.
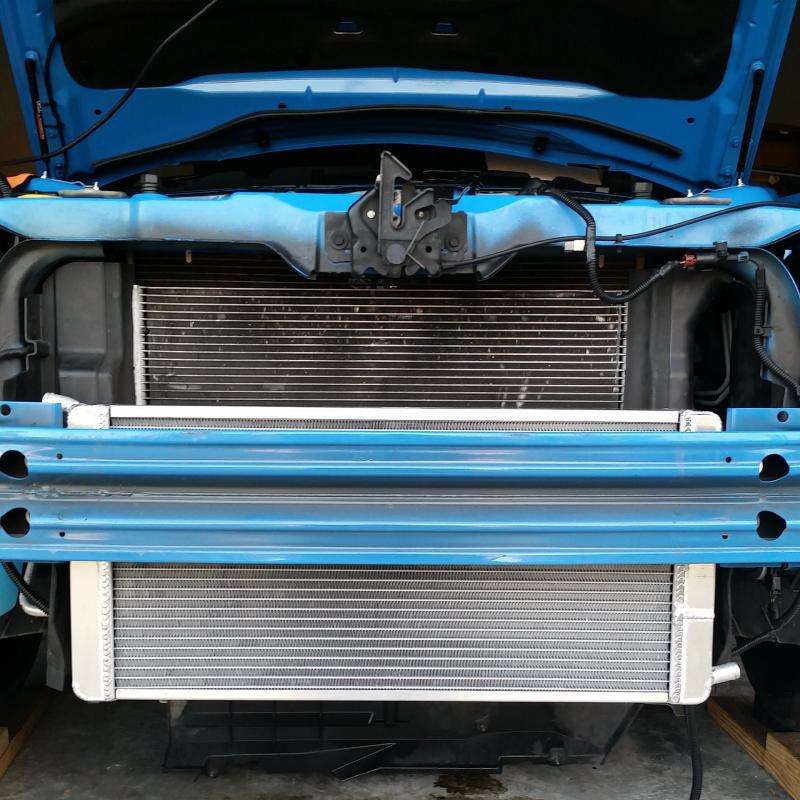
The heat exchanger installed. I think I got the wrong version, because the instructions have the inlet and outlets in the opposite sides. I made it work regardless.
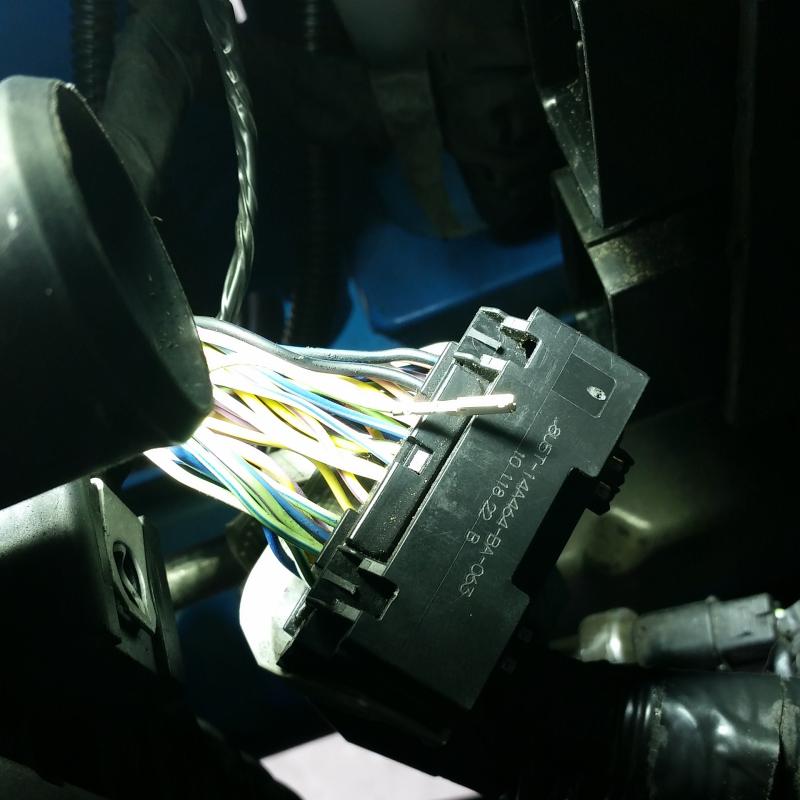
Soldered and pinned the connector to the computer.
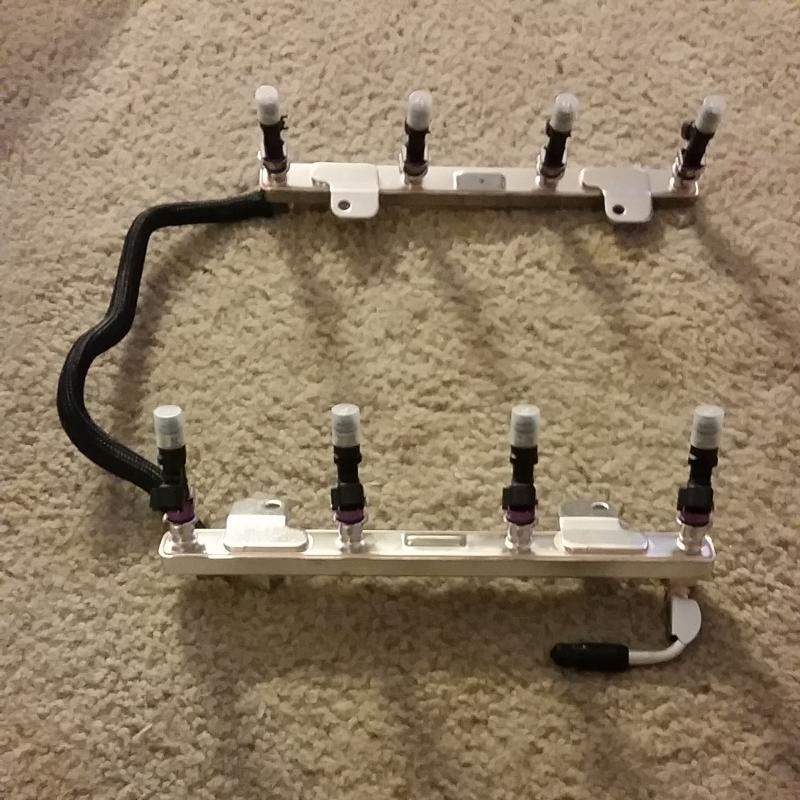
Got the ID1000s installed on the new fuel rails.
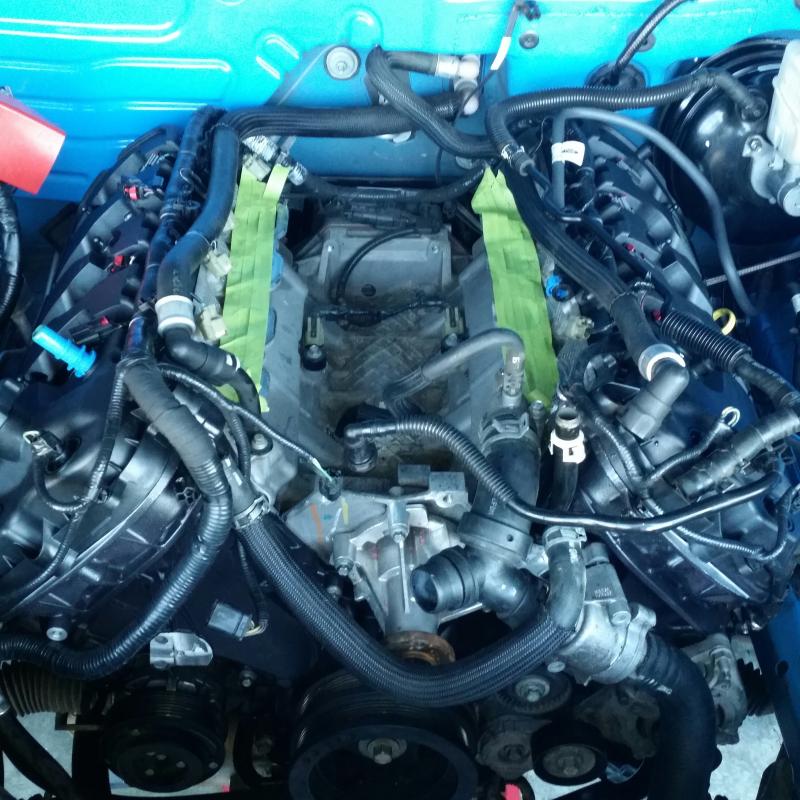
Lower intake installed.

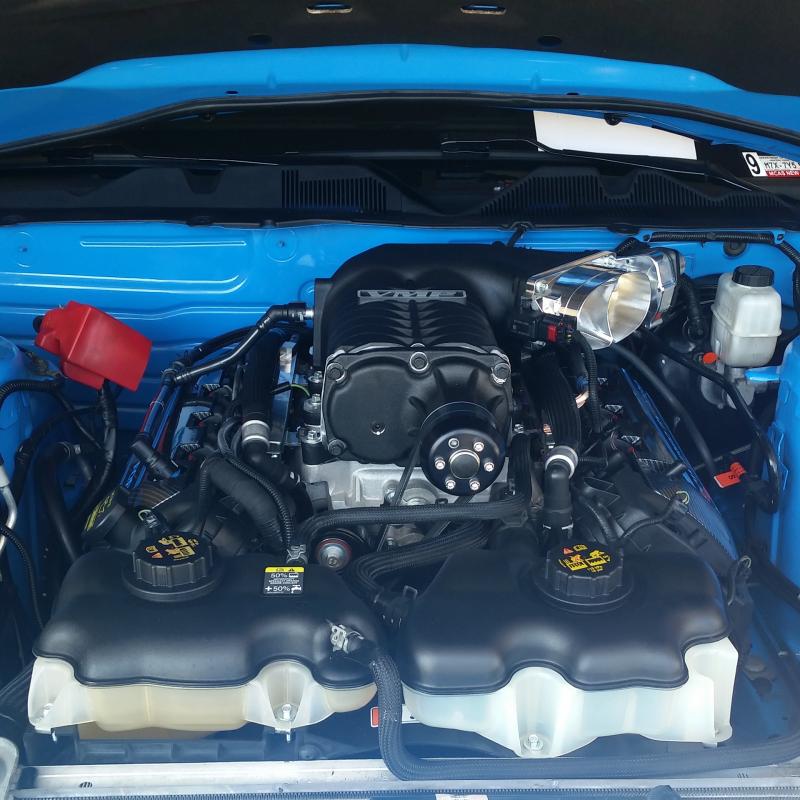
Head unit installed.
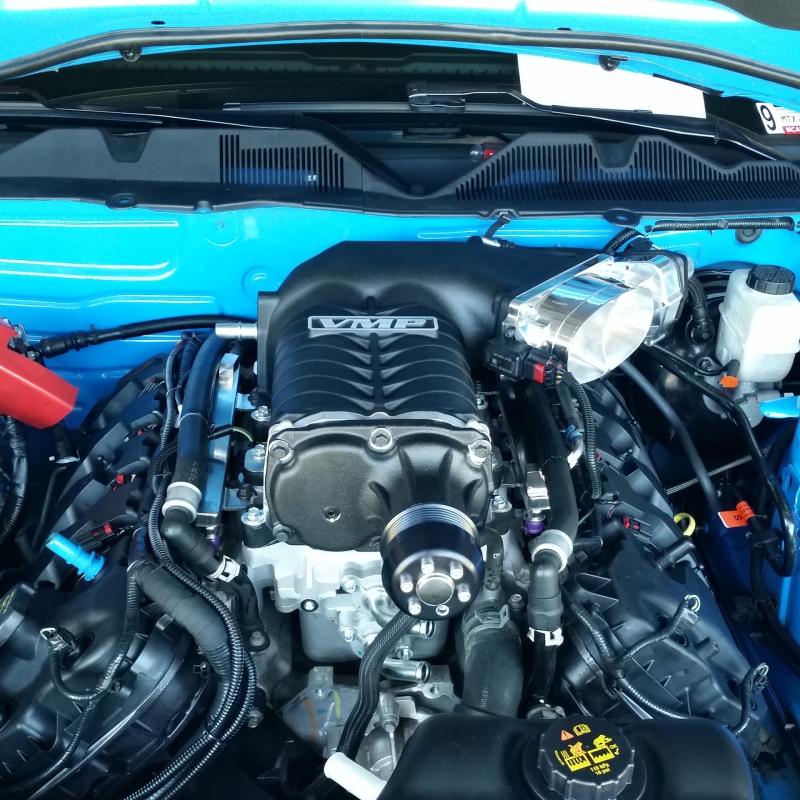
Brackets, belts and coolant hoses all routed.
And finally took her for a spin around the neighborhood without the bumper on.
Got the front cover on

I figured since I had the bumper off, I would change out the headlights that I bought from LRS.

The heat exchanger installed. I think I got the wrong version, because the instructions have the inlet and outlets in the opposite sides. I made it work regardless.

Soldered and pinned the connector to the computer.

Got the ID1000s installed on the new fuel rails.

Lower intake installed.

Head unit installed.

Brackets, belts and coolant hoses all routed.

And finally took her for a spin around the neighborhood without the bumper on.

Thread Starter
GT Member
Joined: March 18, 2014
Posts: 126
Likes: 0
From: Jacksonville, NC
It goes to a sensor on the lower intake manifold
I have everything on except for the front bumper. Still need to trim it. I'm also posting codes, so I might have to tear apart the engine. I definitely hope not. It's posting P0017 and P0308.
I have everything on except for the front bumper. Still need to trim it. I'm also posting codes, so I might have to tear apart the engine. I definitely hope not. It's posting P0017 and P0308.
I Have No Life
Joined: September 24, 2011
Posts: 10,141
Likes: 172
^ what does your X3 say the codes mean? When JDM did my tune, I initially had a Pxxx (can't remember) code, but all it was, was that they accidentally didn't remove the secondary IAT sensor temp request, which Magnuson doesn't have (Roush and Whipple have them). JDM updated the code and all's perfect now.
Thread Starter
GT Member
Joined: March 18, 2014
Posts: 126
Likes: 0
From: Jacksonville, NC
^ what does your X3 say the codes mean? When JDM did my tune, I initially had a Pxxx (can't remember) code, but all it was, was that they accidentally didn't remove the secondary IAT sensor temp request, which Magnuson doesn't have (Roush and Whipple have them). JDM updated the code and all's perfect now.
P0308 is Cylinder 8 Misfire
Someone told me to do the idle relearn process to see if it will fix it, because it drove just fine when I went around the block to get the car up to temp and see if there were any leaks. So I'll do it sometime this week. Didn't do that this weekend since I felt like crap from this cold I got. I did install my switch back turn signal bulbs though.

I Have No Life
Joined: September 24, 2011
Posts: 10,141
Likes: 172
P0017 is Bank 1 sensor b cam position sensor P0308 is Cylinder 8 Misfire Someone told me to do the idle relearn process to see if it will fix it, because it drove just fine when I went around the block to get the car up to temp and see if there were any leaks. So I'll do it sometime this week. Didn't do that this weekend since I felt like crap from this cold I got. I did install my switch back turn signal bulbs though.

Thread
Thread Starter
Forum
Replies
Last Post