
65 Vert Journal ... continued

Thread Starter
Cobra Member
Joined: June 9, 2004
Posts: 1,300
Likes: 0
04-27
I took Friday off to work on the vert. I wanted to get the fuel system installed. The fuel injection system I'm installing requires a return line, electric fuel pump, inline filter, and pressure regulator which the 65 wasn't equipped with originally. I bought the Mallory pump and regulator that MassFlo recommended, and bought new 3/8 line, braided hose and AN fittings from SECO.
First thing is to gain a return access point to the tank. I drilled a hole in the sender and bent a new line to run next to the supply line. It was a nice tight fit, but I couldn't solder it like I wanted to. I think I needed silver solder and didn't have any. I checked JB Weld's website and it indicated it would survive contact with gasoline, so I sealed the unit and put a few reinforcing bonds on the inside. I was really pleased with the way it turned out, but when I installed it after sitting for several days, the JB Weld cracked on every joint. So now I'll order another sender, bend another tube, and have it soldered or find some silver solder.

First thing is to gain a return access point to the tank. I drilled a hole in the sender and bent a new line to run next to the supply line. It was a nice tight fit, but I couldn't solder it like I wanted to. I think I needed silver solder and didn't have any. I checked JB Weld's website and it indicated it would survive contact with gasoline, so I sealed the unit and put a few reinforcing bonds on the inside. I was really pleased with the way it turned out, but when I installed it after sitting for several days, the JB Weld cracked on every joint. So now I'll order another sender, bend another tube, and have it soldered or find some silver solder.
Thread Starter
Cobra Member
Joined: June 9, 2004
Posts: 1,300
Likes: 0
04-27
I decided to move on and install the pump, filter, and line to the front of the car. I decided to use a stock fuel line for the return, and fabricate a new supply line. I used a handheld tubing bender and worked my way from the back to the front. I pop-riveted hose clamps all along the underside, and it turned out great. I made a bracket to hold the external pump near the bottom of the tank, and mounted the filter up near the frame rails, out of the way of everything.

Thread Starter
Cobra Member
Joined: June 9, 2004
Posts: 1,300
Likes: 0
04-27
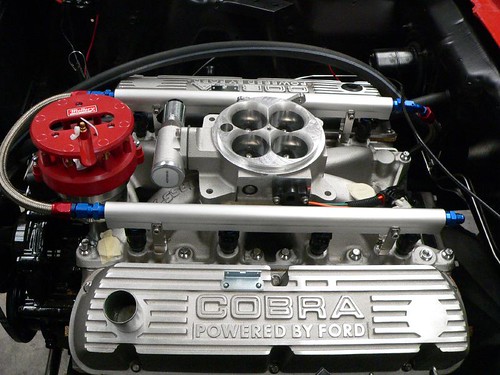
I installed the fuel injectors, fuel rails, brackets, and fabricated a crossover tube at the front with the AN fittings and the braided fuel line. I also fabricated and installed a braided line that connects to the new fuel line I ran to the back. The other side will go to a pressure regulator, but no one had the AN fittings I needed to do that part.
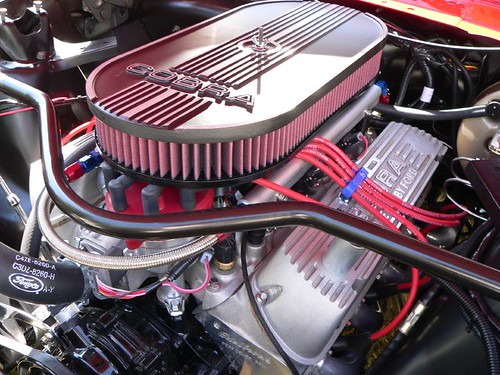
The distributor wouldn't seat all the way down, so I called MassFlo. They told me that I had to cut 3/8 inch off the bottom of the distributor shaft because of the heavy duty ARP oil pump shaft that we used. "OK, I'll just cut this new billet Mallory distributor and hope for the best". It worked just fine, and distributor fell into place. I installed the new Cobra valve covers, and set the new valve body in place just for temporary eye candy.
The distributor wouldn't seat all the way down, so I called MassFlo. They told me that I had to cut 3/8 inch off the bottom of the distributor shaft because of the heavy duty ARP oil pump shaft that we used. "OK, I'll just cut this new billet Mallory distributor and hope for the best". It worked just fine, and distributor fell into place. I installed the new Cobra valve covers, and set the new valve body in place just for temporary eye candy.
Thread Starter
Cobra Member
Joined: June 9, 2004
Posts: 1,300
Likes: 0
04-28
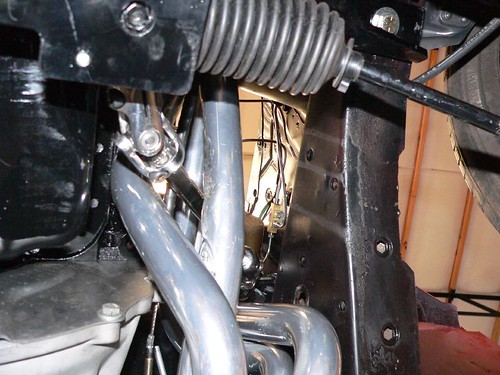
The rack & pinion steering cleared the engine just fine. The problem is finding headers that play well with the steering shaft from the firewall to the rack. The shaft actually runs between tubes of the headers. Unisteer claims to have used Hooker Comps, but installers have tried with no success. One installer noted that the Hooker SuperComps were a close fit, but of course they are twice the price. I noticed that Flowtech makes a header that seems to be a copy of the Hooker SuperComps, so I ordered those. After struggling to install the header, it didn't clear the shaft. I removed it and took it to Clanton muffler, but he wouldn't bend the tube because he was afraid it would distort the mounting flange. I decided to order a set of shorties, hoping they would fit. They came in, and as you can see in the photo, the outlet is exactly in the middle of the two U-joints for the steering shaft.

I quickly removed the shorties and packed them up for return to Summit. I reinstalled the Flowtechs and decided that if it were mounted to the head before I did any "adjusting", the flange wouldn't move. I used pry bars, hammers, c-clamps, straps, blocks of wood, etc. and actually made some progress, although it wasn't quite enough. What I needed was a cylinder head that I could mount the header to (outside the car on a bench). I struggled once again to remove the header from the car. Andy had one, so I ran out to his place. After discussing the situation, he offered up his hydraulic portapower, and suggested I install the header before using the portapower to spread the tubes. Crap, I just pulled it off! I reinstalled the header (getting pretty good at this by now) and used the portapower. Wow, what a great tool. I easily gained the clearance I needed to route not only the steering shaft, but also the cable for the clutch.
View from under the car. Header is ugly, but none of the "adjustment marks" are visible from above. I now hate headers and all that is associated with them.
Thread Starter
Cobra Member
Joined: June 9, 2004
Posts: 1,300
Likes: 0
04-28
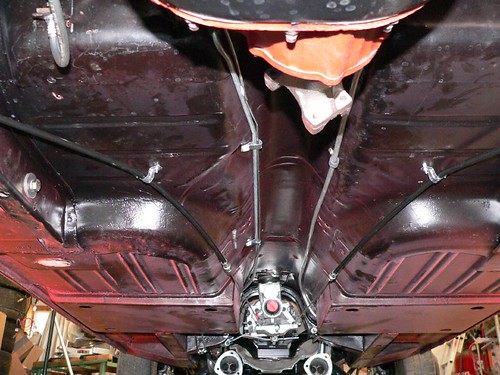
Here's a picture of the undercarriage looking back to front. You can see the foxbody parking brake cables going to the modified parking brake actuator, the header collectors, the new T5, the fuel lines and the rear brake line. I ordered a new driveshaft and should have that early next week.

Legacy TMS Member
Joined: January 19, 2007
Posts: 231
Likes: 2
Looking real good !
I'm curious if the Tri-Y style of headers would have cleared. I have cut out the "interference" area before and install a piece of muffler pipe flipped over backwards to make a clearance channel. Seemed to worked well when it was a whole lot of interference.
I'm curious if the Tri-Y style of headers would have cleared. I have cut out the "interference" area before and install a piece of muffler pipe flipped over backwards to make a clearance channel. Seemed to worked well when it was a whole lot of interference.
Thread Starter
Cobra Member
Joined: June 9, 2004
Posts: 1,300
Likes: 0
Looking real good !
I'm curious if the Tri-Y style of headers would have cleared. I have cut out the "interference" area before and install a piece of muffler pipe flipped over backwards to make a clearance channel. Seemed to worked well when it was a whole lot of interference.
I'm curious if the Tri-Y style of headers would have cleared. I have cut out the "interference" area before and install a piece of muffler pipe flipped over backwards to make a clearance channel. Seemed to worked well when it was a whole lot of interference.
Thanks for the compliments. The car is shaping up, but I'm getting tired of looking at it. I'd really like to see it drive away.


Cobra Member
Joined: June 9, 2004
Posts: 1,031
Likes: 0
GT Member
Joined: January 18, 2007
Posts: 153
Likes: 0
From: Ashburn VA


Bullitt Member
Joined: January 21, 2007
Posts: 498
Likes: 0
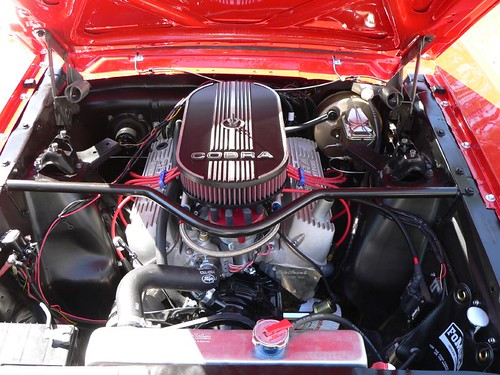
Getting close. Here's a sneak peek:
http://farm2.static.flickr.com/1262/...753c73203e.jpg
http://farm2.static.flickr.com/1034/...7d524fa411.jpg
http://farm2.static.flickr.com/1262/...753c73203e.jpg
http://farm2.static.flickr.com/1034/...7d524fa411.jpg

beautiful!


Thread Starter
Cobra Member
Joined: June 9, 2004
Posts: 1,300
Likes: 0
06-23-07
Well, I'm putting the final touches on the car. Sorry I haven't had many updates, but there was no time for progress pictures. With the great help of many RCMC members, I was able to complete this car in time for Billy's homecoming party, which is tomorrow. Thanks to all that helped, especially Andy and Ken who showed up Saturday and helped me knock out the list of things to do.
I'll finish it up tomorrow morning and take some pictures.
I'll finish it up tomorrow morning and take some pictures.