
BMR K-Member and A-Arm Install

Thread Starter
Mach 1 Member
Joined: April 1, 2010
Posts: 841
Likes: 16
From: King City, Ontario, Canada
BMR K-Member and A-Arm Install
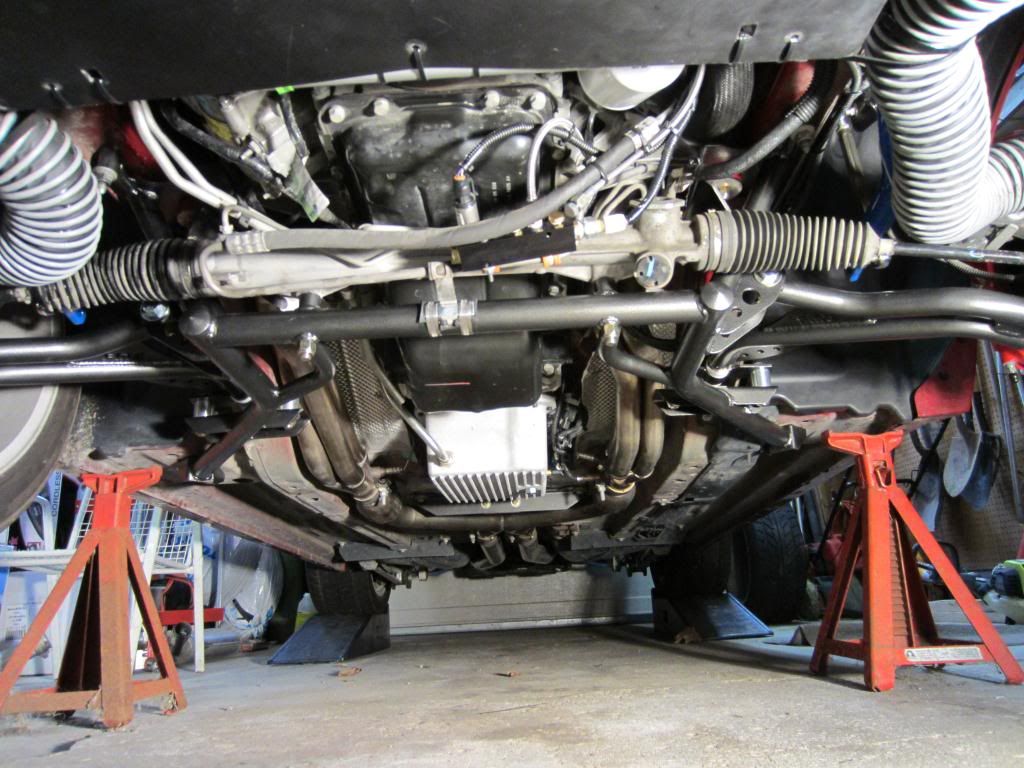
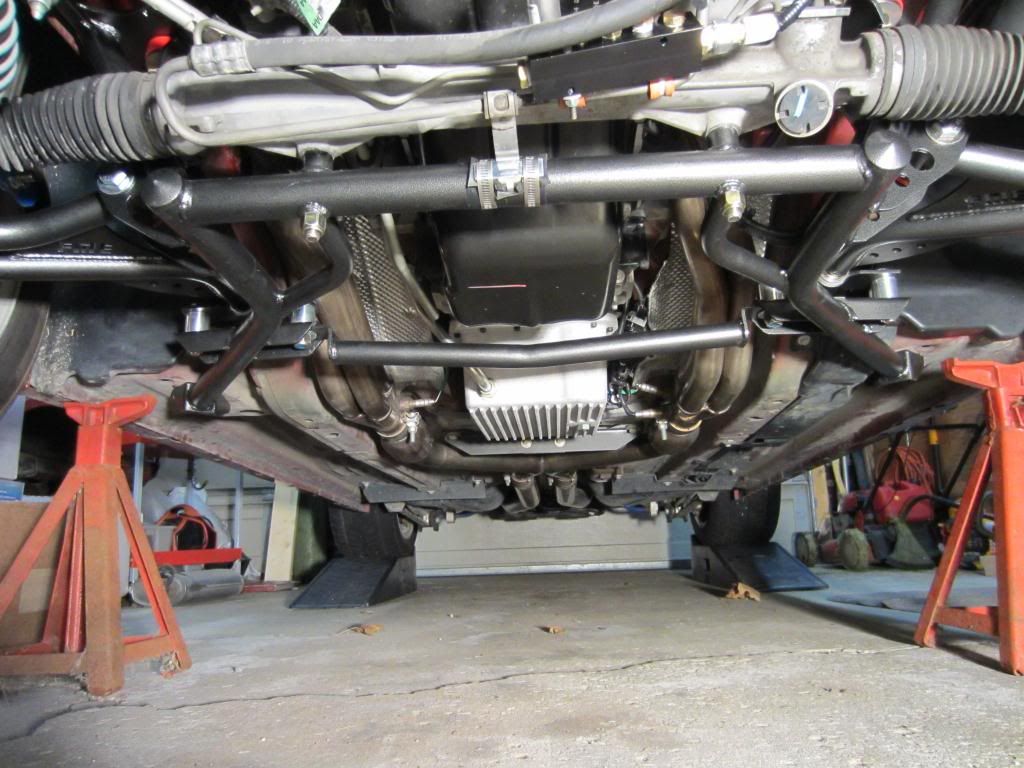
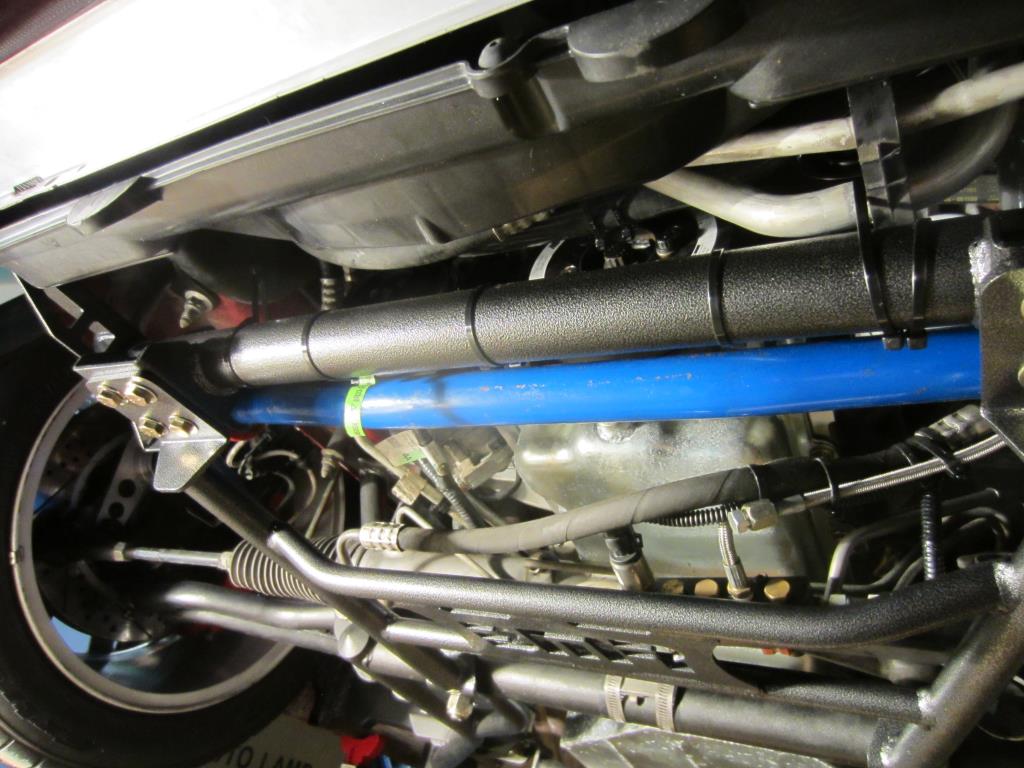
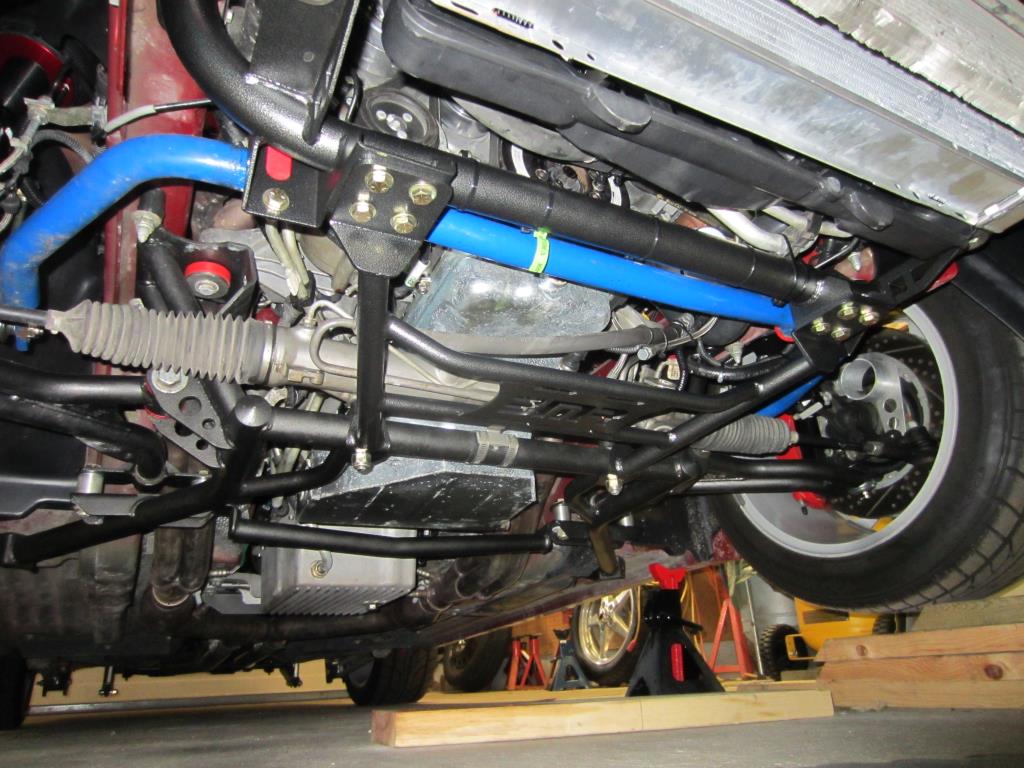
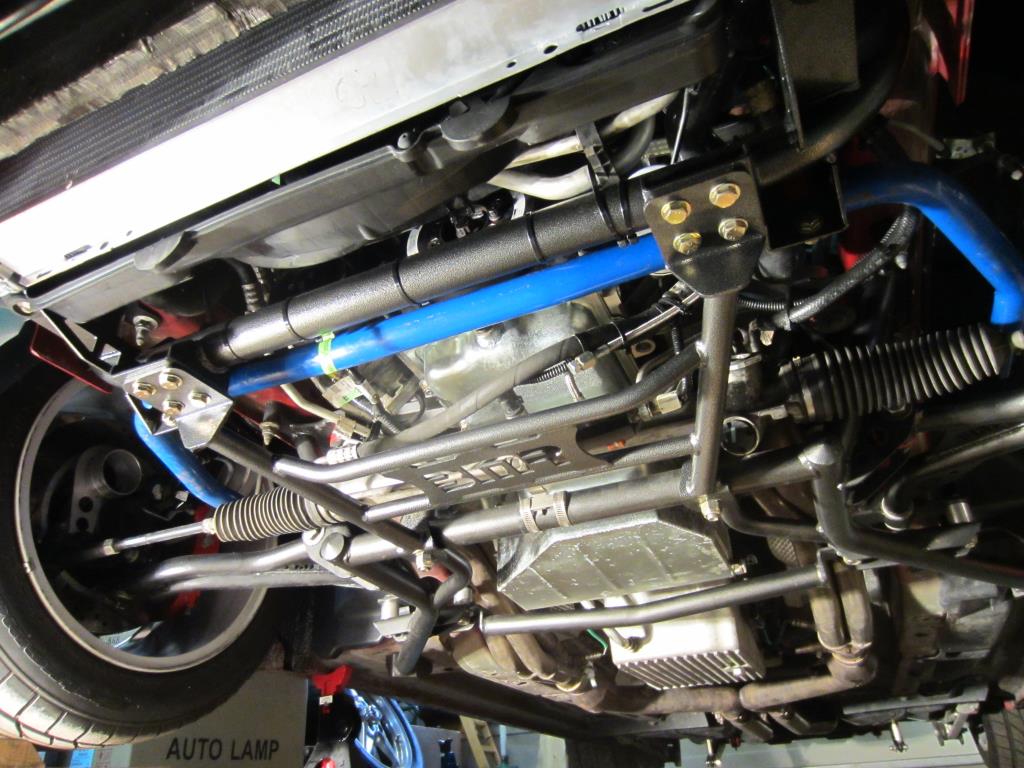
Completed the installation of a BMR Suspensions Tubular K-Member and A-Arms on Sunday. Here are a couple of pictures. Just need to torque the front A-Arm bolts when the chassis is loaded.
Thread Starter
Mach 1 Member
Joined: April 1, 2010
Posts: 841
Likes: 16
From: King City, Ontario, Canada
Excellent question, one that I pondered and asked already. Several alternatives identified are as follows:
1. Have a two post lift installed in my garage
2. Drive up onto 2x6�s and then onto ramps
3. Drive up onto 2x6�s and use two jacks, one on each unibody frame rail and alternating a couple of pumps on each jack
4. Cut and drill a 2x4 or 2x6 to fit on the steering rack bolts and extend over to the K-Member main rails. Drive up onto 2x6s, place the support board in place and jack the center of the support board.
No money currently allocated for option 1 so it looks as if I will be using option 2 unless I need to remove the wheels. I have two floor jacks, but they are not very well matched, which makes option 3 tricky. The more I think about option 4 the better it looks.
What do you think?
Bullitt Member
Joined: September 10, 2009
Posts: 360
Likes: 1
From: Alabama
Option 4 sounds good as long as the board will hold the weight. I've thought of getting that k-member but then I would have to drive to my brothers house and use his lift in his garage. Good luck and keep us posted on what you come up with.
Legacy TMS Member
Joined: August 7, 2006
Posts: 16,113
Likes: 789
From: In Boredom
Nice work. Did you use stock type struts and springs? Did you happen to weigh your parts both stock and bmr? How long did it take you to do the install. Use a 4x4 or a chunk of square tubing on that jack.
legacy Tms Member
Joined: October 9, 2005
Posts: 2,607
Likes: 77
From: N.E. Ohio
Excellent question, one that I pondered and asked already. Several alternatives identified are as follows:
1. Have a two post lift installed in my garage
2. Drive up onto 2x6’s and then onto ramps
3. Drive up onto 2x6’s and use two jacks, one on each unibody frame rail and alternating a couple of pumps on each jack
4. Cut and drill a 2x4 or 2x6 to fit on the steering rack bolts and extend over to the K-Member main rails. Drive up onto 2x6s, place the support board in place and jack the center of the support board.
No money currently allocated for option 1 so it looks as if I will be using option 2 unless I need to remove the wheels. I have two floor jacks, but they are not very well matched, which makes option 3 tricky. The more I think about option 4 the better it looks.
What do you think?
I'm thinking of fabbing a 'spreader' bar for my floorjack- could plop it right in the existing pad hole, and lift outboard by the arm mounts- maybe even add short pegs to lock it into the kmember or something - and with plug in risers to lift the diff by the tubes like the rolling jacks on my lift...not sure on the height/clearance needed, but think its doable...if not I'm thinking of widening a jack so its like 24" wide instead of 8 or so, then put 2 pads- but it wont pivot
Last edited by ford4v429; Nov 29, 2011 at 05:53 PM.
Thread Starter
Mach 1 Member
Joined: April 1, 2010
Posts: 841
Likes: 16
From: King City, Ontario, Canada
While I did not weigh everything, here is the information from BMR�s web site:
- OEM K-Member + motor mounts weighs 44 lbs.
- BMR K-Member + mounts weigh 24 lbs.
- BMR A-Arms are 11.2 lbs lighter than the OEM for the pair.
- Providing a total of 31.2 lbs weight savings.
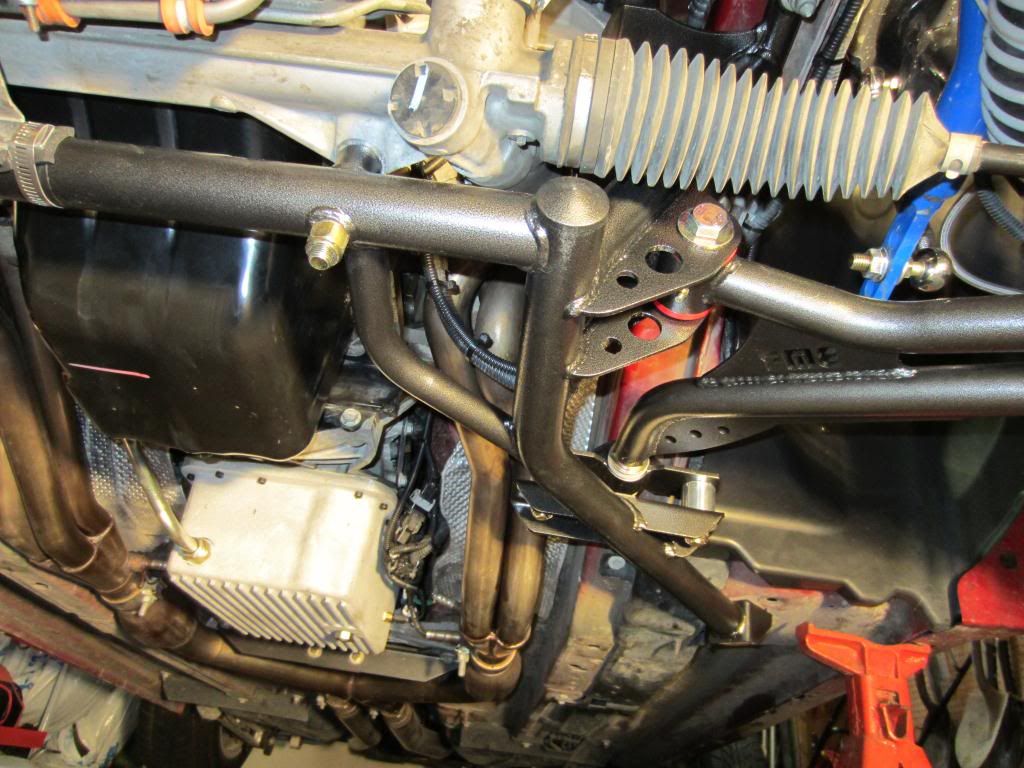
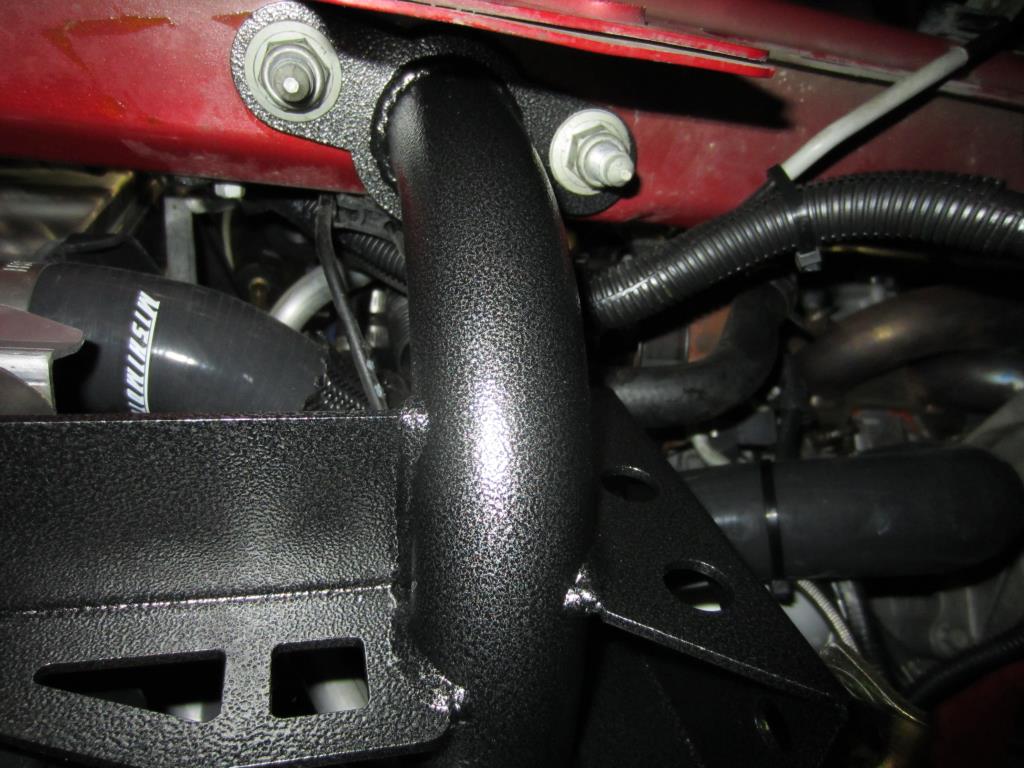
However, as you can see from the pictures there is also a bunch more space. Much easier to install headers, and while I am not sure yet there may even be enough room to re and re the oil pan without raising the motor. There is 3 �� between the bottom of the pan and the top of the BMR K-Member. There is about 1� between the bottom of the pan and the top of the steering rack, if one were to index the steering shaft to the steering knuckle and remove the top bolt, remove the two steering rack mount bolts (now that they are so much easier to get at), one could move the rack forward and down. This would provide a full 3 �� clearance between the pan bottom and top of K-Member.
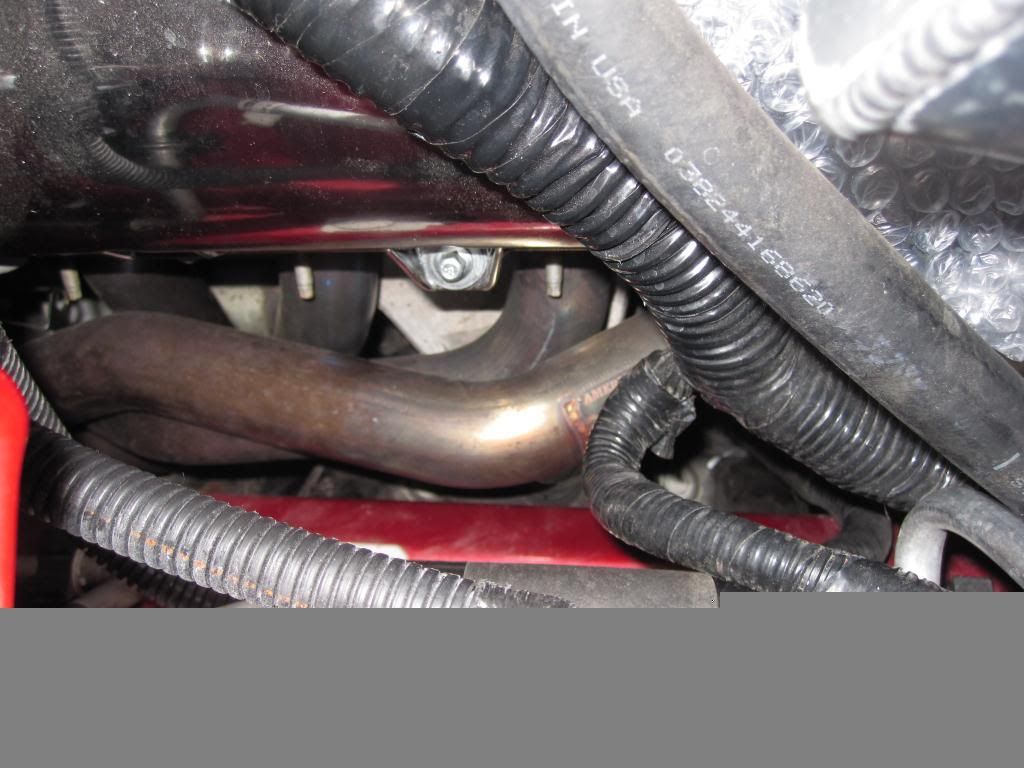
I am retired and not as quick as I once was. I ran into a significant challenge removing the passenger side motor mount bolt. This picture is taken from directly above the mount and as you can see nut is just barely visible under the front ARH LT header tube. I tried various combinations of 15 mm sockets, u-joints, extensions, gear wrenches etc., I finally broke the nut loose from above using a Flare Crow Foot wrench, a universal and several extensions. Then I was able to remove the nut with a gear wrench from below one painful �click� at a time. When all was said and done I likely spent 6+ hours on the install over two weekends. The Steering Rack bolts are a PITA to remove as the nuts are spot welded to the K-Member and the bolts must be removed from above. Not really a challenge in my case compared to the passenger motor mount nut.
Thread Starter
Mach 1 Member
Joined: April 1, 2010
Posts: 841
Likes: 16
From: King City, Ontario, Canada
chassis looks good- bet the lower arms save a fair bit of weight- are the balljoints greasable, or oem?
I'm thinking of fabbing a 'spreader' bar for my floorjack- could plop it right in the existing pad hole, and lift outboard by the arm mounts- maybe even add short pegs to lock it into the kmember or something - and with plug in risers to lift the diff by the tubes like the rolling jacks on my lift...not sure on the height/clearance needed, but think its doable...if not I'm thinking of widening a jack so its like 24" wide instead of 8 or so, then put 2 pads- but it wont pivot
I'm thinking of fabbing a 'spreader' bar for my floorjack- could plop it right in the existing pad hole, and lift outboard by the arm mounts- maybe even add short pegs to lock it into the kmember or something - and with plug in risers to lift the diff by the tubes like the rolling jacks on my lift...not sure on the height/clearance needed, but think its doable...if not I'm thinking of widening a jack so its like 24" wide instead of 8 or so, then put 2 pads- but it wont pivot
legacy Tms Member
Joined: October 9, 2005
Posts: 2,607
Likes: 77
From: N.E. Ohio
I ran into a significant challenge removing the passenger side motor mount bolt. This picture is taken from directly above the mount and as you can see nut is just barely visible under the front ARH LT header tube. I tried various combinations of 15 mm sockets, u-joints, extensions, gear wrenches etc., I finally broke the nut loose from above using a Flare Crow Foot wrench, a universal and several extensions. Then I was able to remove the nut with a gear wrench from below one painful �click� at a time. When all was said and done I likely spent 6+ hours on the install over two weekends. The Steering Rack bolts are a PITA to remove as the nuts are spot welded to the K-Member and the bolts must be removed from above. Not really a challenge in my case compared to the passenger motor mount nut.
after seeing your pics, think if my mustang ever needs a rack, a BMR crossmember might go in with it- racks are such a pain... my mark vii went thru 3 in 10 years, every time trying to get at the hydraulic lines and input joint was simply infuriating... the extra room sure looks tempting

Thread Starter
Mach 1 Member
Joined: April 1, 2010
Posts: 841
Likes: 16
From: King City, Ontario, Canada
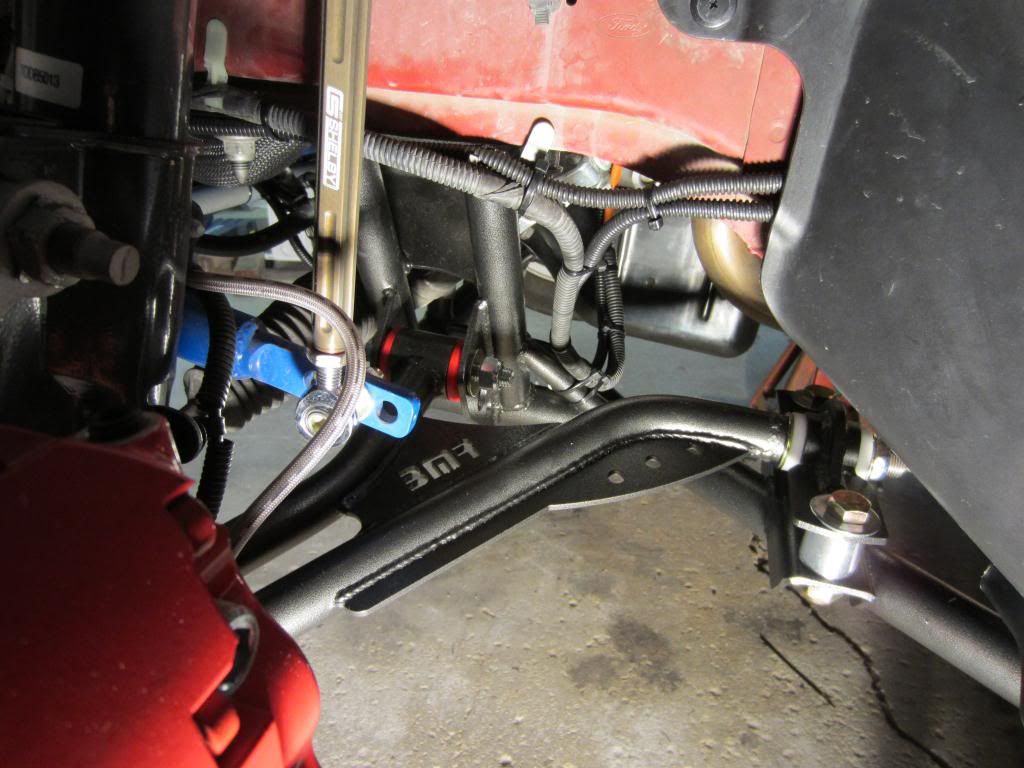
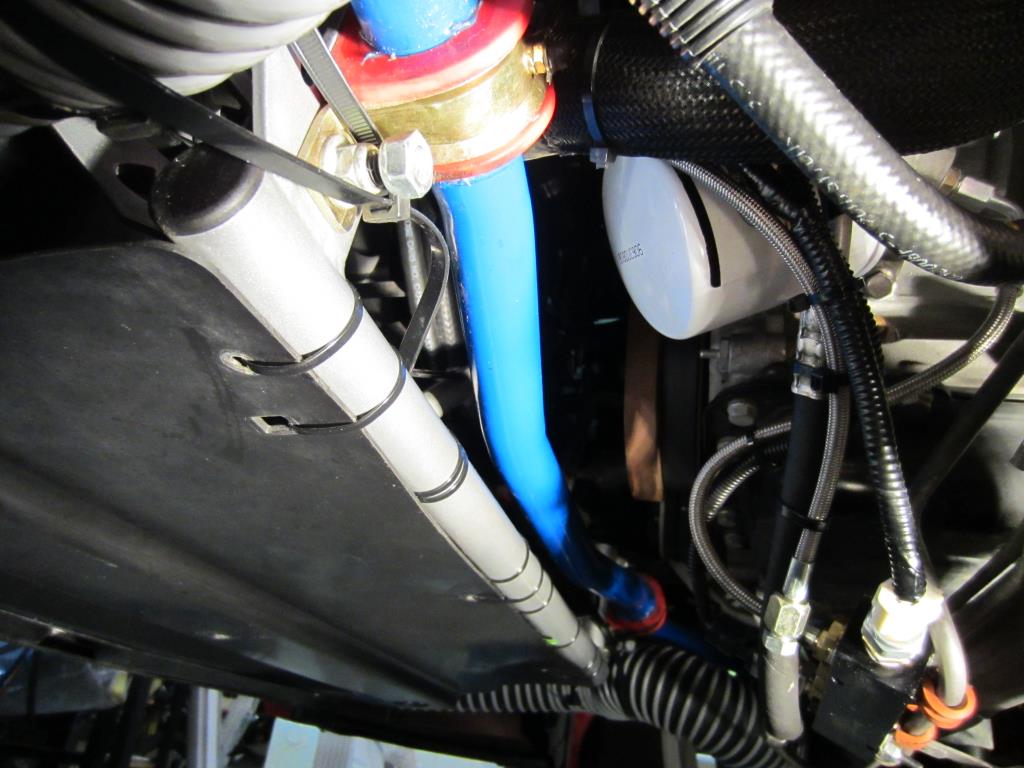
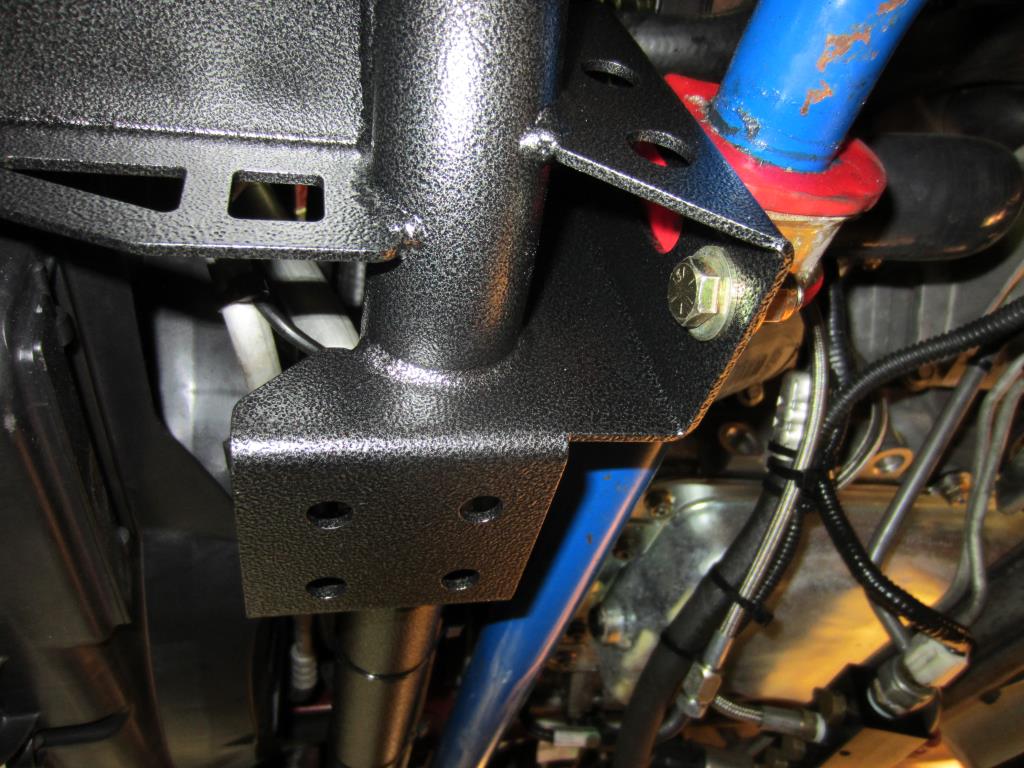
Added a BMR Suspensions A-Arm Support Brace the other day and I am glad I did. To install the Brace I had to back off all four rear A-Arm nuts (two on each side) and shift the arms to get the brace to align. The A-Arm position was at least a �� too wide. I am sure the alignment will be much easier done now assuming the Brace center-to-center hole dimension is to the OEM Ford specification.
Thread Starter
Mach 1 Member
Joined: April 1, 2010
Posts: 841
Likes: 16
From: King City, Ontario, Canada
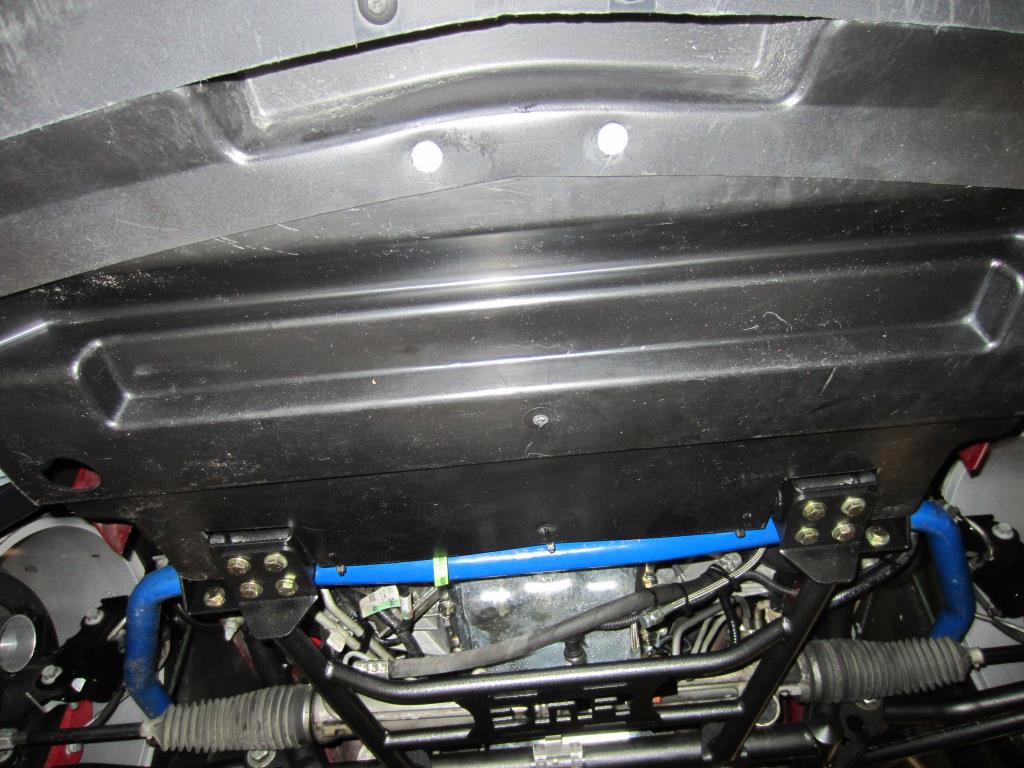
BMR Radiator Support and Chassis Brace Install
Removed my Steeda Radiator Support part number 555-5075, not because there was any issue with it as it is a high quality product, but because I wanted to update my chassis to 2011+ specifications and incorporate a Radiator Support Chassis Brace, BMR part number CB004. To facilitate the Radiator Support Chassis Brace it was necessary to replace the Steeda Radiator Support with the BMR Radiator Support, part number RS003 as it has functionality to mount the CB004 Chassis Brace.
Removed the Steeda Radiator Support by; removing the four 15mm nuts securing the sway bar to the support, lowering the sway bar out of the way and removing the four 18mm nuts securing the Radiator Support to the chassis.
Transferred the lower radiator isolators from the Steeda support over to the BMR support. Installed the Radiator Support and tightened the four nuts to 75 ft-lbs with an 18mm deep socket.
Cable tied the brake line to the Radiator Support
Reinstalled the sway bar with the 3/8� x 1.25� bolts provided and tightened them to 45 ft-lbs with a 9/16 socket and wrench.
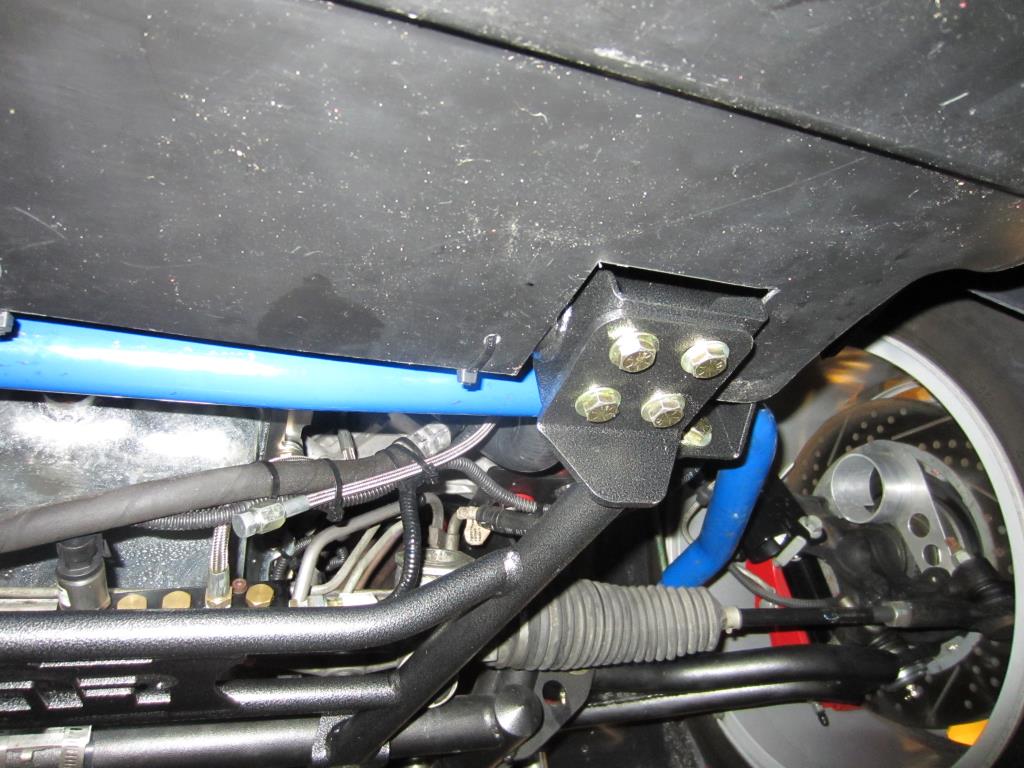
Removed the two nuts from the steering rack with a � socket and wrench. Installed the chassis brace with the eight provided 3/8� x 1.25� bolts, nuts and flat washers at the radiator support. The nuts were tightened to 45 ft-lbs with a 9/16 socket and wrench. The steering rack nuts were tightened to 84 ft-lbs. The CB004 integrated with both the RS003 Radiator Support and my existing KM010 BMR Tubular K-Member perfectly.
Prepared the splash panel for installation with the 2011+ style chassis brace by cutting two notches to clear the brackets on the radiator support and drilling two additional mounting holes.
Installed the splash panel with four screws at the bumper cover using a 5.5mm socket and three cable ties around the radiator support.
Removed the Steeda Radiator Support by; removing the four 15mm nuts securing the sway bar to the support, lowering the sway bar out of the way and removing the four 18mm nuts securing the Radiator Support to the chassis.


Transferred the lower radiator isolators from the Steeda support over to the BMR support. Installed the Radiator Support and tightened the four nuts to 75 ft-lbs with an 18mm deep socket.

Cable tied the brake line to the Radiator Support

Reinstalled the sway bar with the 3/8� x 1.25� bolts provided and tightened them to 45 ft-lbs with a 9/16 socket and wrench.

Removed the two nuts from the steering rack with a � socket and wrench. Installed the chassis brace with the eight provided 3/8� x 1.25� bolts, nuts and flat washers at the radiator support. The nuts were tightened to 45 ft-lbs with a 9/16 socket and wrench. The steering rack nuts were tightened to 84 ft-lbs. The CB004 integrated with both the RS003 Radiator Support and my existing KM010 BMR Tubular K-Member perfectly.


Prepared the splash panel for installation with the 2011+ style chassis brace by cutting two notches to clear the brackets on the radiator support and drilling two additional mounting holes.
Installed the splash panel with four screws at the bumper cover using a 5.5mm socket and three cable ties around the radiator support.


Member
Joined: September 24, 2015
Posts: 6
Likes: 0
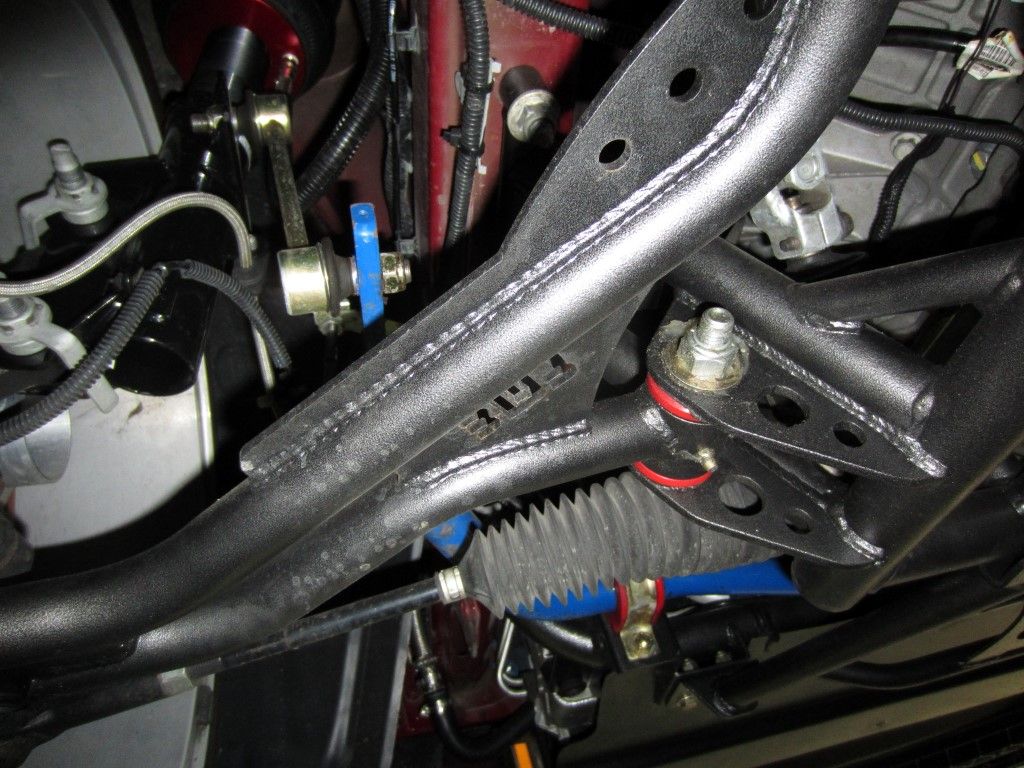
How was the fitment
How did the a arm bushings fitment go with the k member bracket? I'm doing the same mods and I am having trouble getting the driver side a arm to fit. I'm thinking the bracket is slightly bent in and needs to be bent back just a hair.
Thread Starter
Mach 1 Member
Joined: April 1, 2010
Posts: 841
Likes: 16
From: King City, Ontario, Canada
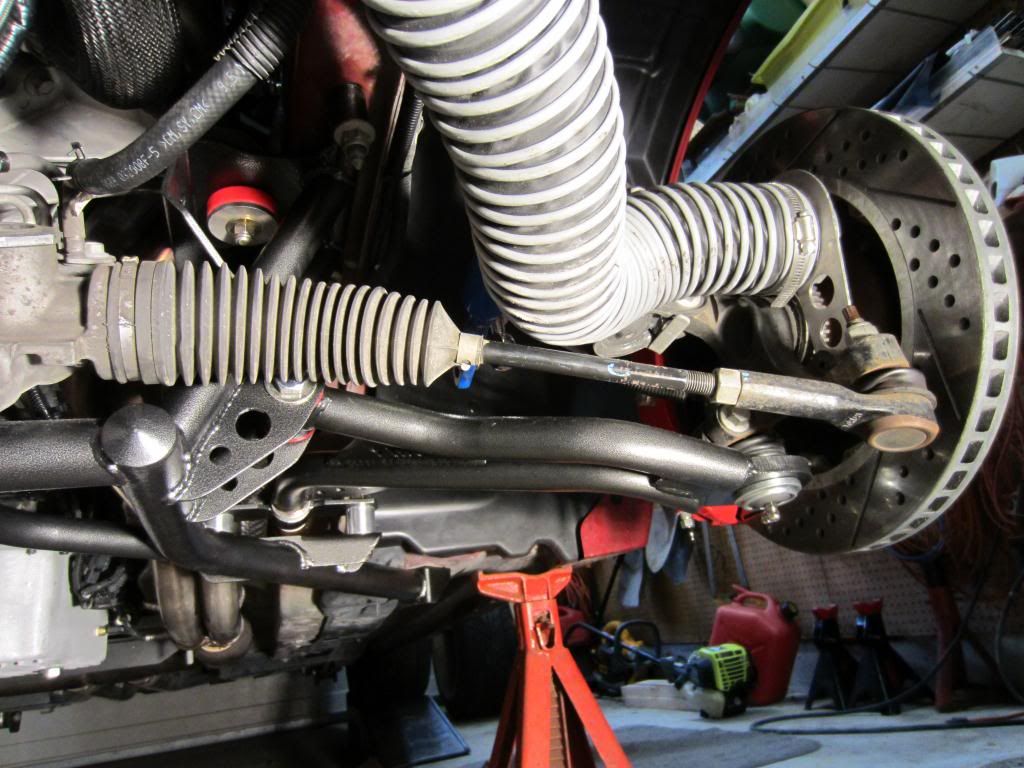
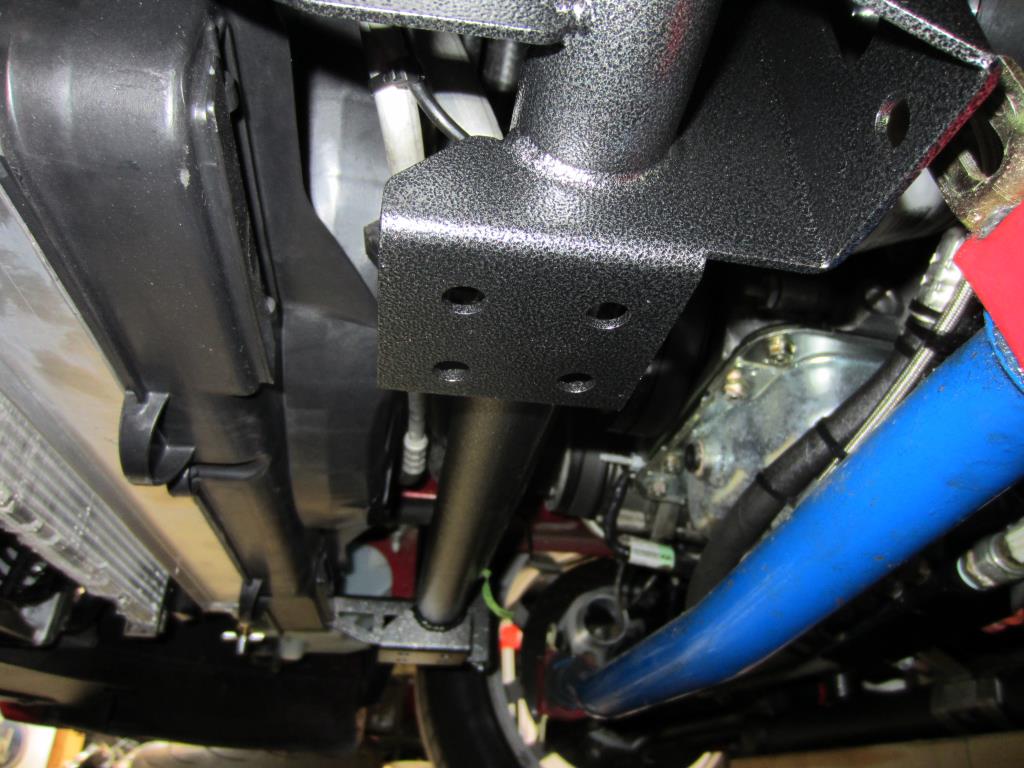
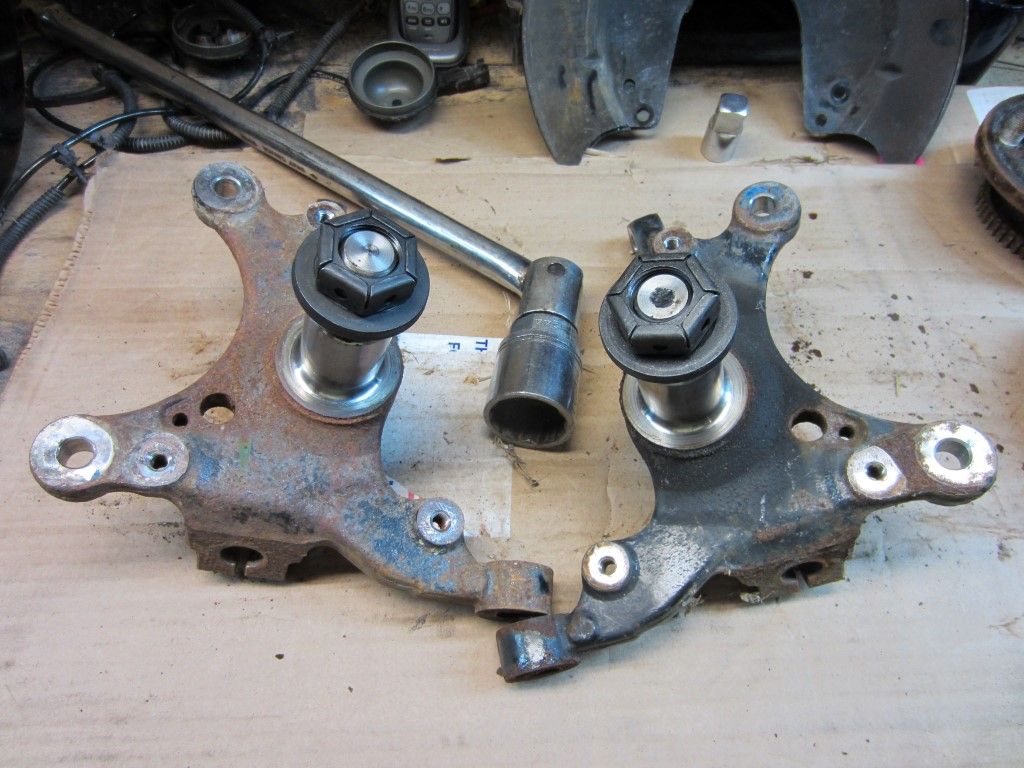
This what you are having trouble with?

I have been collecting the pieces to swap my non adjustable arms with BMR adjustable ones with tall 19mm ball joints. Bought recycled spindles for a 2011 (19mm ball joints) and am in process of cleaning them now. Probably a month or two until I get around to the install. Will update the thread accordingly.

Member
Joined: September 24, 2015
Posts: 6
Likes: 0
I did my install back in 2011 and can not remember having any issue. Did you try a little grease and a rubber mallet?
This what you are having trouble with?
I have been collecting the pieces to swap my non adjustable arms with BMR adjustable ones with tall 19mm ball joints. Bought recycled spindles for a 2011 (19mm ball joints) and am in process of cleaning them now. Probably a month or two until I get around to the install. Will update the thread accordingly.
Thread Starter
Mach 1 Member
Joined: April 1, 2010
Posts: 841
Likes: 16
From: King City, Ontario, Canada
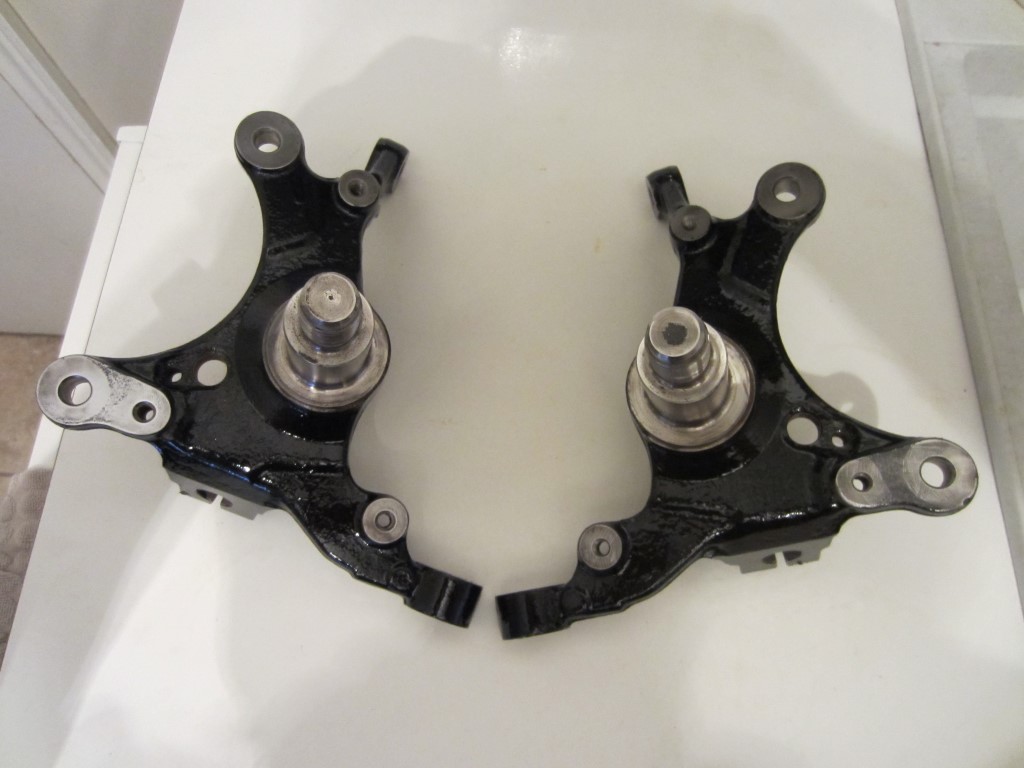
Finally got the 2011 spindles cleaned up and painted.
And the adjustable A-Arms with 19mm tall ball joints are all ready to install.
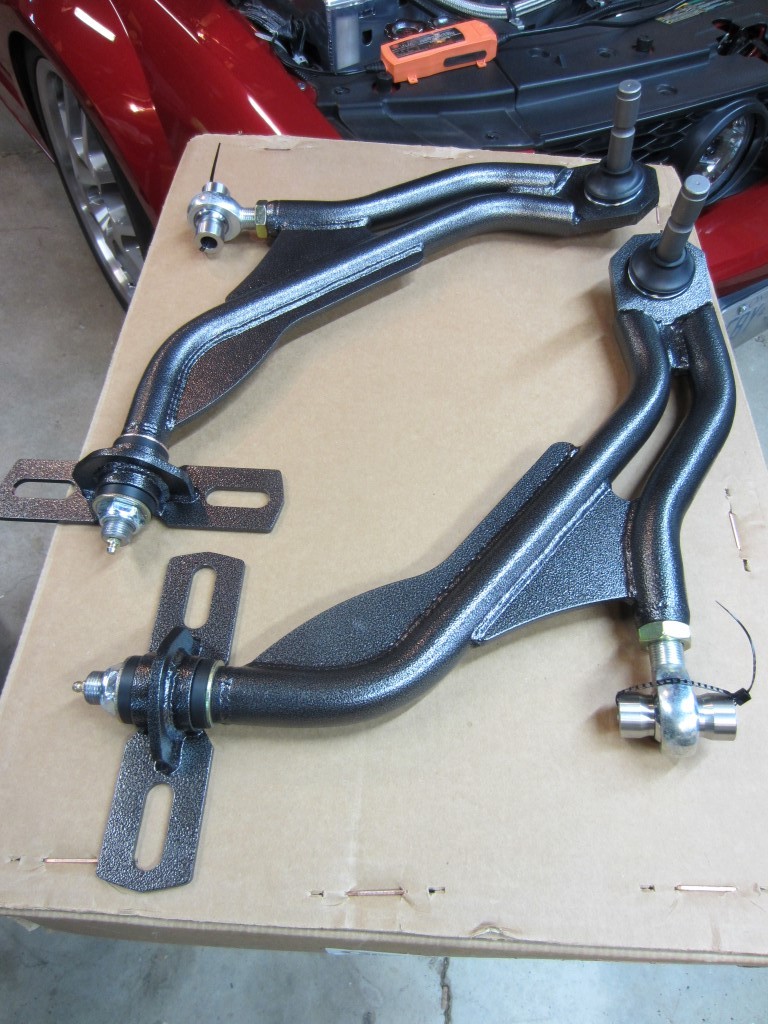
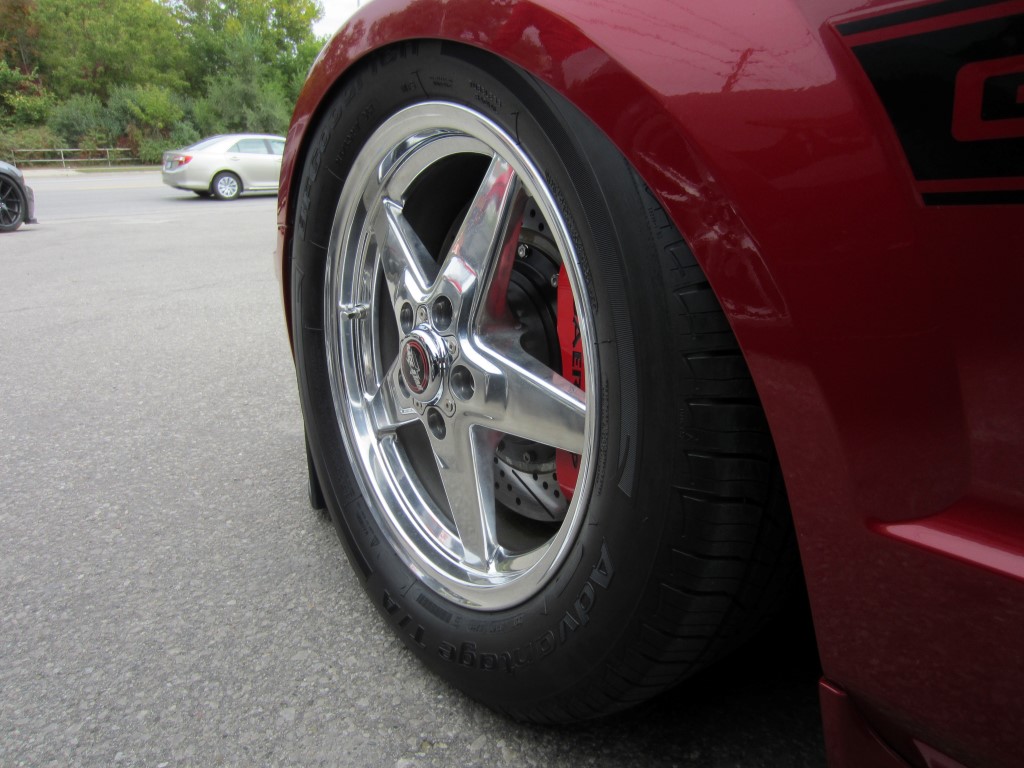
My objective is to narrow the track by 1/2 inch or so with the adjustable A-Arms to move the tires in from the inner fender when the suspension is "aired-out".

And the adjustable A-Arms with 19mm tall ball joints are all ready to install.

My objective is to narrow the track by 1/2 inch or so with the adjustable A-Arms to move the tires in from the inner fender when the suspension is "aired-out".

Thread Starter
Mach 1 Member
Joined: April 1, 2010
Posts: 841
Likes: 16
From: King City, Ontario, Canada

Thread
Thread Starter
Forum
Replies
Last Post
tj@steeda
2015 - 2023 MUSTANG
0
Sep 10, 2015 12:44 PM