
What did you do to your '10-'14 today?


V6 Member
Joined: June 3, 2013
Posts: 65
Likes: 0
From: Elizabeth City, NC
I tried to install lowering springs today but that ended badly  I wasn't careful enough nor knew how to properly take off the strut mounts (Spring replacement videos don't show this!!). I lost some bearings on the second one, but the first one it popped off under a little bit of compression that left was at the top of the spring, it hit the ground and bearings flew off everywhere. Now I'm spending $200+ more than I wanted to for replacement strut mounts. I now know it'd be better to get the GT500 mounts but I just can't afford to get new 05-10 struts to fit them. Do the GT500 strut mounts separate too?
When I get the new ones they'll be taped or clamped together somehow so they don't ever separate during installation.
I wasn't careful enough nor knew how to properly take off the strut mounts (Spring replacement videos don't show this!!). I lost some bearings on the second one, but the first one it popped off under a little bit of compression that left was at the top of the spring, it hit the ground and bearings flew off everywhere. Now I'm spending $200+ more than I wanted to for replacement strut mounts. I now know it'd be better to get the GT500 mounts but I just can't afford to get new 05-10 struts to fit them. Do the GT500 strut mounts separate too? When I get the new ones they'll be taped or clamped together somehow so they don't ever separate during installation.
I Have No Life
Joined: September 24, 2011
Posts: 10,141
Likes: 172
^ I thought you could get 11+ struts and strut mounts? Go that route rather than the 05-10. I have the new 11+ Koni's, on stock strut mounts. I lost ONE bearing ball during the install. Simply cleaned it and put it back in with some grease.
As for the bearings, you can still reuse them even if they fly off. Just pick them all up, clean, and regrease. New strut mounts are ideal, obviously. But if budget is tight, just reuse the existing mounts.
As for the bearings, you can still reuse them even if they fly off. Just pick them all up, clean, and regrease. New strut mounts are ideal, obviously. But if budget is tight, just reuse the existing mounts.
V6 Member
Joined: June 3, 2013
Posts: 65
Likes: 0
From: Elizabeth City, NC
^ I thought you could get 11+ struts and strut mounts? Go that route rather than the 05-10. I have the new 11+ Koni's, on stock strut mounts. I lost ONE bearing ball during the install. Simply cleaned it and put it back in with some grease.
As for the bearings, you can still reuse them even if they fly off. Just pick them all up, clean, and regrease. New strut mounts are ideal, obviously. But if budget is tight, just reuse the existing mounts.
As for the bearings, you can still reuse them even if they fly off. Just pick them all up, clean, and regrease. New strut mounts are ideal, obviously. But if budget is tight, just reuse the existing mounts.
From what research tells me, GT500 style strut mounts can be used on all 05-14 cars, but they can only use 05-10 struts and springs, or maybe just 05-10 struts.
Last edited by SMBJoshy; Aug 26, 2014 at 03:34 PM.
Mach 1 Member
Joined: March 27, 2014
Posts: 919
Likes: 0
From: Winnipeg, MB

I did the Moroso A/O separator immediately upon getting home from the dealership after picking her up, about 25 kms on the clock. It does a good job. The hose after the separator is pretty much clean and dry and I empty it out about every 750-1000 kms or so, usually get about an ounce out.
V6 Member
Joined: June 3, 2013
Posts: 65
Likes: 0
From: Elizabeth City, NC
UPDATE. Got my car back together with new original "two piece" strut mounts and SR springs. Lovin the much needed drop to eliminate the wheel gap. Funny thing yesterday, the dealer got me the wrong strut mounts which were made for 05-09 Mustangs. Their computer was showing the wrong part for 2013 mustangs, but when the guy put in the vin number of my car, it then showed the correct strut mount, weird... I hands down like the round style strut mounts so much better, but I can't afford to buy the correct struts. And the correct mounts for my car were about half the price. So when I got them today and was piecing together the strut/springs, I was very careful in handling the new mounts.
Next time I decide to take it apart again for changing the shocks/struts, I'll definitely get the GT500 style mounts.
Next time I decide to take it apart again for changing the shocks/struts, I'll definitely get the GT500 style mounts.

Bullitt Member
Joined: July 16, 2014
Posts: 219
Likes: 0
Thinking about having a custom plaque made for the radiator cover. I've gone back and forth with replacing the whole **** thing to this. It has to come off at some point to replace the chrome Pony (though I'm not 100% sure I'm going to replace the pony now. I'm old school and like the chrome. I'm not into the black-out everything look. IMO).
Emplem Pro's says they can do it, and I trust them to. I'm waiting on my build sheet though as I want some numbers off of it on the plaque. I also can't decide if I want to go with Ford Racing / Pony Logo or 50 years / Pony logo. I'm leaning towards Ford Racing / Pony because I already have the Ford Racing Coil covers (and they do look very nice).
The final design will be done in Photoshop. (10 + years experience with it so I know what I'm doing). Definitely want it in stainless polished with black etching.
Thoughts or opinions? Anyone have custom work done with Emblem Pros before?
I've also ordered enough replacement clips for the radiator cover(waiting on them because Late Model Resto was out of them when I ordered the second set). and am going to chrome/clear coat the tops. Figured it would be a nice contrast against the black plastic.
I bought the stainless polished inserts (emblempros) for the engine cover and purposely went with the plain ones (without etching - excellent fit and finish) so I can add the plaque and not "over badge" the car. The name of the car "Rose" will also be on the plaque. The engine bay by far has gotten most of my attention, and it's all for me. I don't plan on "showing" the car except maybe now and then at a coffee and cars event we have once a month.
To date, the only thing I have done to the outside of the car is two small pony decals (reflective vinyl and I tested them the other night, they DO reflect) on the rear quarter panel windows to help give it a little more visibility at night (they are black with silver accents during the day, at night when hit with lights they look like mirror reflections and appear to be chrome--because running red lights here in upstate SC is a pastime). And possibly the black pony with airbrushed skeleton (which hasn't gone on yet. I'm still debating if that's too over the top).
Still no pictures, as the car is not done yet. These are appearance only mods for the most part. I want no hassle with warranty issues, especially since I paid for the extended warranty and road hazard coverage. The supercharger will come later as I plan on keeping this car for a long time.
I have all the tools/equipment in to do the Klasse AIO and Klasse Sealant this weekend. I bought two portable batteries (i used the excuse that the wife's car could keep one, but the real reason is so I can work outside in the complex with power tools and have an outlet to plug into. hehe). with the porter orbital, and several different pads. The paint is new so I won't need any cutting pads, I'll just need to clay it in some spots to remove some tree sap it's collected since last week. I'm hoping to get 3 coats of the sealant on this weekend. The first time around will take the longest because of the prep/clay/polish/sealant. Sunday and Monday's coats should not take nearly as long. I'll also be mixing some Meguiars detailer with some sealant (Glanz Spritz anyone?) for quick wipe downs. I'm going with the sealant because it'll last longer and the car is not garaged. Wax has to be reapplied once a month. (bleah). I figure with 3 coats I won't have to worry about adding more until it cools off a bit and before winter hits. Then I'll do I a couple more coats of the sealant and be good for winter.
Oh, and I've already replaced all the regular bulbs with raxiom. Including the trunk light. AM was kind enough to send me another set of the raxiom for the dome light because one was flickering and I just replaced it the other day, no more flickering. And yeah I did the license plate lights too.
I may even get around to installing the Laminex protectors for the headlights and fogs this weekend too. I keep forgetting to do them. The color of the car is SGM.
I will not take pictures until the car is completed to my satisfaction. But once it is they will be forthcoming. I also need to find a spot and here somewhere that will work well with a photo shoot (photography is my hobby)
Honestly, most of the stuff I am doing, I feel like Ford should have done to "finish" the car. It won't be radical by any means. But it should be much more complete, and it does provide a lot of stress relief for me when I can get the alone time to do it.
Last edited by Critical Mass; Aug 29, 2014 at 09:56 AM.
GT Member
Joined: June 11, 2014
Posts: 184
Likes: 9
From: Eastern, MA
Installed Airaid Intake Tube.
And of course broke the small yellow clip that holds in the smallest of the three tubes that attach to the air intake tube. Anyone know where I can get another clip? I wonder if the "Help!" section at an auto parts store will have something like that (probably not).
For clarification, there are 3 tubes: Large= Sound Tube, Medium = Oil Breather, Small = AT Tube. The small yellow clip that locks the AT Tube broke. I have it together for now, but I'd like to replace it.
Last edited by VIP1; Aug 30, 2014 at 01:06 PM.
Super Boss Lawman Member
Joined: October 16, 2012
Posts: 4,414
Likes: 215
From: Vancouver BC
Here's the stance after installing the ground control suspension system from Hypermotive.
The ride is amazing. The stance is only slightly different than my eibach pro kit was.
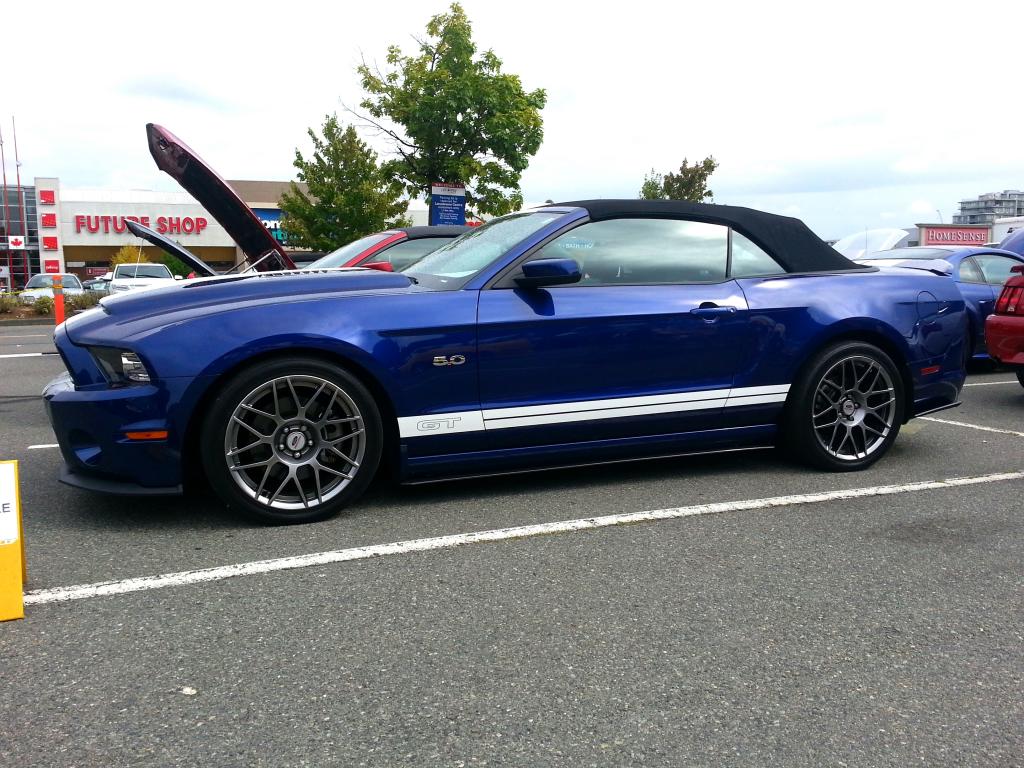

The ride is amazing. The stance is only slightly different than my eibach pro kit was.
I Have No Life
Joined: September 24, 2011
Posts: 10,141
Likes: 172

Super Boss Lawman Member
Joined: October 16, 2012
Posts: 4,414
Likes: 215
From: Vancouver BC
I Have No Life
Joined: September 24, 2011
Posts: 10,141
Likes: 172
 . I posted all the pics up in the other threads. I can't post here because this stupid app still won't let you post.
Roush Forum Stalker
Joined: March 9, 2013
Posts: 11,140
Likes: 1,749
From: Massachusetts

Bullitt Member
Joined: June 18, 2014
Posts: 243
Likes: 6
I have all the tools/equipment in to do the Klasse AIO and Klasse Sealant this weekend. I bought two portable batteries (i used the excuse that the wife's car could keep one, but the real reason is so I can work outside in the complex with power tools and have an outlet to plug into. hehe). with the porter orbital, and several different pads. The paint is new so I won't need any cutting pads, I'll just need to clay it in some spots to remove some tree sap it's collected since last week. I'm hoping to get 3 coats of the sealant on this weekend. The first time around will take the longest because of the prep/clay/polish/sealant. Sunday and Monday's coats should not take nearly as long. I'll also be mixing some Meguiars detailer with some sealant (Glanz Spritz anyone?) for quick wipe downs. I'm going with the sealant because it'll last longer and the car is not garaged. Wax has to be reapplied once a month. (bleah). I figure with 3 coats I won't have to worry about adding more until it cools off a bit and before winter hits. Then I'll do I a couple more coats of the sealant and be good for winter.


Bullitt Member
Joined: February 24, 2011
Posts: 358
Likes: 2
From: MD
[QUOTE=Cdvision;6832216]Installed Redline hood struts...bye, bye ugly prop rod!!
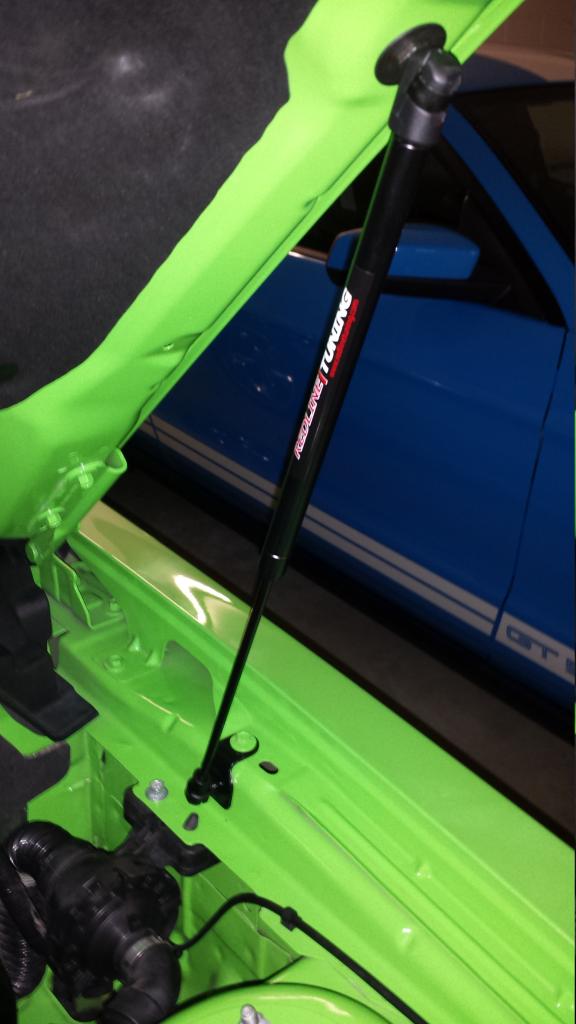
How did you get the rubber nub in the hole? I just installed the bracket under the metal lip in preparation for when my hood strut comes in and the nub is way below the surface of the metal lip.

How did you get the rubber nub in the hole? I just installed the bracket under the metal lip in preparation for when my hood strut comes in and the nub is way below the surface of the metal lip.

V6 Member
Joined: March 27, 2014
Posts: 60
Likes: 0
From: Tucson Arizona
Over the weekend I installed the Whiteline trans mount insert and changed trans fluid to Amsoil 75-90 manual trans gear lube.......my results, night and day difference. Probably more improvement than the Barton 2 post bracket.
After doing this change I now see the biggest problem with the shifting is not necessarily just the shifter but in all the movement of the trans in relation to the shifter. Which is why I think the Blowfish bracket will work so well. I do still plan to upgrade the shifter to get a better "mechanical click" into each shift. I think I will hold off on the Blowfish bracket ( since its not available till Oct) and use that money to upgrade the shifter and move on to suspension or tune. Also very happy with how Amsoil smoothed the shifts.
I am back to being excited to drive this car again, shifting was just terrible from the factory.......
Last edited by Way2QWK; Sep 1, 2014 at 12:09 PM.
Super Boss Lawman Member
Joined: October 16, 2012
Posts: 4,414
Likes: 215
From: Vancouver BC
[QUOTE=dohc97;6846279]nice!