Wiring up some gauges...
 7/14/08, 02:57 PM
#1
Bullitt Member
Thread Starter

Join Date: June 16, 2008
Location: Northern VA
Posts: 396
Likes: 0
Received 0 Likes
on
0 Posts
Wiring up some gauges...
To complete my nitrous install I will be hooking up some Auto Meter c2 series gauges. I had these in my old Mustang and remember they need a ground, 12v (of course), and illumination. Where is the best place to tap into for a power source and illumination? Pictures are greatly appreciated!
 7/14/08, 06:28 PM
#2
This is for hooking up for crank / run power .
Under the dash on the drivers side is a blue/white switch.
The switch has two wires going to it,one solid red wire and a light blue /with red tracer, you will need to conect it to the solid red wire, use a blue Scotch lock crimp, you'll have to lie on your back and use one hand to conect the Scotch lock and your other one to crimp it. here's pics of what the Scotch lock looks like, just remember the pic on the left is just an example of what the lock looks like( but not the right switch)The pic in the middle is the correct switch.
Fas as for the lights,I hooked up to the light switch( but I can't remember which wire I tapped to.lol
7/14/08, 06:59 PM
#3
Bullitt Member
Thread Starter
Join Date: June 16, 2008
Location: Northern VA
Posts: 396
Likes: 0
Received 0 Likes
on
0 Posts
This is for hooking up for crank / run power .
Under the dash on the drivers side is a blue/white switch.
The switch has two wires going to it,one solid red wire and a light blue /with red tracer, you will need to conect it to the solid red wire, use a blue Scotch lock crimp, you'll have to lie on your back and use one hand to conect the Scotch lock and your other one to crimp it. here's pics of what the Scotch lock looks like, just remember the pic on the left is just an example of what the lock looks like( but not the right switch)The pic in the middle is the correct switch.
Fas as for the lights,I hooked up to the light switch( but I can't remember which wire I tapped to.lol
Under the dash on the drivers side is a blue/white switch.
The switch has two wires going to it,one solid red wire and a light blue /with red tracer, you will need to conect it to the solid red wire, use a blue Scotch lock crimp, you'll have to lie on your back and use one hand to conect the Scotch lock and your other one to crimp it. here's pics of what the Scotch lock looks like, just remember the pic on the left is just an example of what the lock looks like( but not the right switch)The pic in the middle is the correct switch.
Fas as for the lights,I hooked up to the light switch( but I can't remember which wire I tapped to.lol
7/14/08, 08:01 PM
#4
You can always use a test light to find which wire on the light switch to hook it to. Atleast that is what I did.I changed the Cobalt series with Nexus ,with the Nexus I didn't have to use the light switch,so I don't have any pics of which wire I originally used on the light switch.I have the wire still hooked up,it's just caped off.lol
7/16/08, 08:55 PM
#6
Mach 1 Member
Join Date: October 20, 2005
Location: Honolulu, Hawaii
Posts: 874
Received 0 Likes
on
0 Posts
there is a black/white wire on the dimmer switch. pop out the headlight/dimmer panel like flamin ponyexpress posted. tap into that black/white wire and ground it behind the driver's side kick panel. there is a bolt there already which has wires grounding to it.
as far as where to tap into power, i used the mini add-a-circuits and wired them to the fuse panel behind the passenger kick panel. one fuse was for my air/fuel meter and the other fuse ran the boost and fuel pressure. the inner fuses in the pic are the ones that were originally in the slot.
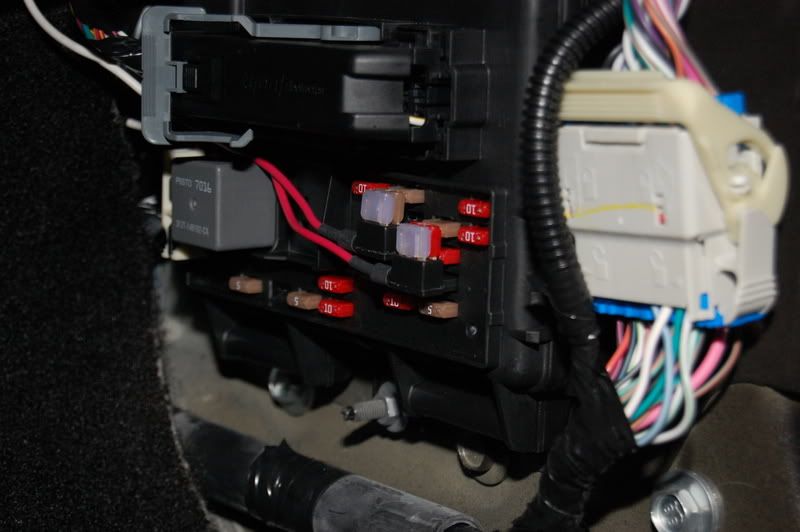
as far as where to tap into power, i used the mini add-a-circuits and wired them to the fuse panel behind the passenger kick panel. one fuse was for my air/fuel meter and the other fuse ran the boost and fuel pressure. the inner fuses in the pic are the ones that were originally in the slot.
7/17/08, 01:16 PM
#9
there is a black/white wire on the dimmer switch. pop out the headlight/dimmer panel like flamin ponyexpress posted. tap into that black/white wire and ground it behind the driver's side kick panel. there is a bolt there already which has wires grounding to it.
as far as where to tap into power, i used the mini add-a-circuits and wired them to the fuse panel behind the passenger kick panel. one fuse was for my air/fuel meter and the other fuse ran the boost and fuel pressure. the inner fuses in the pic are the ones that were originally in the slot.
as far as where to tap into power, i used the mini add-a-circuits and wired them to the fuse panel behind the passenger kick panel. one fuse was for my air/fuel meter and the other fuse ran the boost and fuel pressure. the inner fuses in the pic are the ones that were originally in the slot.
7/17/08, 04:22 PM
#10
Mach 1 Member
Join Date: October 20, 2005
Location: Honolulu, Hawaii
Posts: 874
Received 0 Likes
on
0 Posts
yeah, the black/white wire that connects to the dimmer switch will power the lighting of the gauge. it also dims the lighting on the gauge as you turn the dimmer switch. don't use that particular wire to power the gauge itself. hehe.
yeah, flamin ponyexpress's method is a cleaner install, but running the wire to the other side wasn't too bad. i just zip tied my wiring to other existing wires. his way is also cheaper, since you don't have to buy the add-a-circuit.
the thing that i liked with the way i did it, is that you just pop the two kick panels and the lighting switch.
but yeah, both ways work.
7/17/08, 08:27 PM
#11
Bullitt Member
Thread Starter
Join Date: June 16, 2008
Location: Northern VA
Posts: 396
Likes: 0
Received 0 Likes
on
0 Posts
Ok, two other things. Where is there a solid 12v in the trunk? And, is there a 12v in the center console? I thought I read that there is an unused wiring harness.
7/18/08, 01:17 PM
#12
The power souce I gave you was for RUN/CRANK only,power will be off when switch is off.
Last edited by flamin ponyexpress; 7/18/08 at 01:19 PM.
7/18/08, 09:15 PM
#13
Mach 1 Member
Join Date: October 20, 2005
Location: Honolulu, Hawaii
Posts: 874
Received 0 Likes
on
0 Posts
probably has another project in mind. i don't know about a 12v wire that is always hot in the trunk. i added an additional light bar to illuminate the trunk, but i am not sure what type of wire that was tied into.
the only thing i could maybe help you with is if you decided to run a wire from the passenger fuse panel and run it under the door sill, under the rear seats, and go to the trunk that way. sorry.
the only thing i could maybe help you with is if you decided to run a wire from the passenger fuse panel and run it under the door sill, under the rear seats, and go to the trunk that way. sorry.
Last edited by sound wave; 7/18/08 at 09:16 PM.
7/18/08, 09:31 PM
#14
Bullitt Member
Thread Starter
Join Date: June 16, 2008
Location: Northern VA
Posts: 396
Likes: 0
Received 0 Likes
on
0 Posts
probably has another project in mind. i don't know about a 12v wire that is always hot in the trunk. i added an additional light bar to illuminate the trunk, but i am not sure what type of wire that was tied into.
the only thing i could maybe help you with is if you decided to run a wire from the passenger fuse panel and run it under the door sill, under the rear seats, and go to the trunk that way. sorry.
the only thing i could maybe help you with is if you decided to run a wire from the passenger fuse panel and run it under the door sill, under the rear seats, and go to the trunk that way. sorry.
And I also need wire up a remote bottle opener and bottle warmer.
7/18/08, 10:27 PM
#15
Mach 1 Member
Join Date: October 20, 2005
Location: Honolulu, Hawaii
Posts: 874
Received 0 Likes
on
0 Posts
here are the instructions for the install of the bap. tacobill does it again!!!!
http://forums.bradbarnett.net/showthread.php?t=467743
http://forums.bradbarnett.net/showthread.php?t=467743
7/19/08, 10:40 PM
#16
Bullitt Member
Thread Starter
Join Date: June 16, 2008
Location: Northern VA
Posts: 396
Likes: 0
Received 0 Likes
on
0 Posts
Yeah, I saw that the other day. One great write up!
Anyway, I'll just run any 12v source to the front of the car. If I tap into a 12v source, how many pieces of equipment can i tap into one 12v without it being "overwhelming?"
Anyway, I'll just run any 12v source to the front of the car. If I tap into a 12v source, how many pieces of equipment can i tap into one 12v without it being "overwhelming?"
7/29/08, 05:07 PM
#18
Bullitt Member
Thread Starter
Join Date: June 16, 2008
Location: Northern VA
Posts: 396
Likes: 0
Received 0 Likes
on
0 Posts
there is a black/white wire on the dimmer switch. pop out the headlight/dimmer panel like flamin ponyexpress posted. tap into that black/white wire and ground it behind the driver's side kick panel. there is a bolt there already which has wires grounding to it.
as far as where to tap into power, i used the mini add-a-circuits and wired them to the fuse panel behind the passenger kick panel. one fuse was for my air/fuel meter and the other fuse ran the boost and fuel pressure. the inner fuses in the pic are the ones that were originally in the slot.
as far as where to tap into power, i used the mini add-a-circuits and wired them to the fuse panel behind the passenger kick panel. one fuse was for my air/fuel meter and the other fuse ran the boost and fuel pressure. the inner fuses in the pic are the ones that were originally in the slot.
7/30/08, 06:51 AM
#19
Shelby GT350 Member
There will be a set of prongs that plug into the fuse box just as the fuse did. You then plug the original fuse into one of the slots on the add-a-circuit , the instructions will tell you which one and the fuse for the new line into the other slot. As far as amperage , gauges don't draw much so either a 5 or 10 should be OK ...
7/31/08, 09:43 PM
#20
Bullitt Member
Thread Starter
Join Date: June 16, 2008
Location: Northern VA
Posts: 396
Likes: 0
Received 0 Likes
on
0 Posts
There will be a set of prongs that plug into the fuse box just as the fuse did. You then plug the original fuse into one of the slots on the add-a-circuit , the instructions will tell you which one and the fuse for the new line into the other slot. As far as amperage , gauges don't draw much so either a 5 or 10 should be OK ...