
anyone with cloth seats installed leather takeoffs?

Thread Starter
GT Member
Joined: January 22, 2007
Posts: 136
Likes: 0
anyone with cloth seats installed leather takeoffs?
just wondering how the finished job looks and feels and the quality and if it compares exactly with getting it from the dealer or feels lesser quality. i searched this forum high and low with no return. im really lookin foward to trying this mod out.
Team Mustang Source
Joined: August 23, 2004
Posts: 461
Likes: 0
From: Austin TX
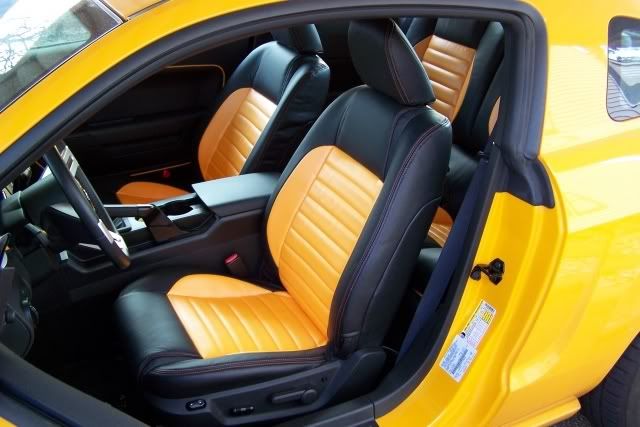
I've done it and yes, it works out beautifully. Mine looks just like the factory leather interior and is holding up just fine. There are some tricks, first thing is pay close attention to how you take everything apart, it can get a little daunting cause you wind up with quite a few parts. There will be a few 'hog rings' you'll have to unclip and reclip, I used needle nosed pliers but there's actually a tool you can use to do this which I've heard is much easier. Next be sure to seat the velcro strips into the crevices of the seats really well before fastening the sides and edges down. I didn't do this on my back seat and wound up with some slack on my rear seat cushion that had to be worked out. Last, after you get each piece done, put it out in the sun for a little while. This will let the leather/vinyl "relax" and the wrinkles go away. I was really disspointed after I put on my back seat cover and there were tons of wrinkles...until it went out in the sun and all was well. Hope this helps! Here are some pics of mine:


Mach 1 Member
Joined: June 5, 2006
Posts: 870
Likes: 0
Hey I havent done it but I'm going to. Here is a link to get the seat at a pretty cheap price: http://www.mustangcollective.com/showthread.php?t=5438
Nice guy!
Nice guy!
Bullitt Member
Joined: May 21, 2005
Posts: 259
Likes: 0
From: Hildebran, NC
I did my passenger seat today. It was a pain in the behind. Hopefully the drivers side will go better. I think the hardest thing was getting the headrest guides out. Just watch out for sharp edges when you are working inside the back seat frame. I got a couple cuts when working the cover on. I was glad to hear the sun will fix the wrinkles cause I was disappointed because of them. I guess I will take the seat back out and set it in the sun. One more seat to go and I'm done
Team Mustang Source
Joined: August 23, 2004
Posts: 461
Likes: 0
From: Austin TX
Like I said make sure the thin velcro strips are seated well first, they are located just on either side of the pleated areas of the seat running from the front to back. I left my seats out in the sun for a couple hours, seemed the longer I left them out there the better. Keep in mind it was late summer in Texas when I did mine so the sun was HOT! If the wrinkles are still somewhat present just try to leave them out in the sun longer. Yeah those headrest guides were a real pain, I wound up with a dozen small cuts or more on my hand after doing the front seats - washing up for dinner afterwards was fun - soon as I soaped up my hands....Yeehaw!! LOL
It was definitely worth it though.
Post some pics when you are done!
It was definitely worth it though.
Post some pics when you are done!
Bullitt Member
Joined: May 21, 2005
Posts: 259
Likes: 0
From: Hildebran, NC
Did you disconnect the battery before removing the seats or just unplug the seats connectors without disconnecting the battery? I could see doing that if you had side airbags but don't see why it would be neccessary if not. I did it for the passenger seat due to the air bag weight sensor but I wasn't going to do it for the drivers side if not needed.
Cobra Member
Joined: July 7, 2004
Posts: 1,328
Likes: 0
Ah yes, the ol' leather seat replacement. I just got done putting in my Classic Seat Trim kit on my GO Stang. So.... I have the factory leather seats up for sale. I swapped them out just this past Saturday. The driver's seat has 7700 miles on it. The others? Less than 3 hours... combined!
PM me if you're interested. $275 for the seats, and of course, the headrests. You'll pay actual shipping costs on top of that.
Stan
New Jersey
Here is a pic of the driver's seat. The other three are virtually 'new'...

PM me if you're interested. $275 for the seats, and of course, the headrests. You'll pay actual shipping costs on top of that.
Stan
New Jersey
Here is a pic of the driver's seat. The other three are virtually 'new'...
Team Mustang Source
Joined: August 23, 2004
Posts: 461
Likes: 0
From: Austin TX
Did you disconnect the battery before removing the seats or just unplug the seats connectors without disconnecting the battery? I could see doing that if you had side airbags but don't see why it would be neccessary if not. I did it for the passenger seat due to the air bag weight sensor but I wasn't going to do it for the drivers side if not needed.
Bullitt Member
Joined: May 21, 2005
Posts: 259
Likes: 0
From: Hildebran, NC
Mach 1 Member
Joined: May 13, 2005
Posts: 574
Likes: 1
From: Laval, Quebec
I've done it and yes, it works out beautifully. Mine looks just like the factory leather interior and is holding up just fine. There are some tricks, first thing is pay close attention to how you take everything apart, it can get a little daunting cause you wind up with quite a few parts. There will be a few 'hog rings' you'll have to unclip and reclip, I used needle nosed pliers but there's actually a tool you can use to do this which I've heard is much easier. Next be sure to seat the velcro strips into the crevices of the seats really well before fastening the sides and edges down. I didn't do this on my back seat and wound up with some slack on my rear seat cushion that had to be worked out. Last, after you get each piece done, put it out in the sun for a little while. This will let the leather/vinyl "relax" and the wrinkles go away. I was really disspointed after I put on my back seat cover and there were tons of wrinkles...until it went out in the sun and all was well. Hope this helps! Here are some pics of mine:
What parts should I get before starting this project, any clip or fastners I should buy ?
Team Mustang Source
Joined: August 23, 2004
Posts: 461
Likes: 0
From: Austin TX
Very good question...the only fasteners I came across during my conversion were little snap type fasteners that hold the leather around the metal uprights that support the seatback right where the seat hinges...if you can imagine the seat cover "wraps" around those and something has to hold it together...it's a little black snap like fastener. Well of course mine broke trying to take them out. Since the area is not visible where the two pieces of leather come together I used a small, black zip tie and trimmed it way down and just tucked it back in like it came with the cloth seats. The other area with fasteners is the area where the seat cover is held on by "hog rings". They are fastened around a rod support that is cast into the foam foundation of the seat bottom (and also the seat back, but my set of seat covers came with the entire back including the foam so I didn't have to mess with the seat backs). I think there are four or five of those clips that need to be undone and re-clipped when you put the leather on. There is a specific tool to clip hog rings, an upholstery place would probably have one, maybe a fabric store too? Not sure about an automotive suppy store but it might be worth a try. If you can't find one don't worry as I used needle nosed pliers to do mine. It was probably not as easy as the hog ring pliers but it got the job done. Past that, I'd say the best thing to have is patience, and a fairly large area to spread out to work. And watch out for lifting the seats out of the car, as it's super easy for the seat brackets to scratch steering wheels and door panels. It might be worth it to un-fasten the seat then wrap the bracket ends with some masking tape to help protect your interior parts. That's about all I can think of at the moment, sorry for the long reply!
Team Mustang Source
Joined: August 23, 2004
Posts: 461
Likes: 0
From: Austin TX


Team Mustang Source
Joined: August 23, 2004
Posts: 461
Likes: 0
From: Austin TX
I got mine from Diversified on ebay - when I called them they asked if I had side air bags or not, they said they had some side airbag covers then. You may want to call them and ask if they have any (800.995.4003).
Mach 1 Member
Joined: December 28, 2004
Posts: 600
Likes: 0
Jay....or anyone who's done this. Can you remember whether or not the perforated part of the leather (on your butt and your lower back) is stitched in seperately to the smooth parts of the leather seat coverings? If so, is there enough of an underside lip between the two leather pieces to take them apart and then re-stitch later?
I'm wanting to change my Parchment interior to a 2-tone Parchment and Charcoal and all of these rip-off interior places want ridiculous money for enough charcoal perforated leather to do the job. My thoughts.....buy a charcoal take-off and have the upholster (I have a good one where I live) take out the inside parchment perforated sections and re-stitch the charcoal inserts from the take-off set.
Any help would be appreciated. Thanks, Mark

