
2005-2009 Mustang Raxiom OE-Style GPS Navigation w/ Back-Up Camera!

Cobra Member
Joined: November 19, 2005
Posts: 1,105
Likes: 18
From: Central Alabama

Bullitt Member
Joined: April 12, 2007
Posts: 283
Likes: 0
mrkabc....
Regarding the backup camera and the white and green wire. I just got off the phone with Rosen/Echomaster. Leave the wires alone....do not cut either one of them. The little piece of paper that came with mine talked about cutting the wires....but the tech told me that must be an old sheet. The camera comes pre-set now, to work correctly in our application...you do not have to do anything to either the white or green wire. He suggested wrapping them with electrical tape for a bit of protection, but otherwise, said just leave them alone.
So...perhaps one question answered and resolved!
I'll be stopping by my Ford dealership to pick their brains....hope I can come up with some encouraging news regarding the sat. radio antenna.
Last edited by Sabre; Apr 29, 2015 at 10:11 AM.
Legacy TMS Member
Joined: November 13, 2005
Posts: 2,193
Likes: 46
Yet another setback. Tried to hook up the AM/FM antenna to the Raxiom NAV unit, and it doesn't fit! The stock Motorola style antenna plug is different from what the Raxiom has. Check out the picture below.
So now what? Is there a newer, funky design that I'm not aware of for an AM/FM radio? And also, where is the port for the Sirius/XM radio antenna? Is this the Sirius XM antenna, and if so, where is the AM/FM one? I am thoroughly confused and once again cursing the lack of documentation that came with this unit.
Ideas, anyone? I'm going to run to Best Buy tomorrow and see if there is some sort of adapter.
Last edited by mrkabc; Apr 30, 2015 at 02:42 AM.
Legacy TMS Member
Joined: February 2, 2004
Posts: 7,648
Likes: 675
From: Insane
Yes, there is.
http://www.bestbuy.com/site/metra-an...&skuId=9811328
But likely it won't be in stock near ya..
So note to AM... it ain't fully plug and play for all Mustangs 05-09, seems. Darn the luck.
http://www.bestbuy.com/site/metra-an...&skuId=9811328
But likely it won't be in stock near ya..
So note to AM... it ain't fully plug and play for all Mustangs 05-09, seems. Darn the luck.
Bullitt Member
Joined: April 12, 2007
Posts: 283
Likes: 0
Yet another setback. Tried to hook up the AM/FM antenna to the Raxiom NAV unit, and it doesn't fit! The stock Motorola style antenna plug is different from what the Raxiom has. Check out the picture below.
So now what? Is there a newer, funky design that I'm not aware of for an AM/FM radio? And also, where is the port for the Sirius/XM radio antenna? Is this the Sirius XM antenna, and if so, where is the AM/FM one? I am thoroughly confused and once again cursing the lack of documentation that came with this unit.
Ideas, anyone? I'm going to run to Best Buy tomorrow and see if there is some sort of adapter.
So now what? Is there a newer, funky design that I'm not aware of for an AM/FM radio? And also, where is the port for the Sirius/XM radio antenna? Is this the Sirius XM antenna, and if so, where is the AM/FM one? I am thoroughly confused and once again cursing the lack of documentation that came with this unit.
Ideas, anyone? I'm going to run to Best Buy tomorrow and see if there is some sort of adapter.
Maybe this thing is not turning out to be quite so plug N play after all?
My box included a 6 inch long adapter that was marked SiriusXM that I assumed was the adapter for the SiriusXM antenna to the radio...but since I don't have the antenna or the end of it, I could be wrong. I Googled it and it looks just like this. Did you have one of these in your box, or maybe you got shorted.
http://www.ebay.com/itm/like/231535375571?lpid=82&chn=ps
My quest to find out what all I might need from Ford to put the SiriusXm antenna and it's wiring into my car got thwarted yesterday, as the parts man was out for a Ford training session until next week.
Like you, I assumed the AM/FM antenna would plug right into the back of the unit. I don't recall seeing anything like an adapter for that antenna in my box either.
Bullitt Member
Joined: April 12, 2007
Posts: 283
Likes: 0
I got curious, so I went back down to my shop, where all the pieces they sent are still laid out on my bench.
Yes...I do have an AM/FM antenna adapter that fits into the back of the Raxiom unit. Unlike every other part, it does not have a part number or identifying name...but I plugged the single black end neatly into the antenna port on the back of the Raxiom unit. Looks like the split end might accomodate 2 different styles of antenna?
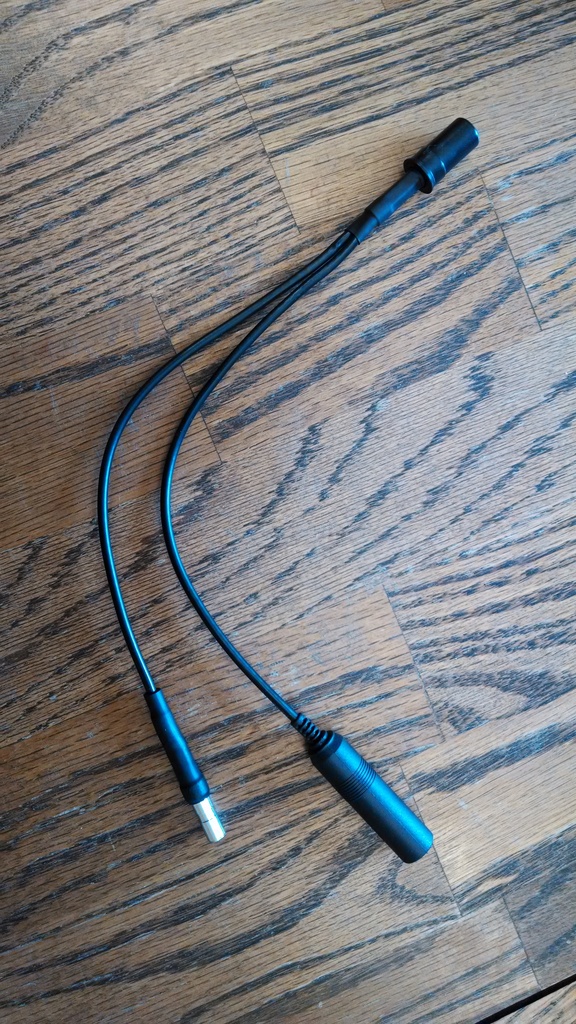
Yes...I do have an AM/FM antenna adapter that fits into the back of the Raxiom unit. Unlike every other part, it does not have a part number or identifying name...but I plugged the single black end neatly into the antenna port on the back of the Raxiom unit. Looks like the split end might accomodate 2 different styles of antenna?

Legacy TMS Member
Joined: November 13, 2005
Posts: 2,193
Likes: 46
Actually, Sabre is right, and I am wrong. There *was* an adapter in the box, I had set it aside separately on my workbench and then forgot to move it to the car with the other wires. Feel free to ignore my previous post about the antenna wiring, it was my fault I overlooked the adapter. Score one for AM's "plug and play" claim. Once I plugged in the antenna the radio works great! I have no Sirius XM account available (I do have one for my Taco, but I don't think I can use it for this radio as well, right?)
Camera wiring update: The camera does work when the green wire labeled "back" is shorted to 12v. That means tying it in to the backup light wire off the SJB as Jim says will mean that when the car is placed in Reverse the camera will override whatever is on the screen. I have tested it and the camera MUST be mounted "upside down" (pix will be uploaded shortly) and not inside the emblem. It has a specific orientation and can't be flipped. By default it does have the tracking lines enabled, so as Sabre says, no need to clip the "variable" wires. It's color and seems nice.
Bluetooth and handsfree operation: I have wired the microphone up through the drivers side "A" pillar and tested the Bluetooth functionality. It works great! Too bad I don't have steering wheel controls to run the phone, that is sorely missed. On a side note, there is a 1/8" jack labeled "remote" that's on the wiring harness, but I'm not sure what it's for.
TOOLS NEEDED:
T20 Torx bit screwdriver (or bit, or socket)
STEP 1: To install the microphone, pull the drivers side visor using a T20 Torx bit screwdriver (or bit) - 2 screws for the visor and one for the retainer plastic clip.
STEP 2: Open the drivers door, then grasp the "A" pillar cover and pull down and out. It is held in by push clips, so it will pop right out.
STEP 3: Grab the center plastic map light cover and pull straight down. Again, this is only held in by push clips, so it should pop right out and dangle by the map light wires.
STEP 4: Now feed the microphone wire, purple plug end first, through the top of the dash at the base of the "A" pillar. Reach up under the dash and route it over to the opening behind the head unit. Plug it in to the head unit.
STEP 5: Detach the plastic retainer clip from the microphone , and feed it through the header cover to the opening where the map light cover is.
STEP 6: (optional) Modify map light cover to hold the microphone. All I did was just snap the map light cover back in place over the wire, leaving the microphone hanging like you see in the picture. At some point in the future I'll come back and modify the map light cover to make it look more professional, but for now I'm done. The microphone/Bluetooth works great with this head unit. We'll see how it works driving around though, that might be a different story though, since convertibles are noisy.
Other observations: The USB port doesn't charge my phone, it's pretty low current.
I bought one of these to install inside my center console rather than the USB extension cable that came with the unit.
http://www.ebay.com/itm/321737035451?_trksid=p2057872.m2749.l2649&ssPageName=STRK%3AMEBIDX%3AIT
I think this will be nice to have a USB and A/V port inside the console where I can leave my iPod out of sight, rather than just hanging loose in the glove box.
Don't calibrate the touch screen! You'll get stuck in an endless loop of the thing asking you to touch the screen in different locations over and over and over and over and over... after 5 minutes of doing this, I had to turn off the radio and pull the power to get out of this routine.
The "secret" code mentioned earlier in this thread to get to the settings menu to disable the "lawyer lockout" doesn't work. I get an invalid code message. There's nothing in the instruction manual about entering a code or what it does anywhere. Interesting. EDIT: I found the code in the instruction leaflet, it's "1120". However, it won't allow me to disable the idiot "lawyer lockout" - there's no menu item listed to allow me to do that. Bastards.
Well, I'm going to go mount the camera and reattach my rear bumper now. Time to get this thing completed, I'm actually much happier with the unit now that most of my questions have been answered. Check back later!
Last edited by mrkabc; May 1, 2015 at 02:59 AM.
Legacy TMS Member
Joined: November 13, 2005
Posts: 2,193
Likes: 46
Another Update!
OK, the camera is in the bumper! Tomorrow I will finish routing the wire to the head unit. Here's how I did it:
TOOLS NEEDED:
This assumes you have already removed the rear bumper as I described a few days ago. We are picking up from that point.
Step 1: Remove rear bumper cover from the car by disconnecting the license plate/marker light harness plug from inside the trunk. Push out the wiring grommet. The bumper cover can now be removed from the car. Place it somewhere that you can lay it as flat as you can (I put it in the bed of my truck)
Step 2: Take the hole saw provided with the Raxiom NAV and trace the outline of the blade on a piece of paper and a marker. Cut out the circle from the paper, you'll use this as your template.
Step 3: Use the template to decide where you want to mount the camera, using the EXTERIOR SURFACE OF THE BUMPER. This way you won't accidentally damage the license plate light. Once you have decided the location you wish to drill, mark the center with your awl. Remember, as they said in high school wood shop, MEASURE TWICE AND CUT ONCE.
Step 4: Using the awl marking as your guide, drill out the hole in your bumper cover from the exterior surface. Keep the bumper cover steady so that you don't slip! It tends to flex a bit.
Step 5: You now have a nice, large hole in your bumper cover. separate the wiring harness so that only the narrow piece attached to the camera is present, then feed it through the hole until you get to the camera. Orient the camera properly, then snap it in to the hole. The folks at Raxiom measured well; its a pretty snug fit and will take a bit of pressure to get the camera to snap in. I was happy to see that, since that means the camera won't move around or pop out.
Step 6: Feed the camera wire through the grommet that contains the license plate/marker light wiring harness. You'll need to slice the electrical tape with a razor blade in order to allow access. DON'T slice the grommet! Once you are done feeding the wire through, re-tape the end like it was with electrical tape. Plug the grommet back in to the access hole in the trunk.
Step 7: Reinstall your bumper cover, reversing the steps I laid out in my previous post.
That's where I quit for the evening. Of course, I tested the camera by reconnecting the harness temporarily just running it to the head unit. Check out the pic from the screen. I like it. Even though the camera is asymmetrical due to the license plate light, the view is still very good IMO. The orange/red marker measured 2' from the camera lens, and the orange one 3'. Note the lines on the left don't match my driveway exactly - this is because of the asymmetrical location of the camera. Just something to be aware of.
I hope this helps you guys! Let me know what you think. Be back tomorrow with the rest of the installation (except for the USB port).
Things I need to do:
TOOLS NEEDED:
- Awl
- Paper/Pen/Scissors
- Electrical Tape
- Phillips Screwdriver
- Drill
- 11mm Deep Socket and 3/8 Ratchet
- Razor Blade
- Soldering iron, heat shrink tape, wire cutters/stripper (optional), otherwise wire taps
This assumes you have already removed the rear bumper as I described a few days ago. We are picking up from that point.
Step 1: Remove rear bumper cover from the car by disconnecting the license plate/marker light harness plug from inside the trunk. Push out the wiring grommet. The bumper cover can now be removed from the car. Place it somewhere that you can lay it as flat as you can (I put it in the bed of my truck)
Step 2: Take the hole saw provided with the Raxiom NAV and trace the outline of the blade on a piece of paper and a marker. Cut out the circle from the paper, you'll use this as your template.
Step 3: Use the template to decide where you want to mount the camera, using the EXTERIOR SURFACE OF THE BUMPER. This way you won't accidentally damage the license plate light. Once you have decided the location you wish to drill, mark the center with your awl. Remember, as they said in high school wood shop, MEASURE TWICE AND CUT ONCE.
Step 4: Using the awl marking as your guide, drill out the hole in your bumper cover from the exterior surface. Keep the bumper cover steady so that you don't slip! It tends to flex a bit.
Step 5: You now have a nice, large hole in your bumper cover. separate the wiring harness so that only the narrow piece attached to the camera is present, then feed it through the hole until you get to the camera. Orient the camera properly, then snap it in to the hole. The folks at Raxiom measured well; its a pretty snug fit and will take a bit of pressure to get the camera to snap in. I was happy to see that, since that means the camera won't move around or pop out.
Step 6: Feed the camera wire through the grommet that contains the license plate/marker light wiring harness. You'll need to slice the electrical tape with a razor blade in order to allow access. DON'T slice the grommet! Once you are done feeding the wire through, re-tape the end like it was with electrical tape. Plug the grommet back in to the access hole in the trunk.
Step 7: Reinstall your bumper cover, reversing the steps I laid out in my previous post.
That's where I quit for the evening. Of course, I tested the camera by reconnecting the harness temporarily just running it to the head unit. Check out the pic from the screen. I like it. Even though the camera is asymmetrical due to the license plate light, the view is still very good IMO. The orange/red marker measured 2' from the camera lens, and the orange one 3'. Note the lines on the left don't match my driveway exactly - this is because of the asymmetrical location of the camera. Just something to be aware of.
I hope this helps you guys! Let me know what you think. Be back tomorrow with the rest of the installation (except for the USB port).
Things I need to do:
- Hook up the green "Reverse" camera wire to the backup wire coming from the SJB
- Find out what to hook up the pink "e-brake" wire. I'm not sure what it's looking for. When I play CDs, it gives me the "lawyer message" but it already seems to know that I am pulling the e-brake because the message will disappear after I cycle the e-brake a few times. (this with the wire not hooked up). Then, what it will do is give me the message when the brake is off, and clear it when I pull the brake. The e-brake circuit is 12v hot when you pull the brake, and 0v when the brake is off. You would think that it wouldn't matter if you hooked up the pink wire since it looks for 0v, right? I plugged in the pink wire to 12v constant and it didn't seem to make a difference.
- Pull the rear seat and run the camera wire into the cabin. It's absurdly easy to pull the lower part of the seat, only 2 tabs to push in, then lift.
- Solder the 12v camera supply wire (+) to the blue and white switched power wire coming from the head unit. It didn't seem to have any function and is hot, so I am assuming this will feed the camera. If not, I'll need to find a switched hot lead and tie in to that.
- Obtain a Sirius XM antenna wire and run it to under the back seat. I'll leave it there for now in the event that I ever decide to get an antenna and hook it up. Leaving the bare Sirius XM antenna plug behind the radio appears to be a bad idea, since it's bare metal and when it touches anything back there you get an unpleasant hum out of the speakers.
- Bolt everything back up!
Bullitt Member
Joined: April 12, 2007
Posts: 283
Likes: 0
OK, the camera is in the bumper! Tomorrow I will finish routing the wire to the head unit. Here's how I did it:
TOOLS NEEDED:
This assumes you have already removed the rear bumper as I described a few days ago. We are picking up from that point.
Step 1: Remove rear bumper cover from the car by disconnecting the license plate/marker light harness plug from inside the trunk. Push out the wiring grommet. The bumper cover can now be removed from the car. Place it somewhere that you can lay it as flat as you can (I put it in the bed of my truck)
Step 2: Take the hole saw provided with the Raxiom NAV and trace the outline of the blade on a piece of paper and a marker. Cut out the circle from the paper, you'll use this as your template.
Step 3: Use the template to decide where you want to mount the camera, using the EXTERIOR SURFACE OF THE BUMPER. This way you won't accidentally damage the license plate light. Once you have decided the location you wish to drill, mark the center with your awl. Remember, as they said in high school wood shop, MEASURE TWICE AND CUT ONCE.
Step 4: Using the awl marking as your guide, drill out the hole in your bumper cover from the exterior surface. Keep the bumper cover steady so that you don't slip! It tends to flex a bit.
Step 5: You now have a nice, large hole in your bumper cover. separate the wiring harness so that only the narrow piece attached to the camera is present, then feed it through the hole until you get to the camera. Orient the camera properly, then snap it in to the hole. The folks at Raxiom measured well; its a pretty snug fit and will take a bit of pressure to get the camera to snap in. I was happy to see that, since that means the camera won't move around or pop out.
Step 6: Feed the camera wire through the grommet that contains the license plate/marker light wiring harness. You'll need to slice the electrical tape with a razor blade in order to allow access. DON'T slice the grommet! Once you are done feeding the wire through, re-tape the end like it was with electrical tape. Plug the grommet back in to the access hole in the trunk.
Step 7: Reinstall your bumper cover, reversing the steps I laid out in my previous post.
That's where I quit for the evening. Of course, I tested the camera by reconnecting the harness temporarily just running it to the head unit. Check out the pic from the screen. I like it. Even though the camera is asymmetrical due to the license plate light, the view is still very good IMO. The orange/red marker measured 2' from the camera lens, and the orange one 3'. Note the lines on the left don't match my driveway exactly - this is because of the asymmetrical location of the camera. Just something to be aware of.
I hope this helps you guys! Let me know what you think. Be back tomorrow with the rest of the installation (except for the USB port).
Things I need to do:
TOOLS NEEDED:
- Awl
- Paper/Pen/Scissors
- Electrical Tape
- Phillips Screwdriver
- Drill
- 11mm Deep Socket and 3/8 Ratchet
- Razor Blade
- Soldering iron, heat shrink tape, wire cutters/stripper (optional), otherwise wire taps
This assumes you have already removed the rear bumper as I described a few days ago. We are picking up from that point.
Step 1: Remove rear bumper cover from the car by disconnecting the license plate/marker light harness plug from inside the trunk. Push out the wiring grommet. The bumper cover can now be removed from the car. Place it somewhere that you can lay it as flat as you can (I put it in the bed of my truck)
Step 2: Take the hole saw provided with the Raxiom NAV and trace the outline of the blade on a piece of paper and a marker. Cut out the circle from the paper, you'll use this as your template.
Step 3: Use the template to decide where you want to mount the camera, using the EXTERIOR SURFACE OF THE BUMPER. This way you won't accidentally damage the license plate light. Once you have decided the location you wish to drill, mark the center with your awl. Remember, as they said in high school wood shop, MEASURE TWICE AND CUT ONCE.
Step 4: Using the awl marking as your guide, drill out the hole in your bumper cover from the exterior surface. Keep the bumper cover steady so that you don't slip! It tends to flex a bit.
Step 5: You now have a nice, large hole in your bumper cover. separate the wiring harness so that only the narrow piece attached to the camera is present, then feed it through the hole until you get to the camera. Orient the camera properly, then snap it in to the hole. The folks at Raxiom measured well; its a pretty snug fit and will take a bit of pressure to get the camera to snap in. I was happy to see that, since that means the camera won't move around or pop out.
Step 6: Feed the camera wire through the grommet that contains the license plate/marker light wiring harness. You'll need to slice the electrical tape with a razor blade in order to allow access. DON'T slice the grommet! Once you are done feeding the wire through, re-tape the end like it was with electrical tape. Plug the grommet back in to the access hole in the trunk.
Step 7: Reinstall your bumper cover, reversing the steps I laid out in my previous post.
That's where I quit for the evening. Of course, I tested the camera by reconnecting the harness temporarily just running it to the head unit. Check out the pic from the screen. I like it. Even though the camera is asymmetrical due to the license plate light, the view is still very good IMO. The orange/red marker measured 2' from the camera lens, and the orange one 3'. Note the lines on the left don't match my driveway exactly - this is because of the asymmetrical location of the camera. Just something to be aware of.
I hope this helps you guys! Let me know what you think. Be back tomorrow with the rest of the installation (except for the USB port).
Things I need to do:
- Hook up the green "Reverse" camera wire to the backup wire coming from the SJB
- Find out what to hook up the pink "e-brake" wire. I'm not sure what it's looking for. When I play CDs, it gives me the "lawyer message" but it already seems to know that I am pulling the e-brake because the message will disappear after I cycle the e-brake a few times. (this with the wire not hooked up). Then, what it will do is give me the message when the brake is off, and clear it when I pull the brake. The e-brake circuit is 12v hot when you pull the brake, and 0v when the brake is off. You would think that it wouldn't matter if you hooked up the pink wire since it looks for 0v, right? I plugged in the pink wire to 12v constant and it didn't seem to make a difference.
- Pull the rear seat and run the camera wire into the cabin. It's absurdly easy to pull the lower part of the seat, only 2 tabs to push in, then lift.
- Solder the 12v camera supply wire (+) to the blue and white switched power wire coming from the head unit. It didn't seem to have any function and is hot, so I am assuming this will feed the camera. If not, I'll need to find a switched hot lead and tie in to that.
- Obtain a Sirius XM antenna wire and run it to under the back seat. I'll leave it there for now in the event that I ever decide to get an antenna and hook it up. Leaving the bare Sirius XM antenna plug behind the radio appears to be a bad idea, since it's bare metal and when it touches anything back there you get an unpleasant hum out of the speakers.
- Bolt everything back up!
Your photos are great! I'm quite happy to see how well the camera works in this location. Gives me a much better idea of how mine will turn out too!
When I talked to the Ford mechanic, I quizzed him about what he thought they might be trying to do with the pink wire and the Ebrake. He said the "thinks" when you pull the Ebrake, it goes to ground...which gives it the 12V and turns on the light in the dash. Perhaps the Raxiom unit is using this signal to only let certain functions happen when the car is stopped and the Ebrake is on? Just a guess.
I guess I'm waiting until next week to get with the Ford parts guy to figure out what all I need for the SiriusXM antenna and wiring...that I didn't have from the factory...before I start my install. The only question left is...where to hook into the back up lights. Be sure to get a photo and wire description if you get this one figured out.
Legacy TMS Member
Joined: November 13, 2005
Posts: 2,193
Likes: 46
I'm at 7 hours and counting. I've done more than my fair share of car stereo installations dating back to the 1980's, and I can tell you that for someone that knows what they are doing it's not *difficult*, it's just tedious.
One of the biggest holdups was doing research to figure out things that should have been laid out in the instructions. *IF* someone had good instructions, they could knock this out in 3 hours or so, maybe 4 if they were being careful. The official AM estimate of 2 hours is, to me, overly optimistic. (unless they were just referring to the head unit installation only and not the camera wiring or the Bluetooth microphone placement)
I'd be curious to see how long it takes Sabre to do this since I am leaving detailed instructions as to what to expect and what tools are needed.
Are you going to get one?

DAYTIME PIC! See if you can spot the camera!
Mach 1 Member
Joined: February 15, 2005
Posts: 639
Likes: 3
Yeah, I'm probably going to get one for the 2005 and dump the Shaker 1000, and if it's not that much of a headache, one for the 2007 Shaker 500 too. I'm NOT an electric/stereo guy although I've rewired Fox Bodies with Painless kits before. Just "tedious" to use your words. Nothing you've described seems complicated, and this forum will be a good resource. Thanks so much for publishing the details of the install.
Legacy TMS Member
Joined: November 13, 2005
Posts: 2,193
Likes: 46
Day Four: Completing the camera wiring
Tools required:
STEP 1: Remove bottom of rear seat. Feel under the lip of the seat for "U" shaped grooves in the carpet, those are your release points. Push in the plastic tabs at the release points, and this will release the seat. Pull the seat out of the car.
STEP 2: Remove Shaker 1000 subwoofer by pulling two 8mm bolts, two 13mm bolts, and one 13mm nut as indicated in the picture. Unplug the two wiring harnesses by pushing in the release tabs and extracting the plugs. Remove the entire unit out of the trunk.
STEP 3: With the removal of the Shaker 1000, you can see a rectangular opening into the cabin on the passenger side of the trunk. Follow the wiring harness, it's very obvious. Run your camera wires through the opening and secure it to the existing wiring harness with zip ties. (note that at this point if you are running an antenna wire to a trunk mounted Sirius XM radio, this would be the step where you would attach the antenna wire. I didn't do a satellite antenna, but simply add the antenna wire to this and the next few steps.)
STEP 4: Plug in your camera at the rear of the trunk and secure all excess wiring with zip ties. It should look like the picture with the pair of wire cutters sitting on the trunk floor at this point. Replace Shaker 1000 subwoofer using the reverse of step 2. Replace the plastic trim panel at the rear of the trunk using the plastic push pins we took out when we removed the trim panel. We are now done with the trunk! It should be back to normal at this point. Put all of your junk back in it.
STEP 5: Pull the wiring through from the trunk, ensuring that the excess is in the well under the seat. Secure the wire to the existing wiring harness on the passenger side using zip ties.
STEP 6: Using a wire coat hanger, slide it under the carpet from the center console mounting stud opening toward the back of the car. Keep it as close as you can to the center of the car (black frame in the center) since there is more clearance there. The carpet is glued down, but you should have enough slack in the center to allow the wire hanger to push through. Secure the wires to the coat hanger with electrical tape. Lift the carpet as much as possible from both sides and gently pull the wiring harness through to the stud opening. Repeat process to the e-brake opening, and the shifter opening (assuming manual trans, I don't know what the automatic looks like). From there run wiring harness under the dash frame and into the opening where the head unit will go.
STEP 7: Tie off any excess wire using zip ties. Replace rear seat bottom by hooking the back to the "D' rings at the back of the car. Buckle the seat belts in so they don't disappear under the seat. Push down on the seat bottom until you hear it snap into place.
You are now done running the camera wire, and the back of your car should be back to normal. If your head unit is already up and running, plug it in and test.
That's it for me this evening! Calling it a night. Tomorrow, I will work on locating the reverse wire off the SJB. I already took the kick panels off and exposed the harness, so I will be hunting for the wire. Once I find it and hook it up, then I will install my console mounted USB port, e-brake wire, pack and secure all loose wiring and put the center stack back together. It will be a wrap! Then I'll go test the NAV functions outside and report back.
I hope this helps! Let me know if any questions.
Tools required:
- 3/8 ratchet and extension
- 13mm and 8mm deep sockets
- zip ties and wire cutter
- coat hanger
STEP 1: Remove bottom of rear seat. Feel under the lip of the seat for "U" shaped grooves in the carpet, those are your release points. Push in the plastic tabs at the release points, and this will release the seat. Pull the seat out of the car.
STEP 2: Remove Shaker 1000 subwoofer by pulling two 8mm bolts, two 13mm bolts, and one 13mm nut as indicated in the picture. Unplug the two wiring harnesses by pushing in the release tabs and extracting the plugs. Remove the entire unit out of the trunk.
STEP 3: With the removal of the Shaker 1000, you can see a rectangular opening into the cabin on the passenger side of the trunk. Follow the wiring harness, it's very obvious. Run your camera wires through the opening and secure it to the existing wiring harness with zip ties. (note that at this point if you are running an antenna wire to a trunk mounted Sirius XM radio, this would be the step where you would attach the antenna wire. I didn't do a satellite antenna, but simply add the antenna wire to this and the next few steps.)
STEP 4: Plug in your camera at the rear of the trunk and secure all excess wiring with zip ties. It should look like the picture with the pair of wire cutters sitting on the trunk floor at this point. Replace Shaker 1000 subwoofer using the reverse of step 2. Replace the plastic trim panel at the rear of the trunk using the plastic push pins we took out when we removed the trim panel. We are now done with the trunk! It should be back to normal at this point. Put all of your junk back in it.
STEP 5: Pull the wiring through from the trunk, ensuring that the excess is in the well under the seat. Secure the wire to the existing wiring harness on the passenger side using zip ties.
STEP 6: Using a wire coat hanger, slide it under the carpet from the center console mounting stud opening toward the back of the car. Keep it as close as you can to the center of the car (black frame in the center) since there is more clearance there. The carpet is glued down, but you should have enough slack in the center to allow the wire hanger to push through. Secure the wires to the coat hanger with electrical tape. Lift the carpet as much as possible from both sides and gently pull the wiring harness through to the stud opening. Repeat process to the e-brake opening, and the shifter opening (assuming manual trans, I don't know what the automatic looks like). From there run wiring harness under the dash frame and into the opening where the head unit will go.
STEP 7: Tie off any excess wire using zip ties. Replace rear seat bottom by hooking the back to the "D' rings at the back of the car. Buckle the seat belts in so they don't disappear under the seat. Push down on the seat bottom until you hear it snap into place.
You are now done running the camera wire, and the back of your car should be back to normal. If your head unit is already up and running, plug it in and test.
That's it for me this evening! Calling it a night. Tomorrow, I will work on locating the reverse wire off the SJB. I already took the kick panels off and exposed the harness, so I will be hunting for the wire. Once I find it and hook it up, then I will install my console mounted USB port, e-brake wire, pack and secure all loose wiring and put the center stack back together. It will be a wrap! Then I'll go test the NAV functions outside and report back.
I hope this helps! Let me know if any questions.
Member
Joined: May 3, 2015
Posts: 4
Likes: 1
From: Texas
New to the forum, joined because I am interested in upgrading my shaker 500 in my '09. The prices I have found online are out of my budget at the moment gut I want to make sure this will work before I save up to spend this much. I would also probably have to have it installed. Who has the best price on this?
Cobra Member
Joined: November 19, 2005
Posts: 1,105
Likes: 18
From: Central Alabama
New to the forum, joined because I am interested in upgrading my shaker 500 in my '09. The prices I have found online are out of my budget at the moment gut I want to make sure this will work before I save up to spend this much. I would also probably have to have it installed. Who has the best price on this?
You can do a quick google search, but I'm pretty sure that American Muscle is the only retailer that currently sells it.
Legacy TMS Member
Joined: November 13, 2005
Posts: 2,193
Likes: 46
New to the forum, joined because I am interested in upgrading my shaker 500 in my '09. The prices I have found online are out of my budget at the moment gut I want to make sure this will work before I save up to spend this much. I would also probably have to have it installed. Who has the best price on this?
Last edited by mrkabc; May 5, 2015 at 12:16 AM.