
Is cervinis gt500 splitter a finish product?
 3/14/08, 08:10 AM
#1
Bullitt Member
Thread Starter

Join Date: August 11, 2007
Location: Anaheim, CA
Posts: 330
Likes: 0
Received 0 Likes
on
0 Posts
Is cervinis gt500 splitter a finish product?
https://www.cervinis.com/large.aspx?img=4339_820.jpg
Does the cervini gt500 splitter require painting and prep or is it a finish product like the shelby gt500 splitter?
Does the cervini gt500 splitter require painting and prep or is it a finish product like the shelby gt500 splitter?
 3/14/08, 10:29 AM
#3
Cobra R Member
Join Date: August 9, 2007
Location: Philadelphia
Posts: 1,839
Likes: 0
Received 0 Likes
on
0 Posts
It needs finishing. It comes in an ugly yellow.
https://www.cervinis.com/Files/File/...ns/4339(1).pdf
https://www.cervinis.com/Files/File/...ns/4339(1).pdf
3/14/08, 04:50 PM
#4
GT Member
Join Date: March 7, 2008
Location: Lake Worth, South Florida
Posts: 142
Likes: 0
Received 1 Like
on
1 Post
I bought and modified the OEM GT500 spoiler to fit my GT, turned out better then I expected it would, I'm very happy with the finished result, and no prep and painting required, just some stainless nuts, bolts and washes from Home Depot and about 2 hours of my time to modify, and only about $70.00 total to do.
3/14/08, 05:18 PM
#5
GT Member
Join Date: July 8, 2007
Posts: 130
Likes: 0
Received 0 Likes
on
0 Posts
I bought and modified the OEM GT500 spoiler to fit my GT, turned out better then I expected it would, I'm very happy with the finished result, and no prep and painting required, just some stainless nuts, bolts and washes from Home Depot and about 2 hours of my time to modify, and only about $70.00 total to do.
 3/14/08, 05:48 PM
#6
GT Member
Join Date: March 7, 2008
Location: Lake Worth, South Florida
Posts: 142
Likes: 0
Received 1 Like
on
1 Post
I bought the spoiler from the dealer, current retail price is $67.77, I didn't take any pictures during the modding of the spoiler because I really wasn't sure how it would turn out, but it wasn't that hard to do.
there is about 1 foot of a reinforcement moulded on the chin spoiler on each side that you have to cut off flush so that it will fit flush with the bottom of the bumper, I used my dremel with a cutoff wheel, start by attaching the sides of the spoiler to the car using the top hole on each side, there are screws that hold the inner fender liner to the fender already there, then you can raise the spoiler up to mark where you need to trim, you'll trim most of it off except about a inch, after you get it trimmed to where it fits nice you can smooth it out by sanding down, be careful not to scratch the outer part of the spoiler that you will see, I did not have to sand because I was able to cut it off with the dremel to where it was nice and smooth, after it's trimmed and fits nice you are ready to bolt to the car, using the 2 outer holes on each side as a guide, mark your bumper and drill holes, then using stainless bolts & nuts you can mount to your car, the vertical ends on each side can be moulded to the contour of your fender opening by using a heat gun, I drilled another hole about half way down and used a trim screw on each side to pull the sides in, the last thing I did was drill another hole in the center of the bumper and mount the spoiler to the bumper so that the middle of the spoiler was supported, there are a total of 5 bolts that mount the spoiler to the bottom of the bumper, 2 underneath on each end and 1 in the center, 2 screws on each end that hold the sides, the last thing was to fill the rest of the holes with interior trim plugs, also I used some rubberized roof flashing and moulded a cap to cover the center opening of the spoiler that was visible before I mounted it to the car, it took about 2 hours to do but in the end it turned out great. Also you'll notice a little tab on the spoiler on top in the middle, I took a razor blade and cut it off flush, then I used some liquid nails and glued it back flush in the hole that was there, I applied the glue underneath the spoiler so you wouldn't see it.
Bill
3/14/08, 05:54 PM
#7
Team Mustang Source
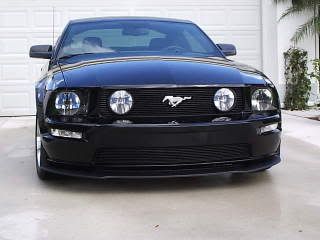
Here's what that splitter looks like from Cervini. Mine is being painted "hot rod" black and should be on the car by next weekend.
Last edited by GRAYPNY; 3/14/08 at 05:56 PM.
3/14/08, 05:55 PM
#8
Cobra R Member
Join Date: January 15, 2007
Location: Hampton Roads, VA
Posts: 1,581
Likes: 0
Received 0 Likes
on
0 Posts
Dang, partsbill and I are like distant cousins or something. We keep doing the same installs.
Here's my thread with some pics:
http://forums.bradbarnett.net/showth...gt500+splitter
There are some other threads too. I'm just too lazy to search for them, but they're there.
Here's my thread with some pics:
http://forums.bradbarnett.net/showth...gt500+splitter
There are some other threads too. I'm just too lazy to search for them, but they're there.
Last edited by mikes rx; 3/14/08 at 05:57 PM.
3/14/08, 07:29 PM
#9
Cobra R Member
Join Date: September 26, 2006
Location: East Moline, IL
Posts: 2,019
Likes: 0
Received 5 Likes
on
4 Posts
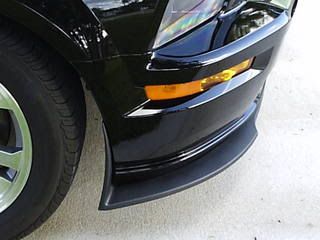
I would personally go with the Legend splitter from SHR. It doesn't need any prep or paint, and fits perfectly. The problem with the Cervini's one, is the side. The bumper has the small spoiler on it, and the Cervini's spoiler completely ignores that. The GT500 one has that terrible gap in the middle.
3/14/08, 11:57 PM
#12
Bullitt Member
Thread Starter
Join Date: August 11, 2007
Location: Anaheim, CA
Posts: 330
Likes: 0
Received 0 Likes
on
0 Posts
I would personally go with the Legend splitter from SHR. It doesn't need any prep or paint, and fits perfectly. The problem with the Cervini's one, is the side. The bumper has the small spoiler on it, and the Cervini's spoiler completely ignores that. The GT500 one has that terrible gap in the middle.
I don't like the SHR one because it doesn't have the tip on each side of the bumper. It just a flat chin. Anyone know how bad the gap is for the gt500 splitter? any pics of the center gap? Whats the part number for the gt500 splitter?
3/15/08, 12:05 AM
#13
Bullitt Member
Thread Starter
Join Date: August 11, 2007
Location: Anaheim, CA
Posts: 330
Likes: 0
Received 0 Likes
on
0 Posts
3/15/08, 12:25 AM
#14
Cobra R Member
Join Date: January 15, 2007
Location: Hampton Roads, VA
Posts: 1,581
Likes: 0
Received 0 Likes
on
0 Posts

But, the end-all be-all is that the gaps are dependent on the craftsmanship of the modification. It's not a direct bolt on. Your fabrication skills will determine the outcome.
Last edited by mikes rx; 3/15/08 at 12:27 AM.
3/19/08, 11:54 AM
#15
Cobra R Member
Join Date: August 9, 2007
Location: Philadelphia
Posts: 1,839
Likes: 0
Received 0 Likes
on
0 Posts
3/19/08, 06:22 PM
#16
Team Mustang Source
My friend is prepping and painting it and he has been busy. Hopefully I will have it on by the end of the month. I'll post pictures when it's on. Thanks for your interest.
3/20/08, 04:33 AM
#17
Member

Join Date: January 30, 2007
Location: Grove City, Ohio
Posts: 27
Likes: 0
Received 0 Likes
on
0 Posts
emailed Phillip at Cervini's late January asking if there were any plans to offer the chin spoiler painted or in molded black. If anyone is interested in the same, I would suggest to email him with your interest. Maybe we can get them to produce it in black if we show him there is a definite market. Phillip's reply below
Mr. Hess,
We may be offering it in painted form in the future but I do not have any sort of conformation as of now. Keep checking the website; I am sure that it will be announced on the website if it becomes available. Thank you
Philip J Sieri
Cervini's Auto Design
1-800-488-6057
www.cervinis.com
Mr. Hess,
We may be offering it in painted form in the future but I do not have any sort of conformation as of now. Keep checking the website; I am sure that it will be announced on the website if it becomes available. Thank you
Philip J Sieri
Cervini's Auto Design
1-800-488-6057
www.cervinis.com
3/20/08, 09:32 AM
#18
Cobra R Member
Join Date: August 9, 2007
Location: Philadelphia
Posts: 1,839
Likes: 0
Received 0 Likes
on
0 Posts
Hessy;
The only thing holding me back from buying it is the fact that it needs finishing. If it were ready to install out of the box, I'd already have it.

Thread
Thread Starter
Forum
Replies
Last Post